
1. Prodotto finitoview
The Fuers H.265+ 8-Channel Security DVR Recorder (Model A1008CH) is a versatile surveillance solution designed for home and business security. This DVR supports various camera types including HD-CVBS, TVI, CVI, XVI, AHD, and IP analog cameras, allowing for flexible system expansion. It features H.265+ video compression for efficient storage and comes with a pre-installed 1TB hard drive for 24/7 recording.
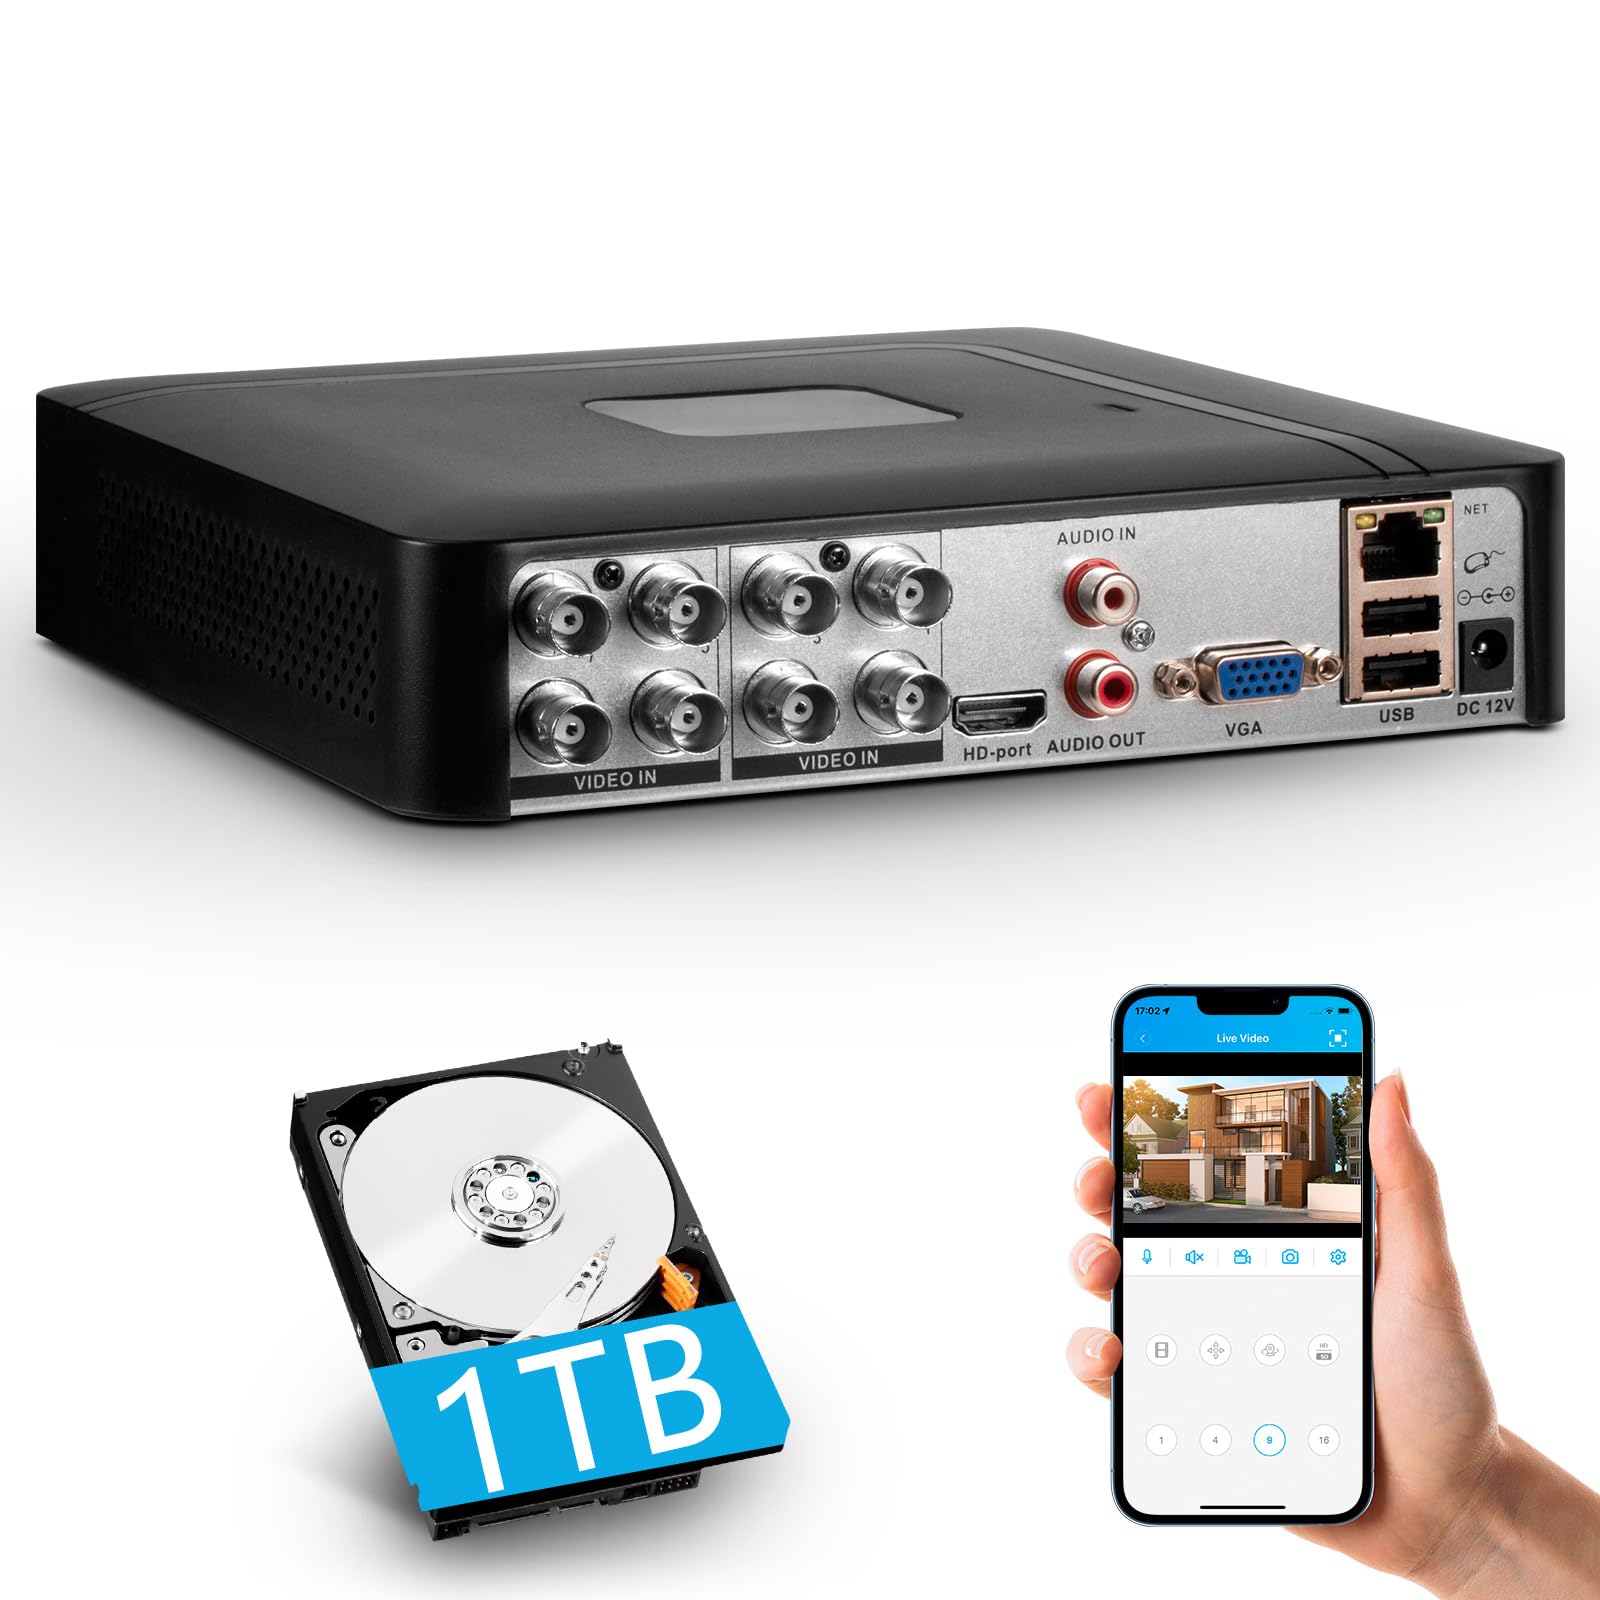
Image 1.1: Fuers H.265+ 8-Channel Security DVR Recorder.
Caratteristiche principali:
- Sistema a 8 canali: Supports up to 8 cameras simultaneously, compatible with HD-TVI, CVBS, CVI, XVI, AHD, and IP cameras.
- Compressione video H.265+: Offers extended recording time and saves up to 50% storage space compared to H.265 systems.
- HDD da 1 TB preinstallato: Security-grade hard drive for continuous surveillance recording. Expandable up to 14TB via SATA port.
- Accesso remoto: View and manage your system remotely using the free iCSee App (iOS/Android) or VMS Client (Windows/Mac).
- Rilevamento intelligente del movimento: Receive mobile push notifications for detected motion types, including person and face detection.
- Configurazione Plug & Play: Easy connection with simultaneous VGA/HDMI output.
2. Configurazione e installazione
2.1 Cosa c'è nella scatola
Prima di iniziare, assicurati che tutti i componenti siano presenti:
- 1x A1008 8CH DVR
- 1x 1TB HDD (Pre-installed on DVR)
- 1x adattatore di alimentazione DVR
- 1x mouse USB
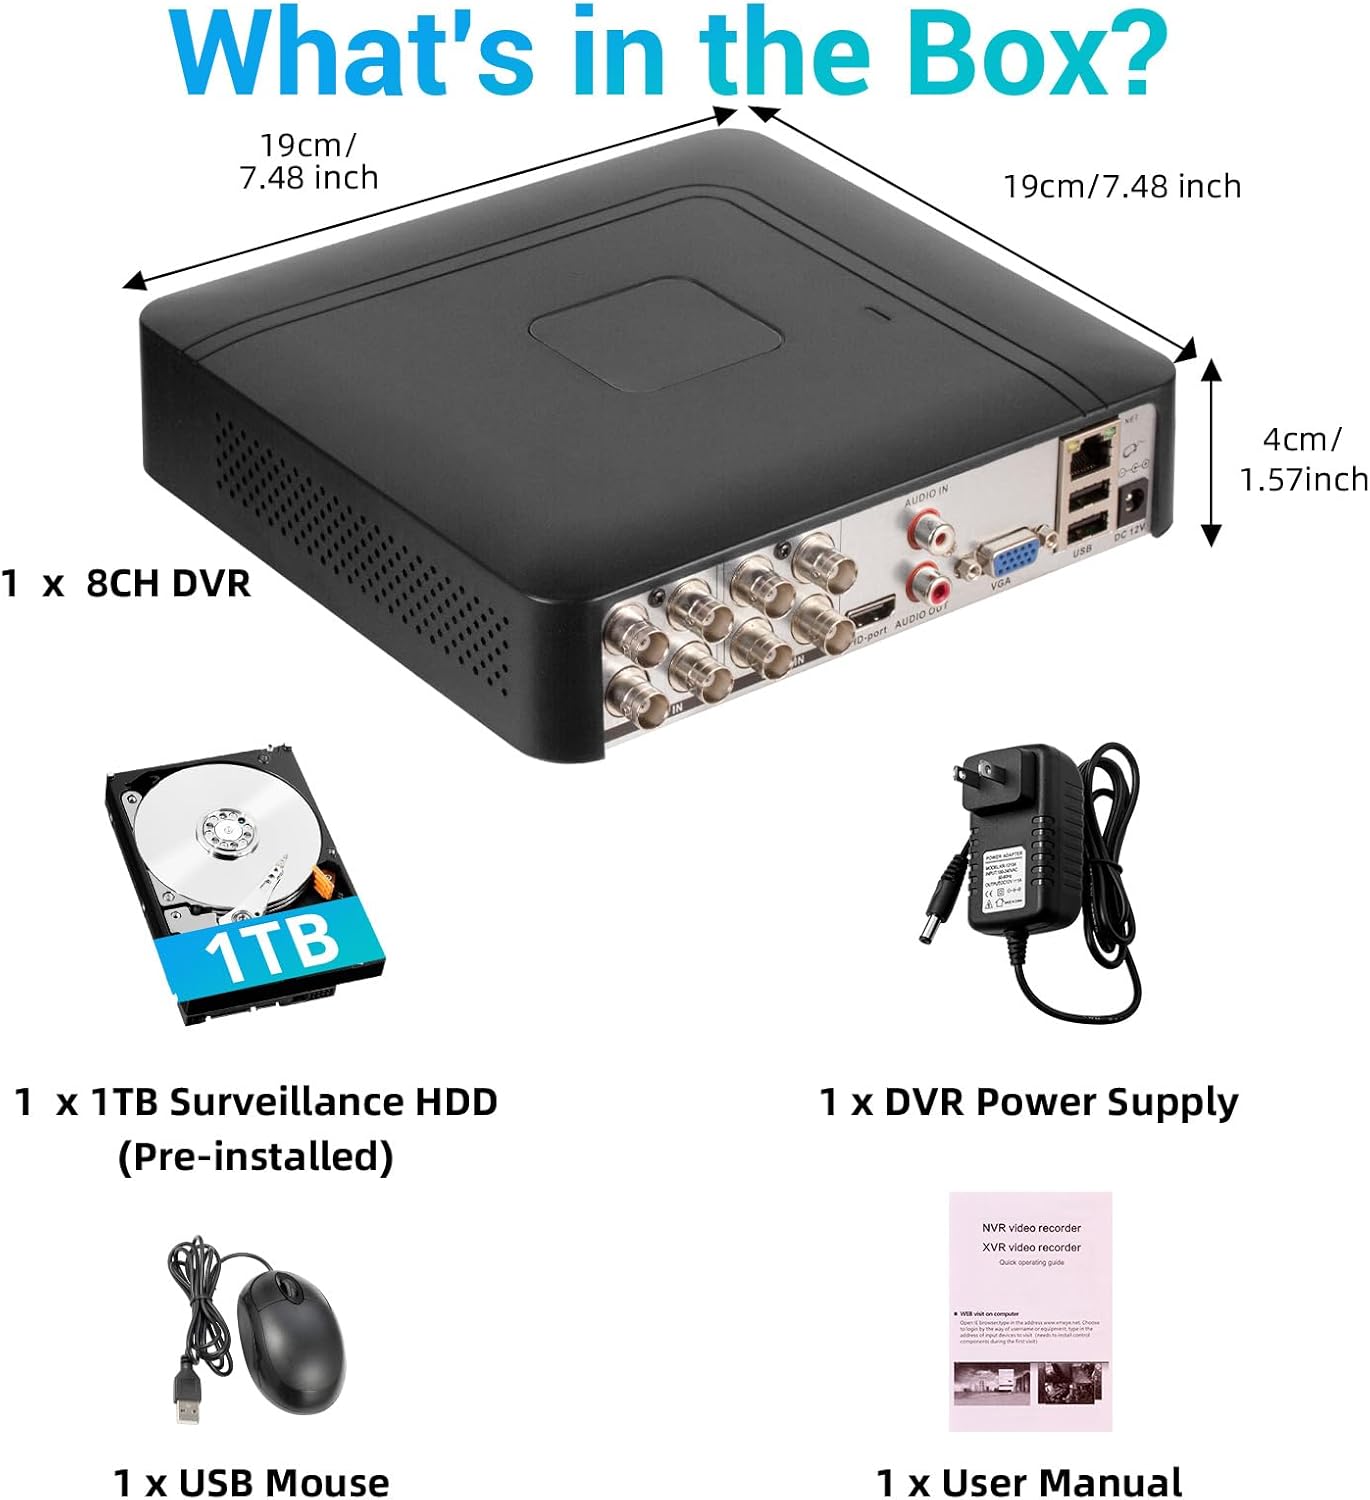
Immagine 2.1: Contenuto della confezione del prodotto.
2.2 Hard Drive Installation (if not pre-installed or for upgrade)
The DVR comes with a pre-installed 1TB HDD. If you need to replace or upgrade the hard drive (up to 14TB), follow these steps:
- Unscrew the bottom cover of the DVR unit.
- Aprire con cautela il casing.
- Connect the SATA data cable and power cable from the DVR to the new hard drive.
- Secure the hard drive within the casing using the provided screws.
- Close the DVR casing e fissarlo con le viti.

Image 2.2: Hard drive installation and expansion options.
2.3 Connecting the DVR System
Per collegare il sistema DVR, seguire questi passaggi:
- Collega le telecamere: Connect your security cameras to the 'VIDEO IN' ports on the back of the DVR using BNC cables.
- Connetti il monitor: Collegare un monitor al DVR tramite la porta HDMI o VGA.
- Collegare il mouse USB: Collegare il mouse USB in dotazione a una delle porte USB del DVR.
- Connect Network (Optional for Remote Access): Per telecomando viewing and notifications, connect an Ethernet cable from your router to the 'NET' port on the DVR.
- Accensione: Connect the DVR power adapter to the 'DC 12V' port and then plug it into a power outlet.

Image 2.3: Connecting cameras and network to the DVR.
2.4 Initial Setup and Channel Type Selection
Upon first power-on, the system may prompt for initial setup. You may need to select the appropriate channel type for your cameras.
- Right-click on the screen to access the Main Menu.
- Vai a Sistema > Digitale > Tipo di canale.
- Select the configuration that matches your camera setup:
- First row: Supports 8 XVI, CVBS, AHD, TVI, CVI coaxial cameras.
- Second row: Supports 8 XVI, CVBS, AHD, TVI, CVI coaxial + 4 IP cameras.
- Third row: Supports 16 1080P IP cameras.
- Fourth row: Supports 16 5MP IP cameras.
- Clic OK to apply changes. The system may restart.

Image 2.4: DVR Channel Type selection screen.
3. Istruzioni per l'uso
3.1 Vivere View e Registrazione
Once the DVR is powered on and cameras are connected, you should see the live feed on your connected monitor. The system is configured for 24/7 recording to the pre-installed 1TB hard drive.

Immagine 3.1: Live view di più feed di telecamere.
3.2 Accesso remoto tramite app mobile
To access your DVR remotely, download the free iCSee App (for iOS/Android) or VMS Client (for Windows/Mac).
- Download the iCSee App from your device's app store.
- Apri l'app e registra un account se non ne hai uno.
- In the DVR's main menu, navigate to Informazioni > Versione to find the DVR's QR code.
- Use the iCSee app to scan the QR code to add your device.
- Una volta aggiunto, puoi view live feeds, playback recordings, and receive alerts from anywhere with an internet connection.

Image 3.2: Steps for remote access via mobile app.
3.3 Riproduzione di Foo registratitage
per riview video registrato:
- Right-click on the screen to access the Main Menu.
- Selezionare Documentazione > Riproduci.
- Choose the desired channel(s) and date/time range for playback.
- Clic Avvia la riproduzione A view il cazzotage.

Image 3.3: Playback interface with timeline.
3.4 Avvisi di rilevamento del movimento
The DVR supports intelligent motion detection, including person and face detection. When motion is detected, you can receive instant mobile push notifications.
- Configure motion detection settings in the DVR's Allarme menu.
- Ensure your mobile app is properly linked and notifications are enabled.

Image 3.4: Human and face detection in action.
4. Manutenzione
4.1 Gestione del disco rigido
Il disco rigido preinstallato da 1 TB fornisce ample storage. Due to H.265+ compression, storage is optimized. If more storage is needed, you can replace the internal HDD with a larger one (up to 14TB). Regularly check the hard drive status in the DVR's system settings to ensure optimal performance.
4.2 Cura generale
- Conservare il DVR in un luogo fresco, asciutto e ben ventilato.
- Avoid exposing the unit to direct sunlight, extreme temperatures, or moisture.
- Pulire l'esterno del DVR con un panno morbido e asciutto. Non utilizzare detergenti liquidi.
- Assicurarsi che tutti i collegamenti dei cavi siano sicuri.
5. Risoluzione Dei Problemi
5.1 Nessuna uscita video sul monitor
- Check if the DVR is powered on and the power adapter is securely connected.
- Verify the HDMI or VGA cable connection between the DVR and the monitor.
- Assicurarsi che il monitor sia impostato sulla sorgente di ingresso corretta (HDMI/VGA).
5.2 Le telecamere non visualizzano
- Check all camera power and video cable connections.
- Verify that the camera type (AHD, TVI, CVI, etc.) is compatible with the DVR.
- Ensure the correct channel type is selected in the DVR settings (refer to Section 2.4).
- Test cameras individually if possible to isolate the issue.
5.3 Accesso remoto non funzionante
- Confirm the DVR is connected to the internet via an Ethernet cable.
- Controlla la connessione Internet del tuo router.
- Assicurati che l'app iCSee sia aggiornata all'ultima versione.
- Verify that the DVR was added correctly to the app by scanning the QR code.
- For some networks, you might need to adjust router settings (e.g., port forwarding), consult your network administrator or ISP.
6. Specifiche
| Caratteristica | Dettaglio |
|---|---|
| Marca | Fuers |
| Numero di modello | A1008CH |
| Numero di canali | 8 |
| Tecnologia di connettività | HDMI, USB, VGA |
| Dispositivi compatibili | Desktop, Tablet, Fotocamera, Smartphone |
| Dimensioni del prodotto | 7.48 cm L x 7.48 cm P x 1.57 cm A |
| Capacità di archiviazione della memoria | 1 TB (preinstallato) |
| Hard-Drive Size | 1 TB (Expandable up to 14 TB) |
| Formato multimediale Video digitale | H.265 + |
| Ingresso video | AHD, CVI, HDMI, HDTVI, IP Input, VGA |
| Codice UPC | 765142240850 |
7. Garanzia e supporto
7.1 Garanzia del prodotto
This Fuers DVR Recorder is covered by a standard manufacturer's warranty. Please refer to the warranty card included with your product or visit the official Fuers webPer i termini e le condizioni di garanzia dettagliati, consultare il sito. Conservare la ricevuta d'acquisto come prova d'acquisto per eventuali reclami in garanzia.
7.2 Supporto tecnico
For technical assistance, troubleshooting, or any questions regarding your Fuers DVR, please contact Fuers customer support. Contact information can typically be found on the product packaging, the official Fuers websito o tramite il tuo rivenditore.
Risorse online:
- Visitare il Negozio Fuers su Amazon per informazioni e aggiornamenti sui prodotti.