
1. Introduzione
Thank you for choosing the FEELWORLD P215-9HSD 21.5 Inch Broadcast Production Monitor. This monitor is designed for professional video production environments, offering a 1920x1080 Full HD display, multiple input/output options including 4K HDMI and 3G-SDI, and advanced monitoring features. This manual provides essential information for the safe and efficient operation of your device. Please read it thoroughly before use and retain it for future reference.

Figura 1.1: Fronte view of the FEELWORLD P215-9HSD monitor, highlighting its 21.5-inch screen, Full HD 1920x1080 resolution, 3000:1 contrast, and 250 nits brightness.
2. Informazioni sulla sicurezza
- Fonte di energia: Use only the provided 3A DC power adapter. Ensure the power supply voltage rientra nell'intervallo specificato.
- Ventilazione: Do not block ventilation openings. Ensure adequate airflow around the monitor to prevent overheating.
- Acqua e umidità: Do not expose the monitor to rain, moisture, or immerse it in water. If liquid enters the unit, disconnect power immediately and contact service personnel.
- Pulizia: Scollegare l'alimentazione prima della pulizia. Utilizzare un panno morbido e asciutto. Non utilizzare detergenti liquidi o spray.
- Posizionamento: Place the monitor on a stable surface. Avoid placing it in direct sunlight, near heat sources, or in environments with excessive dust or vibration.
- Manutenzione: Non tentare di riparare questo prodotto da soli. Affidare tutte le operazioni di manutenzione a personale di assistenza qualificato.
3. Contenuto della confezione
Verifica che tutti gli articoli elencati di seguito siano inclusi nella confezione. Se alcuni articoli risultano mancanti o danneggiati, contatta il rivenditore.
- FEELWORLD P215-9HSD 21.5 Inch Broadcast Production Monitor
- 3A DC Power Adapter
- V Battery Plate
- Mini cavo HDMI
- Tally Kit
- Parasole
- Staffa a U.
- Manuale operativo
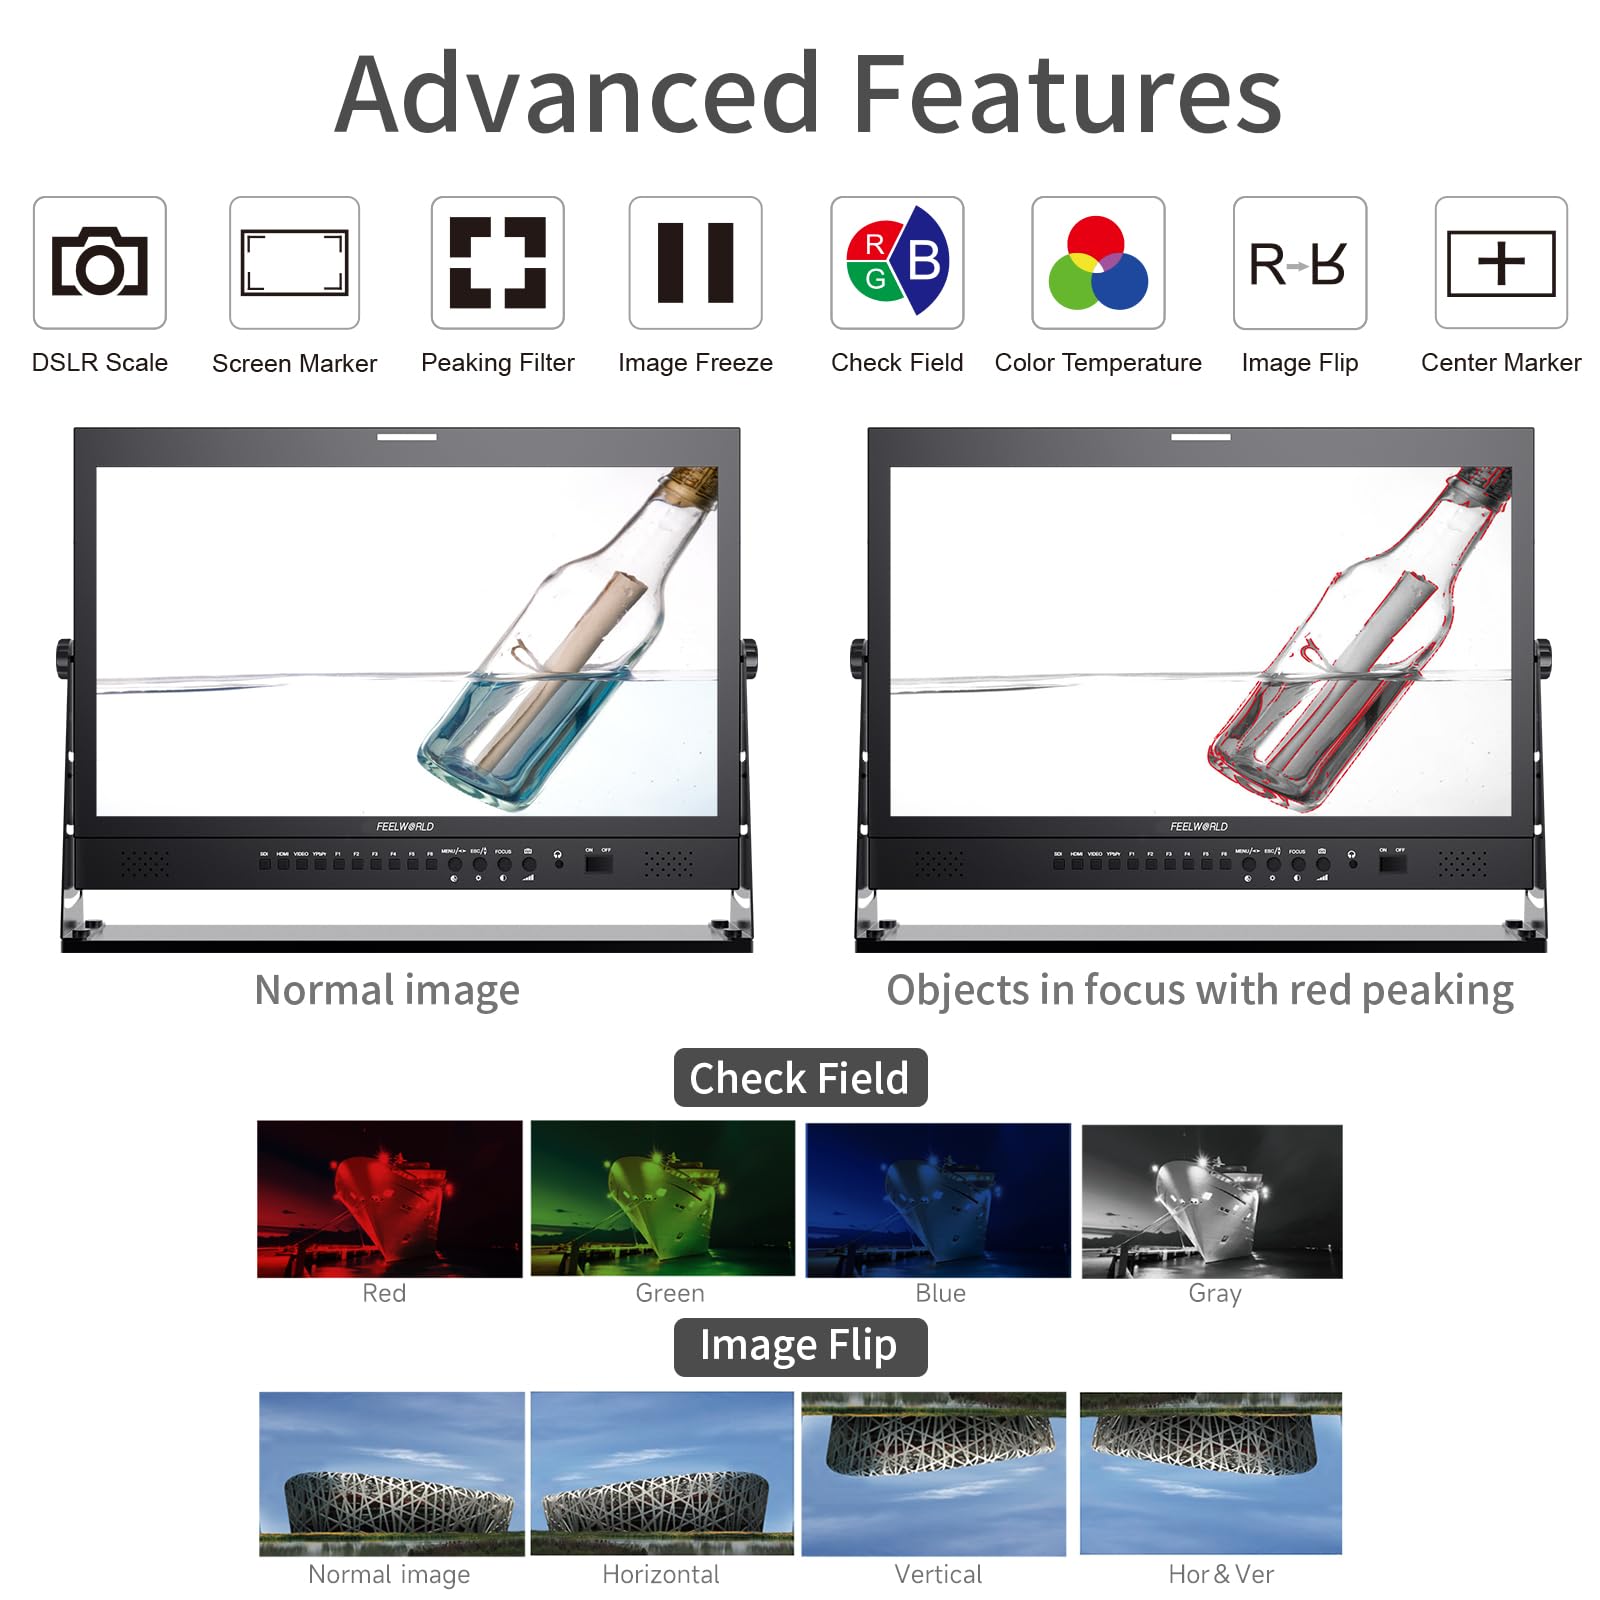
Figure 3.1: Included accessories with the FEELWORLD P215-9HSD monitor, showing the monitor, Mini HDMI cable, V battery plate, 3A power adapter, Tally Kit, Jib Crane Bracket (U bracket), and Operation Manual.
4. Prodotto finitoview
4.1 Controlli del pannello frontale
The front panel features various buttons and indicators for controlling the monitor's functions and navigating the On-Screen Display (OSD) menu.
- Pulsanti di selezione dell'input: SDI, HDMI, VIDEO, YPbPr for selecting video sources.
- Pulsanti funzione (F1-F6): Customizable shortcut buttons for quick access to frequently used features.
- MENU/ESC/◄/► Buttons: Used for OSD menu navigation, entering sub-menus, and adjusting settings.
- FOCUS Button: Activates peaking focus assist.
- Pulsante ON/OFF: Accende o spegne il monitor.
- Altoparlanti incorporati: Per il monitoraggio audio.
- 3.5mm Stereo Earphone Jack: For private audio monitoring.
4.2 Collegamenti del pannello posteriore
The rear panel provides all necessary input and output ports for connecting video and audio sources, as well as power.
- Ingresso DVI: Digital Visual Interface input.
- Ingresso/uscita HDMI: High-Definition Multimedia Interface for both input and loop-through output.
- Ingresso YPbPr: Ingresso video a componenti.
- Ingresso / uscita video: Composite video input and loop-through output.
- Ingresso/uscita audio: RCA connectors for analog audio.
- 3G-SDI Input/Output: Serial Digital Interface for professional video input and loop-through output.
- Connettore XLR: For professional audio input.
- DC Barrel (5.5, 2.1): Power input for the 3A DC adapter.
- Porta di aggiornamento USB: Per gli aggiornamenti del firmware.
- INGRESSO LAN: Porta Ethernet.
- TALLY Port: DP-9 connector for Tally light control.

Figure 4.1: Top section shows the front panel OSD operation buttons. Bottom section details the rear panel connections including DVI, HDMI, YPbPr, Video, Audio, 3G-SDI, XLR, DC power, USB, LAN, and Tally.
Figura 4.2: primo piano view of the rear panel, emphasizing the 3G-SDI, HDMI, Video, and Audio input/output connections, along with the USB upgrade port and DC power input.
5. Impostazione
5.1 Montaggio del monitor
The monitor comes with an adjustable U bracket for desktop placement. Ensure the bracket is securely attached to the monitor and placed on a stable, flat surface. The monitor also supports VESA mounting for alternative setups (mounting hardware not included).
5.2 Collegamento dell'alimentazione
- Connect the provided 3A DC power adapter to the DC barrel input on the rear of the monitor.
- Collegare l'adattatore di alimentazione a una presa di corrente adatta.
- Alternatively, attach a compatible V-mount battery to the V Battery Plate on the rear of the monitor for portable power.
5.3 Collegamento delle sorgenti video
Connect your video source (camera, video switcher, etc.) to the appropriate input port on the monitor's rear panel.
- HDMI: Use an HDMI cable (Mini HDMI cable included) to connect to the HDMI IN port.
- 3G-SDI: Use an SDI cable to connect to the 3G-SDI IN port.
- YPbPr: Use component video cables to connect to the YPbPr IN ports.
- Video: Use a composite video cable to connect to the VIDEO IN port.
If you need to loop out the signal to another device, connect an appropriate cable from the corresponding OUT port (HDMI OUT, 3G-SDI OUT, VIDEO OUT) to your next device.
6. Istruzioni per l'uso
6.1 Accensione/Spegnimento
Premere il tasto ACCESO/SPENTO button on the front panel to power the monitor on or off.
6.2 Selezione dell'ingresso
Premere il pulsante di input corrispondente (SDI, Cavo HDMI, VIDEO, YPbPr) on the front panel to switch between video sources.
6.3 Navigazione nel menu OSD
Premere il tasto MENU button to open the On-Screen Display menu. Use the ◄ E ► buttons to navigate through menu options and adjust values. Press MENU again to confirm a selection or ESC per uscire dal menu.
6.4 Funzioni avanzate
The monitor includes several advanced features to assist with professional monitoring:
- Assistenza alla messa a fuoco con picco: Highlights sharp edges in the image to aid in achieving precise focus. Activate with the MESSA A FUOCO button or assign to a function button.
- Indicatore centrale: Visualizza un mirino al centro dello schermo.
- Marcatore dello schermo: Provides various aspect ratio markers (e.g., 16:9, 4:3, 2.35:1) and safety area markers.
- Blocco immagine: Mette in pausa il fotogramma video corrente.
- Capovolgimento immagine: Flips the image horizontally, vertically, or both. Useful for specific mounting orientations.
- Camera 5D II Mode: Optimizes display for Canon 5D Mark II camera output.
- Controlla campo: Displays only Red, Green, Blue, or Mono channels for color calibration.
- Pixel a pixel: Visualizza l'immagine alla sua risoluzione nativa senza ridimensionamento.
- Ingrandisci tutto: Magnifies the entire image.
- U/D & L/R Zoom: Allows independent vertical and horizontal zooming.
- Proporzioni: Regola le proporzioni dello schermo.
- Regolazione della temperatura del colore: Allows fine-tuning of the display's color temperature.
Figure 6.1: Visual demonstration of advanced features including Peaking Filter (red peaking), Check Field (Red, Green, Blue, Gray channels), and Image Flip (Normal, Horizontal, Vertical, Horizontal & Vertical).
6.5 Tally Light System
The monitor features a 3-color Tally light system (Red, Green, Yellow) on both the front and rear panels, controlled via the DP-9 Tally port. This allows for clear indication of live, preview, and standby states in a multi-camera setup.
- Rosso: Indicates the camera is live (On Live).
- Verde: Indicates the camera is on preview (On Preview).
- Giallo: Indicates the camera is on standby (Standby).

Figure 6.2: Illustration of the Red, Green, and Yellow Tally lights and their corresponding states (On Live, Standby, On Preview), controlled via the DP-9 Barrel on the rear.
7. Manutenzione
- Pulizia dello schermo: Pulire delicatamente lo schermo con un panno morbido e privo di lanugine. Per macchie ostinate, strofinare leggermenteampPulire il panno con acqua o con una soluzione detergente specifica per schermi. Non spruzzare il liquido direttamente sullo schermo.
- Pulizia del Casing: Utilizzare un panno morbido e asciutto per pulire la superficie del monitor.asing. Evitare detergenti abrasivi o solventi.
- Magazzinaggio: Quando non viene utilizzato per lunghi periodi, conservare il monitor in un luogo fresco e asciutto, lontano dalla luce solare diretta e da temperature estreme.
- Aggiornamenti del firmware: Periodically check the FEELWORLD official website for any available firmware updates to ensure optimal performance and access to new features. Use the USB Upgrade Port for this purpose.
8. Risoluzione Dei Problemi
Se riscontri problemi con il tuo monitor, fai riferimento ai seguenti problemi comuni e alle relative soluzioni:
| Problema | Possibile causa | Soluzione |
|---|---|---|
| Nessun potere | Adattatore di alimentazione non collegato o difettoso; problema con la presa di corrente. | Ensure power adapter is securely connected to monitor and outlet. Test outlet with another device. Check if V-mount battery is charged and properly installed. |
| Nessun segnale video | Incorrect input selected; cable not connected or faulty; source device not outputting signal. | Select the correct input source (HDMI, SDI, etc.). Check all video cables for secure connection. Verify the source device is powered on and outputting video. Try a different cable. |
| L'immagine è distorta o i colori sono errati | Incorrect display settings; faulty cable; source issue. | Reset monitor settings to default via OSD menu. Check cable connections. Verify source device output. Adjust color temperature settings. |
| Nessun audio | Audio cable not connected; volume too low; source device not outputting audio. | Ensure audio cables are connected (if applicable). Increase monitor volume. Check audio settings on the source device. |
| Tally light not working | Tally cable not connected or faulty; switcher not sending Tally signal. | Ensure the Tally Kit is correctly wired and connected to the DP-9 port. Verify your video switcher is configured to send Tally signals. |
9. Specifiche
Detailed technical specifications for the FEELWORLD P215-9HSD Broadcast Production Monitor:
- Dimensioni dello schermo: 21.5 pollici
- Risoluzione nativa: 1920 x 1080 (Full HD)
- Tipo di visualizzazione: LED IPS Panel
- Proporzioni: 16:9
- Luminosità: 400 cd/m²
- Viewangolo di ing: 160 Degrees (H/V)
- Rapporto di contrasto: 3000:1
- Profondità del colore: 8 bit, 16.7 milioni di colori
- Ingressi video: 1x HDMI, 1x 3G-SDI, 1x YPbPr, 1x Video, 1x DVI
- Uscite video: 1x HDMI, 1x 3G-SDI, 1x Video
- Ingressi audio: Analog Audio (RCA), XLR
- Uscite audio: 3.5mm Stereo Earphone Jack, Built-in Speakers
- Potenza in ingresso: CC 12 V (3 A)
- Tecnologia di connettività: HDMI, 3G-SDI
- Caratteristiche speciali: Peaking Focus Assist, Center Marker, Screen Marker, Image Freeze, Image Flip, Camera 5D II Mode, Check Field, Pixel to Pixel, Zoom All, U/D & L/R Zoom, Aspect Ratio, Color Temperature Adjustment, 3-Color Tally Light
Figura 9.1: Oltreview of key specifications and features including 8-bit color, HDMI input/output, 3G-SDI input/output, 1920x1080 resolution, 3000:1 contrast, and 250 nits brightness.
10. Garanzia e supporto
The FEELWORLD P215-9HSD Broadcast Production Monitor comes with a Garanzia del produttore di 1 anni dalla data di acquisto. Questa garanzia copre difetti di materiali e lavorazione in condizioni di normale utilizzo.
For warranty claims, technical support, or service inquiries, please contact your authorized FEELWORLD dealer or visit the official FEELWORLD website for customer service contact information. Please retain your proof of purchase for warranty validation.
For more information about FEELWORLD products, visit the FEELWORLD Store on Amazon.