
XTUGA SF-1, TS11
XTUGA SF-1 Wireless XLR System & TS11 Audio Mixer User Manual
Guida completa per l'installazione, il funzionamento e la manutenzione.
Introduzione
This manual provides detailed instructions for the XTUGA SF-1 UHF Wireless XLR Transmitter and Receiver system and the XTUGA TS11 Professional 11 Channel Audio Mixer. Please read this manual thoroughly before operating the devices to ensure proper use and optimal performance.
XTUGA SF-1 Wireless XLR System Overview
The XTUGA SF-1 is a compact UHF wireless system designed for microphones, offering reliable audio transmission with low latency. It includes a transmitter and a receiver, both rechargeable and equipped with 48V phantom power for condenser microphones.
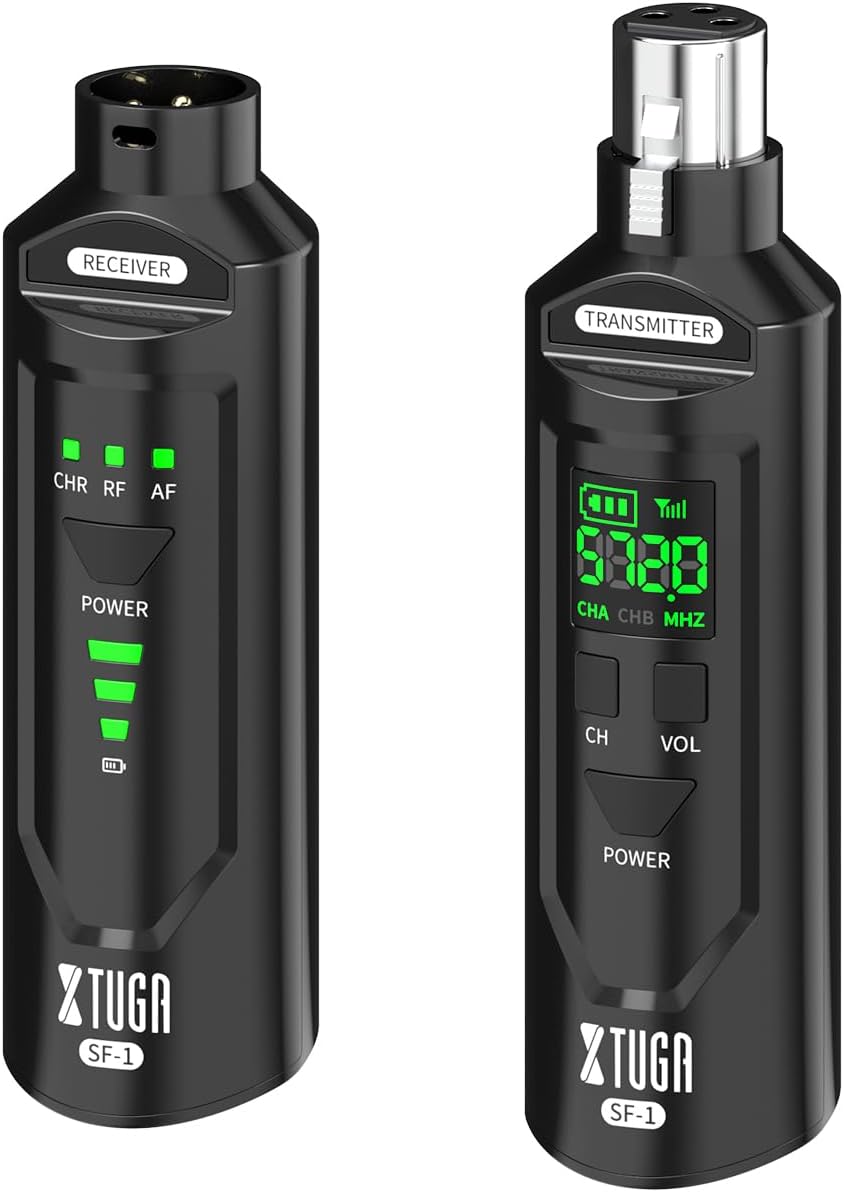
Image: The XTUGA SF-1 wireless system, showing both the transmitter (right) and receiver (left) units. The transmitter has an LCD display, while the receiver has LED indicators for channel, RF, and AF.
Caratteristiche principali
- UHF Wireless Transmission: Stable and reliable signal.
- 48V Phantom Power: Supports both dynamic and condenser microphones.
- Rechargeable Battery: Long operating time.
- Low Latency: Less than 2ms for real-time sound transmission.
- 50 Meters Transmission Distance: Stable signal with strong anti-interference.
- 16 Selectable Frequencies: Allows multiple sets to operate simultaneously.
XTUGA SF-1 Setup
Caricare le unità
Before first use, fully charge both the transmitter and receiver using the provided USB cable. The battery indicator LEDs will show charging status.

Image: Illustration showing the XTUGA SF-1 units with a large '6H' indicating approximately 6 hours of rechargeable battery life.
Collegamento e accoppiamento
- Collegare il trasmettitore: Plug the SF-1 transmitter into your microphone's XLR output. If using a condenser microphone, ensure the 48V phantom power is activated on the transmitter if required by your microphone.
- Collegare il ricevitore: Plug the SF-1 receiver into the XLR input of your mixer, audio interface, or PA system.
- Accensione: Press and hold the Power button on both the transmitter and receiver until their displays/indicators light up.
- Associazione automatica: The units should automatically pair. The RF indicator on the receiver will illuminate steadily when a stable connection is established.
- Selezione del canale (se necessario): If interference occurs, press the "CH" button on the transmitter to cycle through available frequencies. The receiver will automatically sync to the new frequency. Up to 16 sets can operate simultaneously.

Image: Depicts multiple XTUGA SF-1 units connected to microphones and a mixer, illustrating the capability of supporting up to 16 selectable frequencies for simultaneous use.
XTUGA SF-1 Operation
Once connected and paired, the SF-1 system provides real-time audio transmission. Ensure the microphone is powered on and functioning correctly. Adjust the volume on your mixer or audio device as needed.

Image: A graphic highlighting the "Low Latency Wireless XLR System" feature of the XTUGA SF-1, showing a musician performing with the units and a clock icon indicating less than 2ms latency.
Gestione dell'alimentazione
- Accensione/spegnimento: Tenere premuto il pulsante di accensione per circa 3 secondi.
- Indicatore della batteria: The LED indicators on the receiver and the LCD on the transmitter show the remaining battery life. Recharge when the battery is low.

Image: A graphic illustrating the 50-meter transmission distance capability of the XTUGA SF-1, emphasizing stable signal and strong anti-interference.
XTUGA TS11 Audio Mixer Overview
The XTUGA TS11 is a professional 11-channel audio mixer designed for studio, DJ, and live sound applications. It features extensive input options, a 7-band EQ, 99 DSP effects, independent 48V phantom power, Bluetooth connectivity, and a USB interface for recording.

Immagine: dall'alto verso il basso view of the XTUGA TS11 audio mixer, highlighting its 9 mono and 2 stereo input channels with various controls for each channel.
Caratteristiche principali
- 11 Channels: 9 mono (XLR/TRS combo) and 2 stereo (TRS) inputs.
- 99 DSP Effects: Built-in digital signal processing for various audio effects.
- 7-Band Graphic Equalizer: For precise frequency shaping on the main output.
- Independent 48V Phantom Power: Available on mono channels for condenser microphones.
- Bluetooth Function: Wireless audio streaming from compatible devices.
- USB Interface: For direct recording to a computer or playback from a USB drive.
- Independent Mute Buttons: For each input channel.
XTUGA TS11 Setup
Collegamento di potenza
Connect the provided power adapter to the mixer's power input and then to a suitable power outlet. Press the power switch to turn on the mixer.
Connessioni di ingresso
- Microfoni: Connect microphones to the XLR/TRS combo jacks (channels 1-9). For condenser microphones requiring phantom power, press the 48V PHANTOM POWER button for the respective channel.
- Dispositivi a livello di linea: Connect instruments (keyboards, guitars with DI boxes), media players, or other line-level devices to the TRS inputs.
- Ingressi stereo: Use channels 10/11 for stereo line-level sources.
Connessioni di uscita
- Uscita principale: Connect the MAIN OUT (XLR or TRS) to your power amplificatore, altoparlanti amplificati o dispositivi di registrazione.
- Cuffie: Collegare le cuffie alla presa PHONES per il monitoraggio.
- Invio AUX: Use the AUX SEND for external effects processors or monitor mixes.
XTUGA TS11 Operation
Controlli del canale
- GUADAGNO: Adjusts the input sensitivity for each channel. Set this to achieve a strong signal without clipping.
- EQ (ALTO, MEDIO, BASSO): Equalizzatore a tre bande per modellare il tono di ciascun canale.
- Effetti: Controls the amount of internal DSP effect applied to the channel.
- PADELLA: Posiziona il segnale del canale nel campo stereo (da sinistra a destra).
- Fader di LIVELLO: Adjusts the output volume of each channel to the main mix.
- MUTO: Disattiva il singolo canale.

Image: Close-up of the XTUGA TS11 mixer's channel faders and mute buttons, emphasizing the independent mute switch for each channel.
Effetti DSP
The TS11 features 99 built-in DSP effects. Use the PROGRAM knob to select an effect. The display will show the effect number. Adjust the FX SEND and RETURN levels to control the overall effect amount.

Image: A section of the XTUGA TS11 mixer's control panel, highlighting the "99DSP" section with the program knob and display, indicating the selection of built-in reverb effects.
Connettività Bluetooth
Per connettere un dispositivo Bluetooth:
- Press the MODE button on the digital MP3 player section until "Bluetooth" or "BT" is displayed.
- On your smart device, search for Bluetooth devices and select "MIX-MP3 BT".
- Once paired, you can play audio from your device through the mixer.

Image: A user interacting with the XTUGA TS11 mixer while a smartphone displays a music player, illustrating the mixer's Bluetooth compatibility and the "MIX-MP3 BT" pairing name.
Riproduzione e registrazione USB
- Riproduzione USB: Inserisci un'unità USB con audio files into the USB port. Use the controls in the digital MP3 player section to navigate and play tracks.
- Registrazione USB: Connect the mixer to a computer via the USB port. The mixer will appear as an audio interface. Use your preferred recording software to capture the main mix.
Manutenzione
- Pulizia: Use a soft, dry cloth to clean the surfaces of both the SF-1 units and the TS11 mixer. Avoid liquid cleaners or abrasive materials.
- Magazzinaggio: Conservare i dispositivi in un luogo fresco e asciutto, lontano dalla luce solare diretta e da temperature estreme.
- Battery Care (SF-1): For optimal battery life, avoid fully discharging the SF-1 units frequently. Recharge them regularly, especially if storing for extended periods.
Risoluzione dei problemi
| Problema | Possibile causa | Soluzione |
|---|---|---|
| SF-1: No sound or intermittent signal. |
|
|
| TS11: No sound from main output. |
|
|
| TS11: Bluetooth not connecting. |
|
|
Specifiche
XTUGA SF-1 Wireless XLR System
- Banda di frequenza: Frequenza ultra-alta
- Latenza: < 2 ms
- Distanza di trasmissione: Fino a 50 metri (linea di vista)
- Potenza fantasma: 48V (switchable on transmitter)
- Durata della batteria: Circa 6 ore
- Canali: 16 selectable frequencies
XTUGA TS11 Audio Mixer
- Canali: 11 (9 mono XLR/TRS, 2 stereo TRS)
- Effetti DSP: 99 effetti integrati
- Equalizzatore: 7-band graphic EQ on main output
- Potenza fantasma: +48V (independent per mono channel)
- Connettività: Bluetooth, USB (playback/recording)
- Ingressi: XLR, TRS da 1/4"
- Risultati: XLR, 1/4" TRS (Main, AUX, Phones)
Garanzia e supporto
For warranty information and technical support, please refer to the product packaging or contact XTUGA customer service directly. Keep your purchase receipt as proof of purchase.
For further assistance, visit the official XTUGA website or contact their support team through the details provided with your product.
Ask a question about this manual
Ask about setup, troubleshooting, compatibility, parts, safety, or missing instructions. Manuals+ will review the question and use this page’s manual context to help answer it.