1. Informazioni importanti sulla sicurezza
Please read this entire manual carefully before assembling, operating, or servicing your sweeek Edmond Gas Barbecue. Failure to follow these instructions could result in property damage, bodily injury, or death.
- SOLO PER USO ESTERNO. Do not operate this appliance indoors.
- Tenere sempre bambini e animali domestici lontani dal barbecue.
- Ensure the barbecue is placed on a stable, level surface, away from flammable materials.
- Always check for gas leaks before each use. Refer to the 'Operating Instructions' section for leak testing procedures.
- A gas hose and pressure regulator are required for connection to a gas bottle and are NON INCLUSO with this product. Ensure they are compatible with Butane or Propane gas and meet local safety standards.
- Non conservare o utilizzare benzina o altri liquidi o vapori infiammabili nelle vicinanze di questo o di altri apparecchi.
- Indossare sempre guanti protettivi quando si maneggiano superfici calde.
2. Prodotto finitoview
The sweeek Edmond Gas Barbecue is designed for outdoor cooking, featuring multiple burners and a robust construction for efficient grilling.
- bruciatori: 6 main burners + 1 side burner for versatile cooking.
- Accensione: Electronic Piezo ignition for easy startup.
- Controllo della temperatura: Integrated thermometer in the lid for monitoring cooking temperature.
- Costruzione: High-quality steel frame with heat-resistant epoxy paint. Stainless steel burners.
- Superficie di cottura: Enameled cast iron grill grates.
- Mobilità: Equipped with 4 wheels for easy relocation.
- Magazzinaggio: Front cabinet with 2 doors.
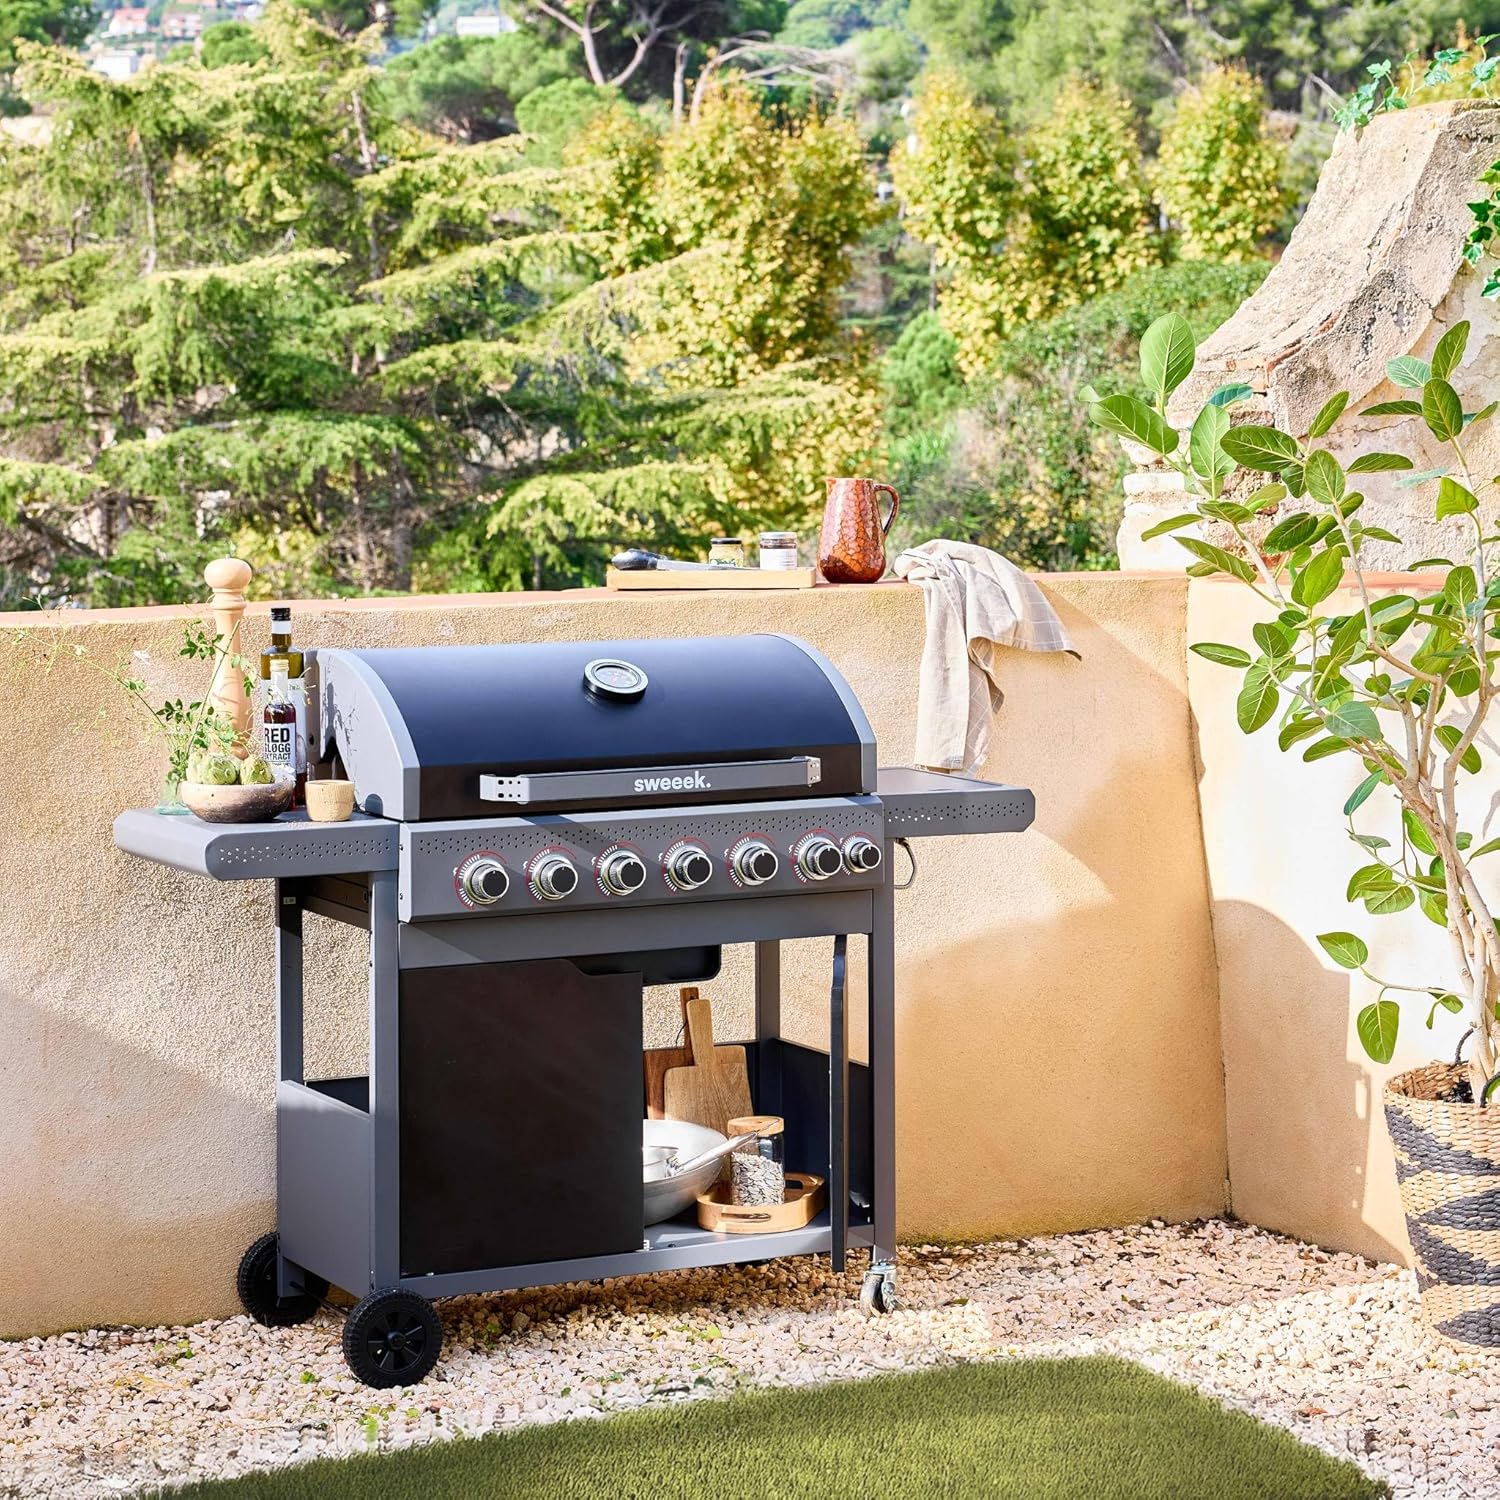
Figura 2.1: Oltreview of the sweeek Edmond Gas Barbecue with the lid closed.
3. Installazione e assemblaggio
Assembly of the sweeek Edmond Gas Barbecue is straightforward. A detailed assembly manual is included in the product packaging. Ensure all components are present and undamaged before beginning assembly.
3.1 Controllo dei componenti
Before assembly, unpack all parts and verify against the included parts list. Contact customer support if any parts are missing or damaged.
3.2 Fasi di assemblaggio
- Seguire le istruzioni dettagliate fornite nel manuale di montaggio separato.
- Assicurarsi che tutti gli elementi di fissaggio siano ben serrati.
- Attach the wheels to the base for mobility.
- Install the side shelves and the main grill body.
- Place the enameled cast iron grill grates and warming rack into position.
3.3 Collegamento del gas
Connect a suitable gas hose and pressure regulator (not supplied) to your gas bottle and the barbecue's gas inlet. Ensure all connections are tight and perform a leak test before first use.

Figure 3.1: Dimensional diagram of the barbecue, useful for planning placement.
4. Istruzioni per l'uso
This section details how to safely operate your gas barbecue.
4.1 Prova di tenuta
Perform a leak test every time you connect a new gas bottle or if you suspect a leak.
- Mescolare una soluzione composta da parti uguali di detersivo liquido per piatti e acqua.
- Assicurarsi che tutte le manopole di controllo dei bruciatori siano in posizione "OFF".
- Aprire l'erogazione del gas dalla bombola.
- Apply the soap solution to all gas connections (hose to regulator, regulator to bottle, hose to barbecue inlet).
- If bubbles appear, there is a leak. Immediately turn off the gas supply. Tighten connections and re-test. If the leak persists, do not use the barbecue and contact customer support.
4.2 Accensione dei bruciatori principali
- Apri il coperchio del barbecue.
- Assicurarsi che tutte le manopole di controllo dei bruciatori siano in posizione "OFF".
- Aprire la valvola di alimentazione del gas sulla bombola.
- Push in and turn one main burner control knob counter-clockwise to the 'HIGH' position.
- Press and hold the electronic piezo ignition button until the burner ignites. You should hear a clicking sound.
- Once ignited, release the ignition button. If the burner does not light within 5 seconds, turn the control knob to 'OFF', wait 5 minutes for gas to dissipate, and repeat the process.
- Repeat for other main burners as needed. Each burner operates independently.
- Adjust the flame intensity by turning the control knobs between 'HIGH' and 'LOW'.
4.3 Accensione del fornello laterale
- Aprire il coperchio del fornello laterale.
- Assicurarsi che la manopola di controllo del fornello laterale sia in posizione "OFF".
- Aprire la valvola di alimentazione del gas sulla bombola.
- Push in and turn the side burner control knob counter-clockwise to the 'HIGH' position.
- Press and hold the electronic piezo ignition button until the burner ignites.
- Once ignited, release the ignition button. If the burner does not light within 5 seconds, turn the control knob to 'OFF', wait 5 minutes, and repeat.
- Adjust the flame intensity as required.

Figure 4.1: Control knobs and integrated thermometer.

Figure 4.2: The auxiliary side burner.
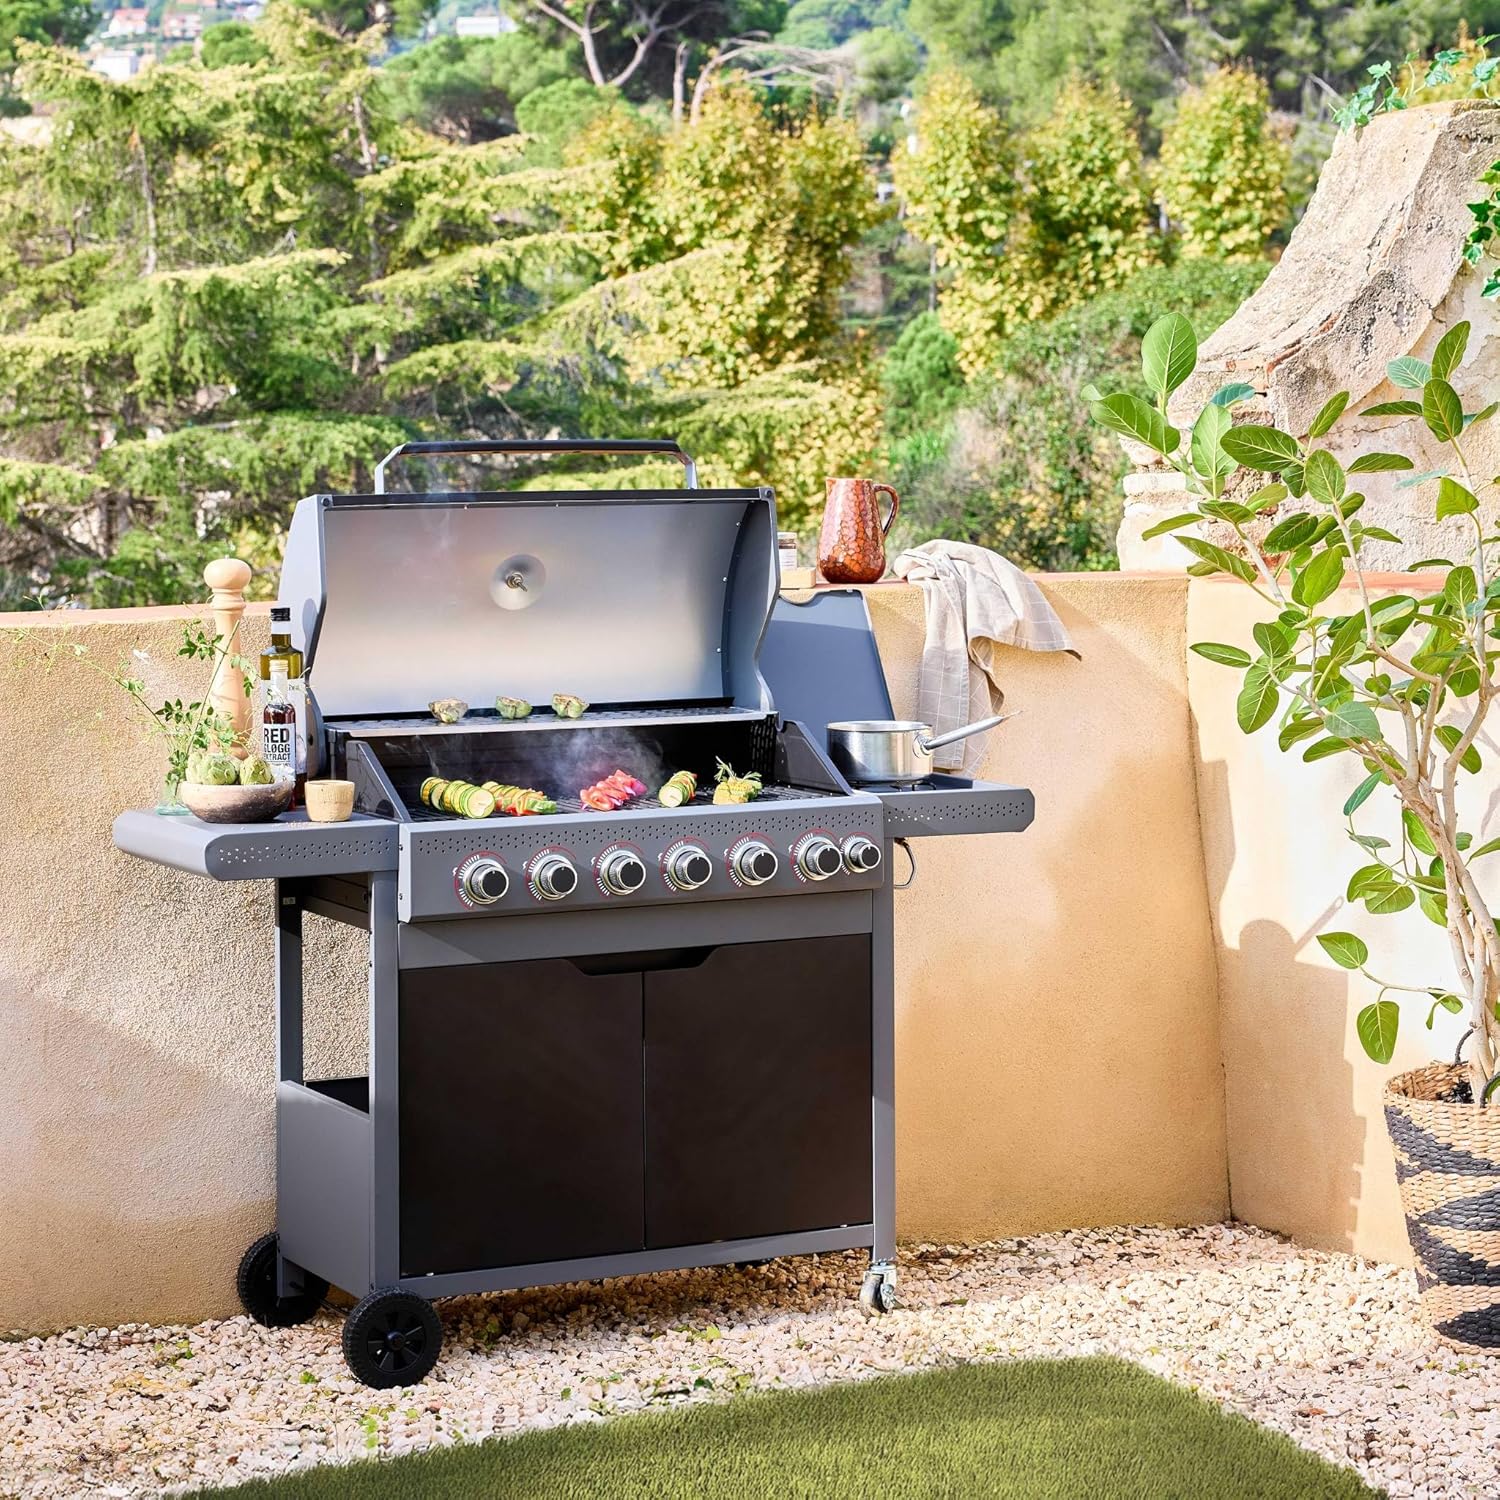
Figure 4.3: Barbecue in operation with food on the grill.
5. Manutenzione
Regular cleaning and maintenance will extend the life of your barbecue and ensure safe operation.
5.1 Pulizia delle griglie del barbecue
The enameled cast iron grill grates should be cleaned after each use once they have cooled down.
- Use a grill brush to remove food residue.
- For stubborn residue, wash with warm soapy water and a non-abrasive sponge. Rinse thoroughly and dry completely to prevent rust.
5.2 vassoio raccogli grasso
The grease tray collects drippings during cooking. It should be emptied and cleaned regularly to prevent grease fires.
- Lasciare raffreddare completamente il barbecue.
- Carefully slide out the grease tray (dimensions: 11.5 x 18 x 3.5 cm).
- Smaltire il grasso raccolto in modo responsabile.
- Wash the tray with warm soapy water, rinse, and dry before replacing.
5.3 Pulizia esterna
Clean the exterior surfaces with a mild detergent and a soft cloth. Avoid abrasive cleaners or pads that could damage the finish.
6. Risoluzione Dei Problemi
Questa sezione affronta i problemi più comuni che potresti riscontrare con il tuo barbecue a gas.
| Problema | Possibile causa | Soluzione |
|---|---|---|
| Il bruciatore non si accende | Nessuna erogazione di gas, porta del bruciatore ostruita, accenditore difettoso. | Check gas bottle, regulator, and hose connections. Ensure gas valve is open. Clean burner ports. Check igniter electrode for spark. |
| Riscaldamento non uniforme | Porte del bruciatore ostruite, bassa pressione del gas. | Clean burner ports. Check gas level in bottle. Ensure regulator is functioning correctly. |
| Fiamma gialla o arancione | Miscela aria/gas non corretta, bruciatore intasato. | Clean burner ports. Ensure air vents are clear. |
| Odore di gas | Perdita di gas. | Immediately turn off gas supply. Perform a leak test (Section 4.1). Do not use if leak persists. |
7. Specifiche
Detailed technical specifications for the sweeek Edmond Gas Barbecue.
| Caratteristica | Specificazione |
|---|---|
| Marca | dolce |
| Numero di modello | 3701672509965 |
| Colore | Nero |
| Tipo di carburante | Gas (Butane or Propane recommended) |
| Bruciatori totali | 7 (6 main burners + 1 side burner) |
| Potenza termica totale | 20.5 kW (20500 watt) |
| Potenza del bruciatore principale | 3 kW per burner (total 18 kW for 6 main burners) |
| Potenza del fornello laterale | 2.5 kW |
| Tipo di accensione | Piezo elettronico |
| Materiale (telaio) | Alloy Steel with epoxy paint |
| Material (Burners) | Acciaio inossidabile |
| Material (Cooking Surface) | Ghisa smaltata |
| Dimensioni complessive (L x P x A) | Dimensioni: 144 x 62 x 143 cm |
| Dimensioni della superficie della griglia | 41.5 x 22.5 cm (Note: This seems to be for one grate, not total. The description states 3 grates, so total cooking area would be larger.) |
| Altezza griglia | 85.5 centimetri |
| Dimensioni del coperchio | Dimensioni: 82.5 x 45 x 24.5 cm |
| Grease Tray Dimensions | Dimensioni: 11.5 x 18 x 3.5 cm |
| Peso | 40 kg |
| Assemblaggio richiesto | SÌ |
| Caratteristiche speciali | Integrated thermometer, portable (with wheels) |
8. Garanzia e supporto
For warranty information, please refer to the documentation provided with your purchase or contact the retailer where the product was acquired. Specific warranty terms and conditions may vary.
If you require technical assistance, have questions about assembly, operation, or maintenance, please contact sweeek customer support or your authorized dealer. Please have your model number (Edmond Gas Barbecue Model 3701672509965) and proof of purchase available when contacting support.