Introduzione
This manual provides instructions for the Karlak APL-F002X Telescope Phone Adapter. This device is designed to connect your smartphone to various optical instruments such as telescopes, monoculars, binoculars, and microscopes for photography and video recording.
The adapter features a 360° rotatable design for flexible shooting angles, an added fixing screw for enhanced stability, and a quick-clamp mechanism for efficient phone installation and precise focusing.

Figura 1: The APL-F002X adapter demonstrating its compact and portable design, weighing approximately 103g.
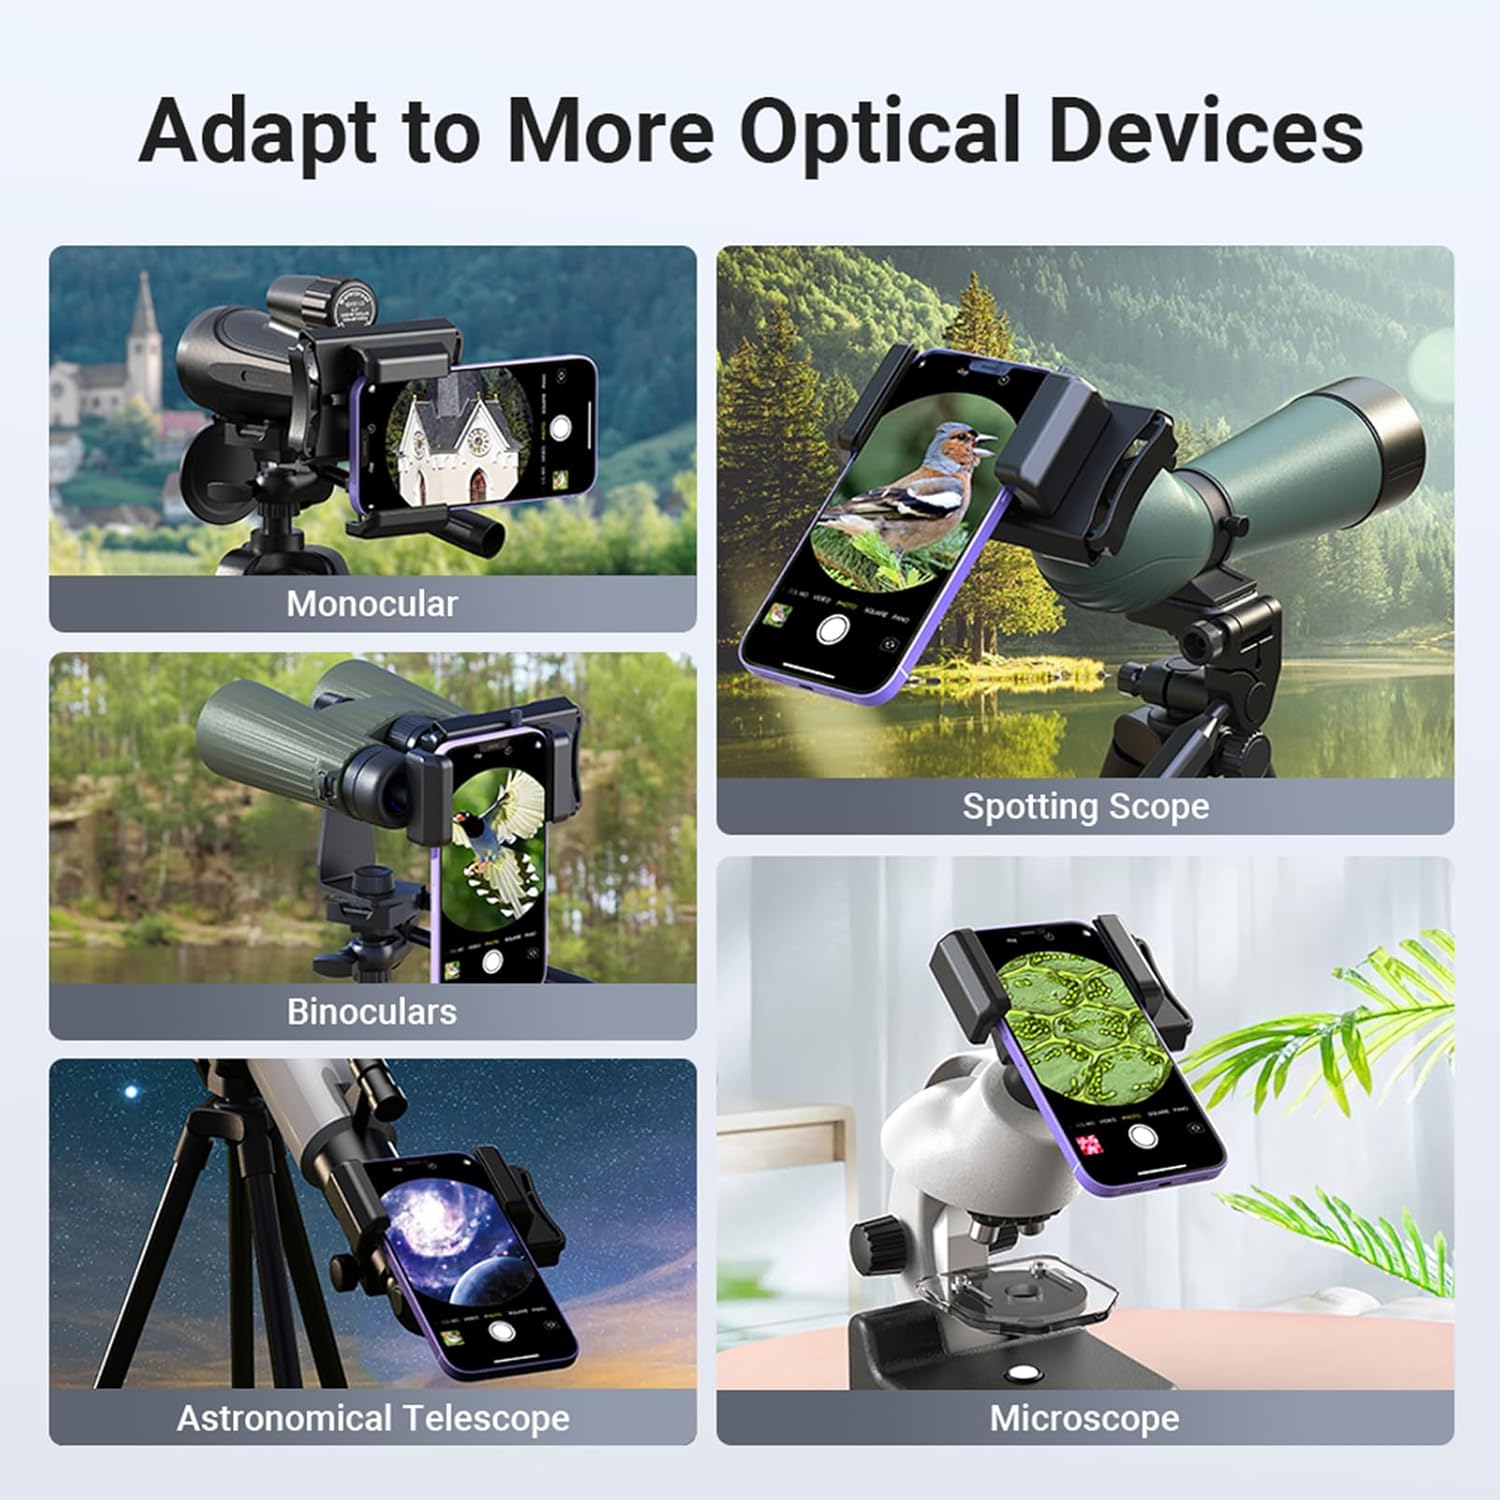
Figura 2: The adapter's compatibility with various optical devices, including monoculars, spotting scopes, binoculars, astronomical telescopes, and microscopes.
Impostare
1. Disimballaggio e ispezione iniziale
Carefully remove all components from the packaging. Verify that all items listed in the "Package Contents" section are present and undamaged. If any items are missing or damaged, contact customer support.
2. Attaching Your Smartphone to the Adapter
- Apri la clip del telefono: Gently pull the spring clip of the adapter to expand the phone holder.
- Inserisci Smartphone: Carefully place your smartphone into the expanded clip. Ensure the phone is securely held. The adapter accommodates phone widths between 66mm and 95mm.
- Align Phone Camera: Loosen the screw on the slide rail and adjust the phone's position until its main camera lens is aligned with the adapter's central focusing hole.
- Secure Phone Position: Tighten the top fixing screw to lock the phone's position and prevent shifting during use.

Figura 3: Steps for quickly clamping the phone and adjusting for focus. Pull the clip to insert the phone, then slide to align the camera.

Figura 4: The adapter's fixing screw and design features for secure phone placement and focus retention.
3. Attaching the Adapter to an Optical Device
- Prepare Eyepiece: Ensure the eyepiece of your optical device is clean and free of debris. The adapter is compatible with eyepieces having outer diameters between 23mm and 50mm.
- Collegare l'adattatore: Simultaneously press the left and right clamp jaws of the adapter to expand them. Carefully position the adapter over the eyepiece of your optical device.
- Adattatore sicuro: Rilasciare il clamp jaws to firmly grip the eyepiece. Ensure the adapter is stable and the phone's camera remains aligned with the eyepiece.
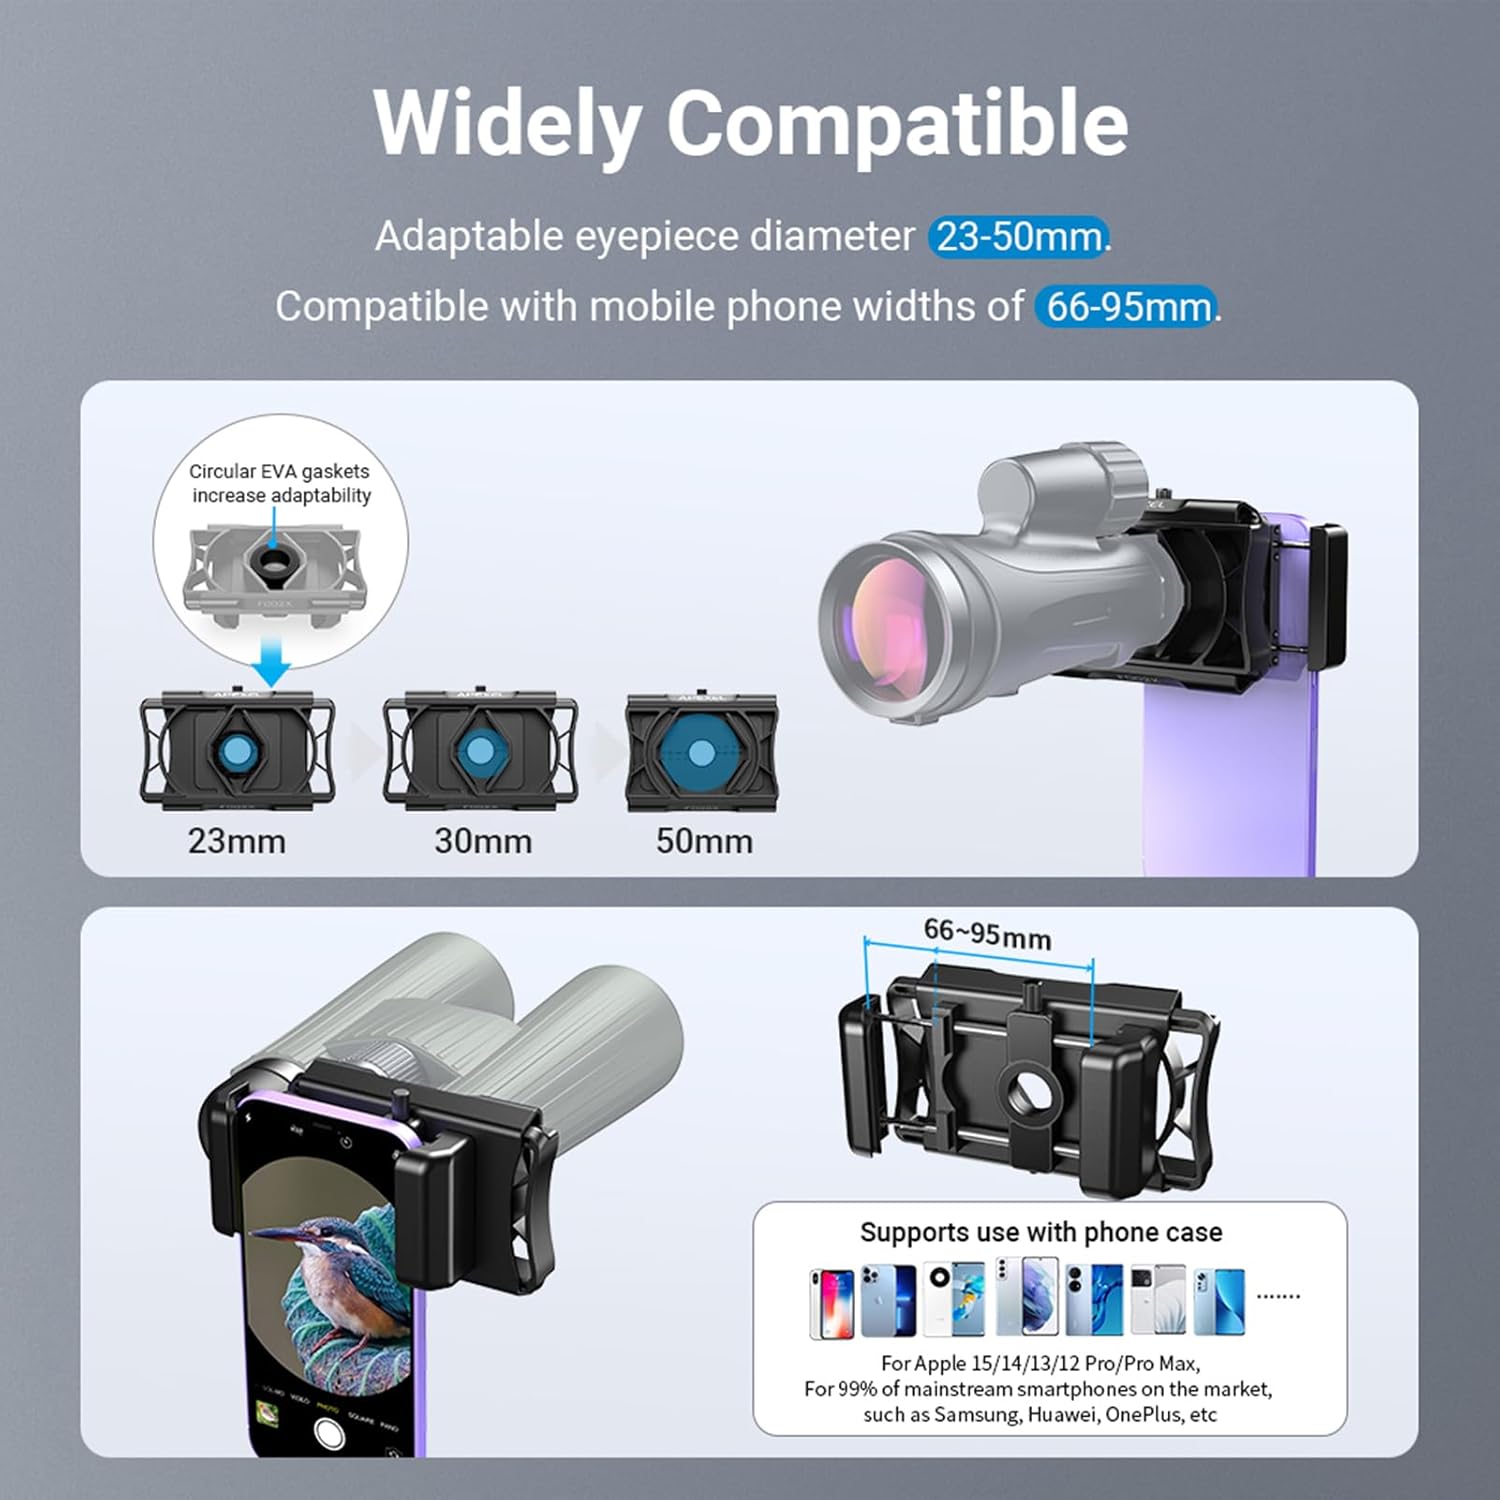
Figura 5: Compatibility ranges for eyepiece diameter and phone width, along with included EVA pads for optimal fit.

Figura 6: A visual summary of the quick installation process for both phone and optical device attachment.
Operativo
1. Adjusting Shooting Orientation
The adapter features a 360° rotatable design, allowing you to switch between horizontal and vertical shooting modes without detaching your phone or the adapter from the optical device. Simply rotate the phone mount section to achieve the desired orientation.

Figura 7: The 360° rotation capability for switching between vertical and horizontal shooting modes.
2. Focusing and Image Capture
Once your phone and the adapter are securely attached, open your smartphone's camera application. Use the optical device's focus mechanism to achieve a clear image. Fine-tune the phone's position within the adapter if necessary to optimize the field of view and eliminate vignetting.
The slide design of the adapter allows for minor adjustments to the phone's camera position relative to the eyepiece, aiding in precise focusing.
Manutenzione
1. Pulizia
- Corpo adattatore: Wipe the adapter's body with a soft, dry, lint-free cloth. For stubborn dirt, a slightly damp È possibile utilizzare un panno e asciugare immediatamente. Evitare detergenti abrasivi o solventi.
- Cuscinetti EVA: The EVA pads can be gently wiped with a damp cloth. Ensure they are completely dry before reassembly or storage.
- Evitare l'immersione in acqua: Do not immerse the adapter in water or any cleaning solutions.
2. Conservazione
- Conservare l'adattatore in un luogo fresco e asciutto, lontano dalla luce solare diretta e da temperature estreme.
- Keep the adapter in its original packaging or a protective pouch to prevent dust accumulation and scratches.
Risoluzione dei problemi
1. Phone Not Holding Securely
- Check Phone Width: Assicurati che la larghezza del tuo telefono sia compresa tra 66 e 95 mm.
- Verify Clip Engagement: Make sure the spring clip is fully engaged and gripping the phone firmly.
- Remove Thick Cases: If your phone has a very thick case, it might interfere with the grip. Consider removing the case during use.
2. Adapter Not Attaching Firmly to Eyepiece
- Check Eyepiece Diameter: Confirm the eyepiece outer diameter is between 23-50mm.
- Use Correct EVA Pads: Ensure the appropriate EVA pads (2mm, 3mm, or 4mm) are used to create a snug fit for smaller eyepieces.
- Classe correttaampin: Garantire il clamp jaws are fully released to grip the eyepiece.
3. Image is Blurry or Not Centered
- Align Phone Camera: Re-adjust your phone's position using the slide rail until its main camera lens is perfectly centered with the adapter's focusing hole and the optical device's eyepiece.
- Tighten Fixing Screw: Ensure the top fixing screw is tightened to prevent the phone from shifting out of alignment.
- Focus Optical Device: Use the focus knob on your telescope, monocular, or microscope to achieve a sharp image. The adapter does not provide focusing capabilities.
- Lenti pulite: Ensure both your phone camera lens and the optical device's eyepiece are clean.
4. Vignetting (Dark Edges in Image)
- Adjust Phone Position: Slightly adjust the phone's position within the adapter to find the optimal alignment that minimizes dark edges.
- Ingrandisci: Use your phone's digital zoom slightly to crop out the vignetting, if necessary.
Specifiche
| Caratteristica | Dettaglio |
|---|---|
| Modello | APL-F002X |
| Materiale | PA + GF |
| Phone Width Range | 66 mm - 95 mm |
| Phone Depth Range | Fino a 19 mm |
| Eyepiece Diameter Range | 23 mm - 50 mm |
| Clamping forza | 15N - 35N |
| Dimensioni del prodotto (L x P x A) | 122 mm x 78 mm x 43.5 mm (circa 5.12 x 3.15 x 1.97 pollici) |
| Peso del prodotto | 103 g (circa 3.63 once) |

Figura 8: Detailed display of the adapter's features, including anti-slip elements and protective pads.
Contenuto della confezione
- 1 x Karlak APL-F002X Telescope Phone Adapter
- 1 x Circular EVA Pad
- 3 x Small EVA Pads (2mm, 3mm, 4mm)
- 1 x Manuale utente (inglese)
Garanzia e assistenza clienti
For warranty information, technical assistance, or customer support, please refer to the contact details provided with your purchase documentation or visit the official Karlak websito. Conserva la ricevuta d'acquisto come prova d'acquisto.