1. Prodotto finitoview
The Greadio R12 is a versatile portable radio designed for outdoor activities and emergency preparedness. It features multiple radio bands, Bluetooth connectivity, various charging methods, and essential emergency functions.
1.1. Componenti e controlli
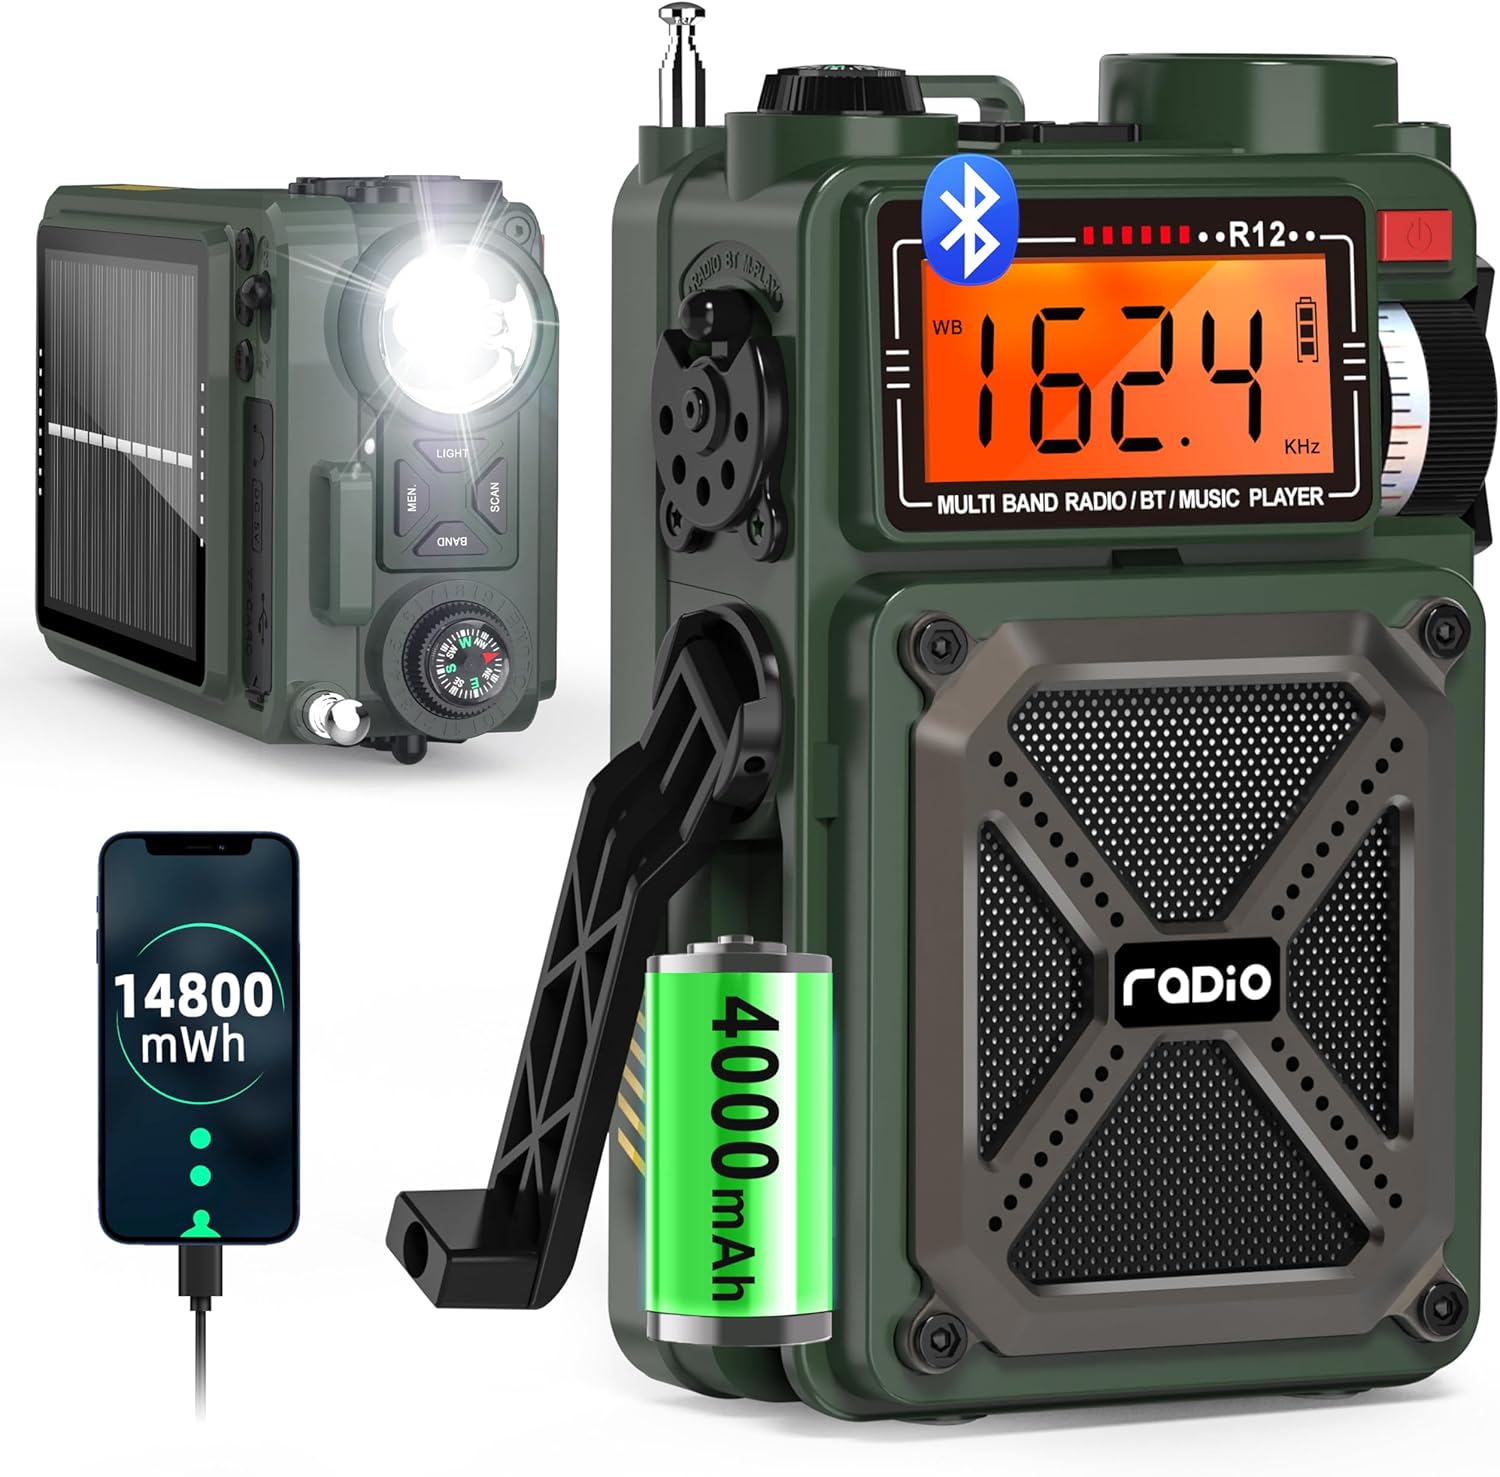
Figure 1: Greadio R12 Portable Multi-Band Emergency Radio. This image displays the front and side views of the green Greadio R12 radio, highlighting its compact design, digital display, speaker grille, flashlight, and hand crank.

Figure 2: Greadio R12 Multi-Function Radio Diagram. This diagram illustrates the various ports and controls on the side of the radio, including the 3.5mm earphone jack, USB Type-C charging port, TF/SD card slot, and USB port.
Pannello frontale:
- Schermo LCD: Mostra frequenza, modalità, livello della batteria e altri indicatori.
- Oratore: Uscita audio.
- Manopola di sintonia: Regola la frequenza radio.
- Interruttore di alimentazione: Accende/spegne la radio.
- Indicatore di carica: Lights up when charging.
Pannello superiore:
- Torcia a LED: Fornisce illuminazione.
- Bussola: Integrato per la navigazione.
- Manopola del volume: Regola il volume audio.
- Antenna: Estensibile per una migliore ricezione radio.
- Tasto LUCE: Attiva la torcia.
- MEM. Button: Accesses and stores preset stations.
- Pulsante BAND: Switches between radio bands (FM/AM/SW/WB).
- Pulsante SCAN: Initiates automatic station search.
Pannello laterale:
- Interruttore di funzione: Selects between Radio, Bluetooth (BT), TF/SD Card, and USB modes.
- Manovella: Per la generazione manuale di energia.
- Interruttore SOS: Attiva l'allarme di emergenza.
- Jack per auricolari (3.5 mm): Per l'ascolto privato.
- Porta di ricarica di tipo C: Per ingresso di alimentazione esterna.
- Slot per scheda TF/SD: For playing audio from memory cards.
- Porta USB: For playing audio from USB drives or charging external devices.
Pannello posteriore:
- Pannello solare: Per la ricarica solare.
2. Configurazione e ricarica
2.1. Accensione/spegnimento iniziale
- To turn on the radio, long press the Interruttore di alimentazione per circa 2 secondi.
- Per spegnere la radio, premere a lungo il tasto Interruttore di alimentazione again for approximately 2 seconds.
2.2. Ricarica della radio
The Greadio R12 offers three methods for charging its internal 4000mAh battery:

Figure 3: Three Ways to Charge the Greadio R12. This image visually explains the three charging methods: Type-C cable, hand crank, and solar panel.
- Ricarica di tipo C: Connect a standard Type-C charging cable (5V 1A/2A adapter, not included) to the Type-C charging port on the side of the radio. The charging indicator light will turn red during charging.
- Ricarica solare: Place the radio with its solar panel facing direct sunlight. The charging indicator lights will turn red when solar charging is active. This method is ideal for maintaining charge or slow charging in outdoor conditions.
- Ricarica a manovella: Extend the hand crank on the side of the radio. Turn the hand crank clockwise or anti-clockwise. The red charging indicator will light up, indicating that power is being generated. Continuous cranking is required for effective charging.
Video 1: How to Use USB-C, Hand Crank and Solar Charging. This video demonstrates the three charging methods for the Greadio R12 radio: connecting a USB-C cable, utilizing the solar panel, and operating the hand crank.
3. Istruzioni per l'uso
3.1. Radio Modes (AM/FM/SW/NOAA)

Figure 4: Greadio R12 Radio Bands. This image highlights the supported radio frequencies for WB (NOAA Weather Band), AM, FM, and SW (Shortwave) bands.
- Selezione della banda: Premere il tasto BANDA button on the top panel to cycle through FM, AM, SW, and WB (NOAA Weather Band) modes.
- tuning: Utilizzare il Manopola di sintonia on the front panel to manually adjust the frequency within the selected band.
- Ricerca automatica: Premere a lungo il tasto SCANSIONE pulsante per cercare automaticamente le stazioni disponibili e fermarsi alle stesse.
- Stazioni preimpostate: Premere a lungo il tasto MEM. button to automatically search and store stations as presets. Short press the MEM. button to recall preset stations, then use the Manopola di sintonia per passare da uno all'altro.
Video 2: How to Perform Radio Channel Switching and Feature Switching. This video demonstrates how to switch between different radio bands (AM, FM, SW, WB) and other features using the radio's controls.
Video 3: How to Preset Stations and Operate Bluetooth/TF/USB Modes. This video guides users through presetting radio stations and operating the Bluetooth, TF card, and USB playback modes.
3.2. Modalità Bluetooth

Figure 5: Greadio R12 Bluetooth 5.4 Connectivity. This image shows the radio connected via Bluetooth to a smartphone, illustrating the wireless audio streaming capability.
- Regolare il Funzione Switch on the side of the radio to the "BT" position to enter Bluetooth mode.
- On your mobile device, enable Bluetooth and search for the device named "R12".
- Select "R12" to pair and connect. Once connected, you can stream audio from your device to the radio.
3.3. Riproduzione tramite scheda USB/TF
- Regolare il Funzione Switch to the "M-PLAY" position.
- Insert a Micro SD (TF) card or a USB drive into the respective slot/port. The radio supports MP3 and WAV formats up to 256GB.
- Use the Previous/Next buttons (often integrated with scan/mem buttons or separate controls) to navigate tracks. Short press the Play/Pause button to control playback.
4. Funzioni di emergenza
4.1. Allarme SOS

Figure 6: Greadio R12 SOS Alarm. This image shows the radio with its SOS alarm activated, emitting a loud sound and flashing light for emergency signaling.
In an emergency, slide the SOS Switch on the side of the radio to activate a loud siren and flashing light to attract attention.
Video 4: Emergency Outdoor Radio. This video highlights the emergency features of the Greadio R12, including the SOS alarm and flashlight, demonstrating their use in outdoor scenarios.
4.2. Torcia elettrica
Premere il tasto LEGGERO button on the top panel to turn on the integrated LED flashlight. Press it again to turn it off.
4.3. Funzione Power Bank (uscita USB)

Figure 7: Greadio R12 USB Output Charging Phone. This image shows the radio being used to charge a smartphone via its USB output port.
The radio can act as a power bank to charge external devices:
- Spingere il Funzione Switch to the lightning symbol position (USB output mode).
- Plug your device's charging cable into the USB output port.
- Ensure the radio has sufficient charge to power your external device.
4.4. Bussola
The integrated compass on the top panel provides basic directional guidance. Ensure the radio is held level for an accurate reading.
5. Specifiche
| Caratteristica | Dettaglio |
|---|---|
| Dimensioni del prodotto | 3.19 x 2.05 x 5.2 pollici |
| Peso dell'articolo | 12.3 once |
| Numero modello articolo | R12 |
| Batterie | 2 Lithium Ion batteries required (built-in 4000mAh) |
| Marca | Greadio |
| Caratteristiche speciali | Built-In AM Antenna, Built-In Flashlight, Portable, Rechargeable, SOS Alarm |
| Tecnologia di connettività | Bluetooth 5.4, USB |
| Tecnologia sintonizzatore | AM/FM/SW/WB |
| Fonte di alimentazione | Hand crank/Solar/Type-C Charging |
| Bande radio supportate | 4-Band (AM/FM/SW/WB) |
| Componenti inclusi | Shortwave Radio *1, Type-C Cord*1, Owner's Manual, Military Style Gift Box*1, Hand Strap*1 |
6. Manutenzione e cura
- Keep the radio dry and away from extreme temperatures.
- Pulire l'esterno con un panno morbido, damp stoffa. Non utilizzare prodotti chimici aggressivi o detergenti abrasivi.
- Regularly charge the battery, even if not in use, to prolong its lifespan. Avoid complete discharge for extended periods.
- Quando non viene utilizzata, conservare la radio in un luogo fresco e asciutto.
7. Risoluzione Dei Problemi
- Nessun potere: Ensure the battery is charged. Try charging via Type-C, solar, or hand crank.
- Scarsa ricezione radio: Extend the antenna fully. Try repositioning the radio. In AM/SW modes, rotating the radio may improve reception.
- Bluetooth non si connette: Ensure the radio is in BT mode and your device's Bluetooth is enabled and discoverable. Check if other devices are connected to the radio.
- USB/TF Card Playback Issues: Ensure the card/drive is inserted correctly and contains supported audio formats (MP3, WAV). Check if the radio is in M-PLAY mode.
- SOS Alarm Not Working: Verify the SOS switch is fully engaged.
8. Garanzia e supporto
Greadio is committed to providing quality products and customer service. For warranty information, technical support, or any inquiries regarding your Greadio R12 radio, please refer to the contact details provided in the included 'Greadio Card' or visit the official Greadio websito.
Si prega di conservare la prova d'acquisto per eventuali reclami in garanzia.