1. Istruzioni di sicurezza
Si prega di leggere attentamente tutte le avvertenze e le istruzioni di sicurezza prima di utilizzare questo prodotto. La mancata osservanza delle avvertenze e delle istruzioni può causare scosse elettriche, incendi e/o lesioni gravi.
- Keep the vacuum away from water or other liquids.
- Non utilizzare l'aspirapolvere per aspirare liquidi infiammabili o combustibili, come la benzina, né utilizzarlo in aree in cui potrebbero essere presenti.
- Non raccogliere nulla che stia bruciando o che stia producendo fumo, come sigarette, fiammiferi o cenere calda.
- Prima dell'uso, assicurarsi che il filtro sia installato correttamente.
- Tenere capelli, abiti larghi, dita e tutte le parti del corpo lontano dalle aperture e dalle parti mobili.
- Utilizzare solo come descritto nel presente manuale. Utilizzare solo gli accessori consigliati dal produttore.
- Non utilizzare con un cavo o una spina danneggiati. Se l'apparecchio non funziona come dovrebbe, è caduto, è stato danneggiato, lasciato all'aperto o è caduto in acqua, restituirlo a un centro di assistenza.
- Non maneggiare il caricabatterie o l'apparecchio con le mani bagnate.
- Always turn off the appliance before connecting or disconnecting the battery.
- Conservare l'apparecchio al chiuso in un luogo fresco e asciutto.
2. Contenuto della confezione
Verifica che tutti gli articoli elencati di seguito siano inclusi nel tuo pacchetto:
- Scatola portaoggetti
- Unità di aspirazione 4 in 1
- Manuale d'uso
- Tubo flessibile
- Ugello di soffiaggio lungo
- Ugello di aspirazione piatto
- Ugello multisuperficie
- Pennello piatto
- Ugello di soffiaggio corto
- Filtro lavabile in acciaio inossidabile
- HEPA Washable Filter (1 pre-installed, 1 spare)
- Pennello rotondo
- Ugello di aspirazione dell'aria
- Cavo di ricarica di tipo C.
- Batteria rimovibile x 2
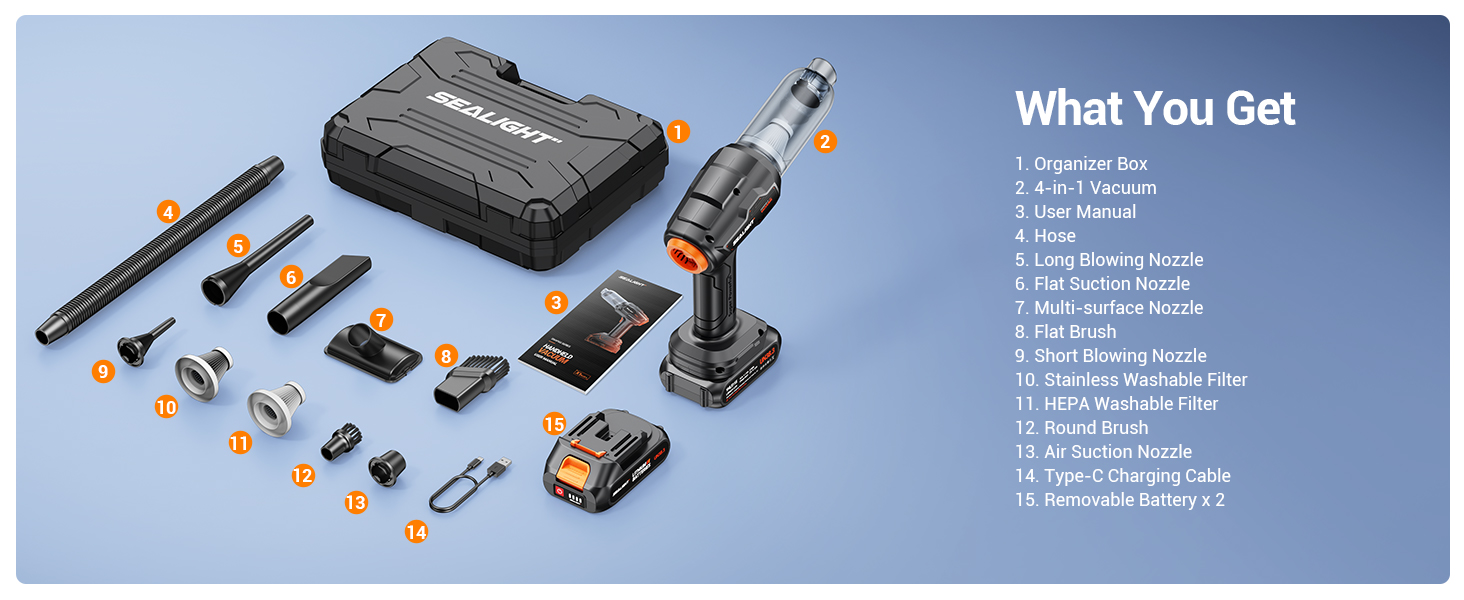
Image: All components of the SEALIGHT Car Vacuum including the main unit, various nozzles, filters, charging cable, and two batteries, neatly arranged in an organizer box.
3. Impostazione
3.1 Attaching/Detaching Battery
To attach the battery, align the battery pack with the base of the vacuum unit and slide it in until it clicks securely into place. To detach, press the release button on the battery pack and slide it off.
3.2 Attaching/Detaching Dust Cup and Filter
To attach the dust cup, align it with the main body and twist clockwise until secure. To detach, twist counter-clockwise and pull it off. The filter is located inside the dust cup and can be pulled out for cleaning.
3.3 Collegamento degli ugelli
The vacuum comes with various nozzles for different tasks. Simply push the desired nozzle onto the suction port (for vacuuming) or the blowing port (for air duster/inflator) until it fits snugly.
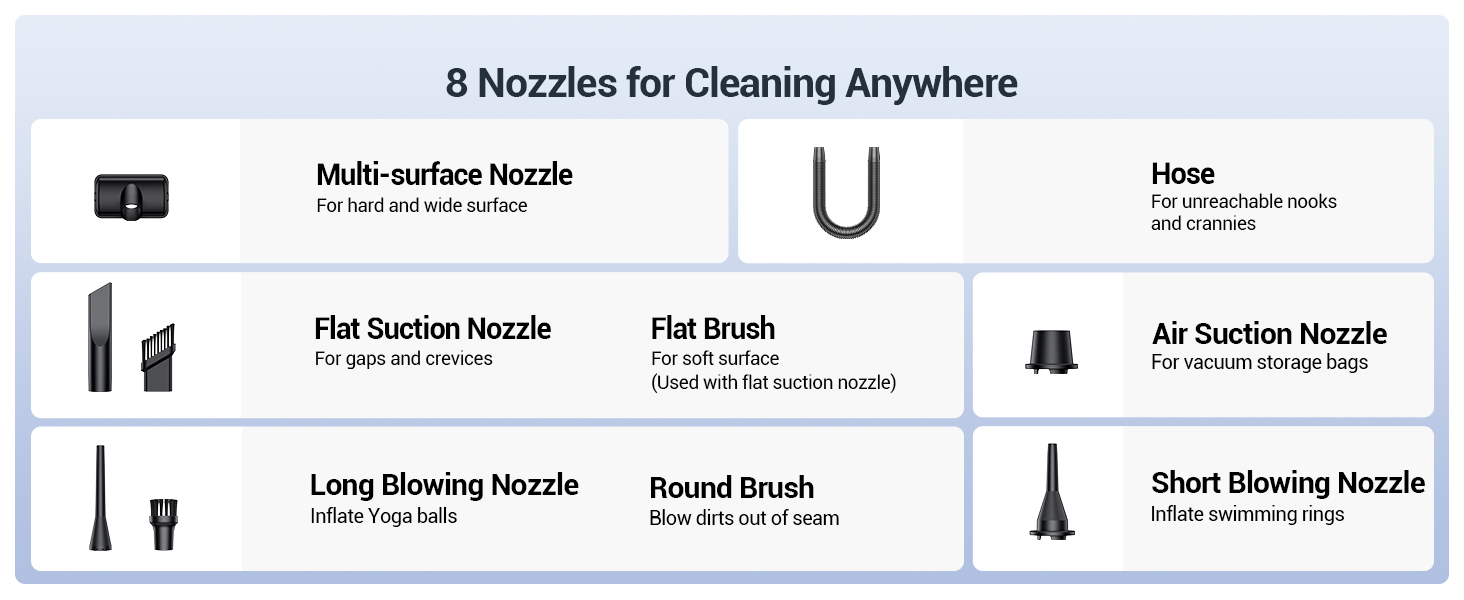
Image: Diagram showing various nozzles and their recommended uses for different cleaning and inflating tasks.
4. Istruzioni per l'uso
4.1 Accensione/spegnimento
Press the power button once to turn on the vacuum. Press again to cycle through different suction/blowing speeds (if applicable). Press and hold to turn off the device.
4.2 Aspirazione
Attach the appropriate nozzle to the suction end of the vacuum. Use the Flat Suction Nozzle for crevices and tight spaces, the Multi-surface Nozzle for general cleaning, and the Flat Brush for soft surfaces. The Flexible Hose can extend reach into difficult areas.
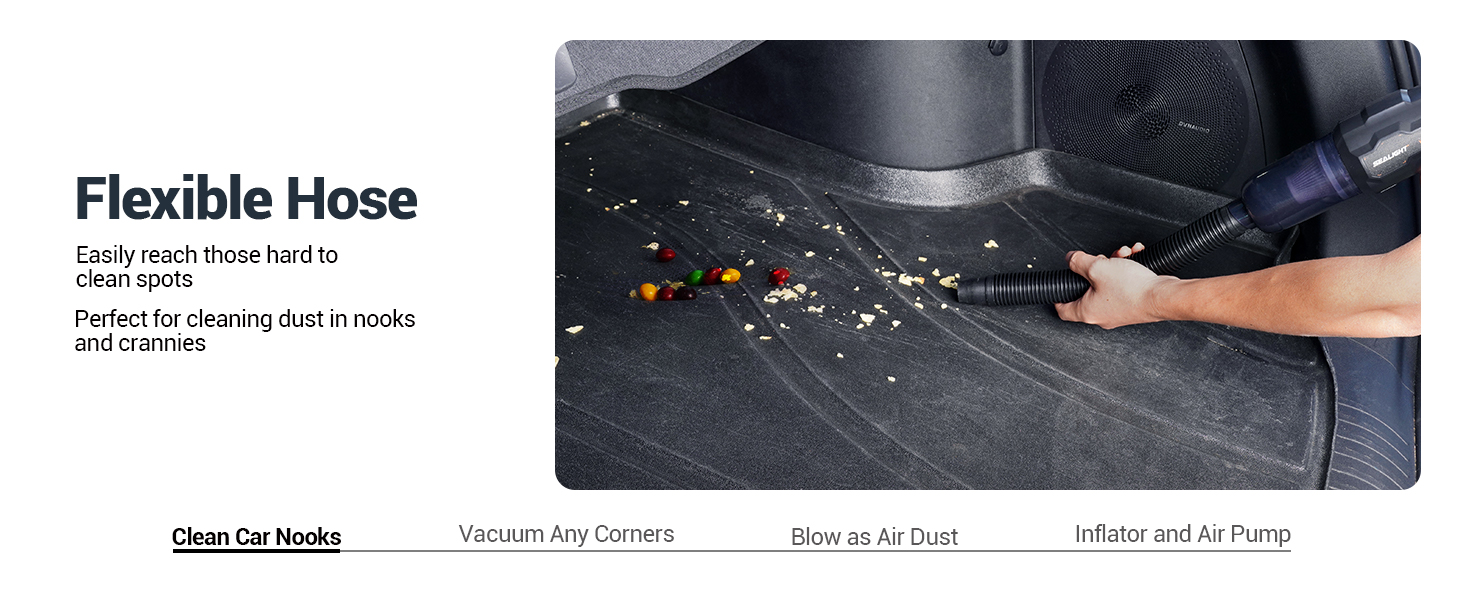
Image: Using the flexible hose for cleaning car nooks.
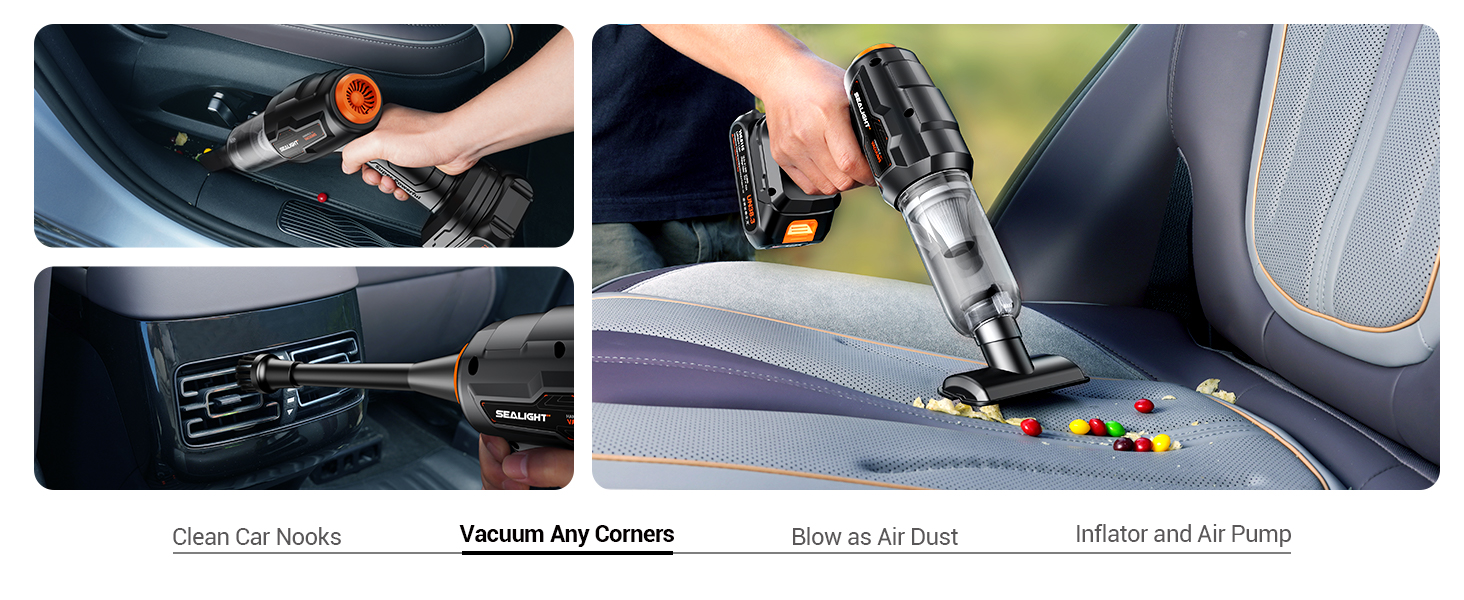
Image: Vacuuming various corners and surfaces in a car.
4.3 Funzione Air Duster
Attach a blowing nozzle to the exhaust end of the vacuum. Use this function to blow away dust from keyboards, car vents, or to clear light debris like leaves from surfaces.
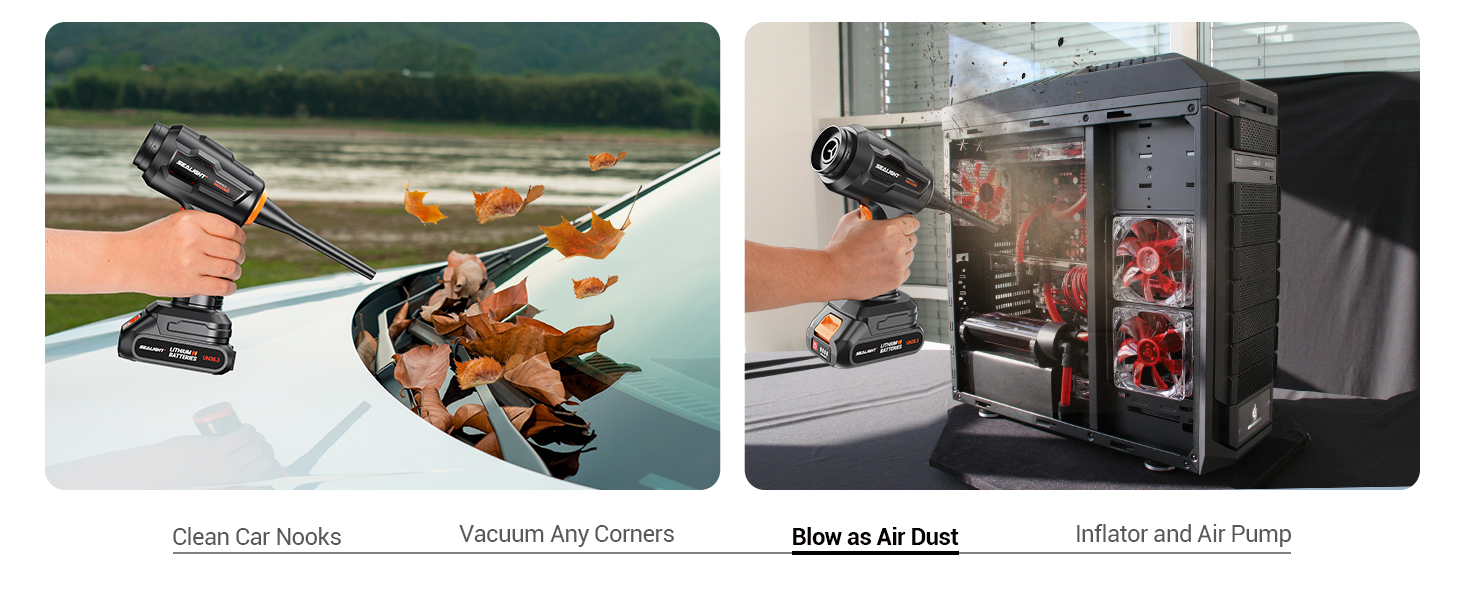
Image: Using the air duster to clear dust and leaves.
4.4 Inflator/Pumping Function
Utilize the specialized nozzles on the blowing port to inflate items such as yoga balls, inflatable pools, or to vacuum seal storage bags.
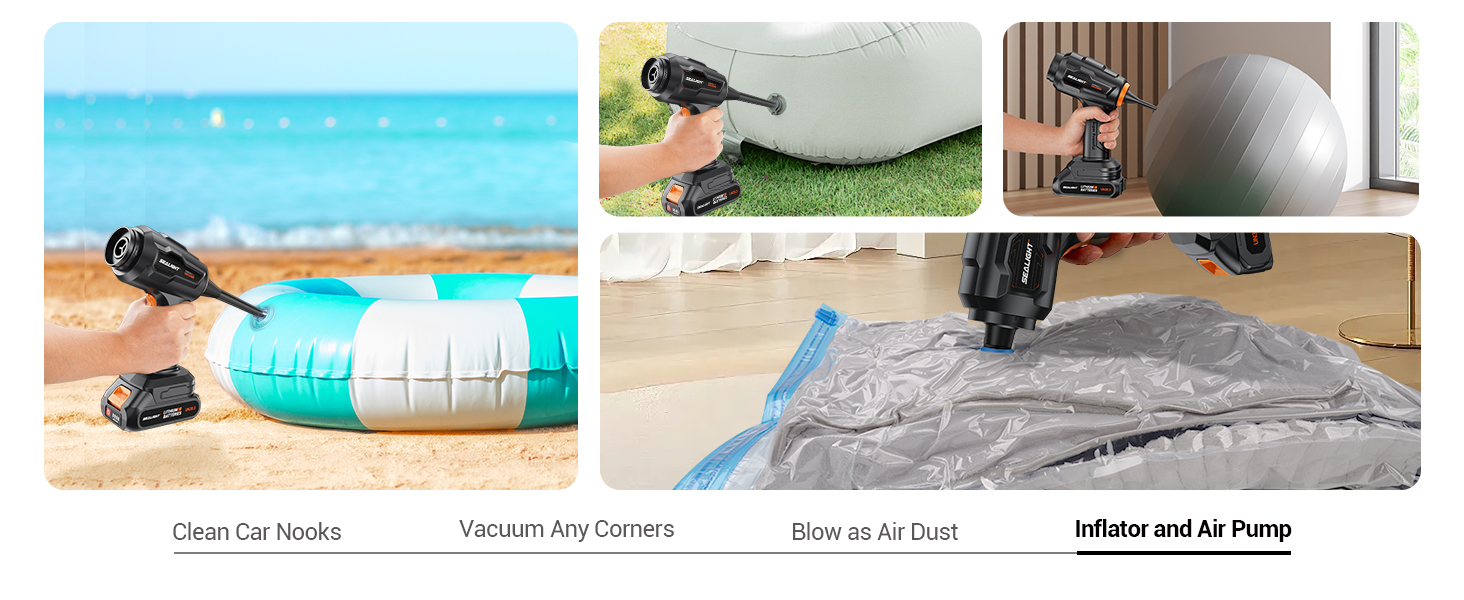
Image: Inflating and pumping with the specialized nozzles.
Video: Un oltreview of the SEALIGHT Mini Vacuum's features and versatility.
Video: Demonstration of the SEALIGHT Portable Vacuum Cleaner's functions and accessories.
Video: The SEALIGHT Car Vacuum in action, showcasing its cleaning capabilities in a vehicle.
Video: A detailed look at the SEALIGHT Handheld Vacuum's design and functionality.
5. Manutenzione
5.1 Svuotamento del contenitore della polvere
The dust cup has a capacity of 180ml. To empty, twist the dust cup counter-clockwise to detach it from the main unit. Dispose of collected debris into a trash bin. Reattach by twisting clockwise until secure.
5.2 Pulizia del filtro
The vacuum uses a washable HEPA filter. After detaching the dust cup, carefully remove the filter. Rinse the filter under running water until clean. Ensure the filter is completely dry before reinserting it into the dust cup and reattaching to the vacuum.
5.3 Caricamento della batteria
Connect the Type-C charging cable to the charging port on the battery pack. Use a 5V/2A adapter (not included) for optimal charging. The battery provides approximately 15 minutes of use per single battery, or 30 minutes with dual batteries. After the battery is exhausted, separate the vacuum cleaner and the bottom battery to avoid the vacuum cleaner completely consuming the battery pack when it is turned on, which reduces the battery life.

Image: Type-C Charging Port for convenient charging.
6. Risoluzione Dei Problemi
- Nessun potere: Ensure the battery is fully charged and properly attached.
- Low Suction/Blowing Power: Check if the dust cup is full or if the filter is clogged. Clean the filter and empty the dust cup. Ensure no blockages in the nozzles or main unit.
- Surriscaldamento: If the unit overheats and shuts off, allow it to cool down for at least 15-20 minutes before resuming use. This can occur after prolonged continuous operation.
- La batteria si scarica rapidamente: Ensure the vacuum is separated from the battery when not in use to prevent passive discharge.
7. Specifiche
| Marca | LUCE MARINA |
| Nome del modello | X1 più |
| Potenza di aspirazione | 21000Pa |
| Cosatage | 120 watt |
| Durata della batteria | 15 minutes (single battery), 30 minutes (dual batteries) |
| Capacità del contenitore della polvere | 180 millilitri |
| Livello di rumore | 70 decibel |
| Dimensioni del prodotto | 8 cm L x 3 cm P x 10 cm A |
| Peso dell'articolo | 1 libbre |
| Tipo di filtro | Filtro HEPA (lavabile) |
| Fonte di alimentazione | Alimentato a batteria |
8. Garanzia e supporto
SEALIGHT is committed to providing high-quality products and customer satisfaction. For any product-related inquiries, technical support, or warranty claims, please refer to the contact information provided in your product packaging or visit the official SEALIGHT websito.
Offriamo:
- 24/7 Quick Reply
- Sostituzione gratuita
- Product Quality Support