
Introduzione
This manual provides comprehensive instructions for the installation, operation, and maintenance of your Mount-It! Universal Projector Mount. This versatile mount offers three installation configurations: flush ceiling mount, telescoping arm ceiling mount, and wall mount. It is designed for compatibility with most LCD/DLP projectors, featuring adjustable arms, integrated cable management, and full-motion adjustability for optimal projection alignment.
Please read these instructions carefully before installation to ensure safe and correct usage. Retain this manual for future reference.
Configurazione e installazione
1. Contenuto della confezione
Verificare che tutti i componenti siano presenti prima di iniziare l'installazione:
- Staffa di montaggio del proiettore
- Mounting Hardware (various screws, anchors, washers)
2. Opzioni di installazione
The Mount-It! Universal Projector Mount supports three primary installation methods:
- Flush Ceiling Mount: Per un basso profilofile installation directly against the ceiling.
- Extension Arm Ceiling Mount: Utilizes the telescoping arm to adjust the projector's distance from the ceiling.
- Wall Mount: Attaches the projector to a vertical wall surface using the adjustable arm.

Figure 1: Illustration of the three installation options: Flush Ceiling Mount, Extension Arm Ceiling Mount, and Wall Mount.
3. Controllo di compatibilità
Before installation, ensure your projector meets the following criteria:
- Fori di montaggio: Your projector must have 3 or 4 mounting holes.
- Modello del foro: The mounting hole pattern on your projector must be between 8.85 inches (22.5 cm) and 12.44 inches (31.6 cm) in diameter.
- Capacità di peso: The projector's weight must not exceed 40 lbs (18.1 kg).
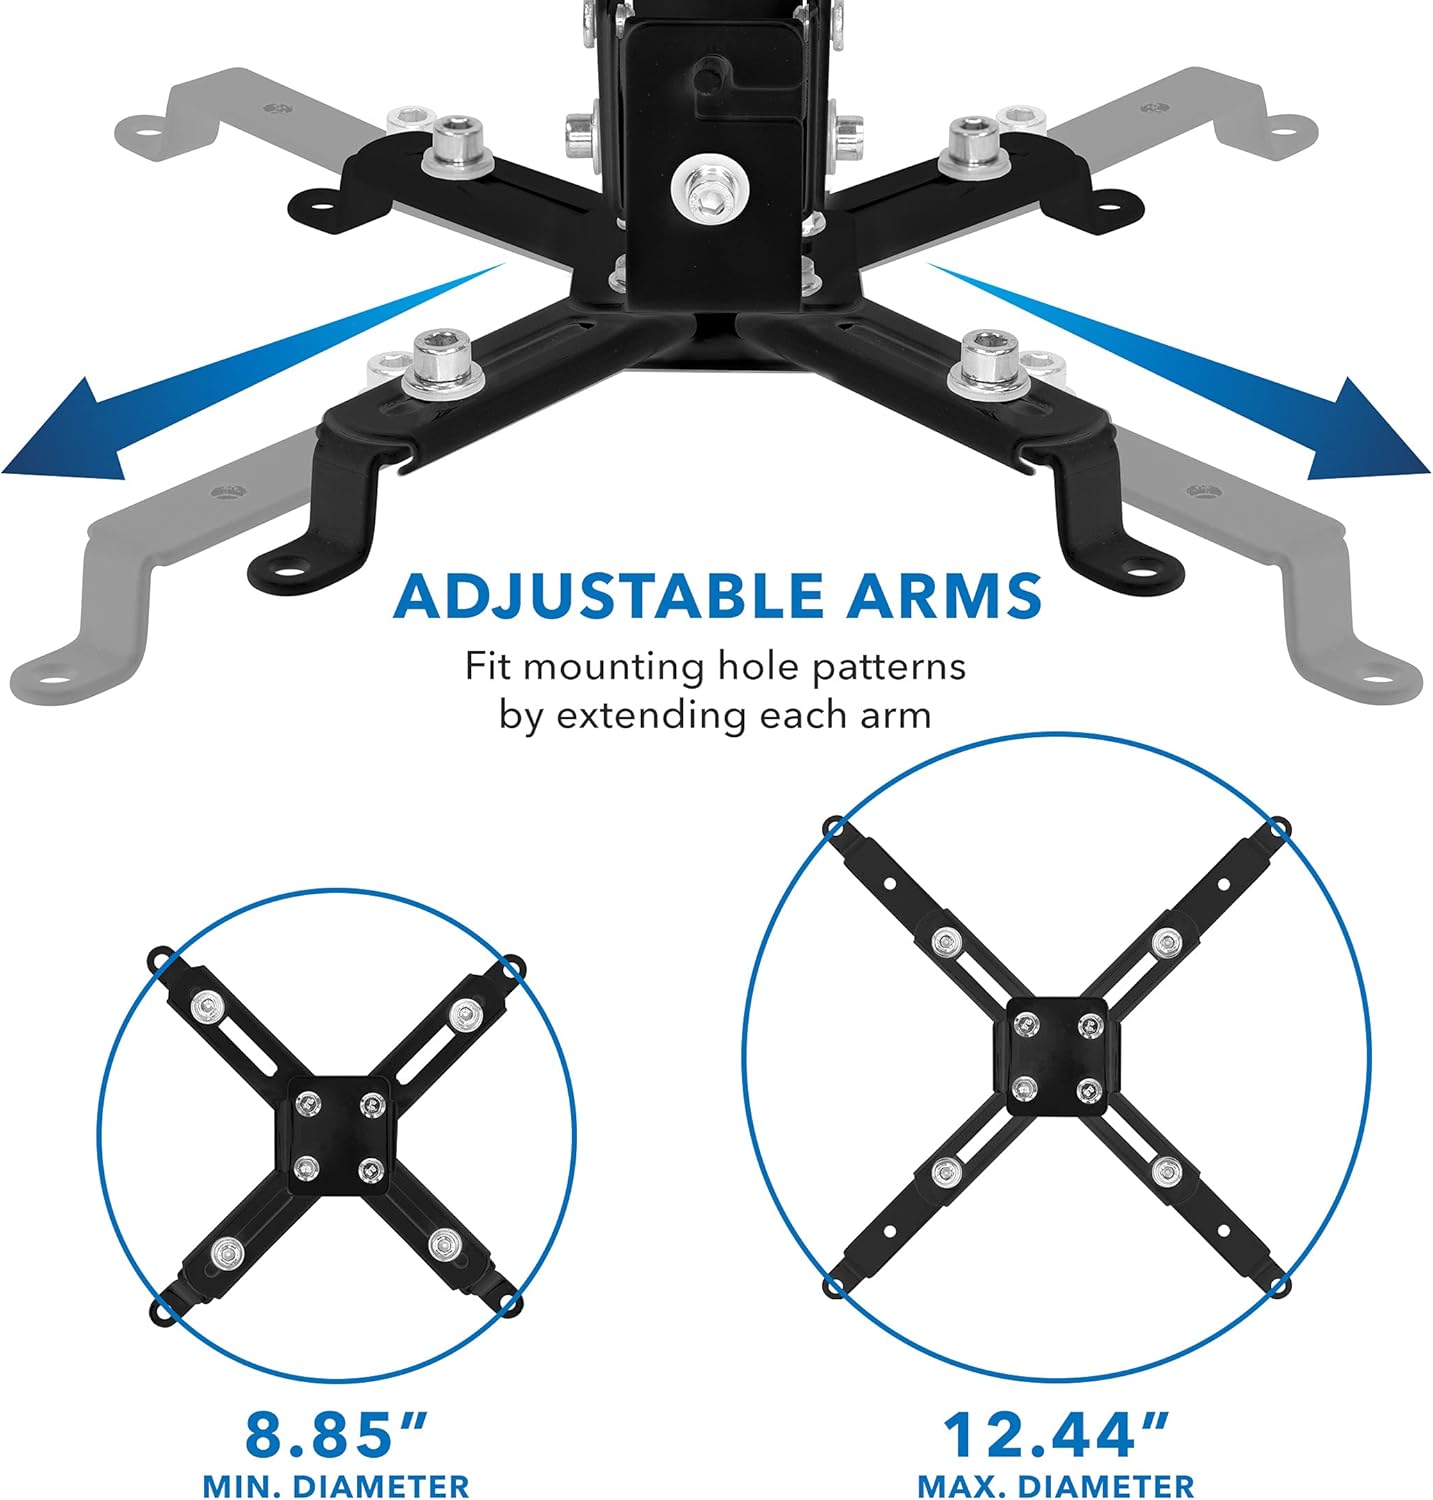
Figure 2: Adjustable mounting arms to fit projector hole patterns between 8.85 inches and 12.44 inches.
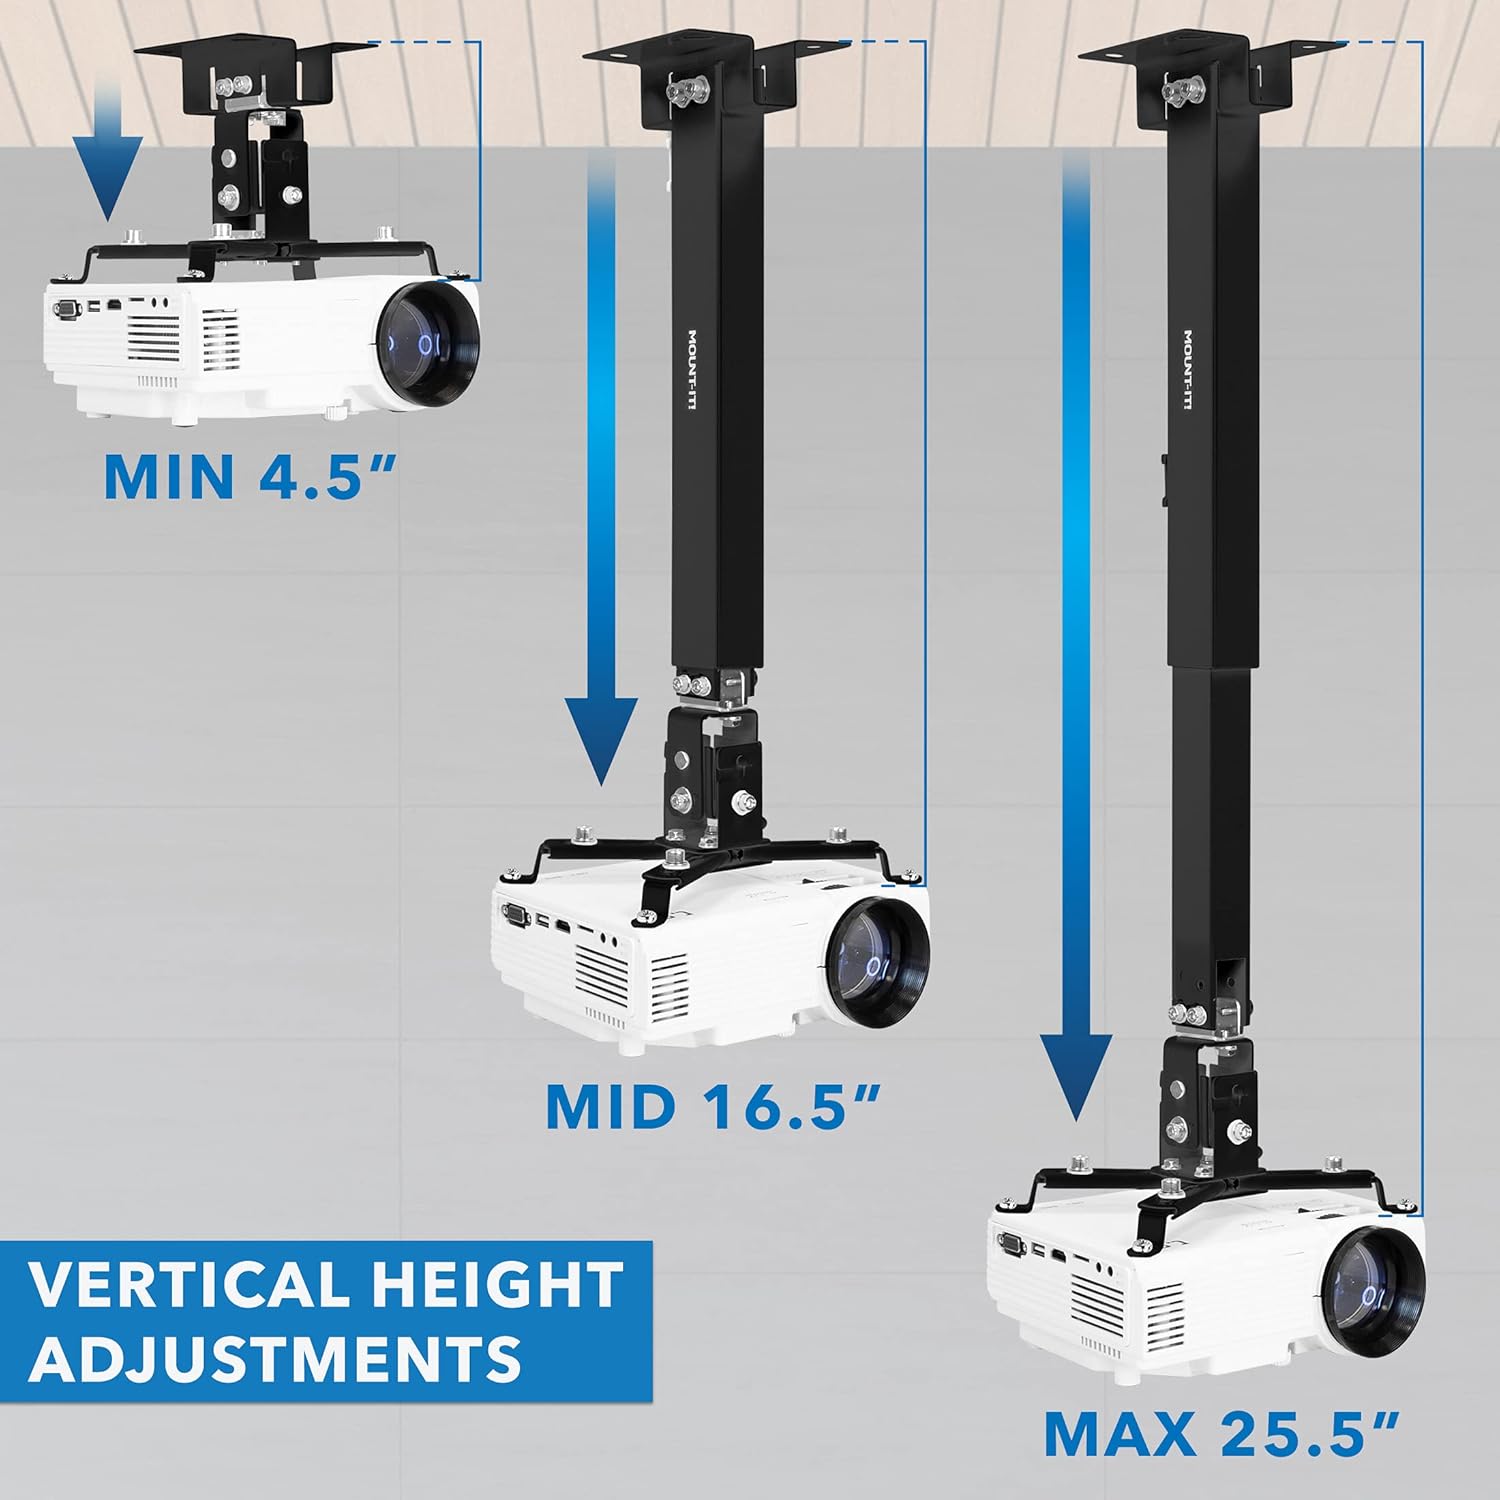
Figure 3: The mount supports projectors up to 40 lbs (18.1 kg).
4. Mounting Surface Requirements
This mount requires installation on solid surfaces. It is suitable for:
- Borchie in legno
- Concrete ceilings/walls
- soffitti piani
Importante: Do not install on vaulted ceilings or drywall without proper reinforcement.
5. Fasi di installazione (generali)
Detailed installation steps will vary based on your chosen configuration (ceiling flush, ceiling extension, or wall mount). Refer to the included hardware guide for specific instructions on attaching the mounting plate to your chosen surface and assembling the projector bracket.
- Individuare il punto di montaggio: Identify a suitable location on your ceiling or wall, ensuring it can support the weight of the mount and projector. Use a stud finder for wood studs.
- Fissare la piastra di montaggio: Secure the ceiling/wall plate using the appropriate hardware for your surface type. Ensure it is level and firmly attached.
- Assemble Projector Bracket: Attach the adjustable arms to your projector, matching the mounting hole pattern.
- Connect Projector to Mount: Secure the projector bracket assembly to the main mount structure.
Funzionamento e regolazioni
Once installed, the mount allows for various adjustments to achieve the perfect projection angle and alignment.
1. Full-Motion Adjustability
The mount provides the following movement capabilities:
- Tilt (Pitch): +/- 15 gradi
- Swivel (Roll): +/- 8 gradi
- Rotazione: 360 gradi
These adjustments allow you to fine-tune the projector's position to align with your screen and correct for any minor installation imperfections.

Figure 4: Adjustments for pitch (+/-15 degrees) and roll (+/-8 degrees) to achieve optimal projection angles.
2. Vertical Height Adjustment (Ceiling Mount)
For ceiling installations using the extension arm, the projector height can be adjusted from 4.5 inches (11.4 cm) to 25.5 inches (64.8 cm) from the ceiling.
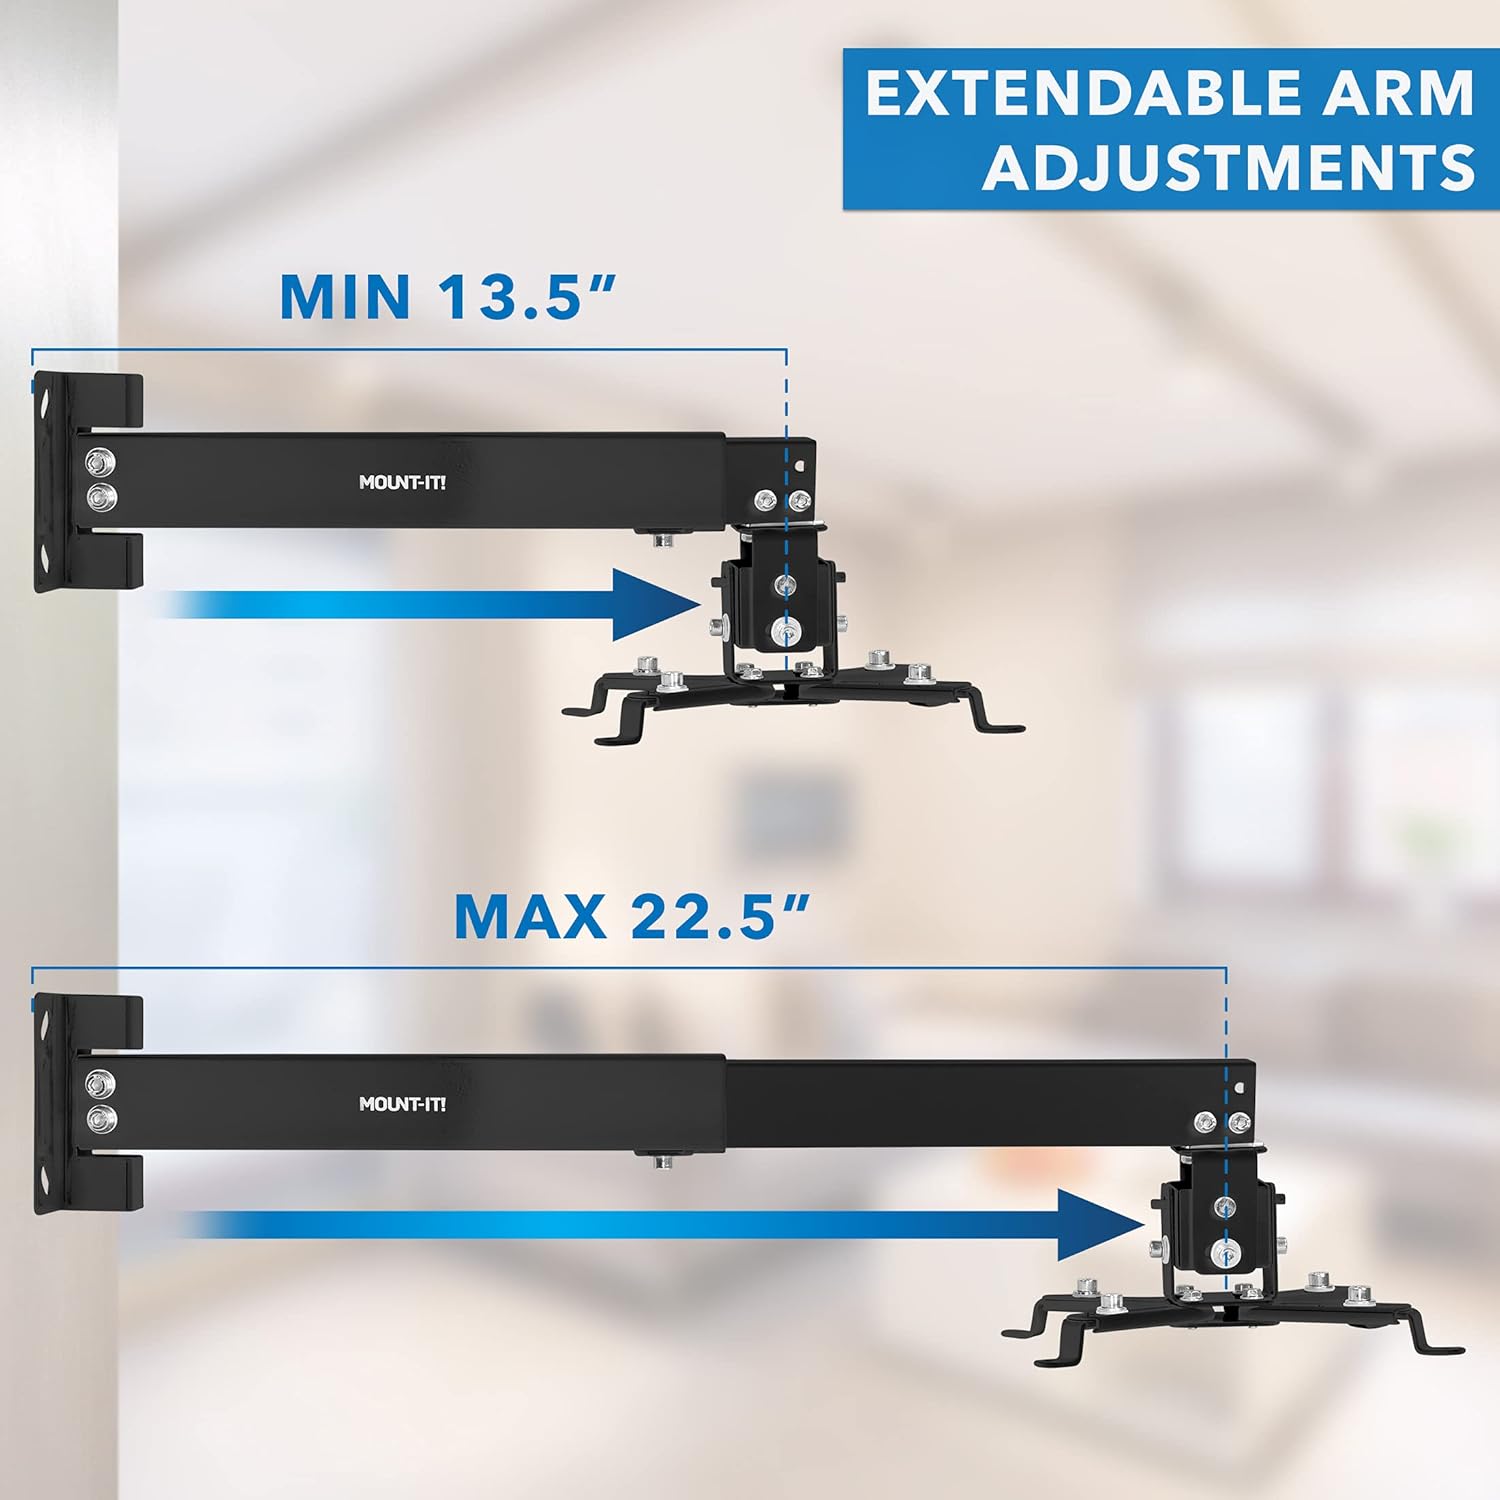
Figure 5: Vertical height adjustment for ceiling mounts, ranging from 4.5 inches to 25.5 inches.
3. Extendable Arm Adjustment (Wall Mount)
When configured as a wall mount, the arm extends from 13.5 inches (34.3 cm) to 22.5 inches (57.2 cm) from the wall.

Figure 6: Extendable arm adjustment for wall mounts, ranging from 13.5 inches to 22.5 inches.
4. Gestione dei cavi
The mount features an integrated cable management system. Route your projector's power and video cables through the mounting arm to maintain a clean and organized setup.

Figure 7: Integrated cable management system to conceal and organize cables within the mounting arm.
Manutenzione
To ensure the longevity and safe operation of your projector mount, follow these maintenance guidelines:
- Pulizia regolare: Spolverare periodicamente la montatura con un panno morbido e asciutto. Evitare detergenti abrasivi o solventi.
- Controllare i dispositivi di fissaggio: Annually, or if you notice any instability, check all screws and bolts to ensure they are securely tightened. Do not overtighten.
- Ispezionare l'usura: Periodically inspect the mount for any signs of wear, damage, or corrosion. If any issues are found, contact customer support.
Risoluzione dei problemi
If you encounter issues with your Mount-It! Universal Projector Mount, refer to the following common problems and solutions:
- Projector Does Not Fit the Mount:
Soluzione: Re-verify your projector's mounting hole pattern against the mount's compatibility range (8.85" to 12.44"). Ensure your projector has 3 or 4 mounting holes. - Mount Appears Unstable or Sags:
Soluzione: Ensure the mount is installed on a solid surface (wood stud, concrete) and all fasteners are securely tightened. Avoid installing on drywall without proper reinforcement. Check that the projector weight does not exceed the 40 lb capacity. - Cannot Achieve Desired Projection Angle:
Soluzione: Utilize the full-motion adjustability features (tilt +/-15°, swivel +/-8°, 360° rotation). For ceiling mounts, adjust the telescoping arm height. For wall mounts, adjust the extendable arm length. Ensure no adjustment knobs or screws are overtightened, restricting movement. - Cables are Visible/Cluttered:
Soluzione: Utilize the integrated cable management system by routing cables through the designated channels within the mounting arm.
If these solutions do not resolve your issue, please contact Mount-It! technical support.
Specifiche
| Caratteristica | Dettaglio |
|---|---|
| Numero di modello | 810164691118 |
| Peso dell'articolo | 3.65 libbre (1.66 kg) |
| Dimensioni del pacco | 12.48 x 4.21 x 2.44 pollici (31.7 x 10.7 x 6.2 cm) |
| Tipo di montaggio | Soffitto e parete |
| Dispositivi compatibili | Universal LCD/DLP Projectors |
| Schema dei fori di montaggio | 8.85" to 12.44" (22.5 cm to 31.6 cm) diameter |
| Capacità di peso | 40 libbre (18.1 kg) |
| Regolazione dell'inclinazione | +/-15° |
| Regolazione della rotazione | +/-8° |
| Rotazione | 360° |
| Ceiling Extension Arm Length | Da 4.5" a 25.5" (da 11.4 cm a 64.8 cm) |
| Wall Mount Arm Length | Da 13.5" a 22.5" (da 34.3 cm a 57.2 cm) |
| Colore | Nero |
| Caratteristiche speciali | Adjustable, Heavy Duty, Rotatable, Universal, Built-in Cable Management |
Garanzia e supporto
Garanzia a vita
Your Mount-It! Universal Projector Mount is backed by a lifetime manufacturer warranty. This warranty covers defects in materials and workmanship under normal use. Please retain your proof of purchase for warranty claims.
Supporto tecnico
For any questions, concerns, or technical assistance regarding your product, please contact our US-based technical support team. Contact information can be found on the official Mount-It! websito o sulla confezione del prodotto.