
1. Introduzione
Thank you for choosing the Fafeicy Mini Handheld Inkjet Printer. This manual provides essential information for the safe and efficient operation, setup, and maintenance of your device. Please read this manual thoroughly before using the printer and keep it for future reference.
2. Prodotto finitoview
2.1 Caratteristiche principali
- Prestazioni fluide: Equipped with a powerful quad-core CPU and high-capacity battery for continuous and efficient operation.
- Precise Printing: Delivers accurate printing of text, barcodes, and images.
- Stampa versatile: Capable of printing on various surfaces including wood, acrylic, fabric, and leather.
- Touchscreen intuitivo: Features an HD LED touchscreen for a user-friendly interface.
- Connettività senza interruzioni: Supports USB-C connection for easy import of images or QR codes.
- Design compatto: Portable and easy to carry, suitable for printing on curved, concave, and convex surfaces.
- Supporto multilingua: Supports 28 languages including Simplified Chinese, Traditional Chinese, English, Russian, Thai, Spanish, German, French, Japanese, Korean, Arabic, Turkish, Italian, Portuguese, Vietnamese, Bulgarian, Ukrainian, Polish, Hebrew, Hungarian, Greek, Indonesian, Dutch, Serbian, Malaysian, Filipino, Persian.
- Adjustable Printing: Printing lines adjustable from 1 to 3 lines, and printing height adjustable from 2-12.7mm.
2.2 Componenti della stampante
The Fafeicy Mini Handheld Inkjet Printer consists of the main printer unit with an integrated touchscreen, an ink cartridge slot, a power button, and a USB-C port. It also includes a lanyard for portability.

Immagine 2.2.1: Davanti view of the Fafeicy Mini Handheld Inkjet Printer showing its compact size and dimensions (70mm/2.8in height, 82mm/3.2in width, 48mm/1.9in depth). The device features a large touchscreen display.

Immagine 2.2.2: The Fafeicy Mini Handheld Inkjet Printer with an attached lanyard, highlighting its portability and the HD touch capacitive screen. The screen displays icons for document, print, and settings.

Immagine 2.2.3: Visual representation of the printer's key features, including compact design, multiple languages, handwriting support, adjustable word height, high-definition quick drying ink, capacitive touch screen, excellent chip, and multi-material printing capability.
3. Istruzioni per l'installazione
3.1 Installazione della cartuccia d'inchiostro
- Remove Protector Clip: Carefully remove the protective clip from the ink cartridge.
- Inserire la cartuccia: Insert the ink cartridge into the machine at a 45-degree angle, ensuring it seats correctly.
- Clamp Macchina: Sicuro clamp the machine to hold the cartridge in place. The cartridge can be removed by reversing these steps.

Immagine 3.1.1: Step-by-step guide for installing the ink cartridge. (1) Remove the ink cartridge protector clip. (2) Insert the cartridge into the machine at a 45-degree angle. (3) Clamp the machine to secure the cartridge.
3.2 Handle Installation (Optional)
For enhanced grip and control during handheld operation, you can attach the provided handle.
- Prepare the Handle: Ensure the handle is clean and ready for attachment.
- Align Handle and Printer: Position the handle with the mini printer, aligning the grooves.
- Maniglia di spinta: Gently push the handle into the groove located under the printer until it clicks into place.
- Verifica installazione: Confirm that the handheld inkjet printer is successfully installed and secure on the handle.
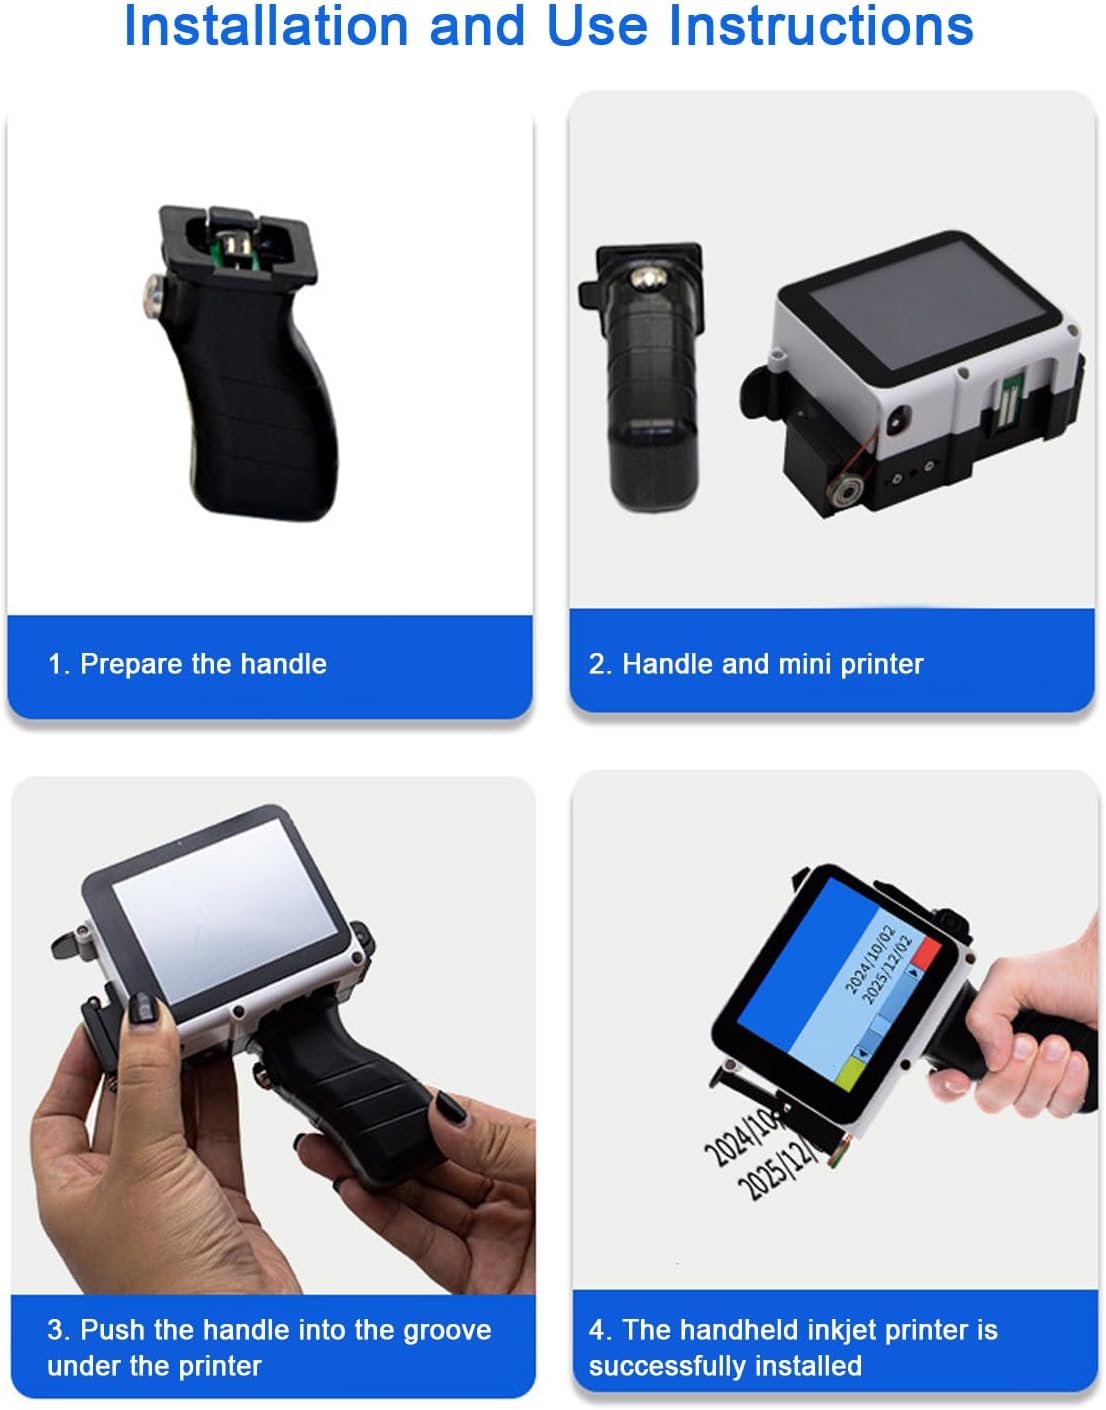
Immagine 3.2.1: Visual instructions for installing the handle. (1) Prepare the handle. (2) Align the handle with the mini printer. (3) Push the handle into the groove under the printer. (4) The handheld inkjet printer is successfully installed and ready for use.
4. Istruzioni per l'uso
4.1 Accensione/Spegnimento
- Accensione: Press and hold the power button located on the side of the printer until the screen illuminates.
- Spegni: Press and hold the power button until a shutdown prompt appears on the screen, then confirm to power off.
4.2 Interfaccia touchscreen
The printer features an HD LED touchscreen, similar to a smartphone. Navigate through menus and options by tapping and swiping. The main screen typically displays icons for creating/editing content, printing, and settings.
4.3 Creazione di contenuti stampati
- Access Content Editor: Tap the 'document' or 'edit' icon on the touchscreen to enter the content creation interface.
- Testo di input: Use the on-screen keyboard to type text. You can adjust font size, style, and alignment.
- Add Barcodes/QR Codes: Select the barcode/QR code option and input the data.
- Importa immagini: Connect the printer to your computer via the USB-C cable. Transfer image files (e.g., BMP, JPEG) to the printer's internal storage. Then, select the image import option from the content editor.
- Regola impostazioni: Modify printing parameters such as print lines (1-3), print height (2-12.7mm), and printing accuracy (300-600dpi) as needed.
4.4 Processo di stampa
- Seleziona Contenuto: From the main menu or content editor, select the content you wish to print.
- Prepara la superficie: Ensure the printing surface is clean and dry. For optimal results, maintain a 5mm distance between the print head and the object.
- Avvia stampa: Tap the 'print' icon on the touchscreen.
- Apply Printer: Gently and steadily move the printer across the desired printing surface. The printer will automatically apply the ink.
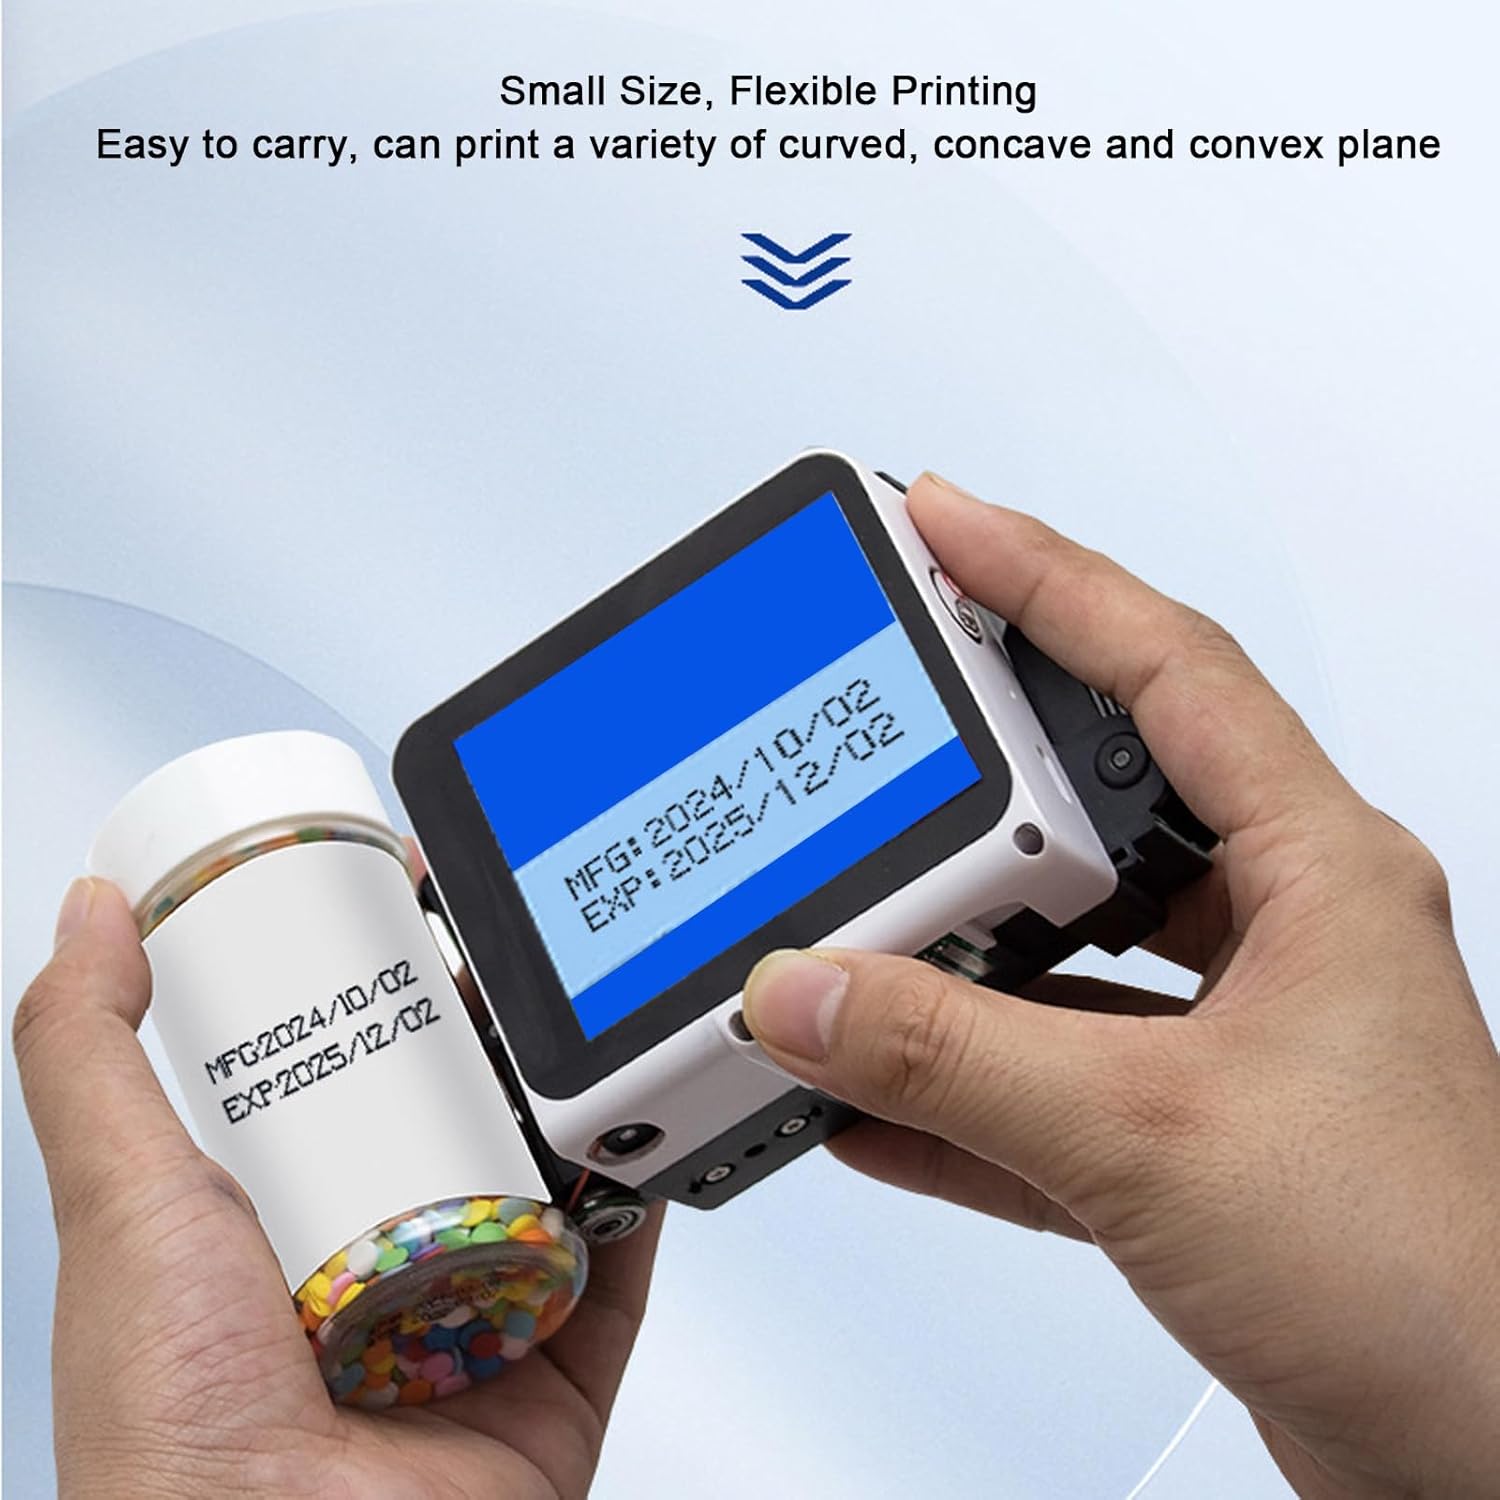
Immagine 4.4.1: A user demonstrating the Fafeicy Mini Handheld Inkjet Printer applying date and expiration information onto a small plastic bottle, showcasing its ability to print on curved surfaces.

Immagine 4.4.2: Examples of printing results on various materials, including a white bottle, a red cap, and a blue plastic surface, demonstrating the printer's versatility and clarity of output for dates and codes.
5. Manutenzione
5.1 Pulizia
- Regularly wipe the exterior of the printer with a soft, dry cloth.
- If the print head becomes clogged or dirty, use a lint-free cloth lightly dampened with isopropyl alcohol to gently clean the print head surface. Avoid excessive moisture.
- Clean the touchscreen with a soft, dry microfiber cloth. Do not use abrasive cleaners.
5.2 Sostituzione della cartuccia d'inchiostro
When the ink cartridge is empty or the print quality deteriorates significantly, replace it by following the installation steps in Section 3.1 in reverse order for removal, then install a new cartridge.
5.3 Conservazione
- Conservare la stampante in un luogo fresco e asciutto, lontano dalla luce solare diretta e da temperature estreme.
- Ensure the ink cartridge has its protective clip re-attached or is properly sealed if storing for an extended period to prevent drying.
6. Risoluzione Dei Problemi
- Nessun potere: Ensure the battery is charged. Connect the printer to a power source using the USB-C cable and allow it to charge for at least 30 minutes before attempting to power on again.
- Scarsa qualità di stampa:
- Check if the ink cartridge is properly installed and not empty.
- Pulire la testina di stampa come descritto nella Sezione 5.1.
- Ensure the printing distance (5mm) is maintained consistently.
- Adjust printing accuracy settings on the touchscreen.
- La stampante non risponde: Try restarting the device. If the issue persists, perform a factory reset via the settings menu (refer to the on-screen instructions).
- Cannot Import Files via USB-C: Ensure the USB-C cable is securely connected to both the printer and the computer. Check if the computer recognizes the printer as a storage device.
- Touchscreen non reattivo: Restart the printer. If the issue continues, contact customer support.
7. Specifiche
| Caratteristica | Specificazione |
|---|---|
| Batteria | Li Battery x 1 (1500MAH) (Built-in) |
| Interfaccia esterna | TYPE C Port, Photoelectric Interface |
| Stampa del contenuto | Date, Count, Batch Number, Serial Number, Image, Dynamic 2D code, Bar code, Graphics, Variable Database etc. |
| Technical Serial Number | 1 to 9 Variable |
| Printing Lines | Adjustable 1 to 3 Lines |
| Distanza di stampa | 5mm (Between Print Head and Object) |
| Altezza di stampa | Regolabile 2-12.7mm |
| Precisione di stampa | Adjustable 300-600dpi |
| Lingue | 28 languages (Simplified Chinese, Traditional Chinese, English, Russian, Thai, Spanish, German, French, Japanese, Korean, Arabic, Turkish, Italian, Portuguese, Vietnamese, Bulgarian, Ukrainian, Polish, Hebrew, Hungarian, Greek, Indonesian, Dutch, Serbian, Malaysian, Filipino, Persian) |
| Porte esterne | USB, 3.5mm Port |
| Sistema operativo | Built-in for RTOS Operating System |
| Tipi di inchiostro | Water-based, Oil-based, 42ml Ink Cartridge |
| Materiali di stampa | Carton, Plastic, Wood, Pipeline, Stone, Cable, Industrial Packaging, Pharmaceutical Food |
| Peso dell'articolo | 1.01 libbre |
| Dimensioni del pacco | 9.84 x 4.33 x 3.15 pollici |
| Numero di modello | Fafeicyriqoe0ta3z |
8. Garanzia e supporto
This product comes with a standard manufacturer's warranty. Please refer to the warranty card included in your product packaging for specific terms and conditions. For technical support, troubleshooting assistance, or warranty claims, please contact Fafeicy customer service through the retailer where the product was purchased or visit the official Fafeicy websito per le informazioni di contatto.