1. Introduzione
This manual provides detailed instructions for the safe and effective operation, setup, and maintenance of your Seesii SE208sd Spot Welder and Heat Gun Kit. This kit is designed for precise spot welding of battery packs and heat shrinking PVC, offering a comprehensive solution for various projects.
2. Informazioni sulla sicurezza
Always prioritize safety when operating electrical tools. Failure to follow these safety guidelines may result in electric shock, fire, or serious injury.
- Protezione degli occhi: Always wear appropriate eye protection (safety glasses or goggles) when operating the spot welder or heat gun to protect against sparks, molten metal, or hot air.
- Ventilazione: Use the spot welder and heat gun in a well-ventilventilated area to avoid inhaling fumes.
- Materiali infiammabili: Keep flammable materials away from the work area. The heat gun produces high temperatures, and welding creates sparks.
- Sicurezza elettrica: Ensure the power supply matches the tool's requirements. Do not operate with damaged cords or plugs. Avoid contact with live electrical parts.
- Superficie di lavoro: Use a stable, non-conductive work surface.
- Bambini e astanti: Tenere i bambini e gli astanti lontani dall'area di lavoro.
- Heat Gun Handling: Do not touch the nozzle of the heat gun during or immediately after use, as it will be extremely hot. Allow the tool to cool completely before storing.
- Spot Welder Probes: Ensure welding probes are clean and properly seated. Avoid short-circuiting the probes.

Image: The Seesii Spot Welder features built-in overheating, over-voltage, and over-current protection for enhanced safety during operation.
3. Contenuto della confezione
Verifica che tutti gli articoli elencati di seguito siano inclusi nel tuo pacchetto:
- Seesii Spot Welder Unit
- 640mm Welding Pen
- Interruttore a pedale
- Caricabatterie
- Diamante File
- 18650 Battery Holders (2 units)
- Spare Copper Tips (4 units)
- 0.15x2m Nickel Strip (2 units)
- 2m x 150mm (5.9IN) PVC Heat Shrink Wrap
- Mini pistola termica
- Manuale dell'utente (questo documento)

Image: The complete Seesii Spot Welder Kit, showing all included components for immediate use.
4. Impostazione
Follow these steps to set up your Seesii Spot Welder and Heat Gun Kit:
- Disimballaggio: Rimuovere con cautela tutti i componenti dall'imballaggio. Verificare che non siano danneggiati.
- Ricarica: Connect the charger to the spot welder unit and a power outlet. The unit features a 5-minute quick charge capability. Ensure the unit is adequately charged before first use.
- Connect Welding Pen: Insert the welding pen cables into the designated P- and P+ ports on the front of the spot welder unit. Ensure a secure connection.
- Collegare il pedale (facoltativo): If using Pedal Mode, connect the foot pedal switch to the 'Triggering Interface' port on the spot welder unit.
- Heat Gun Setup: Plug the mini heat gun into a suitable power outlet.
Video: Un oltreview of the Seesii 10080W Spot Welder and Heat Gun, demonstrating its components and basic setup for battery building.
5. Istruzioni per l'uso
5.1. Spot Welder Operation
The spot welder offers both Auto and Pedal modes for flexible operation. Ensure your workpieces (e.g., nickel strip and battery terminals) are clean and properly aligned.

Image: A user performing spot welding on battery cells with the Seesii unit, highlighting its stable and efficient performance.
5.1.1. Selecting Operating Mode (Auto/Pedal)
The 2.4-inch LCD screen allows you to select between Auto and Pedal modes. Navigate the menu using the control buttons.
- Modalità automatica: For fast, effortless welding. The unit automatically triggers a weld when both probes make contact with the workpiece.
- Modalità pedale: For independent and controlled operation. A weld is triggered only when the foot pedal is pressed, allowing for precise placement.

Image: The spot welder's display illustrating the selection between Auto mode for automatic welding and Pedal mode for foot-controlled operation.
Video: A demonstration on how to adjust between Auto and Pedal welding modes on the Seesii Spot Welder for different operational preferences.
5.1.2. Adjusting Welding Gear (Power Settings)
The spot welder features 999 gear settings to adjust welding power. This allows for precise control over the weld strength for various materials and thicknesses.
- Use the navigation buttons on the unit to adjust the 'Gear' setting on the LCD screen.
- Start with lower settings and gradually increase until the desired weld strength is achieved.
- The unit can handle nickel-plated 0.5mm, pure nickel 0.3mm, copper 0.15mm, and steel 0.3mm.

Image: The spot welder's interface displaying the '999 GEAR' setting, indicating the wide range of power adjustments available.
5.2. Heat Gun Operation
The 350W mini heat gun is ideal for shrinking PVC heat shrink wrap around battery packs or other applications requiring controlled heat.
- Impostazioni della temperatura: The heat gun offers dual temperature settings: LOW (400°F / 200°C) and HIGH (670°F / 350°C). Select the appropriate setting using the switch on the handle.
- Applicazione: Direct the hot air stream evenly over the PVC heat shrink wrap. Move the heat gun continuously to prevent overheating any single spot.
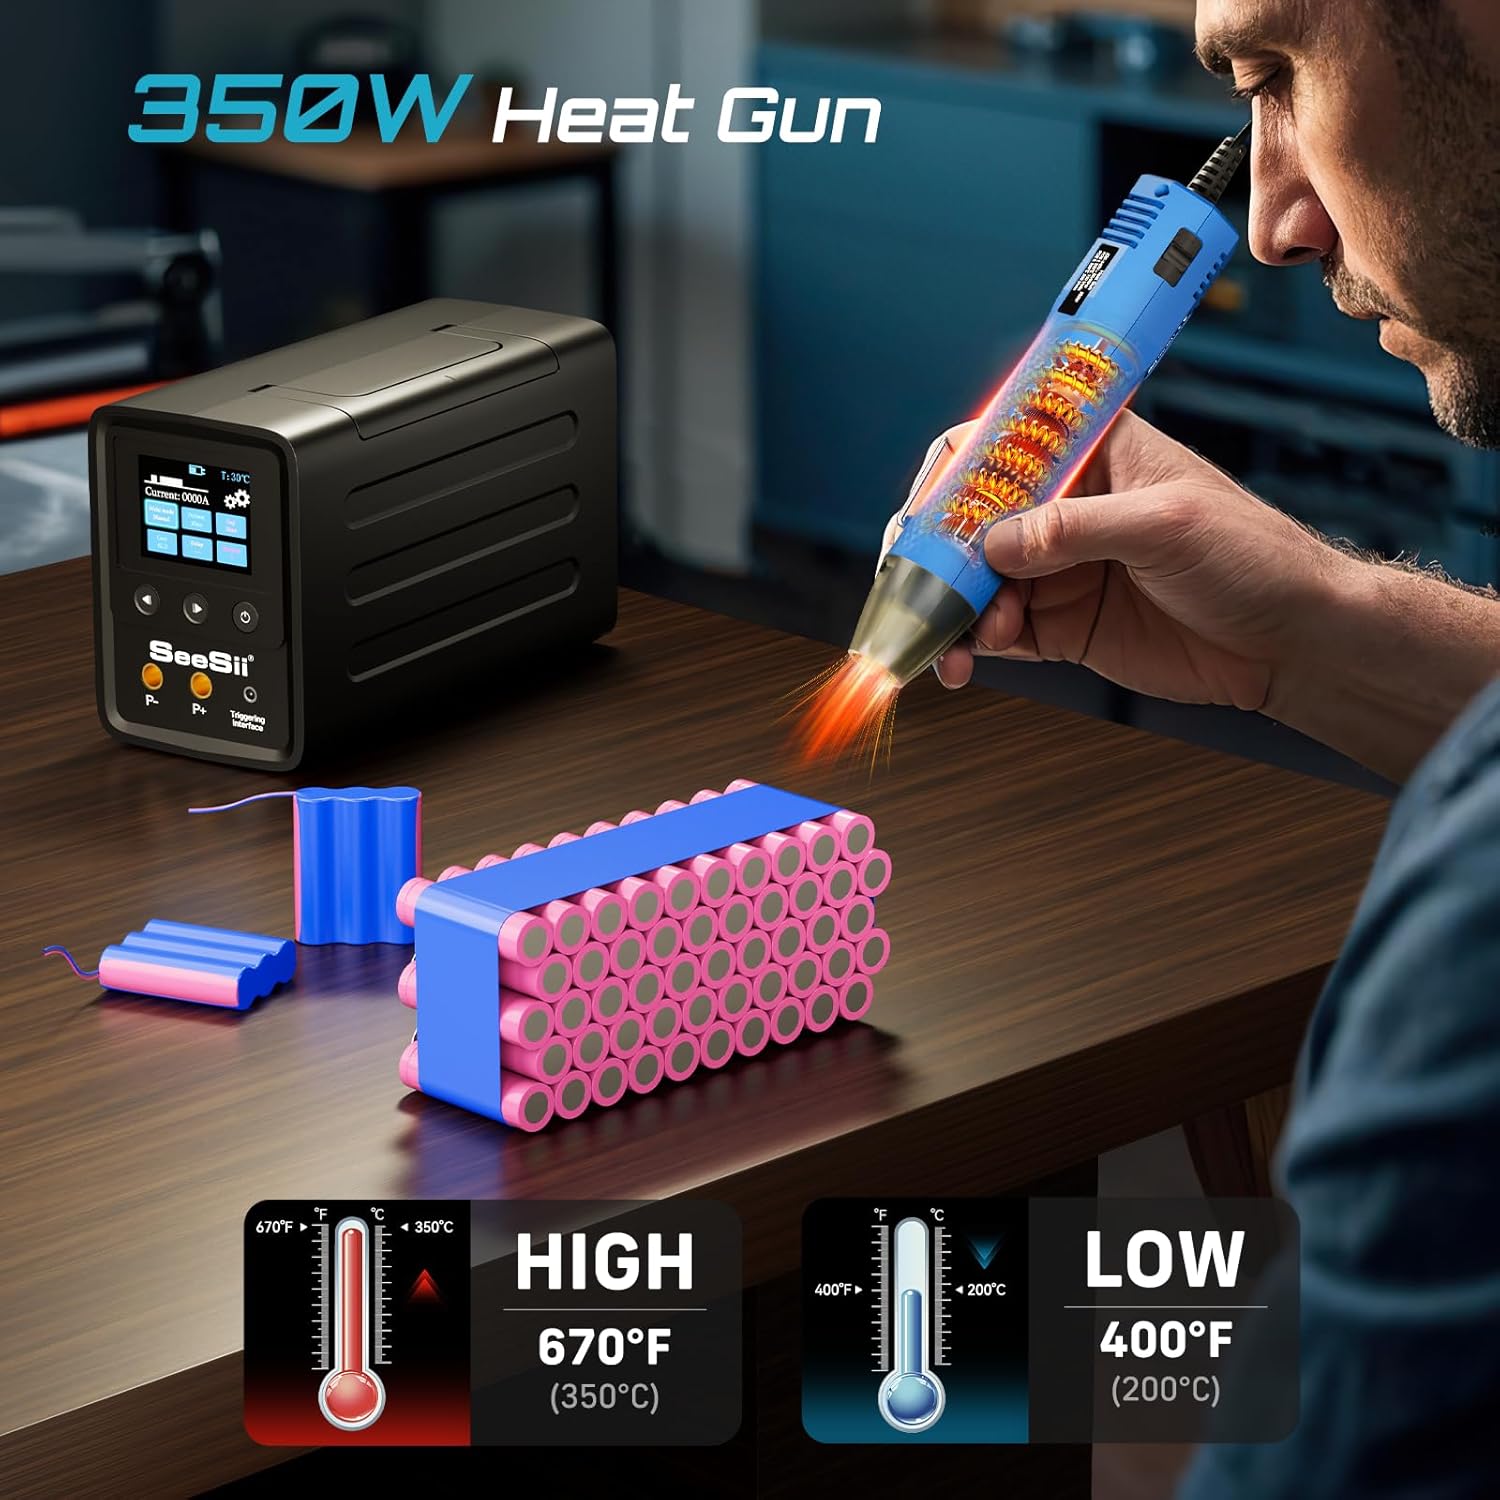
Image: A user applying heat with the 350W mini heat gun to shrink PVC wrap around a battery pack, demonstrating its dual temperature settings.
Video: A tutorial demonstrating the use of the Seesii Welder and Heat Gun for creating flawless battery packs, including heat shrinking techniques.
6. Compatibilità dei materiali
The Seesii Spot Welder is capable of welding various materials with appropriate gear settings:
- Nickel-plated strips: Up to 0.5mm thickness
- Pure nickel strips: Up to 0.3mm thickness
- Copper: Up to 0.15mm thickness
- Steel: Up to 0.3mm thickness

Image: Visual guide to the maximum thickness of various materials that can be welded with the Seesii Spot Welder.
7. Manutenzione
Regular maintenance ensures optimal performance and longevity of your tools.
- Welding Probes: Regularly inspect welding probes for wear or damage. Replace copper tips as needed using the provided spares. Use the diamond file to clean and sharpen probe tips for consistent welds.
- Pulizia: Keep the spot welder unit and heat gun clean and free of dust and debris. Use a dry cloth for cleaning.
- Magazzinaggio: Store the kit in a dry, safe place away from direct sunlight and extreme temperatures.
8. Risoluzione Dei Problemi
In caso di problemi, fare riferimento ai seguenti passaggi comuni per la risoluzione dei problemi:
| Problema | Possibile causa | Soluzione |
|---|---|---|
| Saldature deboli o incoerenti | Low power setting (Gear), dirty/worn probe tips, poor contact, insufficient charge. | Increase Gear setting. Clean or replace probe tips. Ensure firm contact with workpiece. Recharge the unit. |
| L'unità non si accende | No power, unit not charged. | Check power connection. Charge the unit. |
| Heat gun not heating | No power, faulty switch. | Check power connection. Ensure switch is in ON position. |
| Protezione da surriscaldamento attivata | Utilizzo intenso e continuo. | Allow the unit to cool down. Reduce usage intensity. |
9. Specifiche
| Caratteristica | Dettaglio |
|---|---|
| Numero di modello | SE208sd |
| Produttore | Sesii |
| Peso dell'articolo | 2.2 libbre |
| Dimensioni del prodotto | 8.27 x 5.12 x 3.74 pollici |
| Materiale | addominali |
| Fonte di alimentazione | AC |
| Spot Welder Wattage | 10080 watts (max pulse energy) |
| Condensatori | 1500F Dual Farad Capacitors |
| Attuale | Alta corrente da 1800 A |
| Impostazioni dell'ingranaggio | 999 INGRANAGGI |
| Heat Gun Wattage | 350W |
| Heat Gun Temperature Settings | LOW 400°F (200°C), HIGH 670°F (350°C) |
| Display | Schermo LCD da 2.4" |
10. Garanzia e supporto
For warranty information and technical support, please refer to the documentation included with your product or contact Seesii customer service directly. Keep your purchase receipt as proof of purchase.