Introduzione
This manual provides essential information for the safe and efficient operation of your SCULPFUN S9 PRO 10W Laser Engraver. The S9 PRO features 10W laser beam shaping technology, offering a 0.06mm ultra-fine laser focus for strong cutting penetration and precision. It is capable of cutting materials such as 15mm thick wood and 10mm acrylic, and engraving ceramics and stainless steel. Please read this manual thoroughly before use to ensure proper setup, operation, and maintenance.

Informazioni sulla sicurezza
Operating a laser engraver involves potential hazards. Adhere to all safety guidelines to prevent injury or damage.
- Protezione degli occhi: Always wear appropriate laser safety glasses when operating the machine. The integrated laser filter on the S9 PRO blocks 98% of ultraviolet light, allowing observation without additional safety glasses for bystanders, but direct laser exposure should always be avoided.
- Interruttore di alimentazione: The machine is equipped with a secure power switch. Always turn off the machine when not in use or during maintenance.
- Posizionamento sicuro: Utilize the fastening holes on the four feet and frame structure to secure the machine and data cables, preventing accidental movement.
- Protezione della superficie: Use the provided A4-sized steel pad to protect your work surface from laser damage.
- Ventilazione: Assicurare un'adeguata ventilazione nell'area di lavoro per dissipare i fumi prodotti durante l'incisione e il taglio.
- Materiali infiammabili: Do not engrave or cut highly flammable materials without proper precautions.
- Bambini e animali domestici: Keep children and pets away from the operating area. The laser point can attract attention, but direct exposure is dangerous.

Contenuto della confezione
Verificare che tutti i componenti siano presenti al momento del disimballaggio:
- 1 x SCULPFUN S9 Pro 10 W Laser Engraver
- A4-sized steel pad
- Adattatore di alimentazione
- Cavo USB
- Strumenti di montaggio
- Manuale dell'utente (questo documento)
Guida all'installazione
1. Assemblaggio
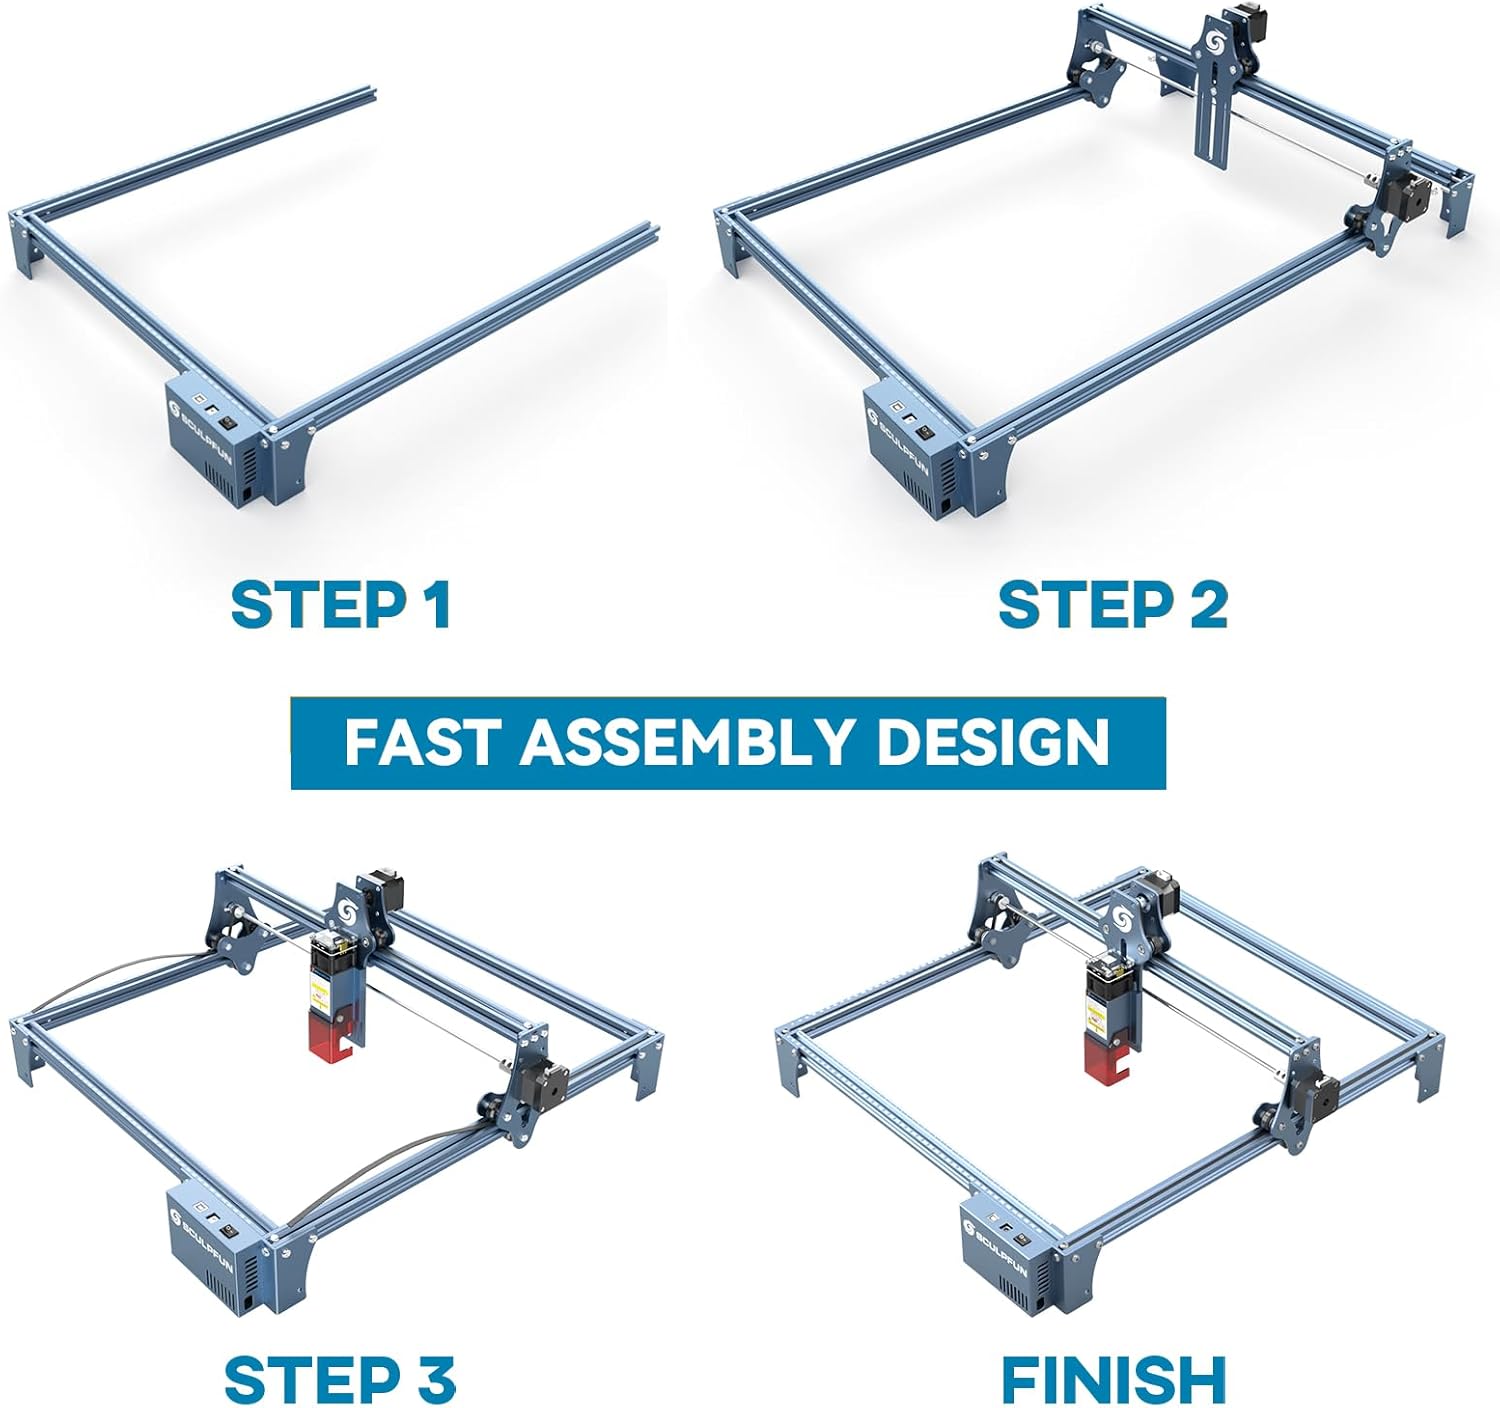
The SCULPFUN S9 PRO features a fast assembly design, allowing for installation typically within 10 to 20 minutes. Follow the steps below:
- Fase 1: Assemblare i componenti principali del telaio.
- Fase 2: Attach the X-axis and laser module to the frame.
- Fase 3: Collegare tutti i cavi necessari.
- Fine: Assicurarsi che tutti i collegamenti siano sicuri e che il telaio sia stabile.
The full-metal structure enhances robustness and engraving accuracy. The X and Y axes include precise scale lines, forming a rectangular measuring ruler for quick object sizing.


2. Regolazione della messa a fuoco
The S9 PRO features a quick fixed-focus design. The laser combines a fixed-focus lens with a sliding design for easy adjustment.
- Place the laser module over your material.
- Move the laser module up or down until the focus is achieved.
- Tighten the screws to secure the laser module in place.

Istruzioni per l'uso
1. Compatibilità del software
The SCULPFUN S9 PRO is compatible with various advanced engraving software:
- LaserGRBL (Windows)
- LightBurn (Windows, macOS, Linux)
- Benbox
- GrblController
- LiteFire
It supports engraving in PWM mode and various file formats including JPG, PNG, DXF, SVG, AI, G-code, NC, and BMP.

2. Material Capabilities
The 10W laser module provides strong cutting and engraving capabilities across a wide range of materials:
- Taglio: Up to 15mm thick wood, 10mm black acrylic.
- Incisione: Wood, leather, ceramics, stainless steel, aluminum oxide, PCB board, paper, cardboard, dark stone, and more.


3. General Operation Workflow
- Progetto: Create or import your design using compatible software (e.g., LightBurn, LaserGRBL).
- Posizionamento materiale: Place your material on the work surface, ensuring it is flat and secure. Use the integrated rulers for precise positioning.
- Regolazione della messa a fuoco: Adjust the laser focus as described in the Setup section.
- Impostazioni software: Configure laser power, speed, and passes in your chosen software according to the material and desired effect. Refer to software documentation for detailed settings.
- Inizia l'operazione: Avviare il processo di incisione o taglio dal software. Monitorare la macchina durante il funzionamento.
- Completamento: Once the process is complete, turn off the machine and carefully remove your finished piece.
Manutenzione
Regular maintenance ensures optimal performance and extends the lifespan of your SCULPFUN S9 PRO.
- Pulisci la lente laser: Per mantenere la precisione del laser, pulire periodicamente la lente laser con un panno morbido e privo di lanugine e una soluzione detergente per lenti.
- Pulisci l'area di lavoro: Remove debris and dust from the engraving area after each use to prevent interference with machine movement.
- Ispezionare cinghie e guide: Check the drive belts for tension and wear. Keep the guide rails clean and lubricated if necessary to ensure smooth movement of the laser module.
- Aggiornamenti del firmware: Controlla il sito ufficiale SCULPFUN websito per eventuali aggiornamenti firmware disponibili per garantire che il tuo computer abbia le funzionalità e i miglioramenti più recenti.
Risoluzione dei problemi
Questa sezione affronta i problemi più comuni che potresti incontrare.
- Il laser non funziona:
- Check if the power cable is securely connected and the power switch is on.
- Verify that the USB cable is connected to your computer and the machine.
- Ensure the software is correctly configured and sending commands.
- Check the laser module connection.
- Scarsa qualità di incisione/taglio:
- Re-check the laser focus. An incorrect focus is a common cause of poor quality.
- Adjust laser power and speed settings in your software. Different materials require different settings.
- Assicurarsi che il materiale sia piatto e posizionato saldamente.
- Pulire la lente laser se appare sporca.
- La macchina non si muove correttamente:
- Check for any obstructions on the rails or belts.
- Ensure belts are properly tensioned and not slipping.
- Verificare che tutti i cavi siano collegati saldamente.
- Riavviare il software e la macchina.
- Problemi di connessione software:
- Assicurati che nel tuo software sia selezionata la porta COM corretta.
- Try restarting your computer and the engraver.
- Reinstall the software or drivers if necessary.
For persistent issues, refer to the SCULPFUN support websito o contattare il servizio clienti.
Specifiche
| Marca | SCULPFUN |
| Numero di modello | S9PRO10W-ELE |
| Potenza laser | 10W (laser a diodo) |
| Messa a fuoco laser | 0.06mm (Ultrafine) |
| Precisione dell'incisione | 0.01mm |
| Area di incisione | 400 x 410 millimetri |
| Fonte di alimentazione | AC |
| Dimensioni del pacco | Dimensioni: 61.79 x 38.4 x 13.4 cm |
| Peso del pacco | 4.95 kg |
| Componenti inclusi | 1 x SCULPFUN S9 Pro 10 W laser engraver |
| Compatibilità software | LaserGRBL, LightBurn, Benbox, GrblController, LiteFire |
| Sistema operativo supportato | Windows, macOS, Linux |
| Supportato File Formati | JPG, PNG, DXF, SVG, AI, G-code, NC, BMP |
Garanzia e supporto
For warranty information, technical support, or service inquiries, please contact SCULPFUN customer support through their official websito o il rivenditore presso cui è stato acquistato il prodotto. Conservare la ricevuta d'acquisto come prova d'acquisto.
Produttore: SCULPFUN
Prima data disponibile: 29 novembre 2024