1. Introduzione
This manual provides essential information for the safe and efficient operation of your ZLPOWER 6000W-24V-SPLIT Low Frequency Pure Sine Wave Inverter Charger. Please read this manual thoroughly before installation and use, and retain it for future reference. This inverter charger is designed to convert 24V DC battery power into 120V/240V AC split-phase power, suitable for various applications including RVs, trailers, campers, homes, and boats. It also features a built-in 90A battery charger and a 30A automatic transfer switch.

Figure 1: ZLPOWER 6000W-24V-SPLIT Inverter Charger
2. Informazioni sulla sicurezza
Per evitare lesioni e danni all'apparecchiatura, osservare sempre le seguenti precauzioni di sicurezza:
- L'installazione deve essere eseguita da personale qualificato nel rispetto di tutte le normative elettriche locali e nazionali.
- Ensure the inverter is disconnected from all power sources (battery and AC input) before performing any maintenance or wiring.
- Non esporre l'inverter a pioggia, neve, spruzzi o altri liquidi.
- Garantire un'adeguata ventilazione intorno all'inverter per evitare il surriscaldamento.
- Verify correct polarity when connecting battery cables. Reversing polarity will damage the inverter.
- Use appropriate wire gauges for all connections as specified in the installation guidelines.
- This inverter is ETL certified to UL 1741 standards, ensuring compliance with safety regulations.
3. Prodotto finitoview
3.1 Caratteristiche principali
- 6000W Continuous Pure Sine Wave Output, 18000W Peak Surge Power (20 seconds).
- 24V DC Input, 240V AC Input, 120V/240V AC Split Phase Output.
- Integrated 90A Multi-Stage Battery Charger.
- 30A Automatic Transfer Switch.
- AC Priority / Battery Priority Selector.
- Adjustable Charging Current (0% to 100%).
- DIP Switch Settings for customizable operation (low battery trip, AC input range, output frequency, power saver).
- Automatic Generator Start (AGS) function.
- Pure Copper Low Frequency Transformer for robust performance with inductive loads.
- Multiple Safety Protections: Over/low voltage, overload, short circuit, over-temperature.
- Remote Control Functionality.
3.2 Componenti e dimensioni
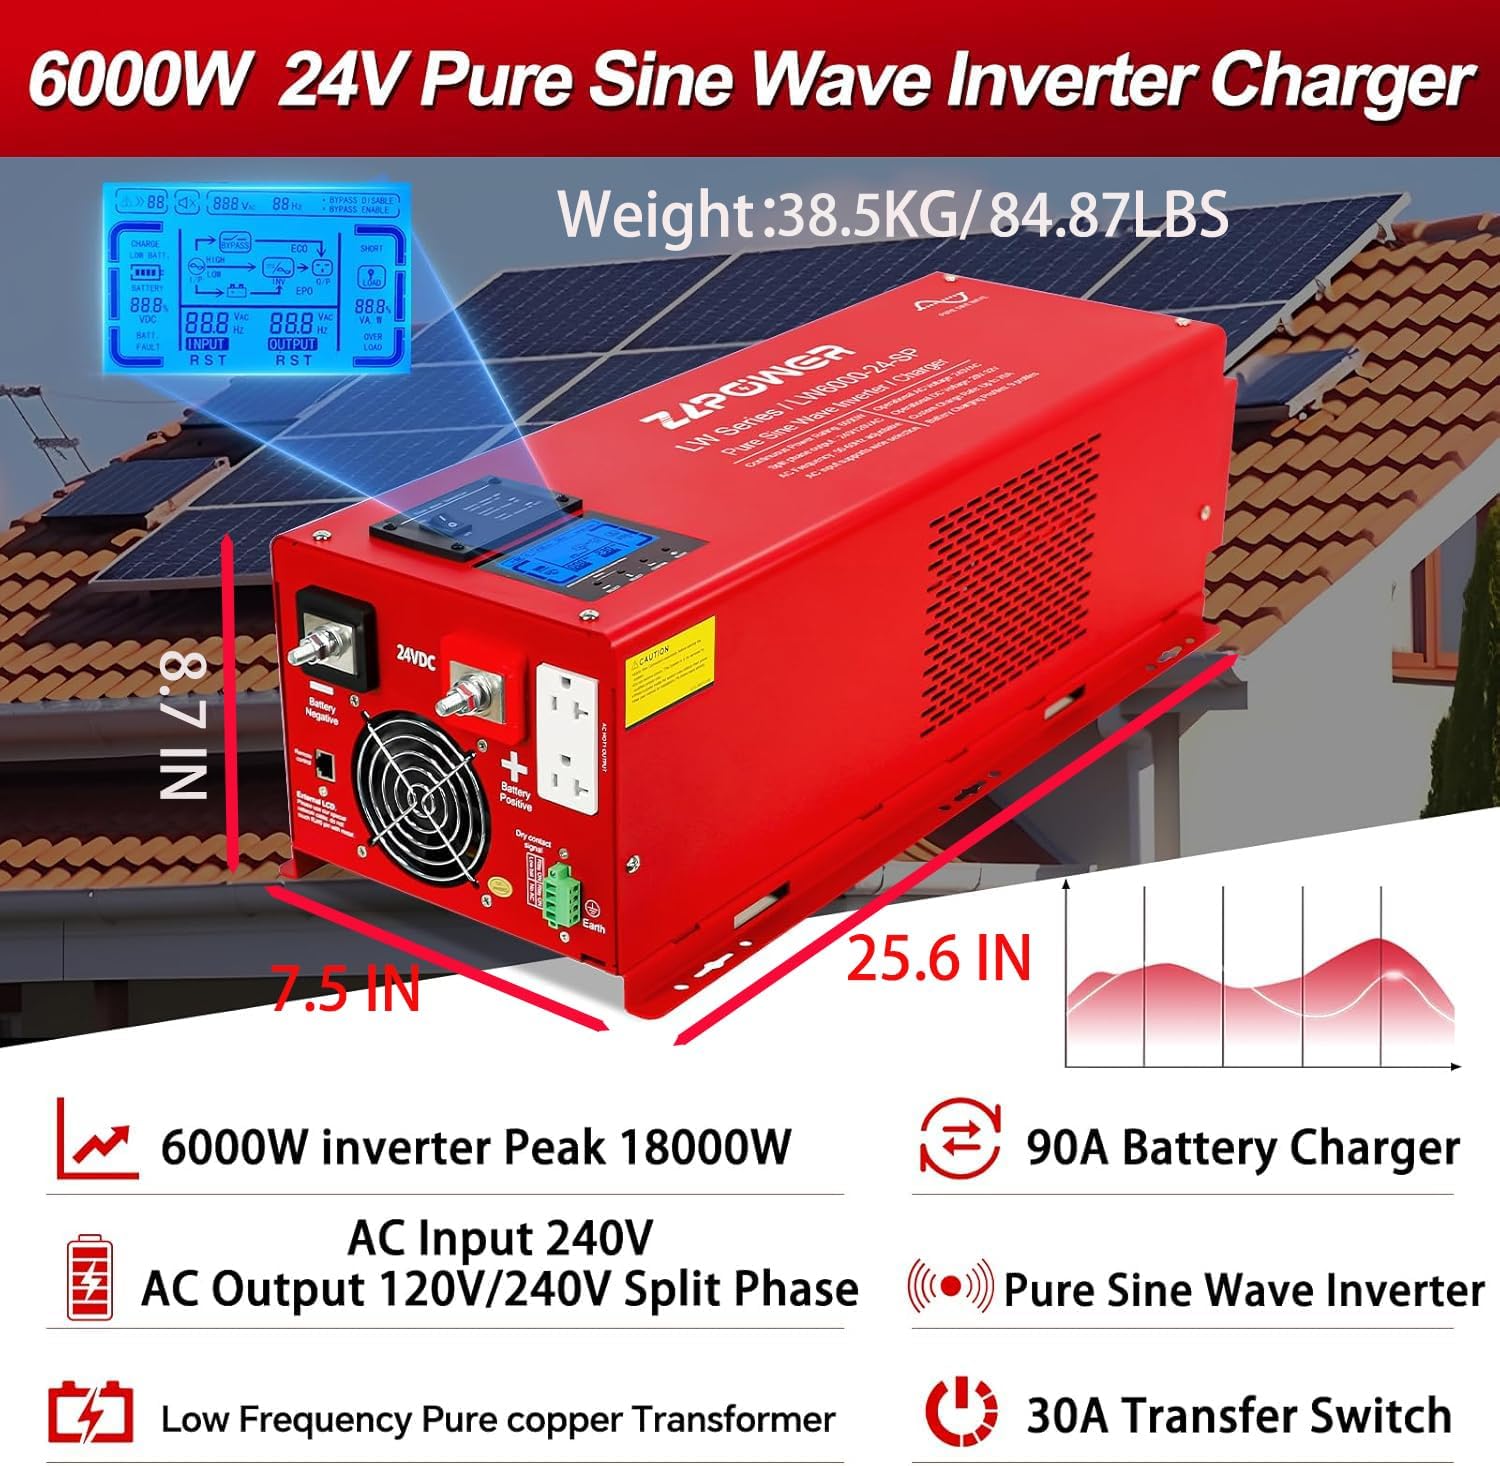
Figure 2: ZLPOWER Inverter Charger with key features and dimensions. The unit weighs 81 pounds and measures approximately 25.6 inches in length, 8.7 inches in width, and 7.5 inches in height.
4. Configurazione e installazione
Proper installation is crucial for the safe and efficient operation of the inverter charger. Refer to the wiring diagram below for a visual guide.

Figure 3: Connection Diagram illustrating the setup with solar panels, solar controller, battery, utility power/generator, and home appliances.
4.1 Collegamento della batteria
- Ensure the inverter is OFF and all power sources are disconnected.
- This inverter operates with a 24V battery system. Connect two 12V batteries in series to achieve 24V.
- Connect the positive (red) battery cable to the inverter's positive terminal and the negative (black) battery cable to the inverter's negative terminal.
- ATTENZIONE: Be extremely careful not to reverse the polarity, as this will cause severe damage to the inverter.
- Fissare saldamente tutte le connessioni.
4.2 Collegamento ingresso CA
The AC input allows the inverter to charge batteries from the grid or a generator, and to pass through AC power to loads when available. Use a 3-core AC cable (Live (L), Neutral (N), and Ground (G)).
- Remove the protective cover of the AC input terminal block.
- Connect the Live (L) wire to the terminal labeled 'AC Input L'.
- Connect the Neutral (N) wire to the terminal labeled 'AC Input N'.
- Connect the Ground (G) wire to the grounding screw.
- Ensure all connections are secure and replace the protective cover.
4.3 Collegamento dell'uscita CA
The AC output is where you connect your home appliances or loads. This inverter provides 120V/240V split-phase output. Use appropriate 3-core AC cables for your loads.
- Remove the protective cover of the AC output terminal block.
- Connect the Live (L1) wire for 120VAC output to 'AC Output L1'.
- Connect the Live (L2) wire for 240VAC output to 'AC Output L2'.
- Connect the Neutral (N) wire to 'AC Output N'.
- Connect the Ground (G) wire to the grounding screw.
- Ensure all connections are secure and replace the protective cover.
4.4 Remote Control and Sensor Connections
- Telecomando: Connect the remote control cable to the 'Remote Control' port on the inverter.
- Sensore di temperatura della batteria: Connect the optional battery temperature sensor to the designated port to optimize charging based on battery temperature.
- Automatic Generator Start (AGS): Connect your generator's start/stop control wires to the AGS terminals. The inverter will automatically start the generator when battery voltage scende al di sotto di una soglia impostata.
Video 1: ZLPOWER Hybrid Inverter Installation Guide. This video demonstrates the physical installation steps for the inverter, including battery and AC wiring.
5. Istruzioni per l'uso
After successful installation, follow these steps to operate your inverter charger:
5.1 Accensione iniziale
- Ensure all battery and AC connections are secure.
- Accendere l'interruttore della batteria (se installato).
- Switch the inverter ON using the main power switch. The LCD display will illuminate.
- If AC input is connected, the inverter will automatically detect it and begin charging the batteries (if needed) and transfer AC power to the loads.
5.2 AC/Battery Priority Settings
The inverter offers flexible priority settings:
- AC Priority (Default): When AC input is available, the inverter charges the battery and transfers AC to power the loads.
- Priorità della batteria: The inverter will supply power from the battery even when AC input is present. This is ideal for maximizing self-consumption from renewable energy sources.
These settings can be configured via the DIP switches or the optional LCD remote panel.
5.3 Impostazioni dell'interruttore DIP
The inverter features five DIP switches for advanced configuration:
- SW1: Low Battery Trip Voltage (adjusts the voltage at which the inverter switches to AC input or shuts down).
- SW2: AC Input Range (sets the acceptable voltage range for AC input).
- SW3: Output Frequency Setting (50Hz or 60Hz).
- SW4: Power Saver Setting (enables or disables power saving mode).
- SW5: Utility/Battery Priority.
Refer to the detailed table in the full manual for specific DIP switch combinations and their corresponding functions.
Display LCD 5.4
The integrated LCD display provides real-time operational status, including input/output voltage, frequenza, stato della batteria e percentuale di caricotage. It also allows for parameter adjustments.
Video 2: How to Use Your Low Frequency Solar Hybrid Inverter. This video demonstrates the LCD display functions and how to operate the inverter with various loads.
6. Manutenzione
Regular maintenance ensures the longevity and optimal performance of your inverter charger:
- Keep the inverter clean and free from dust and debris. Ensure ventilation openings are not obstructed.
- Controllare periodicamente tutti i collegamenti elettrici per verificarne la tenuta e la corrosione.
- Inspect battery cables for any signs of wear or damage.
- Monitor the battery bank's health and ensure proper charging cycles.
7. Risoluzione Dei Problemi
In caso di problemi, fare riferimento ai seguenti problemi comuni e alle relative soluzioni:
| Problema | Possibile causa | Soluzione |
|---|---|---|
| L'inverter non si accende | Collegamento della batteria allentato, basso volume della batteriatage, fusibile bruciato. | Check battery connections, charge batteries, replace fuses. |
| Nessuna uscita CA | Overload, inverter fault, AC output breaker tripped. | Reduce load, check fault codes on LCD, reset AC output breaker. |
| Batteria non in carica | No AC input, AC input breaker tripped, charger fault. | Check AC input connection, reset AC input breaker, consult support. |
| Allarme di sovraccarico | Il carico collegato supera la capacità dell'inverter. | Ridurre il carico totale collegato all'inverter. |
For persistent issues, contact ZLPOWER customer support.
8. Specifiche
| Specificazione | Valore |
|---|---|
| Potenza di uscita | 6000 Watt |
| Potenza di picco | 18000 Watt (per 20 secondi) |
| Ingresso volumetage (CC) | 24 Volt (CC) |
| Ingresso volumetage (CA) | 220-240 Volt (CA) |
| Volume di uscitatage (CA) | Fase divisa 120 V/240 V |
| Frequenza | 60 Hz (regolabile) |
| Corrente del caricabatteria | 90A (regolabile) |
| Interruttore di trasferimento | 30A |
| Certificazioni | ETL to UL 1741 standards |
| Peso dell'articolo | 81 libbre |
| Dimensioni del pacco | 29 x 13 x 12 pollici |
9. Garanzia e supporto
ZLPOWER products are designed for reliability and performance. For warranty information, please refer to the documentation included with your product or visit the official ZLPOWER websito.
For technical support, troubleshooting assistance, or to inquire about replacement parts, please contact ZLPOWER customer service. Contact details can typically be found on the product packaging or the manufacturer's websito.