Flylinktech BD10
FLYLINKTECH 5000A Jump Starter User Manual
Model: BD10 | Brand: Flylinktech
1. Introduzione
Thank you for choosing the FLYLINKTECH 5000A Jump Starter. This portable device is designed to provide instant power to jump-start 12V vehicles, charge electronic devices, and offer emergency lighting. Please read this manual thoroughly before use to ensure safe and optimal performance.
2. Informazioni importanti sulla sicurezza
- Assicurarsi sempre che l'avviatore di emergenza sia completamente carico prima dell'uso.
- Non tentare di avviare una batteria congelata.
- Collegare il clamps correctly: red to positive (+), black to negative (-). Reverse polarity can cause damage.
- Non collegare il rosso e il nero clampsono insieme.
- Tenere fuori dalla portata dei bambini.
- Utilizzare in un'area ben ventilata.
- Evitare di esporre il dispositivo a temperature estreme o alla luce solare diretta per periodi prolungati.
- Se il dispositivo diventa eccessivamente caldo durante l'uso, scollegarlo immediatamente.
- Per le procedure specifiche di avviamento con i cavi, consultare il manuale d'uso del veicolo.
3. Contenuto della confezione
Verifica che tutti gli articoli siano presenti nel tuo pacco:
- FLYLINKTECH 5000A Jump Starter (Model BD10)
- Cavi per ponticelli intelligenti
- Cavo di ricarica USB-C
- Custodia in EVA
- Manuale d'uso

Image: Contents of the FLYLINKTECH 5000A Jump Starter package, including the jump starter unit, smart jumper cables, USB-C charging cable, and EVA storage case.
4. Prodotto finitoview
Familiarize yourself with the components and ports of your jump starter:
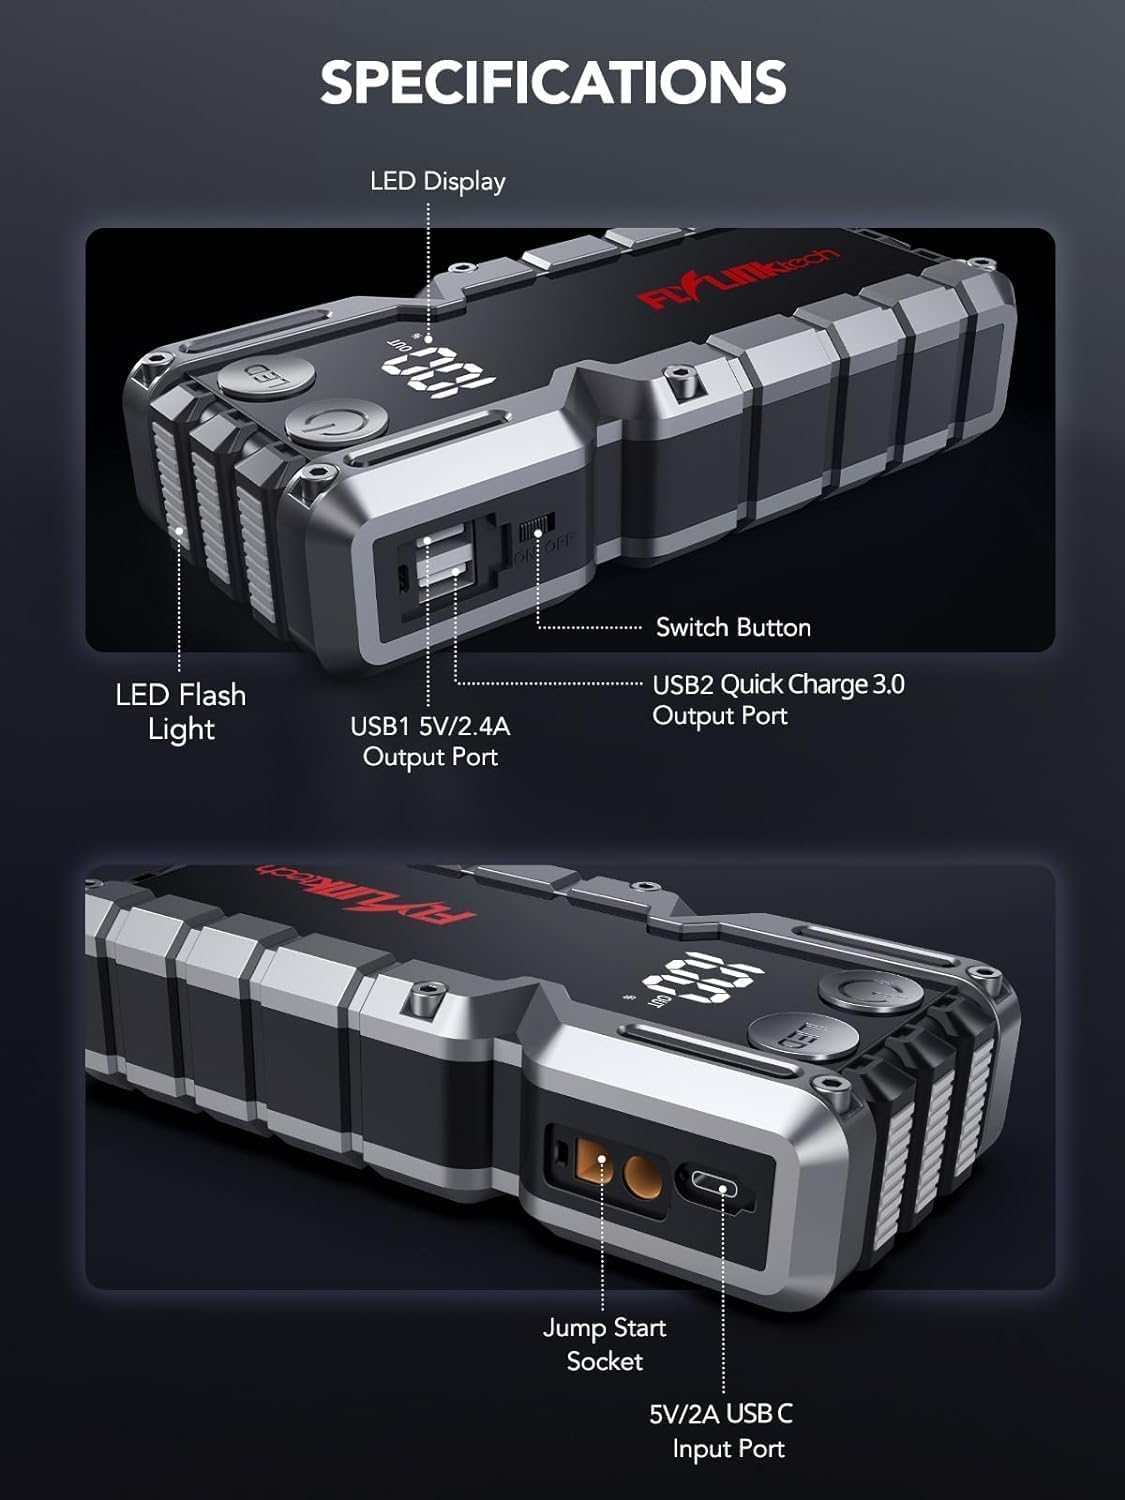
Immagine: dettagliata view of the jump starter showing the LED display, LED flashlight, power button, switch button, USB1 5V/2.4A output port, USB2 Quick Charge 3.0 output port, Jump Start Socket, and 5V/2A USB-C input port.
- Display a LED: Mostra la percentuale della batteriatage.
- Torcia a LED: Fornisce illuminazione con più modalità.
- Pulsante di accensione: Attiva il dispositivo e controlla le modalità torcia.
- Interruttore: Controllo dell'alimentazione principale.
- Uscita USB1 (5 V/2.4 A): Porta di ricarica USB standard.
- USB2 Output (QC3.0): Quick Charge 3.0 port for faster charging.
- Presa di avviamento: Si collega ai cavi di avviamento intelligenti.
- Ingresso USB-C (5 V/2 A): Used to recharge the jump starter.
5. Ricarica dell'avviatore di emergenza
Before first use, fully charge the jump starter. It is recommended to recharge the unit every 3-6 months to maintain battery health.
- Collegare il cavo di ricarica USB-C in dotazione alla porta di ingresso USB-C dell'avviatore di emergenza.
- Collegare l'altra estremità del cavo USB-C a un adattatore da parete USB 5V/2A (non incluso) o a un caricabatteria per auto.
- Il display LED mostrerà l'avanzamento della carica. L'unità è completamente carica quando il display mostra il 100%.

Image: The jump starter connected via USB to charge a smartphone and a tablet, demonstrating its power bank functionality.
6. Avviamento del veicolo con i cavi
Follow these steps carefully to safely jump-start your 12V vehicle:
- Preparare il jump starter: Ensure the jump starter is at least 50% charged. Turn off your vehicle's ignition and all accessories (headlights, radio, etc.).
- Collegare i cavi Smart Jumper: Insert the blue plug of the smart jumper cables into the Jump Start Socket on the jump starter. Ensure a firm connection. The indicator light on the smart clamp lampeggerà in rosso e verde.
- Collegamento alla batteria del veicolo:
- Allega il rosso (+) clamp al terminale positivo della batteria del veicolo.
- Allega il nero (-) clamp al terminale negativo della batteria del veicolo.
Una volta collegato correttamente, la spia luminosa sullo smart clamp diventerà verde fisso.
- Avviare il veicolo: Go into your vehicle and start the engine. If the vehicle does not start immediately, wait 30 seconds and try again. If it still doesn't start, press the "BOOST" button on the smart clamp for 3 seconds until the green light turns solid, then try starting the car again within 30 seconds.
- Rimuovere i cavi: Una volta avviato il motore, rimuovere immediatamente i cavi di avviamento intelligenti dalla batteria del veicolo, quindi scollegarli dall'avviatore di emergenza.

Image: Visual guide for jump-starting: 1. Insert jump clamp into booster. 2. Connect clamps to car battery. 3. Start your car. 4. Remove clamps.

Immagine: La smart clamps connected to the jump starter, illustrating the 10-layer safety protections including short circuit, reverse charge, over charge, reverse polarity, over discharge, over current, reverse connection, and high temperature protection.
7. Utilizzo come Power Bank
The jump starter can also be used to charge your electronic devices.
- Connect your device's USB charging cable to either the USB1 (5V/2.4A) or USB2 (QC3.0) output port on the jump starter.
- L'avviatore di emergenza inizierà automaticamente a caricare il tuo dispositivo.
- The LED display will show the remaining battery capacity of the jump starter.

Image: The jump starter functioning as a portable power bank, with two USB output ports (5V/2.4A and Quick Charge 3.0) actively charging a smartphone and a tablet.
8. Utilizzo della torcia a LED
The built-in 600-lumen LED flashlight has three modes for various situations:
- Per accendere/spegnere: Press and hold the LED button for 3 seconds.
- Per scorrere le modalità: Once the light is on, short press the LED button to switch between:
- Acceso costante: Per l'illuminazione generale.
- Modalità SOS: Flashes the international SOS signal for emergencies.
- Modalità strobo: Rapid flashing for warning or signaling.

Image: The jump starter with its LED flashlight active, illustrating the three available modes: standard flashlight, SOS signal, and strobe light for emergencies.
9. Manutenzione
- Pulizia: Pulire l'unità con un panno morbido e asciutto. Non utilizzare prodotti chimici aggressivi o materiali abrasivi.
- Magazzinaggio: Store the jump starter in its EVA case in a cool, dry place away from direct sunlight. Ensure it is charged to at least 50% before storing for extended periods. Recharge every 3-6 months.
- Cura della batteria: The internal lithium-ion battery is designed for long life. Avoid fully discharging the unit frequently.

Design resistente all'acqua.

Rugged ABS shell for drop resistance.

Operates in extreme temperatures (-4°F to 140°F).
10. Risoluzione Dei Problemi
| Problema | Possibile causa | Soluzione |
|---|---|---|
| Vehicle won't start after connecting. | Jump starter battery too low; incorrect clamp collegamento; batteria del veicolo completamente scarica. | Assicurarsi che l'avviatore di emergenza sia completamente carico. Controllare clamp connections (red to +, black to -). Press the "BOOST" button on the smart clamp for 3 seconds and try again. |
| cl . intelligenteamp la spia è rossa/lampeggiante. | Polarità inversa; cortocircuito; sovratemperatura. | Disconnetti clamps and re-connect correctly. Check for any short circuits. Allow unit to cool down if overheated. |
| L'avviatore di emergenza non si carica. | Cavo di ricarica o adattatore difettoso; collegamento allentato. | Ensure USB-C cable and adapter are working and connected securely. Try a different cable or adapter. |
| La torcia a LED non funziona. | Not activated correctly; low battery. | Press and hold the LED button for 3 seconds to activate. Ensure the jump starter has sufficient charge. |
11. Specifiche
| Caratteristica | Dettaglio |
|---|---|
| Corrente di picco | 5000A |
| Capacità della batteria | 18000mAh (66.6 Wh) |
| Volume inizialetage | 12V |
| Compatibilità del motore | Fino a 9.0L benzina / 8.0L diesel |
| Uscita USB 1 | 5V/2.4A |
| Uscita USB 2 | QC3.0 |
| Ingresso USB-C | 5V/2A |
| Torcia LED | 600-Lumen (Constant, SOS, Strobe) |
| Temperatura di esercizio | Da -4°C a 140°C (da -20°F a 60°F) |
| Dimensioni | Dimensioni: 4.2 x 9 x 19 cm |
| Peso | 540 g (1.19 libbre) |
| Protezioni di sicurezza | 10-Layer (Short Circuit, Reverse Polarity, Over-Current, etc.) |
12. Garanzia e supporto
The FLYLINKTECH 5000A Jump Starter comes with an industry-leading Garanzia di 3 anno dalla data di acquisto. Questa garanzia copre i difetti di fabbricazione e assicura prestazioni affidabili.
For technical support, warranty claims, or any questions regarding your product, please contact FLYLINKTECH customer service through the retailer's platform or visit our official websito.
Conservare la prova d'acquisto per la convalida della garanzia.
Ask a question about this manual
Ask about setup, troubleshooting, compatibility, parts, safety, or missing instructions. Manuals+ will review the question and use this page’s manual context to help answer it.