
TRYX PANORAMA SE 360 ARGB
TRYX Panorama SE 360 ARGB AIO Cooler User Manual
Model: PANORAMA SE 360 ARGB | Brand: TRYX
1. Prodotto finitoview
The TRYX Panorama SE 360 ARGB is a high-performance All-in-One (AIO) liquid CPU cooler designed for efficient thermal management in computer systems. It features a unique rotatable 6.5-inch AMOLED curved screen, offering customizable visual effects and system monitoring. This cooler is engineered to provide stable and quiet operation while supporting a wide range of Intel and AMD CPU sockets.

Figure 1: TRYX Panorama SE 360 ARGB AIO Cooler with its radiator, fans, and pump block featuring the curved AMOLED screen.
2. Caratteristiche principali
- Rotatable 6.5'' Curved AMOLED Screen: Features a 6.5-inch AMOLED curved screen with a 60Hz refresh rate and 2K display (372PPI pixel density, 1,000,000:1 contrast ratio) for stunning visual experience. The screen is rotatable, allowing for multi-adjustable positions and supporting new "Waterfall" 3D animations.
- 3D Anamorphic Effect: The curved AMOLED screen enhances content depth, achieving stunning naked-eye 3D visual effects with custom-formatted 3D videos. Includes preloaded content and a continuously updated 3D content library in KANALI software.
- Reliable Screen Technology: Designed with "G2 Curvature" for enhanced viewing angles and immersion. A tempered glass cover provides resistance against scratches and drops. Full adhesion technology ensures high light transmittance and reduced reflection.
- Asetek Cooling Solution: Utilizes ASETEK's Adela cooling solution, capable of handling CPU-intensive tasks with an overall 280W TDP cooling capacity. Combines a high-density fins radiator with efficient cooling fans for stable performance.
- Ultimate Customization with KANALI Software: The TRYX KANALI software allows customization of the display with instant content switching, split-screen display, and system information. Supports user-uploaded PNG/JPG/GIF/MP4/AVI (1080P, 500MB maximum) media.
- Alta compatibilità: Includes all-metal mounting hardware for reliable installation on Intel LGA 1851/1700/1200/1151/1150/1155 and AMD AM4/AM5 sockets.
- Stability and Quiet Operation: Equipped with three 120mm pre-installed ROTA ARGB fans featuring fluid dynamic bearings and ARGB GEN2 LEDs. Fans include damping pads to minimize vibration noise, operating quietly under 27.86dB(A) even under full load.
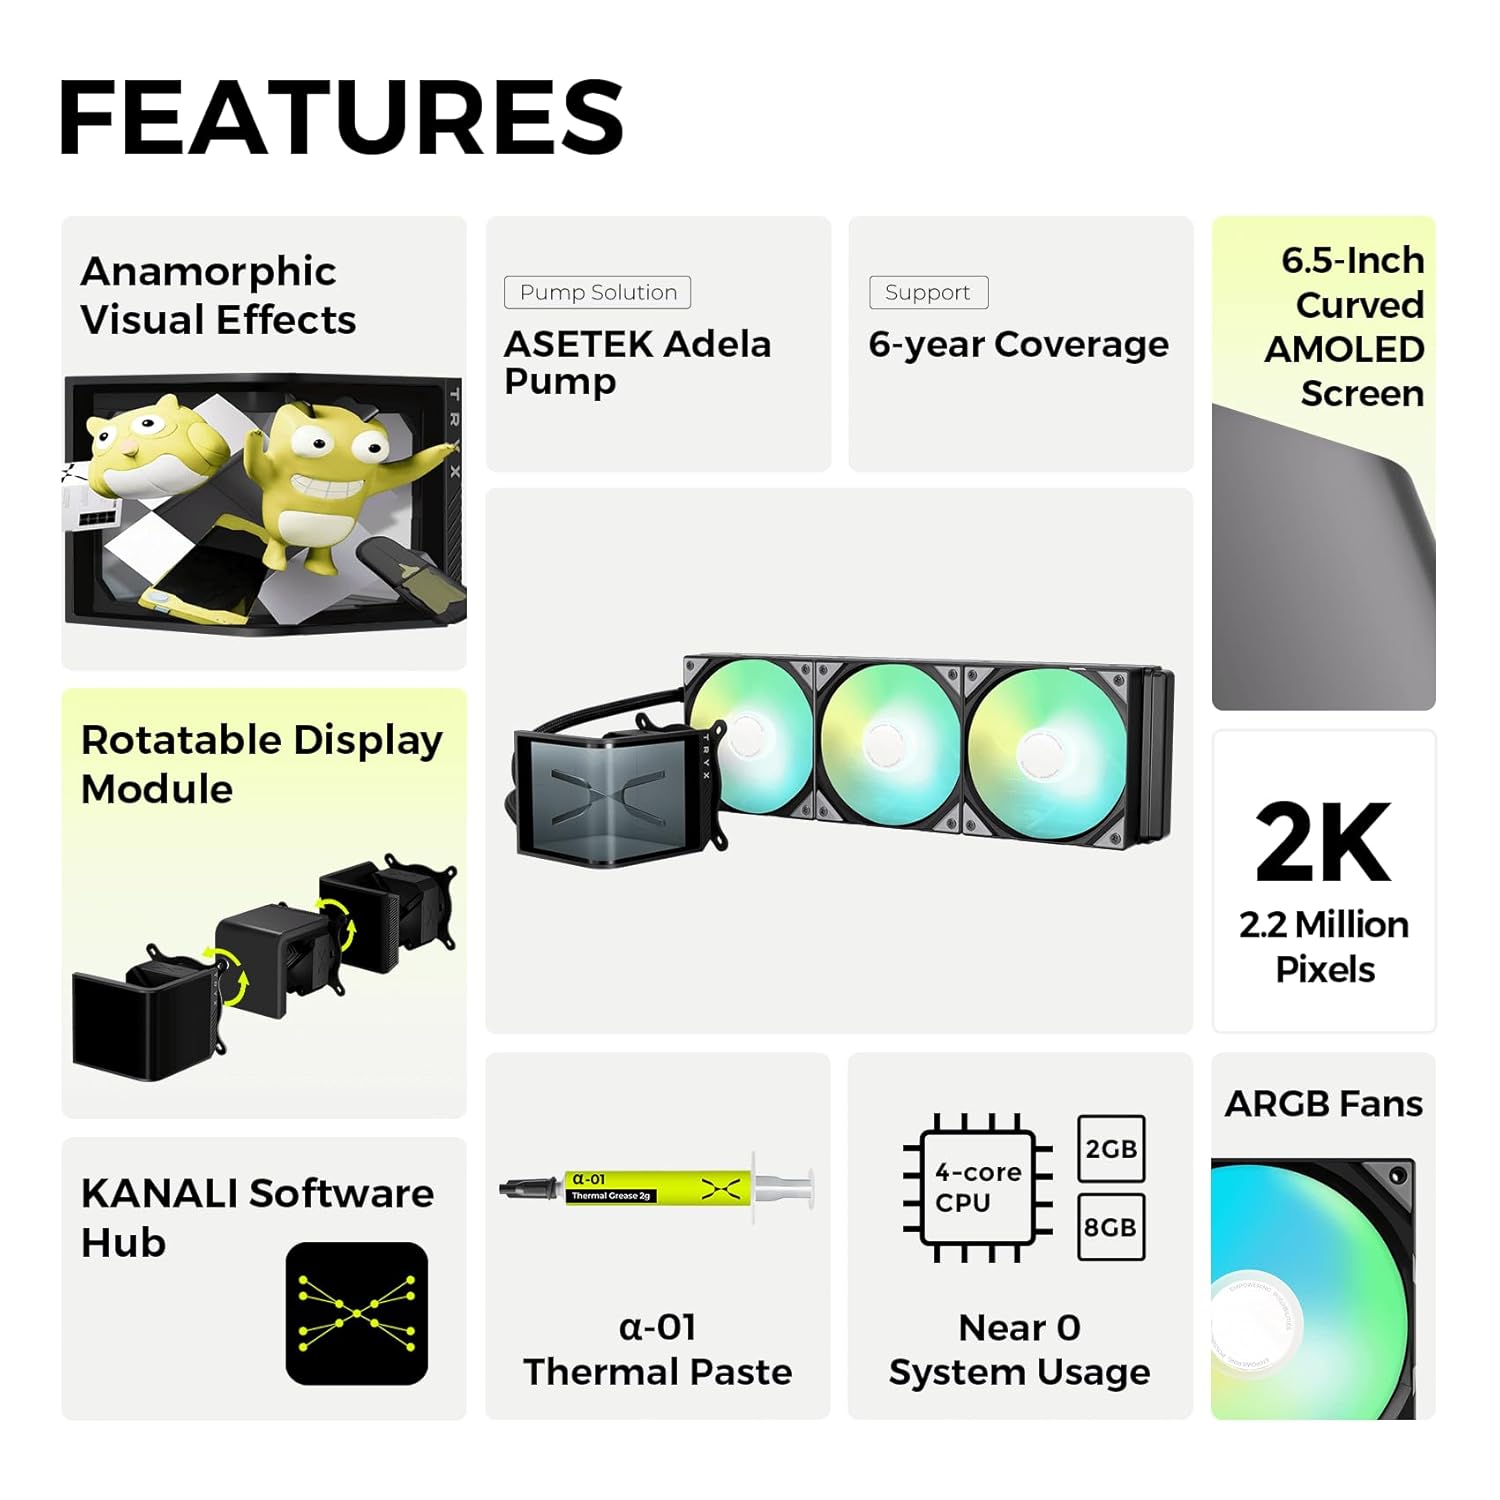
Figura 2: Oltreview of key features including Anamorphic Visual Effects, Asetek Adela Pump, 6.5-Inch Curved AMOLED Screen, Rotatable Display Module, 2K resolution, KANALI Software Hub, Thermal Paste, Near Zero System Usage, and ARGB Fans.

Figure 3: Illustration of the rotatable display module, highlighting its detachable screen, flexible and versatile design, dynamic display settings, and the new "Waterfall Mode" capability.
3. Cosa c'è nella scatola
Dopo aver aperto la confezione, verificare che siano presenti tutti i seguenti componenti:
- AIO Cooler (Radiator with integrated pump and screen)
- AMD/Intel Mounting Brackets
- Pasta termica
- Manuale dell'utente (questo documento)
- Accessories for Installation (Screws, standoffs, etc.)
- Cavo esteso

Figure 4: Contents of the TRYX Panorama SE 360 ARGB AIO Cooler box, including the AIO unit, mounting hardware for Intel and AMD, thermal paste, and cables.
4. Configurazione e installazione
Questa sezione fornisce una panoramica generaleview of the installation process. For detailed, step-by-step instructions, please refer to the dedicated Installation Manual PDF provided with your product or available on the TRYX websito.
4.1 Lista di controllo pre-installazione
- Ensure your motherboard is compatible with Intel LGA 1851/1700/1200/1151/1150/1155 or AMD AM4/AM5 sockets.
- Verify your PC case has adequate space for a 360mm radiator and three 120mm fans.
- Gather necessary tools: Phillips head screwdriver, cleaning cloth, isopropyl alcohol (for CPU surface).
4.2 Fasi di installazione (generali)
- Preparare la CPU: Pulisci accuratamente la superficie della CPU con alcol isopropilico per rimuovere eventuali residui di pasta termica.
- Installare la piastra posteriore: Fissare la piastra posteriore adatta al socket della CPU (Intel o AMD) sul retro della scheda madre.
- Mount Standoffs: Screw the correct standoffs into the backplate from the front side of the motherboard.
- Applicare la pasta termica: Apply a small, pea-sized amount of the provided thermal paste to the center of your CPU's integrated heat spreader (IHS).
- Blocco pompa di montaggio: Carefully align the pump block with the standoffs and gently lower it onto the CPU. Secure it with the provided thumb screws, tightening them in a diagonal pattern until snug.
- Installare radiatore e ventole: Mount the 360mm radiator and pre-installed fans to an available fan mounting location in your PC case (e.g., top, front). Ensure proper airflow direction.
- Collegare i cavi:
- Collegare il cavo di alimentazione della pompa all'intestazione CPU_FAN o AIO_PUMP sulla scheda madre.
- Collegare i cavi di alimentazione della ventola ai connettori disponibili sulla scheda madre o a un controller per ventole.
- Connect the ARGB cables from the fans and pump block to your motherboard's ARGB header or a compatible ARGB controller.
- Connect the USB cable from the pump block to an available internal USB 2.0 header on your motherboard for screen control via KANALI software.
- Gestione dei cavi: Disporre tutti i cavi in modo ordinato per garantire un flusso d'aria adeguato e una struttura pulita.

Figure 5: Diagram illustrating the mounting hardware for Intel (LGA 1851/1700/1200/1151/1150/1155) and AMD (AM4/AM5) chipsets, showing the different brackets and standoffs.
5. Istruzioni per l'uso
5.1 Accensione iniziale
After successful installation, power on your computer. The AIO cooler's fans and ARGB lighting should illuminate, and the AMOLED screen on the pump block will display default content.
5.2 KANALI Software Usage
To unlock the full customization potential of your TRYX Panorama SE 360 ARGB, download and install the KANALI software from the official TRYX websito. Questo software ti consente di:
- Customize Screen Content: Select from preloaded 3D animations, including the "Waterfall" mode, or upload your own images (PNG/JPG), GIFs, and videos (MP4/AVI up to 1080P, 500MB).
- Display System Information: Monitor real-time CPU temperature, frequency, and other system metrics directly on the AMOLED screen.
- Regola luminosità: Fine-tune the screen brightness for optimal viewing.
- Visualizzazione a schermo diviso: Utilize the split-screen capability to show different content simultaneously.
- Control ARGB Lighting: Synchronize or customize the ARGB lighting effects of the ROTA fans.

Figure 6: Screenshot of the KANALI software interface, showing options for screen content customization, including support for various media formats and new features like "Waterfall Mode" and full/splitting screen display.

Figure 7: The AIO cooler's screen displaying the "Waterfall Mode" animation, optimized for vertical screen orientation and showing system statistics.
6. Manutenzione
Regular maintenance ensures optimal performance and longevity of your AIO cooler.
- Pulizia della polvere: Periodically clean the radiator fins and fan blades to prevent dust buildup, which can impede airflow and cooling efficiency. Use compressed air or a soft brush.
- Ispezione della ventola: Check fan blades for any obstructions or damage. Ensure fans are spinning freely and quietly.
- Tubi e raccordi: Inspect the tubing for any kinks, leaks, or signs of wear. Ensure all connections to the pump and radiator are secure.
- Pasta termica: While not required frequently, if you ever remove the pump block from the CPU, you must clean off the old thermal paste and apply new thermal paste before re-mounting.
7. Risoluzione Dei Problemi
This section addresses common issues. For more comprehensive troubleshooting, refer to the Troubleshooting Guide PDF.
7.1 No Power/No Display on Screen
- Controllare le connessioni: Ensure all power cables (pump, fans) and the USB cable for the screen are securely connected to the motherboard.
- Intestazioni della scheda madre: Verify that the pump is connected to the correct motherboard header (CPU_FAN or AIO_PUMP) and that the header is enabled in BIOS/UEFI.
- Software: Ensure KANALI software is installed and running.
7.2 Temperature elevate della CPU
- Pasta termica: Confirm that thermal paste was applied correctly and evenly. Reapply if necessary.
- Pump Contact: Ensure the pump block has full and even contact with the CPU IHS. Tighten mounting screws diagonally.
- Velocità della ventola: Check fan speeds in KANALI software or motherboard BIOS/UEFI. Ensure they are set to an appropriate profile per il raffreddamento.
- Flusso d'aria del radiatore: Clear any dust or obstructions from the radiator fins. Ensure case airflow is adequate.
7.3 Rumore insolito
- Rumore del ventilatore: Check if fan blades are hitting cables or other components. Ensure fans are securely mounted.
- Rumore della pompa: A slight hum from the pump is normal. Excessive gurgling might indicate air bubbles in the loop; try gently tilting your PC case to help dislodge them.
8. Specifiche
| Attributo | Valore |
|---|---|
| Dimensioni del prodotto | 16.93 cm L x 8.74 cm P x 5.71 cm A |
| Numero modello articolo | PANORAMA SE 360 ARGB |
| Produttore | Shanghai TRYX Technology Co.Ltd |
| Marca | TRYX |
| Tipo di connettore di alimentazione | 7 pin |
| Voltage | 12 Volt (CC) |
| Cosatage | 3.9 watt |
| Metodo di raffreddamento | Acqua |
| Dispositivi compatibili | processore |
| Livello di rumore | 27.86 dB |
| Materiale | Aluminum, Copper, Polybutylene Terephthalate |
| Massima velocità di rotazione | 3600 giri al minuto |
9. Garanzia e supporto
The TRYX Panorama SE 360 ARGB AIO Cooler is backed by a manufacturer's warranty, which includes a 6-year coverage period for the Asetek pump solution. For specific warranty terms and conditions, please refer to the official warranty documentation included with your product or visit the official TRYX websito.
9.1 Assistenza clienti
For technical assistance, troubleshooting, or warranty claims, please contact TRYX customer support through their official website or the contact information provided in your product packaging. You may also find additional resources, FAQs, and updated drivers/software on the TRYX support page.
Risorse aggiuntive:
Ask a question about this manual
Ask about setup, troubleshooting, compatibility, parts, safety, or missing instructions. Manuals+ will review the question and use this page’s manual context to help answer it.