SUVCON M02
Manuale utente della Dash Cam SUVCON M02 4K
Modello: M02
Introduzione
Thank you for choosing the SUVCON M02 4K Dash Cam. This manual provides detailed instructions for the installation, operation, and maintenance of your dash cam. Please read this manual thoroughly before using the product to ensure proper functionality and safety.
Informazioni importanti sulla sicurezza
- Non utilizzare la dash cam durante la guida. Regolare le impostazioni solo quando il veicolo è parcheggiato in sicurezza.
- Assicurarsi che la dash cam sia montata saldamente e non ostruisca la visuale del conducente view o attivazione dell'airbag.
- Use only the original power cable provided to prevent damage to the device or vehicle.
- Avoid exposing the dash cam to extreme temperatures, direct sunlight for prolonged periods, or excessive moisture.
- Do not attempt to disassemble or repair the dash cam yourself. Contact customer support for assistance.
- Formattare regolarmente la scheda di memoria per garantire prestazioni ottimali ed evitare il danneggiamento dei dati.
Contenuto della confezione
Si prega di controllare la confezione per verificare la presenza dei seguenti elementi:
- SUVCON M02 4K Dash Cam (Front Camera)
- Telecamera posteriore (se inclusa nella confezione)
- Car Charger with Power Cable
- Supporto a ventosa
- Fermacavi
- Manuale d'uso
- 32GB MicroSD Card (if included in your package)
Prodotto finitoview
Familiarize yourself with the components of your SUVCON M02 Dash Cam.
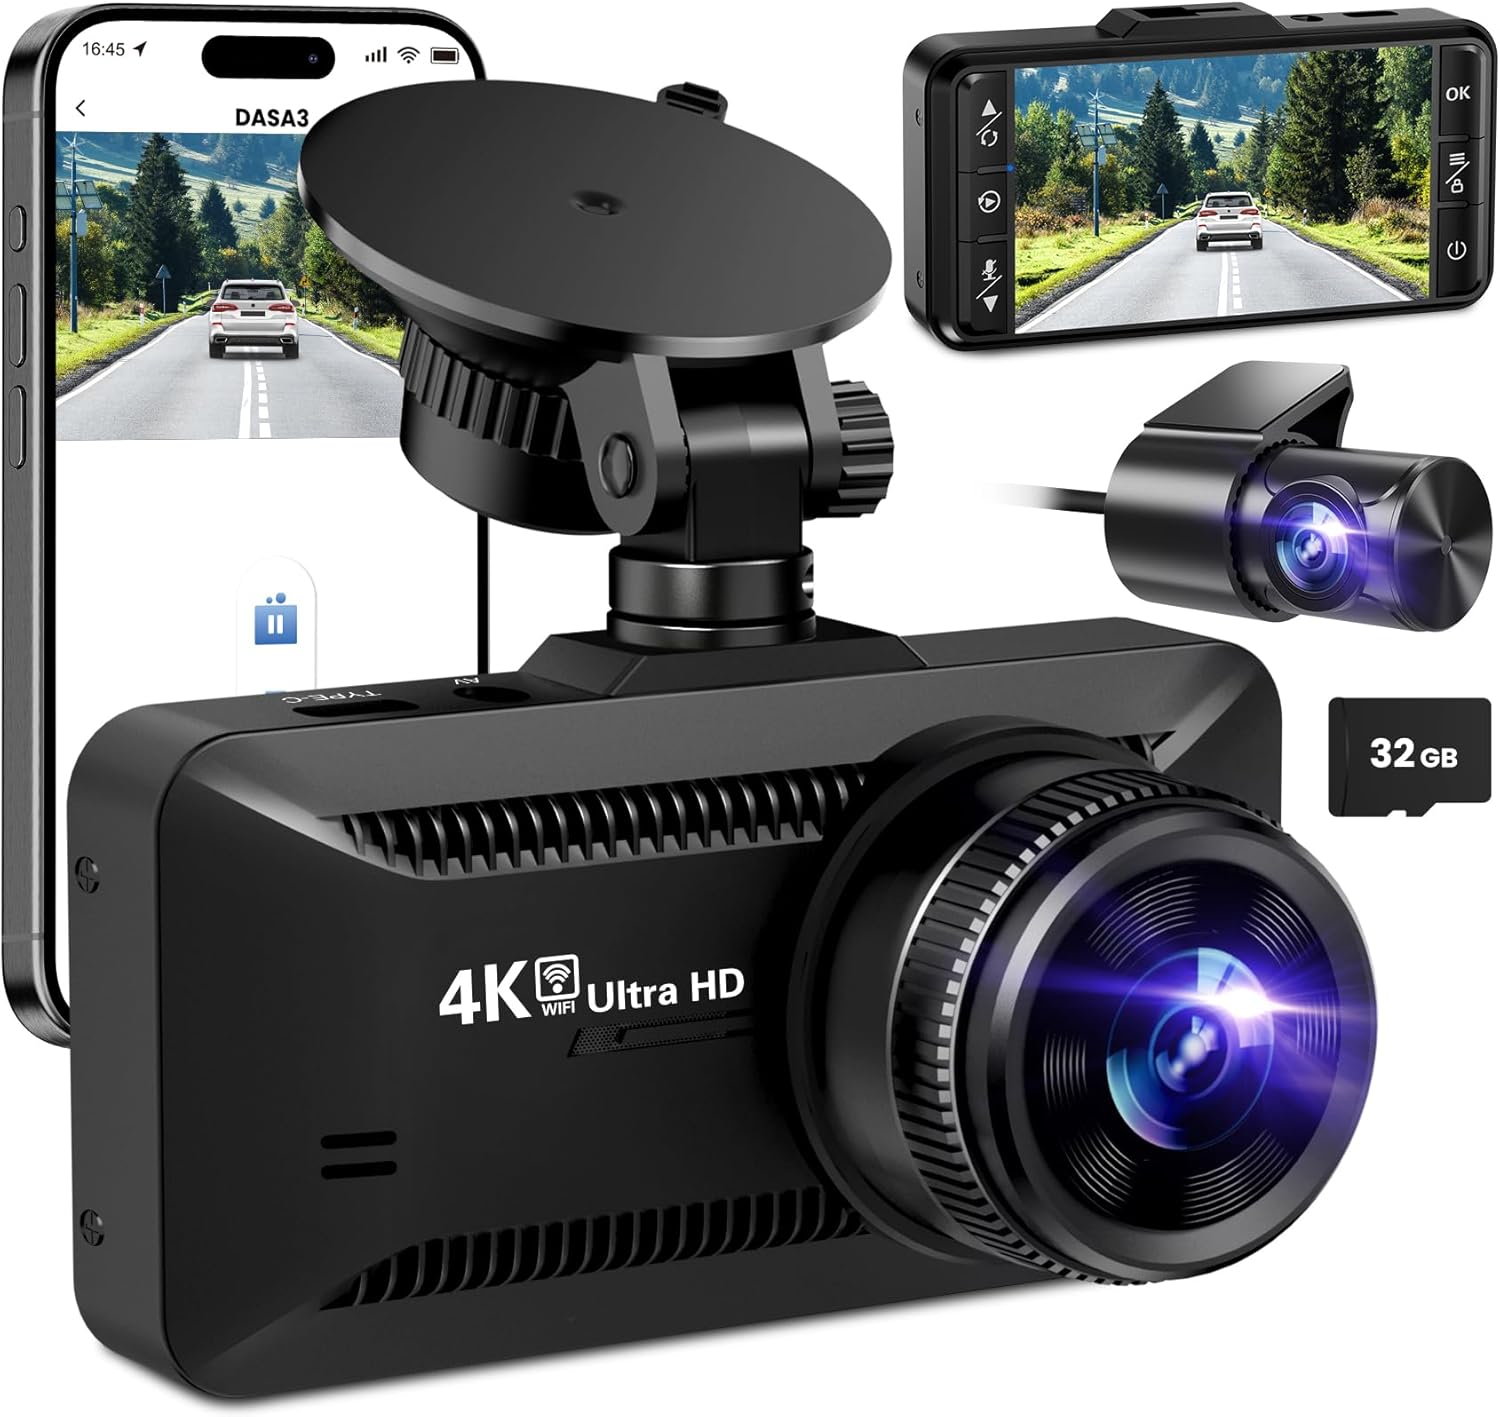
Immagine: The SUVCON M02 4K Dash Cam is shown with its main front camera unit, a separate rear camera, a smartphone displaying the dash cam's app interface, and a 32GB microSD card. The main unit features a prominent lens, a display screen on the back (not fully visible in this angle), and a suction cup mount. The rear camera is compact with its own lens. The smartphone screen shows a live view from the dash cam, indicating Wi-Fi connectivity.
Unità fotocamera anteriore
- Lente: Captures 4K video.
- Schermo di visualizzazione: Per viewing vivo footage, riproduzione e navigazione nel menu.
- Pulsanti di controllo: Power, Menu, Up, Down, OK.
- Slot per scheda MicroSD: Per l'inserimento della scheda di memoria.
- Porta di alimentazione USB (tipo C): Per collegare il caricabatteria dell'auto.
- Porta della fotocamera posteriore: For connecting the rear camera cable.
- Altoparlante/microfono: Per la registrazione e la riproduzione audio.
Unità telecamera posteriore
- Lente: Captures rear view video.
- Cavo: Connects to the main dash cam unit.
Configurazione e installazione
1. Inserimento della scheda MicroSD
- Assicurarsi che la dash cam sia spenta.
- Individuare lo slot per la scheda MicroSD sul lato della dash cam.
- Insert the MicroSD card with the gold contacts facing the back of the dash cam until it clicks into place.
- Per rimuoverla, spingere delicatamente la scheda finché non scatta, quindi rilasciarla.
Nota: A Class 10 or higher MicroSD card (up to 128GB recommended) is required. Format the card in the dash cam's settings before first use.
2. Montaggio della Dash Cam
- Pulisci la zona del parabrezza dove intendi montare la dash cam.
- Fissare il supporto a ventosa alla dash cam.
- Premere saldamente la ventosa contro il parabrezza, idealmente dietro la parte posterioreview specchio e azionare la leva per fissarlo.
- Adjust the angle of the dash cam lens to ensure it captures the road ahead clearly, avoiding obstruction from the hood or dashboard.
3. Collegamento dell'alimentazione
- Connect the small end of the car charger cable to the USB Type-C port on the dash cam.
- Collegare l'estremità più grande del caricabatteria per auto alla presa di corrente da 12 V del veicolo (presa accendisigari).
- Route the power cable neatly along the edge of the windshield and dashboard using the provided cable clips to avoid obstructing your view.
4. Installing the Rear Camera (Optional)
- Connect the rear camera cable to the dedicated rear camera port on the main dash cam unit.
- Route the cable from the front unit to the rear of the vehicle, typically along the headliner and side panels.
- Mount the rear camera on the rear windshield using its adhesive or screws, ensuring a clear view della strada dietro.
- Connect the red wire of the rear camera cable to the vehicle's reverse light positive wire if you wish to enable parking assist lines when reversing.
Istruzioni per l'uso
Accensione/spegnimento
- Automatico: The dash cam will automatically power on and begin recording when connected to power and the vehicle engine starts. It will power off automatically when the engine is turned off.
- Manuale: Tieni premuto il pulsante di accensione per accendere o spegnere manualmente la dash cam.
Modalità di registrazione
- Registrazione in loop: The dash cam records video in continuous loops (e.g., 1, 3, or 5 minutes). When the memory card is full, the oldest unlocked files verrà sovrascritto.
- Sensore G (registrazione di emergenza): The built-in G-sensor detects sudden impacts or collisions. When triggered, the current video segment is automatically locked and saved to prevent it from being overwritten by loop recording.
- Monitoraggio del parcheggio: With a hardwire kit (sold separately) or continuous power, the dash cam can monitor your vehicle while parked. If a vibration or impact is detected, it will automatically record a short video.
Navigazione nei menu
Use the control buttons on the dash cam to navigate the menu:
- Pulsante Menu: Press to enter the settings menu. Press again to switch between video settings, system settings, and playback mode.
- Pulsanti su/giù: Navigare attraverso le opzioni del menu.
- Pulsante OK: Confirm selection or start/stop recording in recording mode.
Connettività Wi-Fi e utilizzo delle app
The SUVCON M02 features Wi-Fi connectivity for easy access to recordings and settings via a smartphone app.
- Download the recommended app (e.g., "DASA3" or similar, check packaging for exact app name) from your smartphone's app store.
- On the dash cam, enable Wi-Fi from the system settings. The dash cam's Wi-Fi SSID and password will be displayed on the screen.
- Sul tuo smartphone, vai alle impostazioni Wi-Fi e connettiti alla rete Wi-Fi della dash cam utilizzando la password fornita.
- Open the app. You can now view cibo vivotage, download recorded videos, change settings, and format the SD card directly from your phone.
Riproduzione
- On Dash Cam: In recording mode, press the Menu button twice to enter playback mode. Use Up/Down buttons to select files and OK to play.
- Tramite App: Connect your smartphone via Wi-Fi and use the app's playback feature to view e scaricare video.
- Sul computer: Remove the MicroSD card from the dash cam and insert it into a computer's card reader. Videos can be played using standard media players.
Manutenzione
Pulizia della Dash Cam
- Per pulire il corpo della dash cam, utilizzare un panno morbido e asciutto.
- Per le lenti, utilizzare un panno per la pulizia delle lenti e una soluzione specifica per la pulizia delle lenti, per evitare graffi.
- Non utilizzare detergenti abrasivi o solventi.
Formattazione della scheda MicroSD
It is recommended to format the MicroSD card every 2-4 weeks to maintain optimal recording performance and prevent data corruption. This can be done through the dash cam's menu settings or via the smartphone app.
Aggiornamenti del firmware
Periodically check the SUVCON official website for available firmware updates. Firmware updates can improve performance, add new features, or fix bugs. Follow the instructions provided with the firmware file accuratamente.
Risoluzione dei problemi
| Problema | Possibile soluzione |
|---|---|
| La dash cam non si accende. |
|
| La dash cam smette di registrare o si blocca. |
|
| Video pippotage è sfocato o poco chiaro. |
|
| Problemi di connessione Wi-Fi. |
|
Specifiche
| Caratteristica | Dettaglio |
|---|---|
| Modello | Numero di modello: M02 |
| Marca | SUVCON |
| Risoluzione di acquisizione video | 4K (Front), 1080P (Rear, if applicable) |
| Caratteristiche speciali | G-Sensor, Loop Recording, Parking Monitor, Wi-Fi Connectivity |
| Tecnologia di connettività | Wifi |
| Tipo di montaggio | Supporto per cruscotto (ventosa) |
| Magazzinaggio | Scheda MicroSD (classe 10 o superiore, consigliata fino a 128 GB) |
| Fonte di alimentazione | Caricabatteria per auto (12V) |
| Dimensioni del prodotto | 2.54 x 2.54 x 2.54 cm (circa, secondo i dati del prodotto) |
Garanzia e assistenza clienti
For warranty information, technical support, or any inquiries regarding your SUVCON M02 Dash Cam, please refer to the warranty card included in your package or visit the official SUVCON websito. Quando contatti l'assistenza, tieni a portata di mano il numero del tuo modello (M02) e i dettagli dell'acquisto.
Websito: www.suvcon.com (Example URL, fare riferimento alla documentazione effettiva del prodotto)
E-mail: support@suvcon.com (Example Email, please refer to actual product documentation)
Documenti correlati - Numero di modello: M02
 |
GT806 3-Channel Dash Cam User Manual Explore the features and setup of the GT806 3-Channel Dash Cam, offering 2.5K+1080P+1080P recording, Wi-Fi connectivity, G-sensor, night vision, and 24-hour parking monitoring. Supports up to 256GB storage. |
 |
Cobra SC201 Dual View Dash Cam Full HD: Manuale del proprietario e caratteristiche Manuale completo del proprietario per Cobra SC201 Dual View Dash Cam Full HD. Scopri di più sull'installazione, il funzionamento di base, l'integrazione con le app Drive Smarter e iRadar, le funzioni di sicurezza, le impostazioni e la risoluzione dei problemi. |
 |
Manuale di istruzioni della Dash Cam SUVCON D370S Manuale di istruzioni completo per la Dash Cam SUVCON D370S 4K, che copre installazione, funzionalità, impostazioni, utilizzo di Wi-Fi e GPS, risoluzione dei problemi e informazioni sulla garanzia. |
 |
AX2V DV-690WM 1080P Full HD Wireless Dash Cam User Manual User manual for the AX2V DV-690WM 1080P Full HD Wireless Dash Cam. Learn about features, installation, specifications, app usage, and troubleshooting for this car dashboard camera. |
 |
Manuale utente della Dash Cam ROVE R2-4K PRO: caratteristiche, configurazione e supporto Manuale utente completo per la Dash Cam ROVE R2-4K PRO. Scopri di più su installazione, funzionalità, impostazioni, connettività Wi-Fi, modalità di parcheggio, risoluzione dei problemi e informazioni sulla garanzia del registratore di guida avanzato del tuo veicolo. |
 |
Manuale utente della Dash Cam a doppio canale WOLFBOX X3 2.5K | Installazione, funzionalità e supporto Manuale utente completo per la dash cam a doppio canale WOLFBOX X3 2.5K. Illustra l'installazione, funzionalità come ADAS, Wi-Fi, GPS, touchscreen, risoluzione dei problemi e altro ancora per migliorare la sicurezza del veicolo e la registrazione. |
Ask a question about this manual
Ask about setup, troubleshooting, compatibility, parts, safety, or missing instructions. Manuals+ will review the question and use this page’s manual context to help answer it.