
1. Informazioni importanti sulla sicurezza
Please read all instructions carefully before using the KEENSTAR 20Bar Espresso Machine. Retain this manual for future reference.
- Assicurarsi che l'apparecchio sia collegato a una presa di corrente con messa a terra e con la tensione correttatage.
- Non immergere la macchina, il cavo di alimentazione o la spina in acqua o altri liquidi.
- Keep hands and cords away from hot surfaces, such as the steam wand and heated cup holder.
- Scollegare la macchina prima di pulirla e quando non è in uso.
- Questo apparecchio è destinato esclusivamente all'uso domestico. Non utilizzare all'esterno.
- Do not operate the machine with a damaged cord or plug. Contact customer service for repairs.
2. Prodotto finitoview
The KEENSTAR 20Bar Espresso Machine is designed to deliver rich, aromatic espresso, hot coffee, and cold brew beverages. It features a 20-bar professional pump, a powerful steam wand for milk frothing, and an intuitive touch screen interface.

Image: KEENSTAR 20Bar Espresso Machine, Z-Silver model, showcasinil suo design elegante e l'interfaccia touch screen.
3. componenti
The following components are included with your KEENSTAR Espresso Machine:
- Unità macchina per caffè espresso
- Portafiltro con maniglia
- 1-Shot Filter Basket
- 2-Shot Filter Basket
- Cucchiaino da caffè e Tamper
- Vassoio raccogli gocce rimovibile
- Water Tank (40oz / 1.2L capacity)
- Manuale di istruzioni
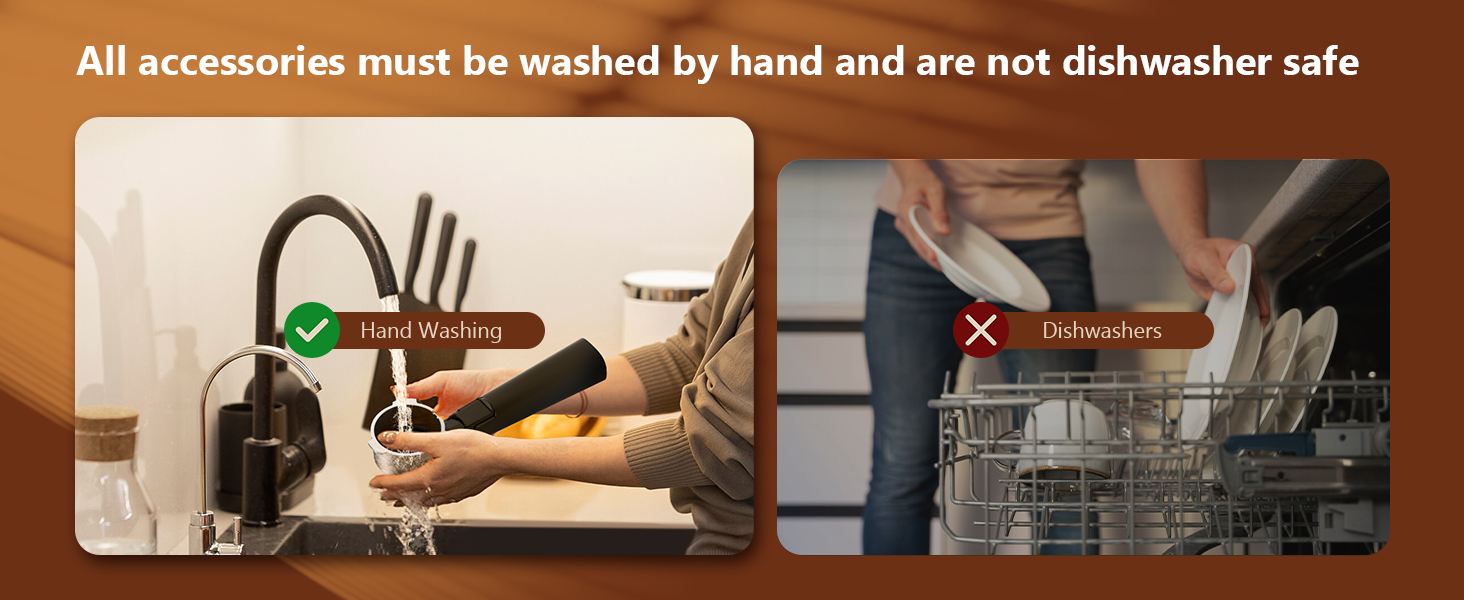
Image: Diagram illustrating the various parts and included accessories of the espresso machine, such as the control panel, water tank, steam knob, portafilter, and drip tray.
4. Configurazione e primo utilizzo
Before using your espresso machine for the first time, follow these steps to prepare it for operation and ensure proper function.
- Disimballare e pulire: Rimuovere tutto il materiale di imballaggio. Lavare il serbatoio dell'acqua, il portafiltro e i filtri con acqua tiepida e sapone. Risciacquare abbondantemente e asciugare.
- Riempire il serbatoio dell'acqua: Fill the detachable water tank with fresh, cold water. Do not exceed the 'MAX' fill line. Ensure the water tank is properly seated in the machine.
- Accensione: Plug the machine into a suitable power outlet. Press the ON/OFF button on the touch screen. The indicator light will blink, signifying preheating.
- Drain Air from System: To ensure optimal performance and prevent brewing failure, it is essential to drain any air from the internal pipes during the first use or after prolonged inactivity. Once the machine has preheated (indicator light is steady), turn the steam knob to the "ON" position. Allow water to run out from the steam wand until a steady stream is observed. Then, turn the steam knob to the "OFF" position.
- Preheat Cup (Optional): Place your espresso cup on the heated cup holder on top of the machine to warm it, which helps maintain coffee temperature.

Image: Step-by-step visual guide for the initial setup process, including filling the water tank, powering on, and draining air from the steam wand.
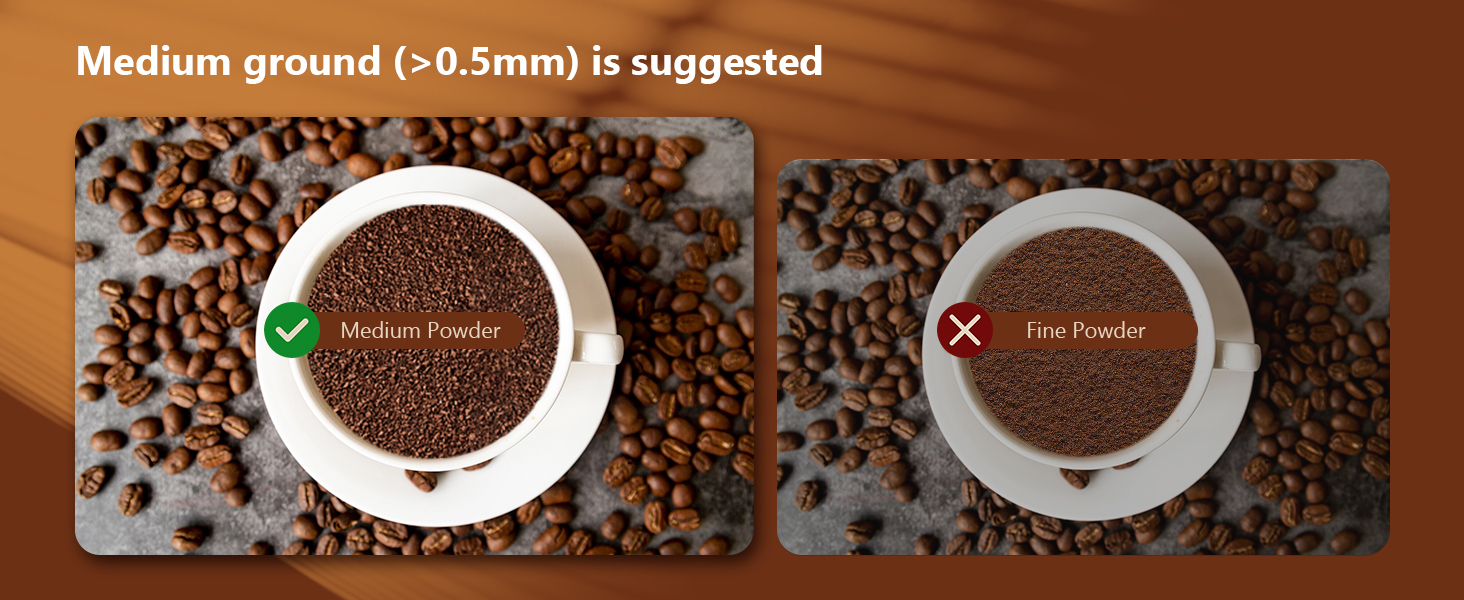
Image: Illustration demonstrating the correct water level for the water tank, indicating not to exceed the maximum fill line.
5. Istruzioni per l'uso
5.1 Preparazione dell'espresso (singolo o doppio)
Follow these steps to brew a perfect shot of espresso:
- Preparare i fondi di caffè: Use medium-ground coffee (recommended >0.5mm). Select the 1-shot or 2-shot filter basket and place it into the portafilter. Fill with ground coffee (1 flat scoop for single, 2 for double) and tamp con fermezza.
- Collegare il portafiltro: Insert the portafilter into the group head and turn it to the right until it is securely locked. Ensure it is fully locked to prevent leaks during extraction.
- Coppa del posto: Posizionare la/le tazzina/e da caffè espresso sulla vaschetta raccogli-gocce, direttamente sotto i beccucci del portafiltro.
- Preparare l'espresso: Once the machine is preheated (indicator light is steady), press the 'Espresso' button for a single shot or '2 X Espresso' for a double shot on the touch screen. The machine will begin brewing.
- Smetti di preparare: The machine will automatically stop when the programmed volume is reached. You can also manually stop brewing by pressing the button again.
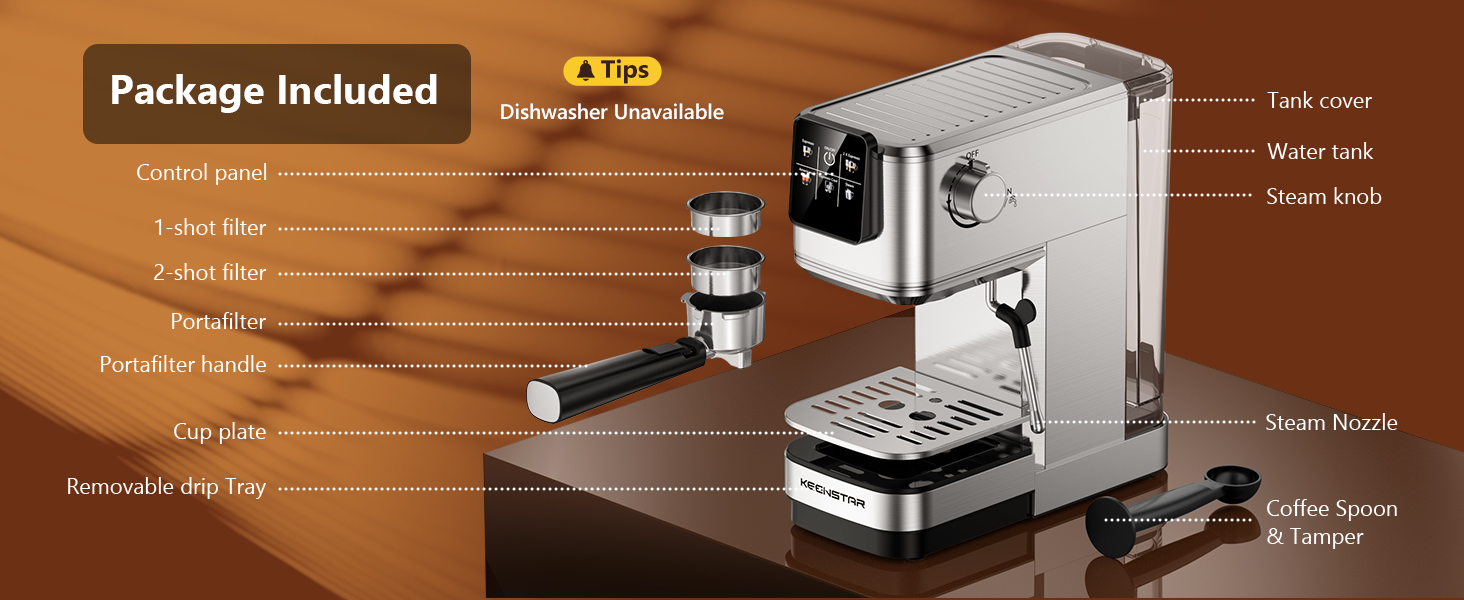
Image: A visual guide detailing the five steps to prepare espresso, from filling the water tank and loading coffee to pressing the brew button.

Image: Illustrates the recommended medium grind size for coffee, comparing it to fine powder for optimal extraction.
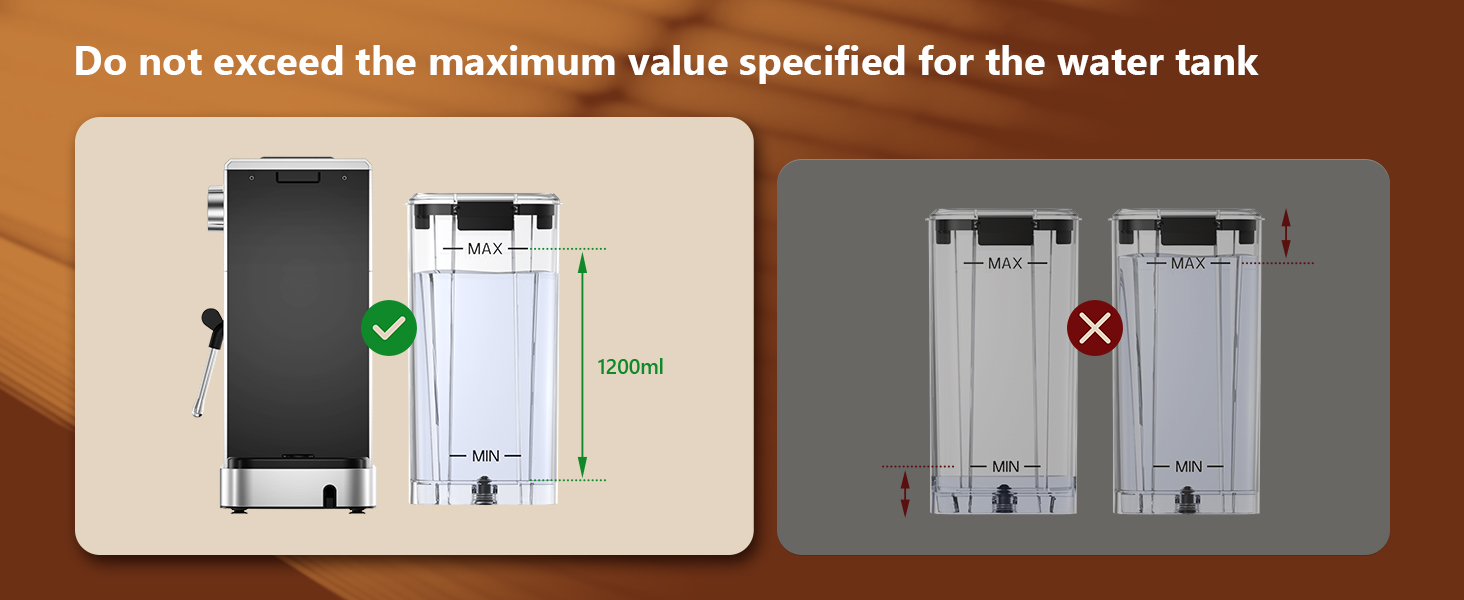
Image: Visual representation of a correctly locked portafilter versus an unlocked one, emphasizing the importance of secure attachment before brewing.
5.2 Making Cold Brew Espresso
The KEENSTAR machine offers a rapid cold brew function:
- Preparare il serbatoio dell'acqua: Fill the water tank 2/3 full with ice cubes, then add cold water to the 'MAX' line.
- Preparare i fondi di caffè: Load ground coffee into the portafilter as you would for hot espresso.
- Brew Cold Espresso: Once the machine is preheated, press the 'Espresso Cool' button on the touch screen. The machine will brew a smooth, fresh cold brew.

Image: The espresso machine preparing a cold brew espresso, with ice cubes visible in the water tank and a glass of iced coffee.
5.3 Preparazione dell'Americano
To make an Americano:
- Preparare l'espresso: First, brew a single or double shot of espresso into your cup as described in section 5.1.
- Aggiungere acqua calda: Press the 'Americano' button on the touch screen. The machine will dispense hot water into your cup, combining with the espresso to create an Americano.
5.4 Utilizzo del montalatte (lancia vapore)
The powerful steam wand allows you to create creamy milk foam for lattes and cappuccinos:
- Preheat Steam: Ensure the machine is powered on and preheated. Press the 'Steam' button on the touch screen. The indicator will blink during preheating and become steady when ready.
- Preparare il latte: Fill a stainless steel frothing pitcher with cold milk (dairy or non-dairy). Do not fill more than halfway to allow for expansion.
- Spurgo lancia vapore: Before frothing, turn the steam knob to the "ON" position briefly to release any condensed water from the wand. Turn it off once steam appears.
- Latte schiumato: Insert the steam nozzle approximately 1 inch into the milk's surface. Turn the steam knob to the "ON" position. Move the pitcher up and down slowly to create foam. Once desired texture and temperature are reached, turn the steam knob to the "OFF" position.
- Pulisci la lancia del vapore: Pulire immediatamente la lancia vapore con un pannoamp panno per evitare che i residui di latte si asciughino. Spurgare nuovamente brevemente la lancia per eliminare eventuali residui di latte all'interno.

Image: The espresso machine's steam wand in action, frothing milk in a pitcher to create creamy foam for coffee beverages.
6. Manutenzione e pulizia
Una pulizia regolare garantisce la longevità e le prestazioni ottimali della macchina per l'espresso.
- vassoio antigoccia: The drip tray should be emptied and cleaned regularly. It is removable for easy access. Wash with warm, soapy water and rinse thoroughly.
- Portafiltro e filtri: After each use, remove the portafilter and discard used coffee grounds. Rinse the portafilter and filter basket under running water. Use a brush to remove any stubborn coffee residue.
- Serbatoio dell'acqua: Clean the water tank periodically with warm, soapy water. Rinse well to remove any soap residue.
- Esterno: Pulire l'esterno della macchina con un panno morbido, damp stoffa. Non utilizzare detergenti abrasivi o spugnette abrasive.
- Decalcificazione: Depending on water hardness and frequency of use, descaling may be required every 2-3 months. Refer to the full manual for detailed descaling instructions.
Nota importante:
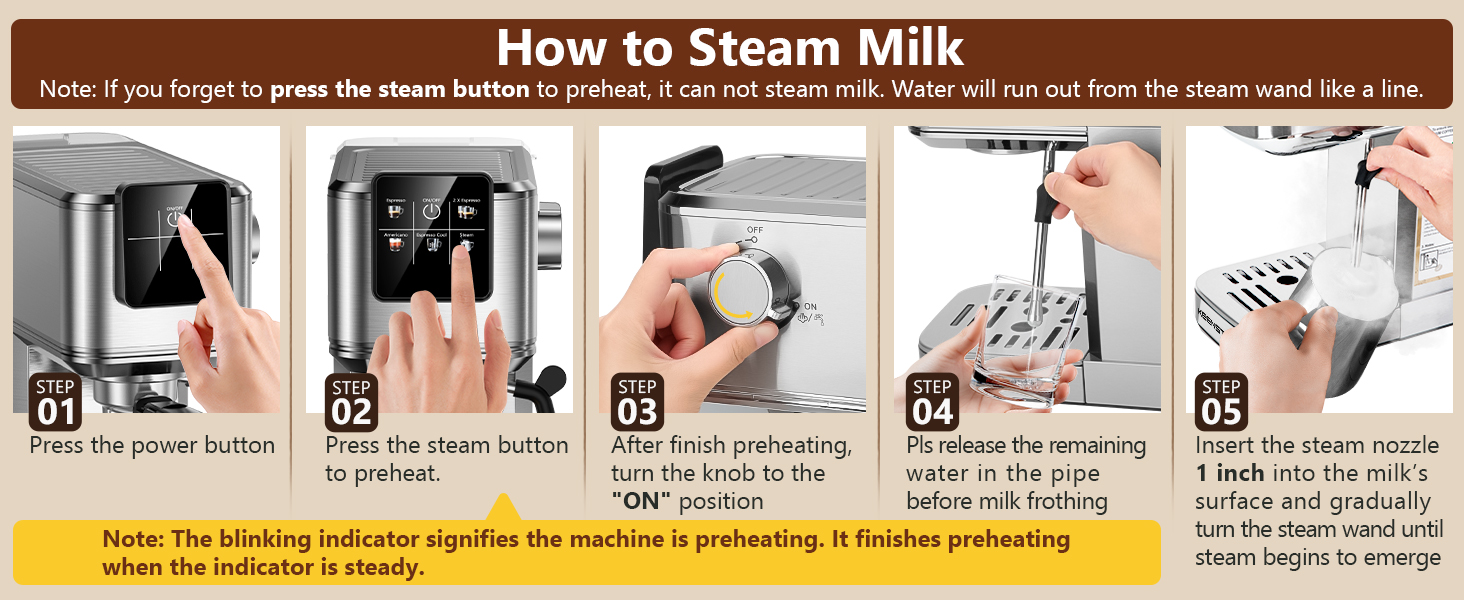
Image: Visual guide indicating that all accessories must be washed by hand and are not safe for dishwashers.
All accessories, including the portafilter, filter baskets, and water tank, must be washed by hand. They are not dishwasher safe.
7. Risoluzione Dei Problemi
Se riscontri problemi con la tua macchina per l'espresso, consulta la tabella sottostante per i problemi più comuni e le relative soluzioni.
| Problema | Possibile causa | Soluzione |
|---|---|---|
| Nessuna erogazione di caffè | Water tank empty; machine not preheated; portafilter not locked correctly; coffee too finely ground. | Fill water tank; wait for steady indicator light; ensure portafilter is fully locked; use medium-ground coffee. |
| Caffè leggero o acquoso | Insufficient coffee grounds; coffee too coarsely ground; tamping not firm enough. | Increase coffee amount; use medium-ground coffee; tamp con fermezza. |
| Nessun vapore dalla lancia | Steam function not preheated; steam wand clogged. | Press 'Steam' button and wait for steady indicator; clean steam wand thoroughly. |
| La macchina perde | Portafilter not locked correctly; seal ring worn; water tank not seated properly. | Ensure portafilter is fully locked; contact customer service for seal replacement; reseat water tank. |
If the problem persists after attempting these solutions, please contact KEENSTAR customer service for further assistance.
8. Specifiche
| Caratteristica | Specificazione |
|---|---|
| Marca | KEENSTAR |
| Nome del modello | JH-C5010E |
| Sistema di pressione | Pompa professionale da 20 bar |
| Cosatage | 1350W |
| Capacità del serbatoio dell'acqua | 1.1 litri (circa 37 once) |
| Dimensioni del prodotto (P x L x A) | 11.8" x 5.5" x 12.6" (30 cm x 14 cm x 32 cm) |
| Peso dell'articolo | 10 libbre |
| Materiale | Acciaio inossidabile |
| Tipo di ingresso caffè | Caffè macinato |
| Tipo di filtro | Riutilizzabile |
9. Garanzia e supporto
KEENSTAR provides the following support for your espresso machine:
- Garanzia soddisfatti o rimborsati entro 30 giorni: Se non sei soddisfatto del tuo acquisto, puoi restituirlo entro 30 giorni per ottenere un rimborso completo.
- Sostituzione gratuita per 1 anno: The product is eligible for a free replacement within 1 year from the date of purchase for manufacturing defects.
- Lifetime After-Customer Service: KEENSTAR offers lifetime customer service to assist with any questions or issues you may encounter with your machine.
For warranty claims or customer support, please refer to the contact information provided on the KEENSTAR official websito o la documentazione di acquisto.