Playtastic K8
K8 Game Stick Retro Game Console User Manual
Model: K8 | Brand: Playtastic
1. Introduzione
Welcome to the world of retro gaming with your new Playtastic K8 Game Stick. This compact and powerful console allows you to relive classic gaming moments in stunning 4K HD. With a vast library of 40,000 pre-loaded games and wireless controllers, endless entertainment is at your fingertips. This manual provides essential information for setting up, operating, and maintaining your K8 Game Stick.
2. Informazioni sulla sicurezza
AVVERTIMENTO:
- Not For Children Under 3 Years Of Age. Small parts may pose a choking hazard.
- Always ensure proper ventilation around the Game Stick during operation.
- Non esporre il dispositivo ad acqua, umidità o temperature estreme.
- Utilizzare solo il cavo di alimentazione e gli accessori forniti.
- Non tentare di smontare o riparare il dispositivo da soli. In caso di problemi, contattare l'assistenza clienti.
3. Cosa c'è nella scatola
Si prega di controllare il contenuto del pacco per assicurarsi che siano presenti tutti gli articoli:
- 1 x K8 Gamestick
- 2 controller wireless
- 1 x cavo di alimentazione USB
- 1 x ricevitore USB (per controller)
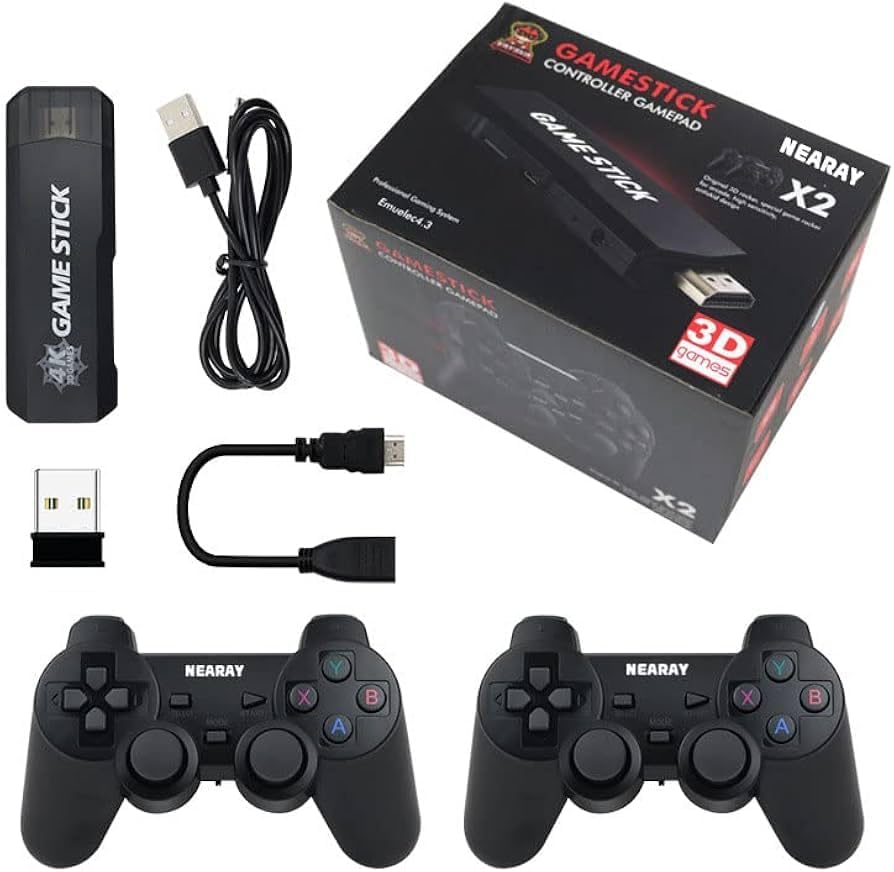
Image: All components included in the K8 Game Stick package.
4. Guida all'installazione
Follow these steps to set up your K8 Game Stick:
- Collega il Game Stick: Plug the K8 Gamestick directly into an available HDMI port on your television or monitor.
- Connetti alimentazione: Connect the provided USB power cable to the Game Stick's DC port and the other end to a USB power source (e.g., TV USB port, USB wall adapter). The Game Stick will power on automatically.
- Inserire il ricevitore USB: Insert the small USB receiver into the USB port on the K8 Gamestick. This receiver enables wireless communication with the controllers.
- Preparare i controllori: Each wireless controller requires 2 AA batteries (total 4 AA batteries, not included). Open the battery compartment on the back of each controller and insert the batteries, ensuring correct polarity (+/-).
- Seleziona ingresso HDMI: On your TV or monitor, switch the input source to the HDMI port where the K8 Game Stick is connected. You should see the Game Stick's main menu appear.
- Controller di coppia: The controllers should automatically pair with the Game Stick once powered on and the USB receiver is connected. If they do not, press the 'MODE' or 'HOME' button on the controller to initiate pairing.
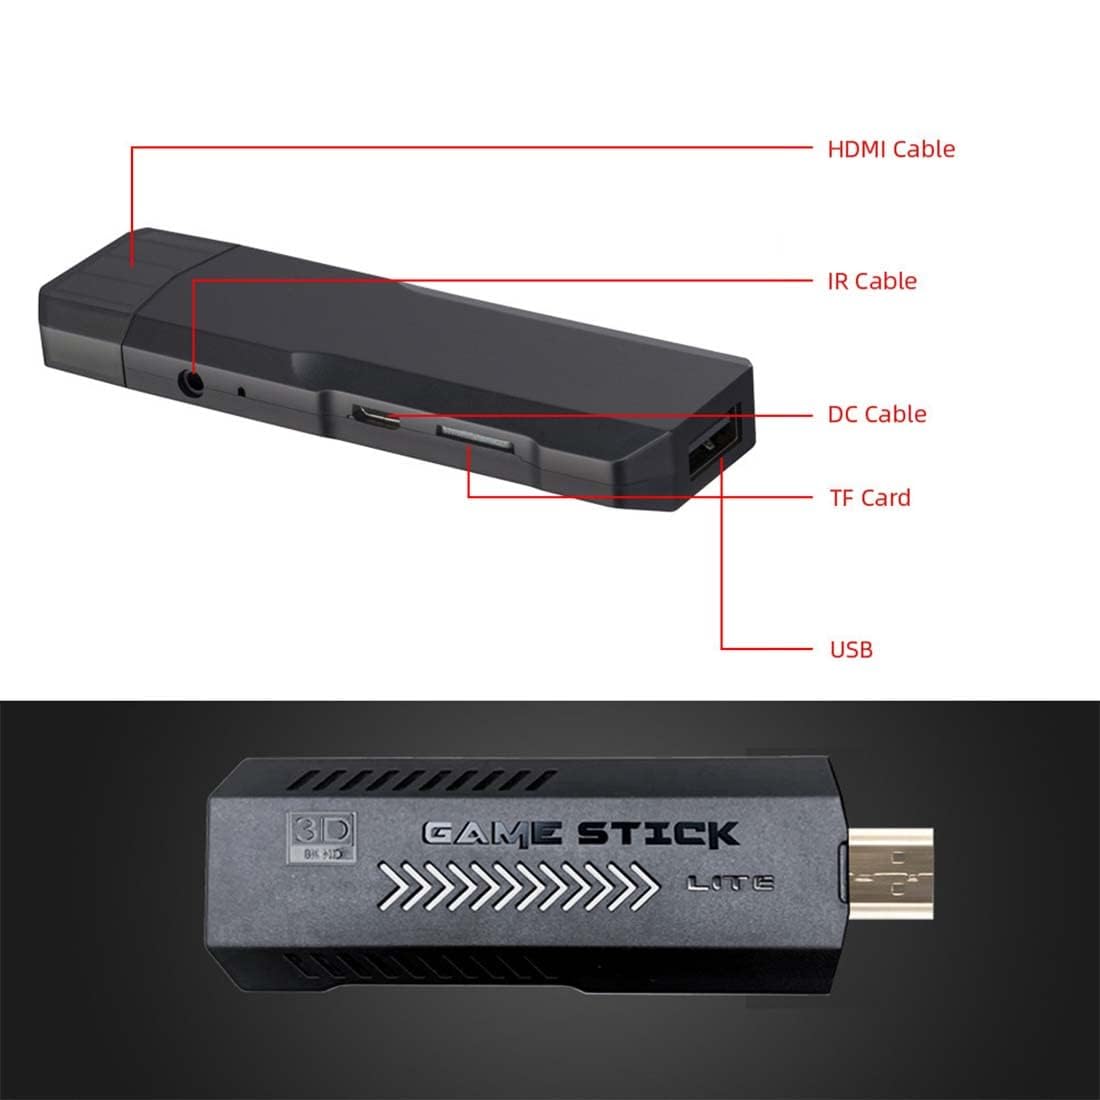
Image: K8 Game Stick with labeled ports for easy connection.
5. Istruzioni per l'uso
5.1 Navigazione nel menu
- Use the directional pad (D-pad) or left analog stick on the controller to move through menu options.
- Press the 'A' or 'X' button (depending on controller layout) to select an option or enter a game.
- Press the 'B' or 'O' button to go back to the previous menu.
- The 'START' and 'SELECT' buttons often have in-game functions or can be used for system shortcuts.
5.2 Giocare
- From the main menu, select the desired game category or search for a specific game.
- Highlight the game you wish to play and press the 'A' or 'X' button to launch it.
- Follow on-screen prompts or in-game instructions to play.

Image: The K8 Game Stick supports HDMI HD output for an enhanced gaming experience.
5.3 Exiting Games and Saving Progress
- To exit a game, typically press 'START' and 'SELECT' simultaneously for a few seconds. This will bring up an in-game menu or return you to the main system menu.
- Many retro games do not have in-game save features. The K8 Game Stick may offer system-level save states. Consult the on-screen menu (accessed via 'START' + 'SELECT' shortcut) for options to save or load game states.

Image: Enjoy classic games in stunning 4K Ultra HD resolution.
6. Manutenzione
- Pulizia: Use a soft, dry cloth to clean the Game Stick and controllers. For stubborn dirt, slightly dampLavare il panno con acqua. Non utilizzare prodotti chimici aggressivi o detergenti abrasivi.
- Magazzinaggio: Store the Game Stick and accessories in a cool, dry place away from direct sunlight and extreme temperatures when not in use.
- Cura della batteria: Remove batteries from the controllers if they will not be used for an extended period to prevent leakage.
7. Risoluzione Dei Problemi
7.1 Nessuna visualizzazione sulla TV
- Assicurati che il Game Stick sia collegato saldamente alla porta HDMI.
- Verificare che il cavo di alimentazione USB sia collegato e che il Game Stick sia alimentato.
- Check that your TV's input source is set to the correct HDMI port.
- Try connecting the Game Stick to a different HDMI port or TV.
7.2 Controllers Not Responding
- Ensure fresh AA batteries are correctly inserted into both controllers.
- Verify that the USB receiver is firmly plugged into the Game Stick's USB port.
- Try re-pairing the controllers by pressing the 'MODE' or 'HOME' button.
- Ensure there are no obstructions between the controllers and the USB receiver.
7.3 Game Lag or Freezing
- Assicurarsi che il Game Stick abbia una ventilazione adeguata e non si surriscaldi.
- Restart the Game Stick by unplugging and re-plugging the power cable.
- Some games may be more demanding; ensure your TV/monitor settings are optimized.
8. Specifiche
| Caratteristica | Descrizione |
|---|---|
| Numero di modello | K8 |
| Capacità di archiviazione della memoria | 64 GB (pre-loaded with 40,000 games) |
| Risoluzione di uscita | 4K HD (HDMI output) |
| Tipo di controllore | 2.4G Wireless Joystick with Action Buttons |
| Fonte di alimentazione | Battery Powered (for controllers), USB Powered (for Game Stick) |
| Batterie del controller | 4 AA batteries required (2 per controller, not included) |
| Materiale | Plastica |
| Peso dell'articolo | 200 grammi |
| Dimensioni del prodotto | Dimensioni: 15 x 12 x 2.5 cm |
| Componenti inclusi | Gamestick, 2 Controllers, USB Cable, USB Connector |
9. Garanzia e supporto
The Playtastic K8 Game Stick is manufactured by Playtastic and imported/packed by Balaji Trading Company (Playtastic) New Delhi. For any product-related inquiries, technical support, or warranty claims, please contact the seller or manufacturer directly through your purchase platform or their official contact channels.
Si prega di conservare la prova d'acquisto ai fini della garanzia.
Ask a question about this manual
Ask about setup, troubleshooting, compatibility, parts, safety, or missing instructions. Manuals+ will review the question and use this page’s manual context to help answer it.