TECXERLLON WBCAT71
TECXERLLON WBCAT71 RV Backup Camera System User Manual
Model: WBCAT71 | Brand: TECXERLLON
Introduzione
This manual provides detailed instructions for the installation, operation, and maintenance of your TECXERLLON WBCAT71 RV Backup Camera System. This system is designed to enhance safety and visibility for various large vehicles, including RVs, trucks, vans, SUVs, and trailers.

Image: TECXERLLON RV Backup Camera System components including the 7-inch monitor, camera, and mounting hardware.
Caratteristiche principali:
- 7-Inch Touchscreen Monitor: Intuitive control for settings and features.
- Wireless HD 1080P: High-definition video transmission for clear visuals.
- Sistema a 4 canali: Expandable to connect up to four cameras for comprehensive coverage.
- Visione notturna IR: Enhanced visibility in low-light conditions with 18 infrared lights.
- AI Detection with Real-Time Alerts: Advanced technology to detect pedestrians, vehicles, and obstacles.
- 2.4GHz Ultra-Strong Wireless Transmission: Stable signal up to 320 feet (97.5 meters) with zero frame loss.
- Registrazione DVR: Built-in capability to record footage (SD card not included).
- IP69K Waterproof Rating: Design resistente per tutte le condizioni atmosferiche.
Contenuto della confezione
Verifica che tutti gli articoli elencati di seguito siano inclusi nel tuo pacchetto:

Immagine: dettagliata view of all items included in the TECXERLLON RV Backup Camera System package.
- Camera Body (x1)
- Display Screen (7-inch Monitor) (x1)
- Sun Shade & U-bracket (x1)
- Viti (varie dimensioni)
- U-bracket Sticker (x1)
- RV Fittings (x1 set)
- Caricabatterie per auto (x1)
- Antenna (x2)
- Suction Holder (x1)
- 3m Cable (x1)
- Adapter Splitter (x1)
- Installation Kit (x1)
- Manuale utente (x1)
Configurazione e installazione
1. Installazione della telecamera
The camera is designed for quick and easy installation, compatible with Furrion pre-wired systems and general vehicle setups.
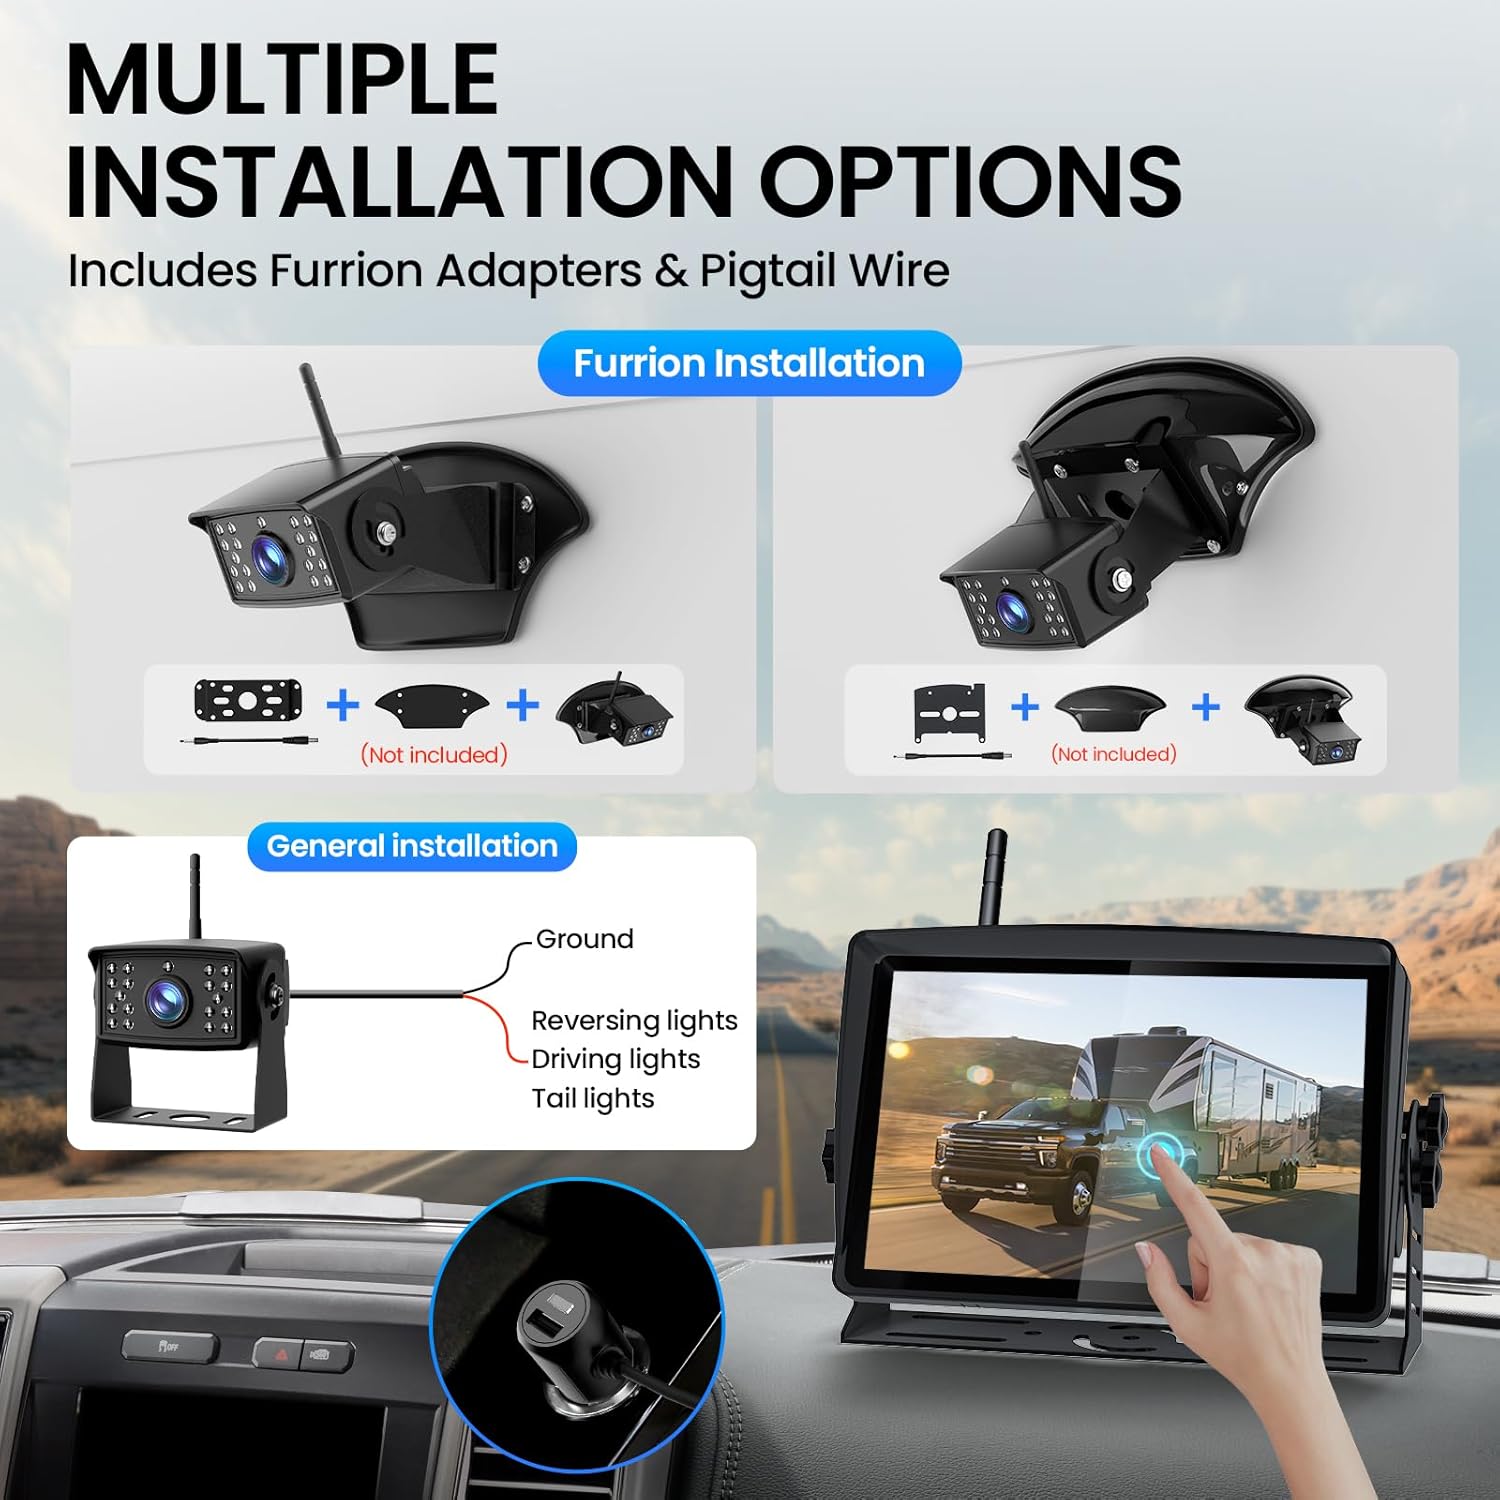
Image: Illustration of various camera installation methods, showing Furrion adapters and general wiring to vehicle lights.
- Scegli la posizione di montaggio: Select a position at the rear of your RV or vehicle that provides an optimal view. Ensure the antenna can be pointed upwards for best signal reception.
- Furrion Pre-wired System: If your RV is pre-wired for a Furrion system, remove the existing cover. Connect the camera using the provided Furrion adapters and pigtail wire.
- Installazione generale: For vehicles without a Furrion pre-wire, connect the camera's power cable to a 12V/24V power source (e.g., reversing lights, driving lights, or tail lights). Ensure proper grounding.
- Fotocamera protetta: Use the appropriate bracket and screws from the installation kit to firmly attach the camera. Adjust the camera angle to point straight down towards the rear of the vehicle.
2. Monitorare l'installazione
The 7-inch touchscreen monitor can be mounted on your dashboard or windshield.

Image: The 7-inch monitor displayed on a dashboard and attached to a windshield using different mounting options.
- Attach Suction Holder: Secure the suction holder to the back of the monitor.
- Superficie di montaggio pulita: Clean the desired area on your dashboard or windshield with rubbing alcohol and a clean rag. Allow it to dry completely.
- Monitor di montaggio: Press the suction cup firmly onto the cleaned surface and engage the locking mechanism to secure it.
- Connetti alimentazione: Plug the monitor's power cord into your vehicle's cigarette lighter outlet.
- Installare le antenne: Screw both antennas onto the designated ports on the monitor and camera.
Video: Una rapida panoramicaview of the TECXERLLON RV Backup Camera System, demonstrating its components and basic functionality.
Istruzioni per l'uso
1. Accensione/spegnimento
Once the monitor is connected to power and the camera is installed, turn on your vehicle. The monitor should automatically power on and display the camera feed.
2. Controllo touchscreen
The 7-inch touchscreen allows for easy navigation of settings and features. Swipe to access various options.
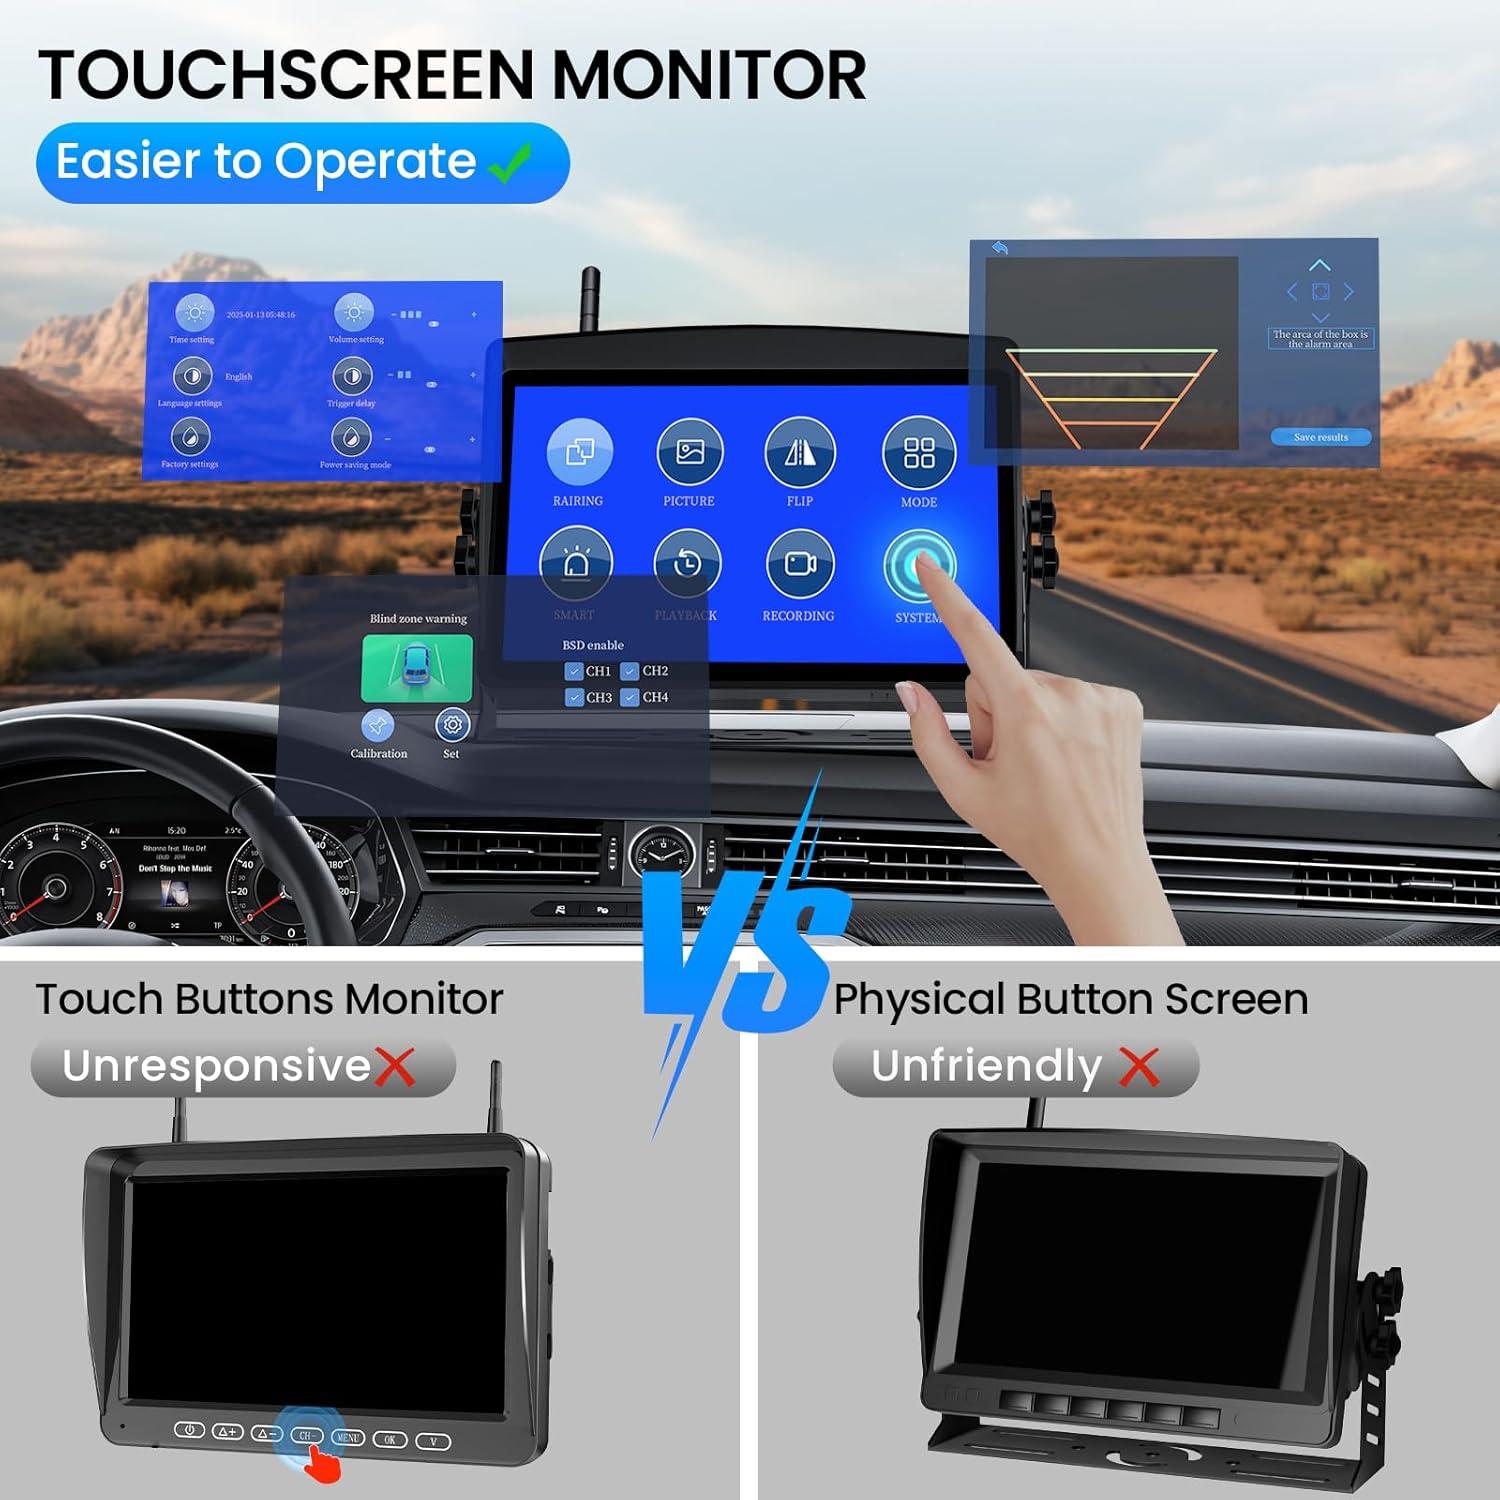
Image: The touchscreen monitor interface, highlighting its ease of use compared to traditional physical button screens.
3. Rilevamento e avvisi AI
The system features advanced AI technology to detect pedestrians, vehicles, and obstacles. Real-time alerts will notify you of potential hazards.

Image: Visual representation of the AI detection system identifying a vehicle and a person with an alarm alert on the monitor.
4. Visione notturna
The camera is equipped with 18 infrared lights for clear night vision, even in total darkness.
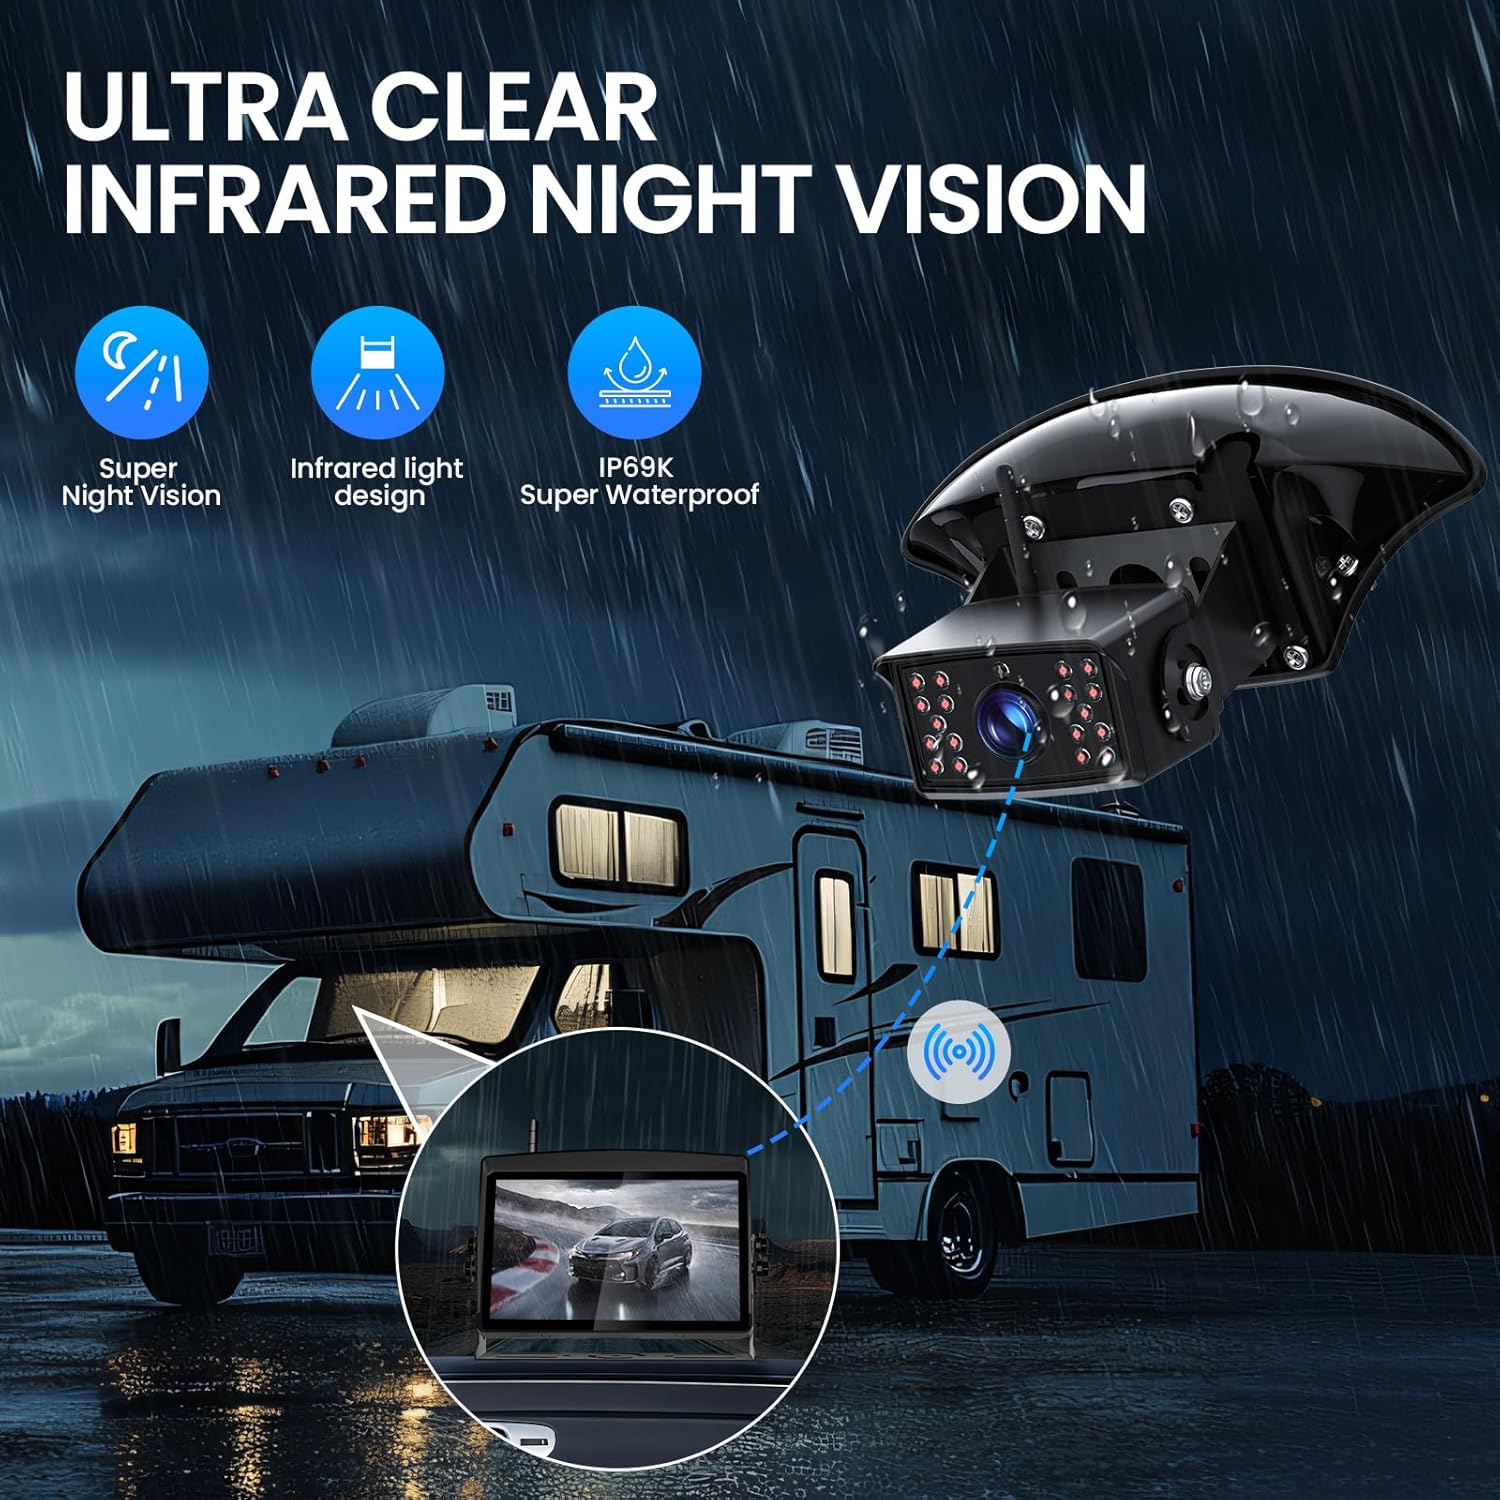
Image: An RV at night with the backup camera's infrared night vision active, showing clear visibility on the monitor.
5. Multi-Channel View
Connect up to four cameras to the HD 1080P monitor. Easily switch between cameras or view multiple feeds simultaneously using the versatile display mode options (single, split, triple, or quad screen).

Immagine: Il monitor mostraasing different multi-channel display modes: single, split, triple, and quad screen views from connected cameras.
Funzionalità avanzate
Trasmissione senza fili
The system utilizes 2.4GHz technology with a high-performance chip, ensuring a stable, crystal-clear signal up to 320 feet (97.5 meters) with zero frame loss. This provides seamless video streaming and a clear view dell'ambiente circostante.

Image: Visual representation of the 2.4GHz wireless signal transmission between the camera and monitor, highlighting stable signal and no frame loss.
Registrazione DVR
Record every drive with the built-in DVR function. The system supports loop recording and local playback. An SD card is required for recording and is not included in the package.

Image: The monitor displaying recorded footage, with an SD card slot indicated for DVR functionality.
Design impermeabile
The camera boasts an IP69K waterproof rating, ensuring durability and reliable performance in all weather conditions, including heavy rain and extreme temperatures.
Specifiche
| Caratteristica | Dettaglio |
|---|---|
| Dimensioni del prodotto | 8.2 x 2.4 x 5.3 pollici |
| Peso dell'articolo | 3.61 libbre |
| Tecnologia di visualizzazione | LCD |
| Dimensioni dello schermo | 7 pollici |
| Colore | Nero |
| Dispositivi compatibili | Compatible with any vehicle |
| Tipo di installazione | Montaggio in superficie |
| Tecnologia dei sensori ottici | Infrarossi |
| Tipo di lente | Grandangolo |
| Angolo reale di View | 120 gradi |
| Tipo di connettore | Senza fili |
| Dimensioni del sensore ottico | 1/3 pollici |
Risoluzione dei problemi
If you encounter any issues with your TECXERLLON WBCAT71 system, please refer to the following common solutions:
- Nessun segnale:
- Assicurarsi che sia la telecamera sia il monitor siano accesi.
- Verificare che le antenne siano fissate saldamente a entrambe le unità.
- Verify that there are no major obstructions blocking the wireless signal path.
- Try re-pairing the camera and monitor through the monitor's settings menu.
- Scarsa qualità dell'immagine:
- Pulisci l'obiettivo della fotocamera.
- Adjust brightness and contrast settings on the monitor.
- Assicurarsi che la telecamera sia montata saldamente e non vibri.
- Il monitor non si accende:
- Check the cigarette lighter connection and ensure it's receiving power.
- Verify the power cable is correctly plugged into the monitor.
- AI Alerts Not Functioning:
- Ensure AI detection is enabled in the monitor's settings.
- Check the sensitivity settings for AI detection.
Manutenzione
Regular maintenance will ensure the longevity and optimal performance of your backup camera system:
- Obiettivo della fotocamera: Pulire regolarmente l'obiettivo della fotocamera con un panno morbido eamp panno per rimuovere sporco, polvere o macchie d'acqua che potrebbero ostruire il viewEvitare detergenti abrasivi.
- Schermo: Wipe the monitor screen with a microfiber cloth. For stubborn smudges, use a screen-safe cleaning solution.
- Connessioni: Periodically check all cable connections (power, antenna) to ensure they are secure and free from corrosion.
- Montaggio: Verify that the camera and monitor mounts are tight and stable, especially after long trips or exposure to rough terrain.
- Guarnizioni impermeabili: Although the camera is IP69K rated, inspect the seals around the camera housing for any signs of damage or wear, particularly if exposed to extreme weather.
Garanzia e supporto
Your TECXERLLON WBCAT71 RV Backup Camera System comes with a manufacturer's warranty. Please refer to the warranty card included in your package for specific terms and conditions.
For technical support, troubleshooting assistance, or warranty claims, please contact TECXERLLON customer service:
- E-mail: support@tecxerllon.com
- Supporto online: Visit the official TECXERLLON websito per FAQ e risorse aggiuntive.
Sono disponibili per l'acquisto ulteriori piani di protezione:
- Piano di protezione biennale
- Piano di protezione biennale
- Protezione completa: un unico piano copre tutti gli acquisti idonei passati e futuri (disponibile l'opzione di fatturazione mensile).
Ask a question about this manual
Ask about setup, troubleshooting, compatibility, parts, safety, or missing instructions. Manuals+ will review the question and use this page’s manual context to help answer it.