
Aqualin YL21177
Aqualin Water Timer Garden Irrigation Hose Timer User Manual
Modello: YL21177
Prodotto finitoview
The Aqualin Water Timer is an advanced irrigation system designed for efficient and automated watering of lawns, gardens, and pools. It features three independent irrigation programs, rain delay functionality, and a manual watering mode, providing flexible control over your watering schedule. Its durable and waterproof design ensures reliable performance in various outdoor conditions.

Figura 1: Fronte view of the Aqualin Water Timer, showing the large LCD display, rotary dial, and control buttons.
Caratteristiche principali:
- 3 Independent Irrigation Programs: Customize watering schedules with distinct start times, durations (1 to 360 minutes), and frequencies (1 hour to 15 days).
- Waterproof and Durable Design: Constructed with waterproof materials and a sealed battery cover to prevent internal leakage. Features a sturdy metal thread connection.
- Interfaccia facile da usare: Large LCD screen for clear display of watering information and intuitive controls for programming.
- Modalità di ritardo pioggia: Pause scheduled watering for 6, 12 hours, or 1-7 days to conserve water during rainfall.
- Modalità manuale: Allows for on-demand watering without affecting programmed schedules.
- Intelligent Timing System: Built-in solenoid valve for precise and stable program execution.
Impostare
1. Unboxing e componenti
Carefully remove the Aqualin Water Timer from its packaging. Ensure all components are present. The main unit includes the timer body, an integrated metal filter, and a connection nut.

Figure 2: The Aqualin Water Timer highlighting the built-in metal filter for durability and the easy-to-operate rotary dial.
2. Installazione della batteria
- Individuare il vano batterie sul retro del timer.
- Aprire il coperchio sigillato della batteria.
- Insert two (2) AA 1.5V batteries (not included) into the compartment, ensuring correct polarity (+/-).
- Securely close the battery cover to maintain its waterproof seal.
3. Installation to Faucet
- Assicuratevi che il rubinetto esterno sia chiuso.
- Thread the Aqualin Water Timer onto your standard outdoor faucet. The top connection features a durable metal thread for a secure fit.
- Tighten the connection by hand until snug. Avoid over-tightening.
- Connect your garden hose to the bottom outlet of the water timer.
- Slowly turn on your outdoor faucet. Check for any leaks at the connections.
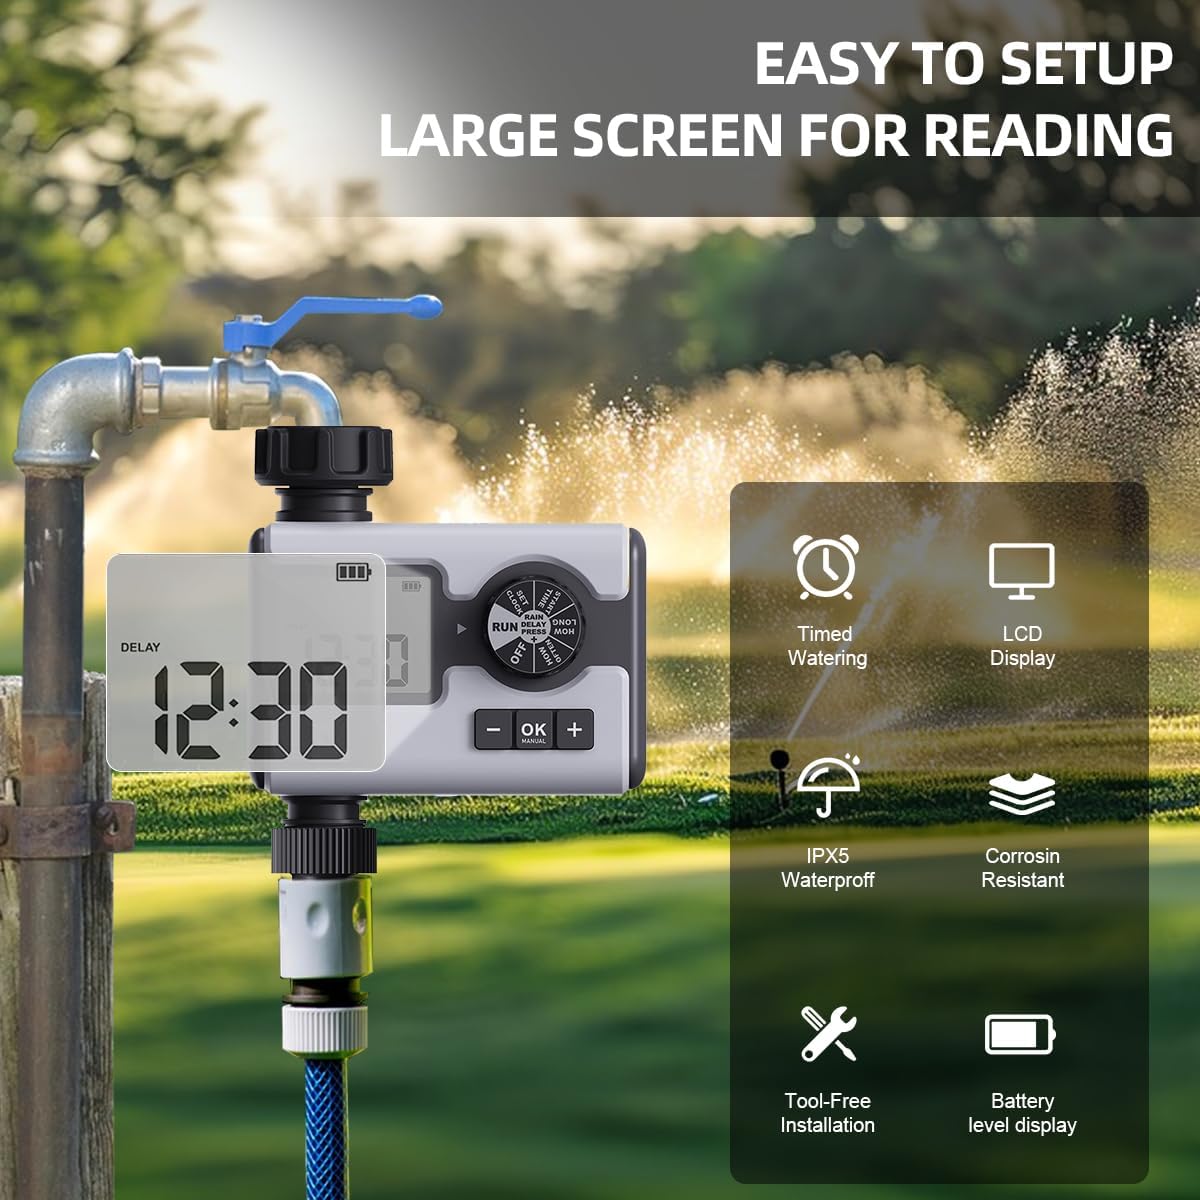
Figure 3: The Aqualin Water Timer connected to a faucet, illustrating its large LCD display for easy reading, IPX5 waterproof rating, corrosion resistance, and tool-free installation.
4. Impostazione dell'orologio
- Ruotare la manopola sulla posizione "SET CLOCK".
- Utilizzare i pulsanti "+" e "-" per regolare l'ora corrente.
- Press "OK" to confirm the setting and move to the next digit or exit the setting mode.
Istruzioni per l'uso
1. Understanding the Control Dial
The central rotary dial allows you to navigate through different settings and modes. The available positions are:
- OFF: Disattiva tutti i programmi di irrigazione.
- CORRERE: Activates the programmed watering schedules.
- IMPOSTA L'OROLOGIO: Usato per impostare l'ora corrente.
- START TIME: Sets the beginning time for a watering program.
- PER QUANTO: Sets the duration of watering.
- QUANTO SPESSO: Sets the frequency of watering.
- RITARDO PIOGGIA: Attiva la funzione di ritardo pioggia.
2. Programming Irrigation Schedules (P1, P2, P3)
The Aqualin Water Timer supports three independent programs (P1, P2, P3). Each program can be configured with its own start time, duration, and frequency.
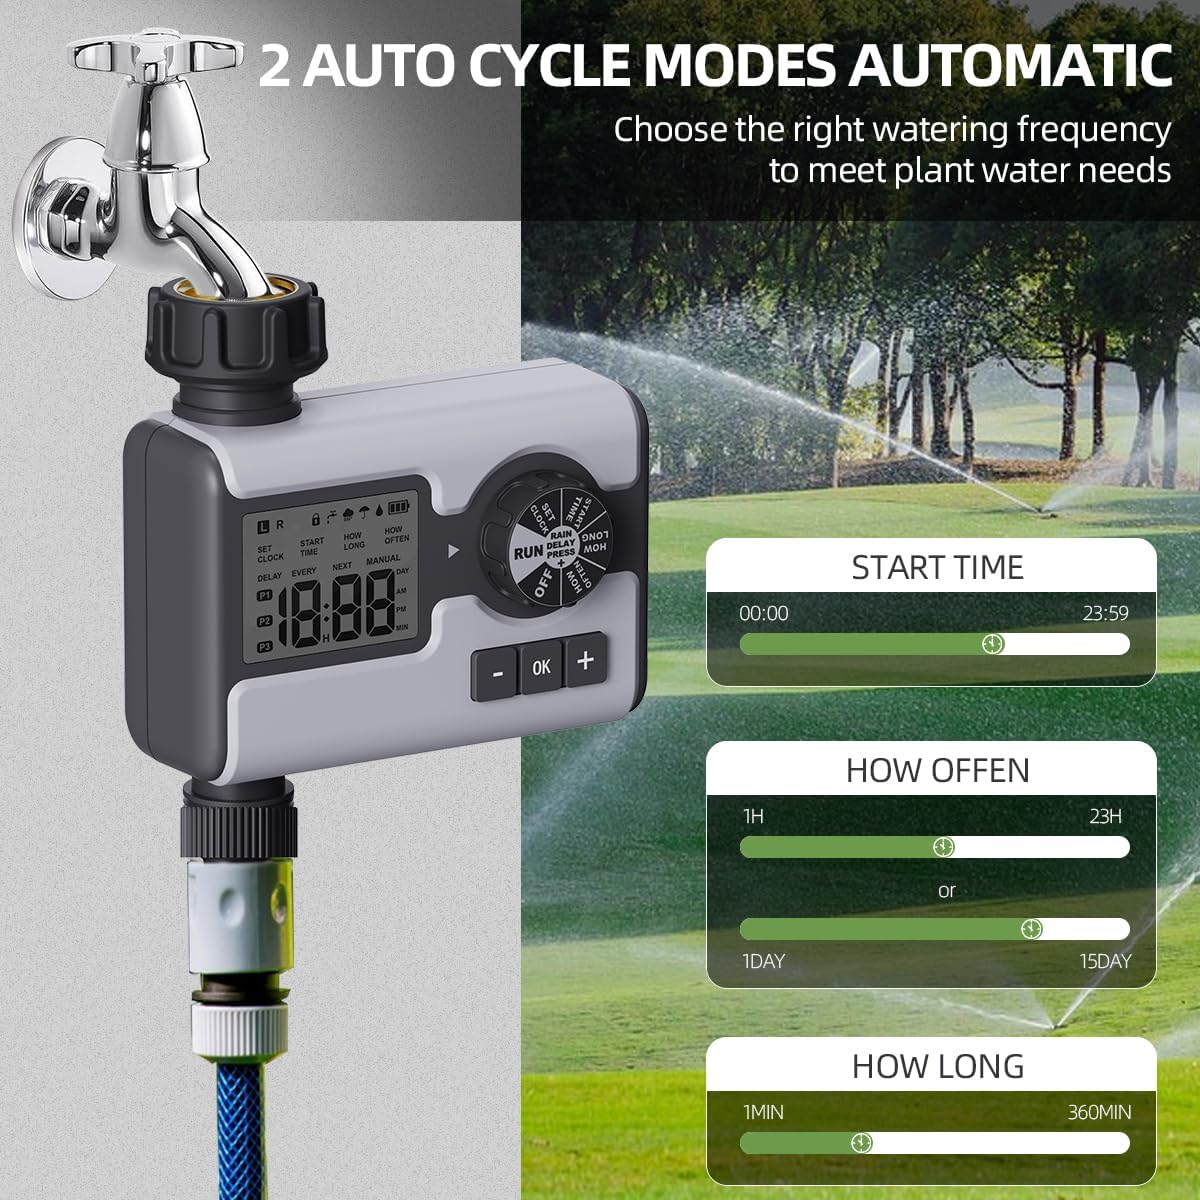
Figure 4: Display illustrating the settings for Start Time (00:00-23:59), How Often (1 hour-23 hours or 1 day-15 days), and How Long (1 minute-360 minutes) for the automatic watering cycles.
- Seleziona programma: While in "RUN" mode, press the "OK" button repeatedly to cycle through P1, P2, P3. The active program will be displayed on the LCD.
- Imposta ora di inizio:
- Rotate the dial to "START TIME".
- Use "+" and "-" buttons to set the desired start time for the selected program.
- Premere "OK" per confermare.
- Set Watering Duration ("HOW LONG"):
- Rotate the dial to "HOW LONG".
- Use "+" and "-" buttons to set the watering duration from 1 minute to 360 minutes.
- Premere "OK" per confermare.
- Set Watering Frequency ("HOW OFTEN"):
- Rotate the dial to "HOW OFTEN".
- Use "+" and "-" buttons to set the frequency: from 1 hour to 23 hours, or from 1 day to 15 days.
- Premere "OK" per confermare.
- After setting all parameters for a program, rotate the dial back to "RUN" to activate the schedule.
3. Modalità di ritardo pioggia
The rain delay feature allows you to temporarily pause your watering schedule to avoid overwatering during or after rainfall.

Figure 5: The Aqualin Water Timer displaying the rain delay function, which can be set for 6/12 hours or 1-7 days.
- While the timer is in "RUN" mode, press the "+" button.
- The display will show "DELAY". Use the "+" or "-" buttons to select the desired delay duration: 6 hours, 12 hours, or 1 to 7 days.
- Press "OK" to confirm the rain delay. The timer will resume its schedule automatically after the delay period ends.
4. Modalità di irrigazione manuale
The manual mode allows for immediate, on-demand watering without interrupting your pre-programmed schedules.

Figure 6: A person using the manual watering feature with the Aqualin Water Timer, indicating that temporary water use does not alter automatic watering schedules. The watering duration can be set from 1 minute to 360 minutes.
- While the timer is in "RUN" mode, press the "MANUAL" (OK) button.
- The display will show the manual watering duration. Use the "+" and "-" buttons to adjust the desired manual watering time.
- Premere "OK" per avviare l'irrigazione manuale.
- To stop manual watering prematurely, press the "MANUAL" (OK) button again.
Manutenzione
- Pulizia: Pulire periodicamente l'esterno del timer con un pannoamp cloth to remove dirt and debris. Do not use abrasive cleaners.
- Pulizia del filtro: The timer has a built-in metal filter. If water flow is reduced, unscrew the timer from the faucet, remove and clean the filter screen under running water. Reinstall the filter before reattaching the timer.
- Sostituzione della batteria: Replace batteries when the low battery indicator appears on the LCD screen. Always use fresh AA 1.5V alkaline batteries.
- Rimessaggio invernale: Before freezing temperatures, disconnect the timer from the faucet and hose. Remove the batteries. Store the timer indoors in a dry, frost-free location to prevent damage.
Risoluzione dei problemi
| Problema | Possibile causa | Soluzione |
|---|---|---|
| Timer not turning on/LCD blank. | Batterie scariche o installate in modo errato. | Replace with new AA 1.5V batteries, ensuring correct polarity. |
| Nessun flusso d'acqua o bassa pressione dell'acqua. |
|
|
| Il timer non irriga negli orari programmati. |
|
|
| Perdita d'acqua dai collegamenti. | Loose connection or missing/damaged washer. | Ensure connections are hand-tight. Check and replace rubber washers if damaged. |
Specifiche
| Caratteristica | Dettaglio |
|---|---|
| Marca | Aqualin |
| Numero di modello | Numero di modello: YL21177 |
| Materiale | Plastic (with metal thread connection) |
| Colore | Grigio |
| Dimensioni del prodotto (P x L x A) | 2.56"P x 5.24"L x 5.91"A |
| Peso dell'articolo | 357 grammi (12.6 once) |
| Intervallo di pressione dell'acqua | da 14.5 psi a 116 psi |
| Fonte di alimentazione | 2 batterie AA da 1.5 V (non incluse) |
| Durata dell'irrigazione | 1 minuto a 360 minuti |
| Frequenza di irrigazione | Da 1 ora a 15 giorni |
| Opzioni di ritardo per pioggia | 6 hours, 12 hours, 1-7 days |
| Grado di impermeabilità | IPX5 (implied from "IPX5 Waterproff" image) |
Garanzia e supporto
For warranty information and customer support, please refer to the documentation provided with your purchase or contact the retailer where the product was acquired. You may also visit the official Aqualin websito per ulteriore assistenza.
Note: No official product videos from the seller were found in the provided data.
Ask a question about this manual
Ask about setup, troubleshooting, compatibility, parts, safety, or missing instructions. Manuals+ will review the question and use this page’s manual context to help answer it.