
1. Introduzione
This manual provides essential information for the safe and efficient operation, installation, and maintenance of your VIKIO HOME Under Cabinet Range Hood. Please read this manual thoroughly before installation and use, and retain it for future reference.

Immagine 1: anteriore view of the VIKIO HOME Under Cabinet Range Hood.
2. Informazioni sulla sicurezza
AVVERTIMENTO: Per ridurre il rischio di incendi, scosse elettriche o lesioni alle persone, osservare quanto segue:
- I lavori di installazione e il cablaggio elettrico devono essere eseguiti da personale qualificato, nel rispetto di tutti i codici e gli standard applicabili, comprese le costruzioni ignifughe.
- Per una corretta combustione e l'espulsione dei gas attraverso il camino delle apparecchiature a combustione di carburante è necessaria aria a sufficienza per evitare il ritorno di aria.
- Quando si taglia o si fora un muro o un soffitto, fare attenzione a non danneggiare i cavi elettrici o altri servizi nascosti.
- I ventilatori canalizzati devono sempre essere indirizzati verso l'esterno.
- Scollegare sempre l'alimentazione dall'unità prima di effettuare interventi di manutenzione o pulizia.
- Do not use the range hood for exhausting hazardous or explosive materials.
- Pulire frequentemente i filtri antigrasso. Evitare che il grasso si accumuli sulla ventola o sul filtro.
3. Contenuto della confezione
Prima di procedere con l'installazione, verificare che tutti i componenti siano presenti e integri.
- VIKIO HOME Under Cabinet Range Hood Unit
- 5-layer aluminum filter (pre-installed or separate)
- Hardware di montaggio (viti, tasselli, ecc.)
- Manuale d'uso
- Duct adapters (6" round and 10" x 3.25" rectangular, for top/rear venting)
4. Configurazione e installazione
Proper installation is crucial for optimal performance and safety. This range hood is designed for under-cabinet mounting and can accommodate both top and rear venting configurations.
4.1 Requisiti di installazione
- Ensure cabinets are wider than 30 inches for proper fit.
- Recommended mounting height: Minimum 24 inches to Maximum 30 inches from the cooking surface to the bottom of the range hood.
- Electrical supply: 120 Volts, 60 Hz, 1.3 Amps.
- Ductwork: Compatible with 6-inch round ductwork for top venting or 10" x 3.25" rectangular ductwork for top/rear venting.
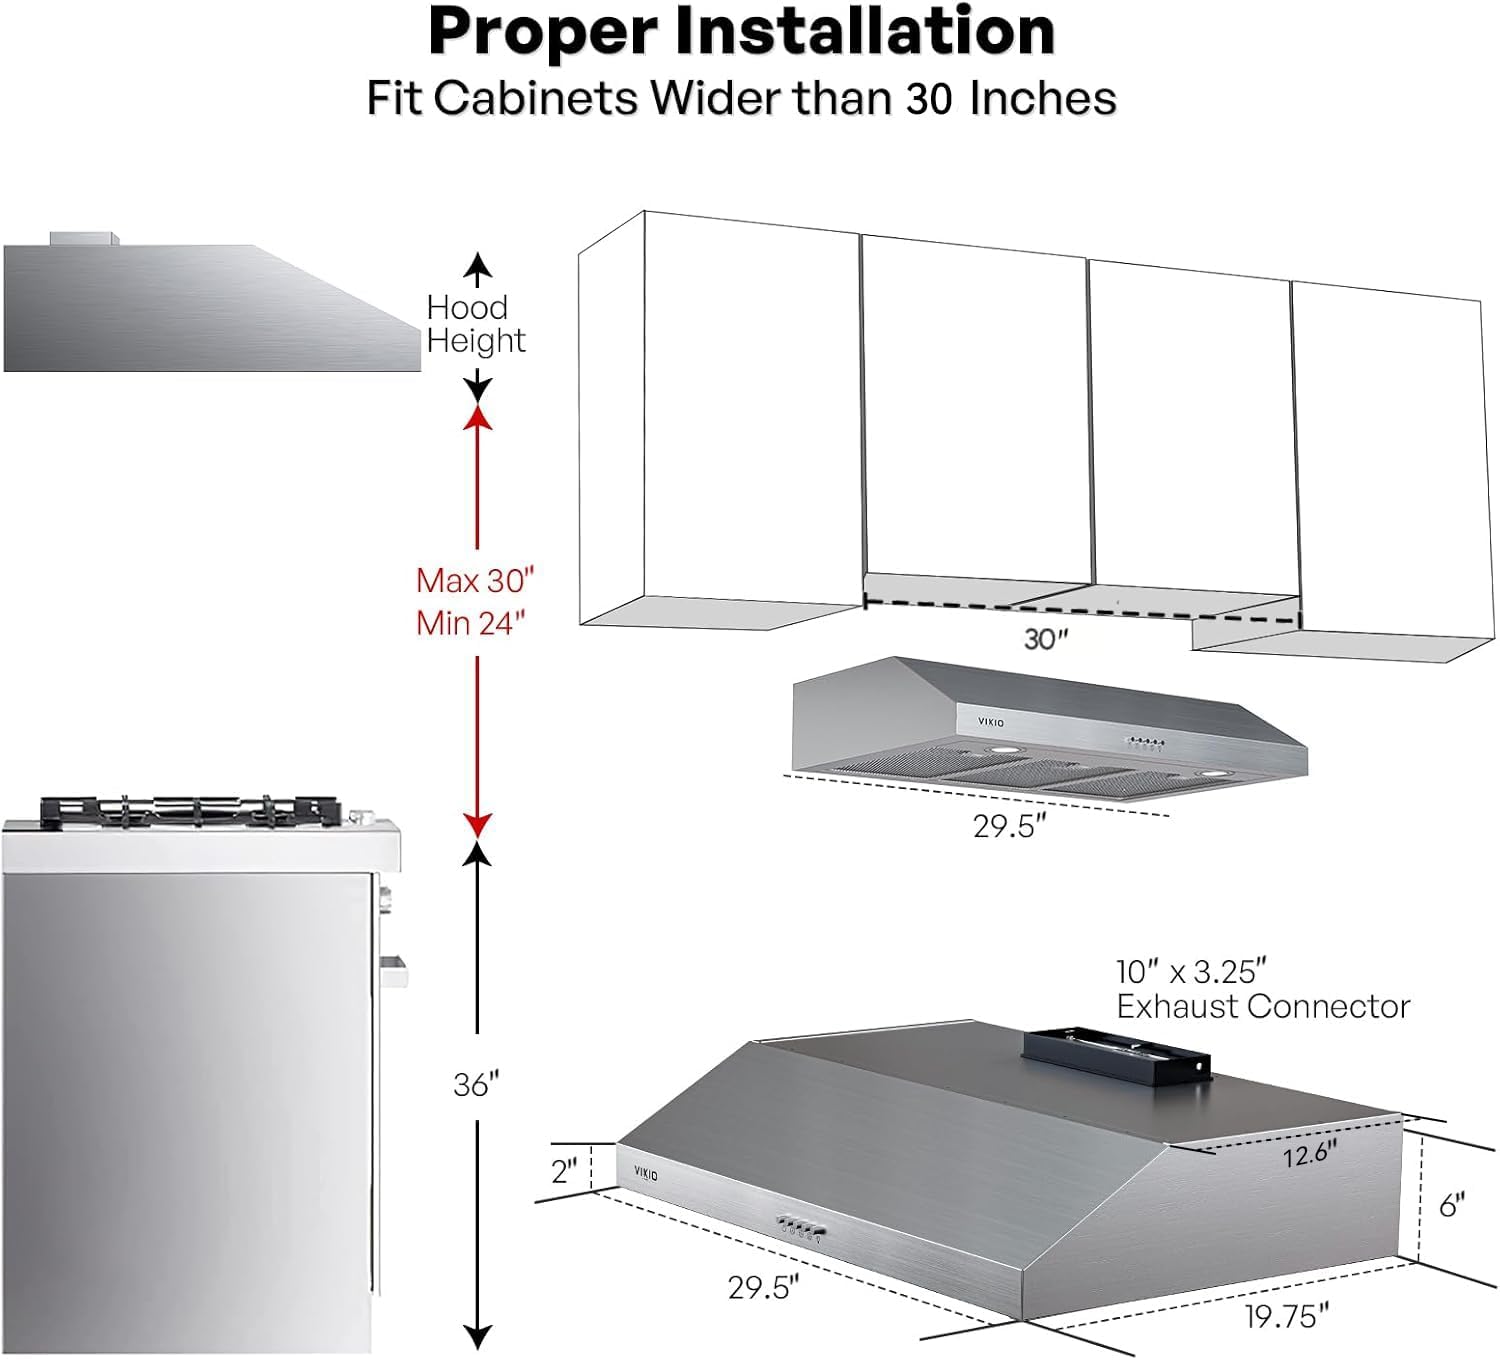
Image 2: Proper installation dimensions and clearances for the range hood.

Image 3: Illustration of top and back venting configurations.

Image 4: Adapters for both round (top) and rectangular (top/rear) ductwork.
4.2 Fasi di installazione (generali)view)
- Preparare l'area: Ensure power is off at the circuit breaker. Mark the location for the range hood and ductwork opening.
- Montaggio: Secure the range hood to the underside of the cabinet using the provided mounting hardware. Ensure it is level and firmly attached.
- Collegamento al condotto: Connect the appropriate ductwork (not included) to the exhaust connector on the range hood. Seal all connections with duct tape to prevent air leaks.
- Collegamento elettrico: Connect the range hood to the household electrical supply according to local codes.
- Installa filtri: Insert the 5-layer aluminum filters into their designated slots.
- Operazione di prova: Restore power and test all functions of the range hood.
5. Istruzioni per l'uso
Your VIKIO HOME range hood features user-friendly mechanical push-button controls for efficient operation.
5.1 Pannello di controllo Sopraview

Immagine 5: Dettagliata view of the mechanical control panel.
- Pulsante di accensione/spegnimento: Premere per accendere o spegnere la cappa.
- Speed Buttons (Low, Med, High): Selezionare la velocità della ventola desiderata.
- Bassa velocità: Ideal for light cooking or simmering.
- Velocità media: Adatto alla cucina generale.
- Ad alta velocità: For heavy cooking, frying, or strong odors, utilizing the full 580 CFM airflow.
- Pulsante di accensione/spegnimento della luce: Premere per accendere o spegnere le luci LED.
5.2 Dual-Motor Technology and Performance
This range hood is equipped with an advanced dual-motor system, providing superior suction and quiet operation. The dual motors work in tandem to deliver an impressive 580 CFM airflow, effectively removing smoke, grease, and cooking odors from your kitchen environment.

Image 6: Illustration of the dual-motor system and its powerful airflow.

Immagine 7: Primo piano view of the powerful dual fans within the range hood.

Image 8: Infographic highlighting the benefits of dual motors, including high CFM and low noise levels.
The range hood operates at noise levels as low as 35 dB and up to 60 dB, ensuring a quiet cooking environment even at maximum power.

Image 9: The range hood maintains a quiet operation, allowing for a peaceful kitchen environment.
5.3 Illuminazione a LED
The range hood features powerful, energy-efficient 4000K LED lights. These lights provide a clear, bright glow over your entire cooking area, enhancing visibility and creating a welcoming ambiance. The GU10 LED type allows for quick and easy replacement if needed.

Image 10: The integrated LED lights provide clear and bright illumination for your cooking space.
6. Manutenzione
Una manutenzione regolare garantisce la longevità e le prestazioni ottimali della cappa.
6.1 Pulizia dell'esterno
The stainless steel finish is resistant to oil and grease buildup and is easy to clean. Use a soft cloth with a mild, non-abrasive cleaner specifically designed for stainless steel. Avoid harsh chemicals or abrasive pads that could scratch the surface.

Image 11: The stainless steel finish is designed for easy cleaning and maintenance.
6.2 Pulizia dei filtri in alluminio
The 5-layer aluminum mesh filters are designed to trap grease effectively. For optimal performance, clean the filters regularly (e.g., monthly, depending on cooking frequency). The filters are dishwasher safe for convenient cleaning.
- To remove filters: Locate the release tabs or handles on each filter and gently pull them down or slide them out.
- Cleaning: Place filters in a dishwasher or wash by hand with hot water and a degreasing detersivo.
- Reinstallation: Ensure filters are completely dry before reinserting them into the range hood.

Image 12: The 5-layer aluminum filters efficiently trap grease, ensuring a cleaner kitchen.
7. Risoluzione Dei Problemi
Fare riferimento a questa sezione per problemi comuni e le loro possibili soluzioni.
| Problema | Possibile causa | Soluzione |
|---|---|---|
| La cappa non funziona. | Nessuna alimentazione; interruttore automatico scattato; cablaggio allentato. | Controllare il collegamento elettrico; ripristinare l'interruttore automatico; assicurarsi che tutti i cavi siano ben saldi (in caso di dubbi, consultare un elettricista qualificato). |
| Aspirazione insufficiente. | Grease filters are clogged; ductwork is obstructed or too long/restrictive; fan speed too low. | Clean or replace filters; check ductwork for obstructions or proper sizing; increase fan speed. |
| Le luci non funzionano. | Bulb is faulty; loose wiring. | Replace LED bulb (GU10 type); check electrical connections. |
| Rumore eccessivo. | Fan blades are dirty or damaged; loose mounting; ductwork vibration. | Clean fan blades; ensure unit is securely mounted; check ductwork for proper installation and sealing. |
8. Specifiche
Technical specifications for the VIKIO HOME Under Cabinet Range Hood (Model: VKH-RC10-30SI).
| Caratteristica | Specificazione |
|---|---|
| Marca | CASA VIKIO |
| Numero di modello | VKH-RC10-30SI |
| Capacità del flusso d'aria | 580 piedi cubi al minuto (CFM) |
| Livello di rumore | 35 dB (Min) to 60 dB (Max) |
| Numero di velocità | 3 |
| Tipo di montaggio | Sotto l'armadio |
| Tipo di ventilazione | canalizzato |
| Dimensioni del prodotto (L x P x A) | 29.5" x 19.68" x 6" |
| Peso dell'articolo | 27 libbre |
| Materiale | Carbide (Stainless Steel Finish) |
| Tipo di controlli | Premere il pulsante |
| Voltage | 120 Volt |
| Amprabbia | 1.3 Amps |
| Cosatage | 146 watt |
| Tipo di sorgente luminosa | LED (4000K, GU10) |
| Tipo di filtro | 5-layer Mesh Aluminum Filter |
| Caratteristiche speciali | Dual-Motor Technology, Noise Reduction |
9. Garanzia e supporto
VIKIO HOME stands behind the quality of its products. Your purchase includes a reliable guarantee. In the event of any issues or the need for replacement accessories such as filters or lights, please contact our dedicated customer support team.
For assistance, please refer to the contact information provided with your product packaging or visit the official VIKIO HOME websito per le risorse di supporto.