1. Importanti istruzioni di sicurezza
Si prega di leggere attentamente il presente manuale prima di utilizzare l'apparecchio e di conservarlo per riferimento futuro. Il mancato rispetto di queste istruzioni può causare scosse elettriche, incendi o lesioni gravi.
- Collegare sempre l'apparecchio a una presa di corrente dotata di messa a terra.
- Non utilizzare l'apparecchio con un cavo o una spina danneggiati.
- Non immergere l'apparecchio, il cavo o la spina in acqua o altri liquidi.
- Tenere l'apparecchio lontano da fonti di calore e luce solare diretta.
- Assicurare una ventilazione adeguata attorno all'unità; non bloccare le prese d'aria o le uscite.
- Questo apparecchio è destinato esclusivamente all'uso in ambienti interni.
- Scollegare l'apparecchio prima di pulirlo o di effettuare qualsiasi intervento di manutenzione.
2. Prodotto finitoview
The BRITEC Dehumidifier + WiFi Air Purifier is an innovative appliance designed to improve indoor air quality by effectively removing excess moisture and purifying the air. It features a HEPA H13 filter to capture fine particles, pollen, bacteria, and viruses.
2.1. Componenti e caratteristiche

Figura 2.1: Fronte view of the BRITEC Dehumidifier. This image shows the sleek white design of the unit with a black top panel and a digital display.
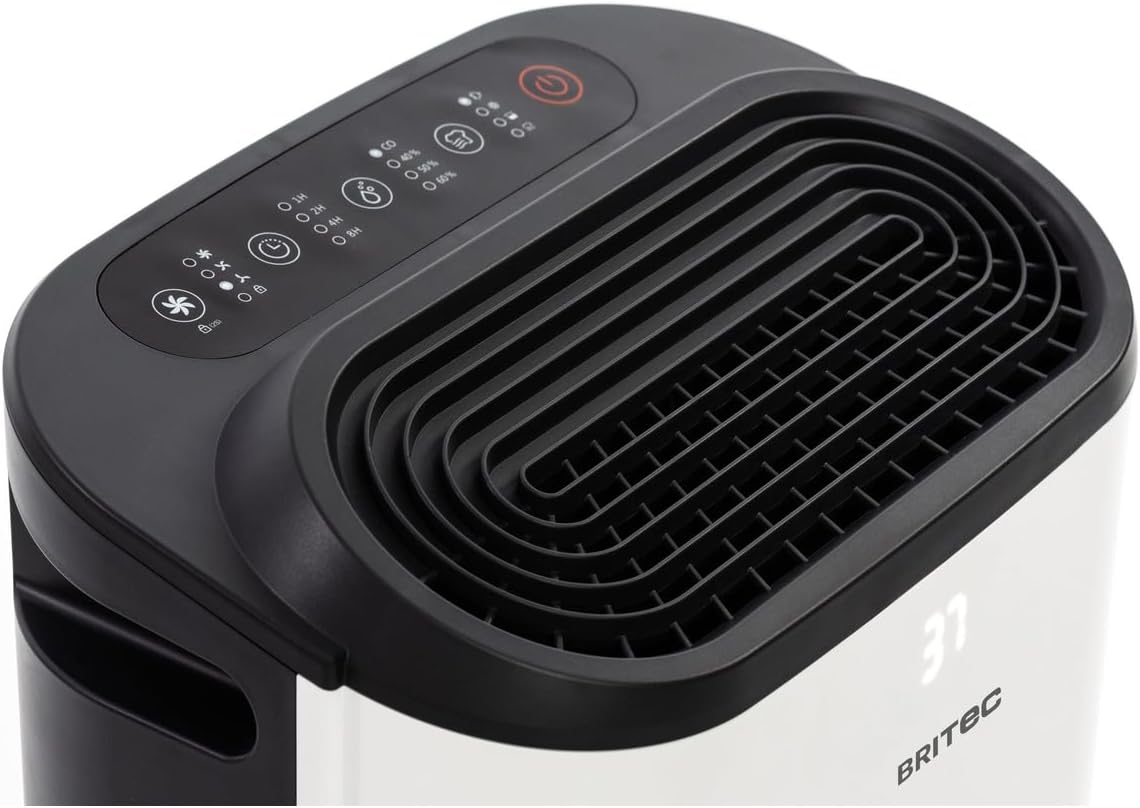
Figura 2.2: in alto view of the dehumidifier, highlighting the control panel and air outlet grille. The control panel features various buttons for mode selection, timer, fan speed, and power.

Figure 2.3: Diagram illustrating the main external components. Labels indicate the Ventilation Outlet, Front Display, and Control Panel.
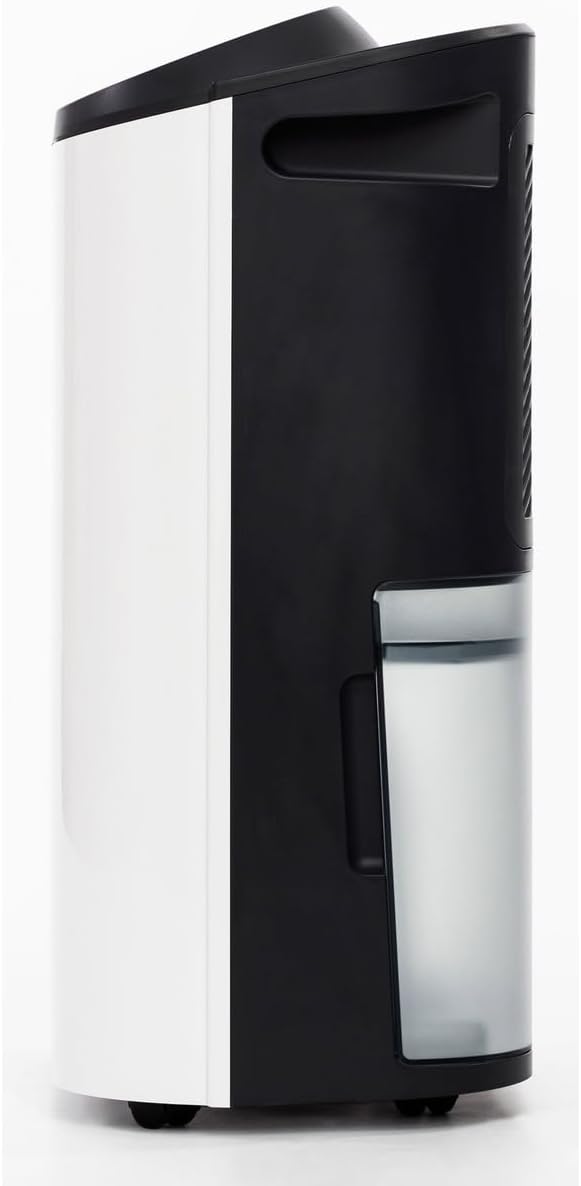
Figura 2.4: lato view of the dehumidifier, showing the transparent water collection tank. The tank is designed for easy removal and emptying.

Figura 2.5: Posteriore view of the dehumidifier, showing the air intake grille and the water tank in place. This is where the air is drawn in for filtration and dehumidification.

Figure 2.6: Diagram of the rear components. Labels point to the Carry Handle, Filtration area, Continuous Drainage outlet, Removable 2.3L Tank, and Wheels for easy mobility.

Figure 2.7: Diagram illustrating the dual filter system. It shows the HEPA13 Filter and the Dust Filter, which work together to purify the air.
3. Impostazione
3.1. Disimballaggio
- Estrarre con cautela il deumidificatore dalla confezione.
- Rimuovere tutto il materiale di imballaggio, compresi eventuali nastri adesivi o pellicole protettive.
- Ispezionare l'unità per verificare la presenza di eventuali danni. In caso di danni, non utilizzarla e contattare l'assistenza clienti.
3.2. Posizionamento
- Posizionare il deumidificatore su una superficie solida e piana.
- Assicurarsi che ci siano almeno 20 cm (8 pollici) di spazio attorno all'unità per un corretto flusso d'aria.
- Non posizionare l'unità vicino ad apparecchi che generano calore o alla luce diretta del sole.
- For optimal performance, place the unit in the center of the room where dehumidification is needed.
3.3. Collegamento elettrico
Collegare il cavo di alimentazione a una presa elettrica con messa a terra. Assicurarsi che il volumetage corrisponde alle specifiche dell'unità.
3.4. WiFi Setup (Tuya App)
- Scarica l'app 'Tuya Smart' dall'app store del tuo smartphone (iOS o Android).
- Registrati o accedi al tuo account Tuya.
- Assicurati che il deumidificatore sia collegato e acceso.
- In the Tuya app, tap '+' to add a device.
- Follow the on-screen instructions to connect your dehumidifier to your home WiFi network. This typically involves putting the device into pairing mode (refer to the control panel section for specific button presses if needed).
- Una volta effettuato il collegamento, è possibile controllare il deumidificatore da remoto tramite l'app.
4. Istruzioni per l'uso
4.1. Pannello di controllo finitoview
The control panel on the top of the unit allows you to manage all functions. The LED display shows current humidity levels or settings.
4.2. Accensione/spegnimento
- Premere il tasto Energia pulsante (simbolo: cerchio con linea verticale) per accendere o spegnere l'unità.
4.3. Selezione della modalità
Premere il tasto Modalità pulsante (symbol: usually a fan or water drop icon) per scorrere le modalità disponibili:
- Modalità di deumidificazione: Rimuove l'umidità dall'aria.
- Modalità di purificazione dell'aria: Operates the fan and filter without active dehumidification.
- Modalità di asciugatura: Designed to help dry laundry faster.
4.4. Impostazione dell'umidità
In modalità Deumidificazione, premere il tasto Umidità pulsante (symbol: often a % sign or up/down arrows) to set your desired humidity level (e.g., 40%, 50%, 60%). The unit will operate until the set humidity is reached.
4.5. Funzione timer
Premere il tasto Timer pulsante (simbolo: icona dell'orologio) to set a delay for the unit to turn on or off (up to 24 hours). Each press typically increases the time by one hour.
4.6. Velocità della ventola
Premere il tasto Velocità della ventola pulsante (symbol: fan icon with varying bars) to adjust the fan speed (e.g., Low, Medium, High). A lower fan speed results in quieter operation.
5. Manutenzione
Una manutenzione regolare garantisce prestazioni ottimali e prolunga la durata del deumidificatore.
5.1. Svuotamento del serbatoio dell'acqua
- Quando il serbatoio dell'acqua è pieno, l'unità smetterà automaticamente di funzionare e si accenderà una spia luminosa.
- Estrarre con cautela il serbatoio dell'acqua dal lato dell'unità.
- Svuotare l'acqua raccolta.
- Reinserire il serbatoio vuoto nell'unità finché non scatta in posizione. L'unità riprenderà a funzionare.
5.2. Configurazione del drenaggio continuo
For continuous operation without emptying the tank, you can set up continuous drainage:
- Locate the continuous drainage outlet at the back of the unit (refer to Figure 2.6).
- Collegare a questa presa un tubo di scarico adatto (non incluso).
- Ensure the hose is sloped downwards to allow water to drain by gravity into a floor drain or larger container.
5.3. Pulizia/Sostituzione dei filtri
The unit uses a HEPA H13 filter and a dust filter (refer to Figure 2.7). Regular cleaning is essential.
- Spegni e scollega il deumidificatore.
- Remove the rear grille to access the filters.
- Carefully remove the dust filter and the HEPA H13 filter.
- Clean the dust filter with a vacuum cleaner or wash it gently with warm water and mild detergent. Allow it to air dry completely before reinserting.
- The HEPA H13 filter cannot be washed. It should be replaced every 6-12 months, depending on usage and air quality.
- Reinsert the filters and replace the grille.
5.4. Pulizia dell'unità
- Pulire l'esterno dell'unità con un panno morbido, damp stoffa.
- Non utilizzare detergenti abrasivi o solventi.
- Clean the air inlets and outlets regularly to prevent dust buildup.
6. Risoluzione Dei Problemi
| Problema | Possibile causa | Soluzione |
|---|---|---|
| L'unità non si accende | Nessuna alimentazione; Cavo di alimentazione non collegato; Presa di corrente difettosa. | Controllare il collegamento elettrico; provare una presa diversa; controllare l'interruttore automatico. |
| Nessuna deumidificazione | Room temperature too low; Air filter clogged; Humidity setting too high; Water tank full. | Ensure room temp is above 5°C; Clean/replace filter; Lower humidity setting; Empty water tank. |
| L'unità è rumorosa | Unità non posizionata su una superficie piana; Filtro dell'aria intasato; Ostruzione nella ventola. | Place on a level surface; Clean/replace filter; Check for obstructions. |
| Water tank full indicator on, but tank is empty | Serbatoio dell'acqua non inserito correttamente; interruttore a galleggiante bloccato. | Reinsert tank correctly; Gently shake tank to free float switch. |
7. Specifiche
| Caratteristica | Specificazione |
|---|---|
| Marca | BRITTEC |
| Numero di modello | BRI629036 |
| Capacità di deumidificazione | 12-16 L/day (depending on version) |
| Purificazione dell'aria | HEPA H13 Filter (removes up to 99.97% of microparticles) |
| Livello di rumore | 36 dB |
| Dimensioni consigliate della stanza | da 15 a 45 mq |
| Capacità del serbatoio dell'acqua | Mobile water reservoir (approx. 2.3L) |
| Connettività | WiFi (Tuya App) |
| Timer | Fino a 24 ore |
| Peso | 14.01 kg |
8. Garanzia e supporto
This BRITEC product is covered by a manufacturer's warranty. Please refer to the warranty card included with your purchase for specific terms and conditions, including the warranty period and coverage details.
8.1. Assistenza clienti
If you encounter any issues or have questions regarding your dehumidifier, please contact the retailer or the manufacturer's customer support. Keep your purchase receipt and model number (BRI629036) ready when contacting support.