Introduzione
Thank you for choosing the ONEVAN Cordless Rivet Gun. This manual provides essential information for the safe and efficient operation, maintenance, and troubleshooting of your new tool. Please read it thoroughly before use and keep it for future reference.

Image: The ONEVAN Cordless Rivet Gun in use, highlighting its portability and efficiency.
Contenuto della confezione
Your ONEVAN Cordless Rivet Gun package includes the following items:
- 1 x ONEVAN Cordless Rivet Gun
- 2 batterie agli ioni di litio da 1500 mAh
- 1 caricabatterie rapido da 1.2A
- 3 x Guide Nozzles (for 1/8", 5/32", 3/16" rivets)
- 1 x Wrench (for changing nozzles)

Image: A visual representation of all items included in the ONEVAN Cordless Rivet Gun kit.
Impostare
1. Ricarica delle batterie
The ONEVAN rivet gun comes with two 1500mAh Lithium-Ion batteries and a 1.2A fast charger. Ensure batteries are fully charged before first use.
- Connect the 1.2A fast charger to a power outlet.
- Insert a battery into the charger. The indicator light on the charger will show the charging status.
- Una carica completa richiede in genere circa 1.5 ore.
- Rimuovere la batteria una volta completamente carica.

Image: Diagram illustrating the internal structure and capacity of the 20V 1500mAh Li-ion battery.
2. Installing/Changing Nozzles
Select the appropriate guide nozzle based on the rivet size you intend to use. The kit includes nozzles for 1/8" (3.2mm), 5/32" (4mm), and 3/16" (4.8mm) rivets.
- Ensure the rivet gun is powered off and the battery is removed for safety.
- Use the provided wrench to loosen and remove the currently installed nozzle.
- Select the desired nozzle size and screw it firmly into place using the wrench.

Image: Guide to selecting the correct nozzle for 1/8", 5/32", and 3/16" stainless and aluminum rivets.
Istruzioni per l'uso
1. Basic Riveting Operation
The ONEVAN Cordless Rivet Gun features a simple one-button operation for efficient riveting.
- Insert a fully charged battery into the rivet gun.
- Select the correct nozzle for your rivet size and install it securely.
- Insert the rivet into the guide nozzle.
- Position the rivet gun with the rivet in the pre-drilled hole of your workpiece. Ensure the rivet head is tightly attached to the board surface for secure installation.
- Set the forward/reverse switch to the 'Forward' position (left side).
- Press and hold the ON/OFF switch. The rivet gun will automatically complete the riveting, nail breaking, and nail retracting processes.

Image: Step-by-step guide for easy operation of the rivet gun.
2. Handling Stuck Rivets
If a rivet becomes stuck during operation:
- Rilasciare l'interruttore ON/OFF.
- Rotate the forward/reverse switch to the 'Reverse' position (right side).
- Press and hold the ON/OFF switch until the nail completely exits the tool.

Image: Explanation of the three-position switch for forward, locked, and reverse operations.
3. Visual Demonstration of Riveting
Video: A demonstration of the ONEVAN Cordless Rivet Gun in operation, showing the process of setting rivets.
Video: This video demonstrates precautions for using an electric rivet gun and showcases the riveting effect on different materials.
Manutenzione
Regular maintenance ensures the longevity and optimal performance of your rivet gun.
- Pulizia: Dopo ogni utilizzo, pulire l'utensile con un panno pulito e asciutto per rimuovere polvere e detriti.
- Ispezione degli ugelli: Periodically inspect the guide nozzles for wear or damage. Replace them if necessary to ensure proper riveting.
- Magazzinaggio: Store the rivet gun and its accessories in a dry, clean place, away from direct sunlight and extreme temperatures.
- Motore Brushless: The brushless motor design means there are no carbon brushes to replace, reducing maintenance requirements and increasing durata della vita.

Immagine: Interna view of the brushless motor and ventilation system, indicating efficient heat dissipation.
Risoluzione dei problemi
Ecco alcuni problemi comuni e le relative soluzioni:
| Problema | Possibile causa | Soluzione |
|---|---|---|
| Rivetto non fissato correttamente | Incorrect nozzle size; Insufficient battery charge | Ensure correct nozzle is installed; Fully charge battery |
| Rivet gets stuck | Rivet material or size mismatch; Tool overload | Use the reverse function to eject the rivet; Verify rivet compatibility with tool specifications |
| Lo strumento non si accende | Battery not inserted correctly; Battery discharged | Re-insert battery firmly; Charge battery |
Specifiche
Key technical specifications for the ONEVAN Cordless Rivet Gun:
- Marca: ONEVAN
- Modello: cordless rivet gun (Model 08)
- Peso dell'articolo: 4.5 libbre
- Dimensioni della confezione: 14 x 10 x 4 pollici
- Batterie: 2 batteria agli ioni di litio richiesta (inclusa)
- Capacità della batteria: 1500 mAh (ciascuno)
- Caricabatterie: Caricabatterie rapido 1.2A
- Max Pull Stroke: 0.78 pollici
- Compatible Rivet Sizes: 1/8" (3.2 mm), 5/32" (4 mm), 3/16" (4.8mm)
- Compatible Rivet Materials: Stainless steel, Aluminum
- Tipo di motore: Senza spazzole
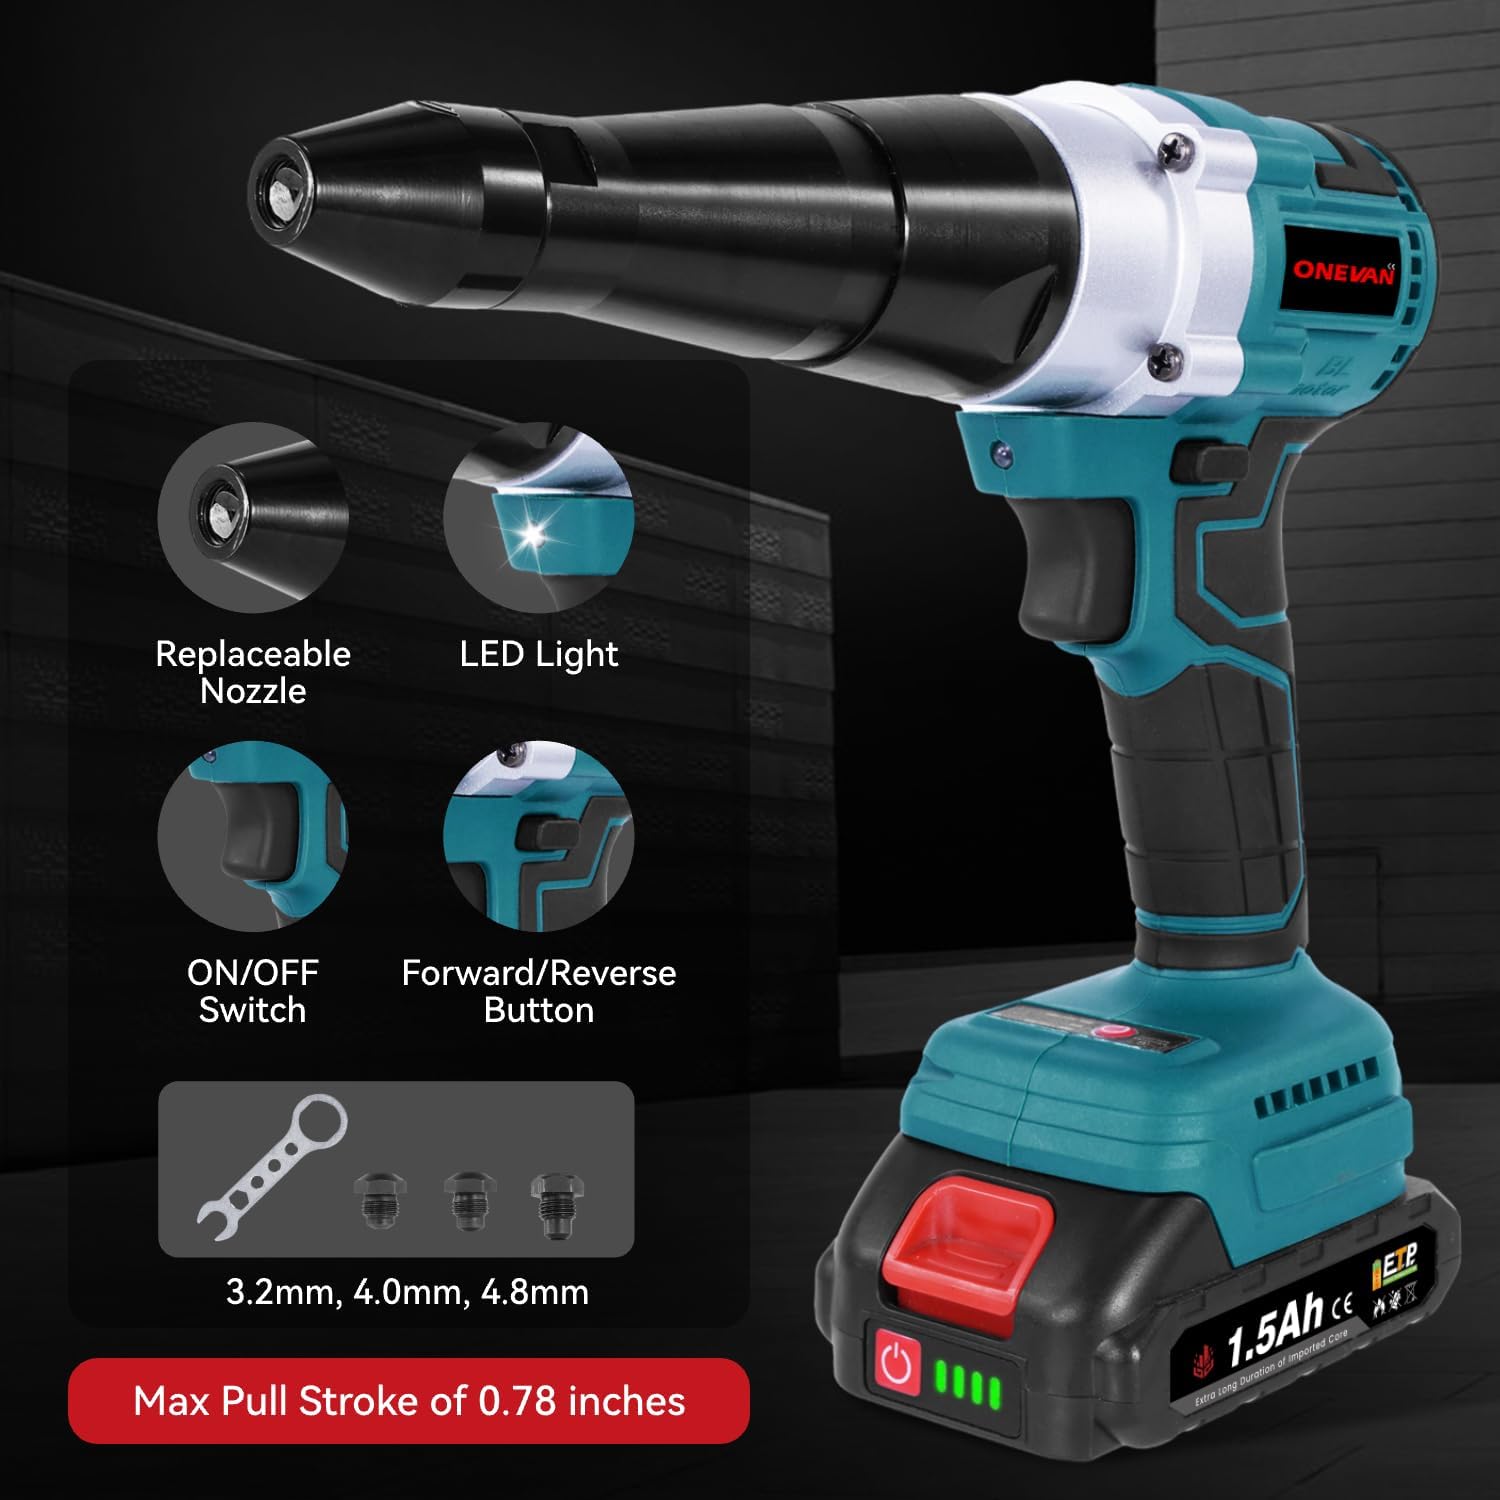
Immagine: Oltreview of the rivet gun's features including LED light, replaceable nozzles, and maximum stroke length.
Informazioni sulla sicurezza
Per ridurre il rischio di lesioni, attenersi sempre alle precauzioni di sicurezza di base quando si utilizzano utensili elettrici.
- Indossare adeguati dispositivi di protezione individuale (DPI), tra cui occhiali e guanti di sicurezza.
- Mantieni la tua area di lavoro pulita e ben illuminata.
- Non utilizzare lo strumento in atmosfere esplosive, ad esempio in presenza di liquidi, gas o polvere infiammabili.
- Tenere lontani i bambini e gli astanti durante l'utilizzo di un elettroutensile.
- Ensure the battery is securely attached before operation and removed during maintenance or when not in use.
- Avoid forcing the tool. Use the correct tool for your application.
Garanzia e supporto
For warranty information, technical support, or service inquiries, please refer to the contact details provided with your purchase or visit the official ONEVAN websito. Conservare la prova d'acquisto per eventuali reclami in garanzia.