1. Introduzione
This manual provides detailed instructions for the LinYuvo KS10 Wireless Controller. It covers setup, operation, and maintenance to ensure optimal performance and an enhanced gaming experience across various platforms, including Nintendo Switch, Windows, SteamOS, and iOS devices.
2. Prodotto finitoview
The LinYuvo KS10 is a versatile wireless controller designed for a comfortable and responsive gaming experience. It features a transparent design showcasing internal components, enhanced joysticks, and customizable functions.

Figura 2.1: Fronte view of the LinYuvo KS10 Wireless Controller, showing its transparent casing e disposizione dei pulsanti.
Caratteristiche principali:
- Metal Mushroom Head & Honeycomb Design Joysticks: Provides improved operational feedback and anti-slip functionality for precise control.
- Three-Speed Continuous Firing (Turbo): Offers flexible operation for rapid input in games.
- Integrated Six-Axis Gyroscope: Enables immersive motion sensing for compatible games.
- Adjustable Vibration Level: Dual motors provide haptic feedback that can be customized.
- Effetti di luce colorati: Features RGB lighting with various patterns to enhance the gaming atmosphere.
- Back-Key Macro Programming: Allows for personalized macro programming and multi-step combined key output.
- Design ergonomico: Progettato per una presa comoda durante le sessioni di gioco prolungate.
- Funzione di riattivazione: Ability to wake up the connected console.

Figure 2.2: Close-up of the metal rocker and honeycomb joystick design, highlighting enhanced detection and anti-slip features.
3. Impostazione
3.1. Ricarica del controller
Before initial use, fully charge the controller using the provided USB-C cable. Connect the cable to the controller's charging port and a compatible USB power source (e.g., a computer USB port or a USB wall adapter). The charging indicator will show the charging status and turn off when fully charged.
3.2. Abbinamento con Nintendo Switch
- Sulla tua console Nintendo Switch, vai al menu HOME.
- Selezionare "Controllori", Poi "Cambia impugnatura/ordine".
- Premere e tenere premuto il tasto Pulsante di associazione on the top of the LinYuvo KS10 controller for a few seconds until the indicator lights start flashing rapidly.
- Once paired, the controller will appear on the Switch screen, and the indicator light(s) on the controller will remain solid.
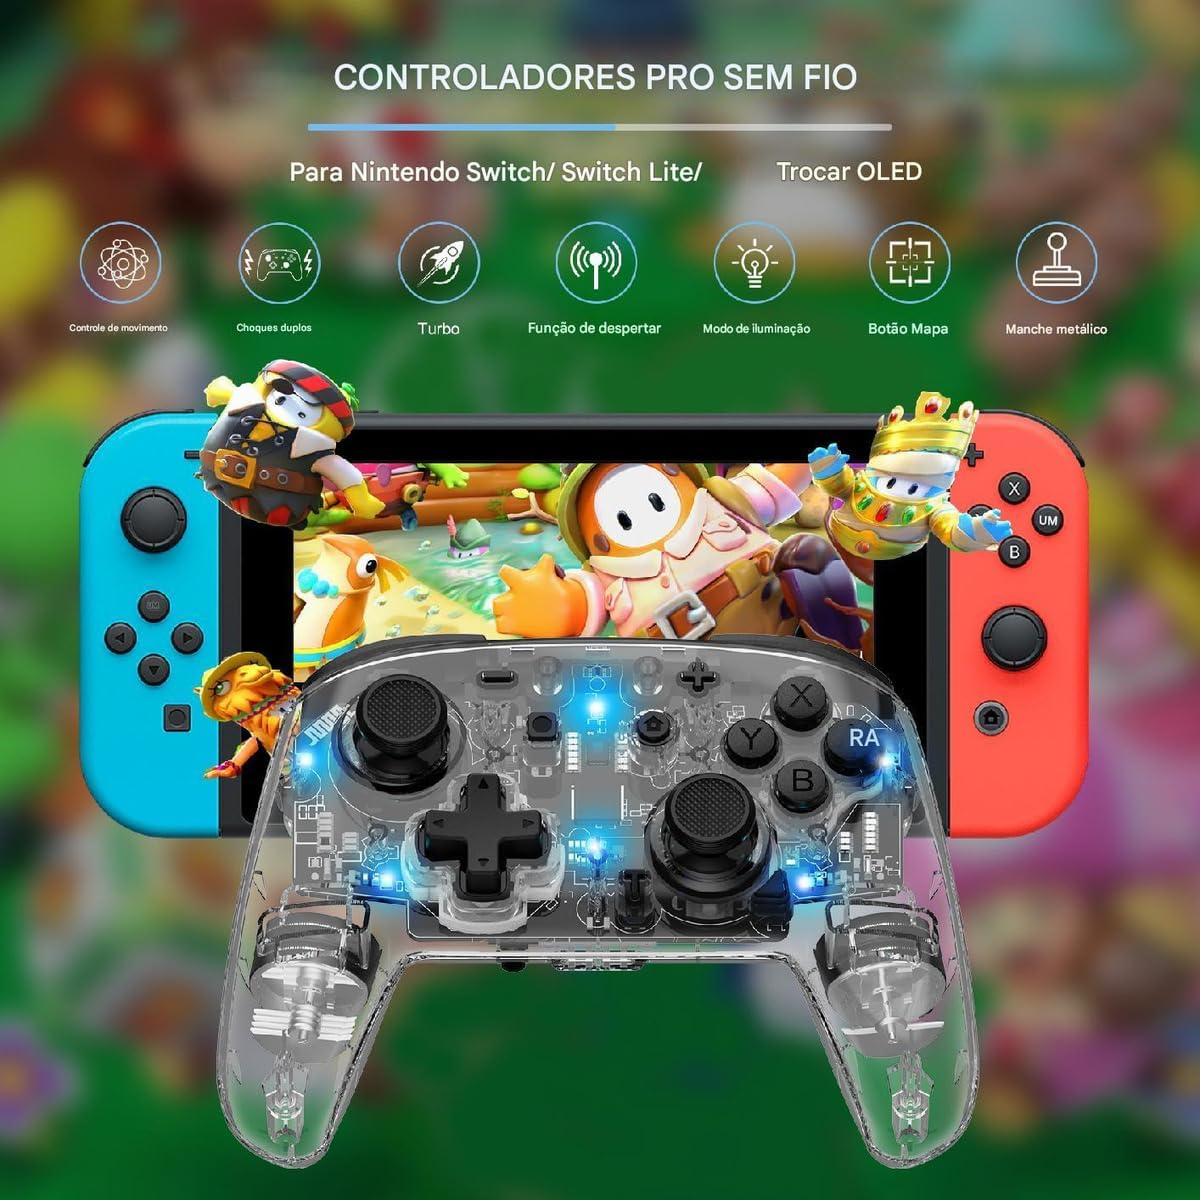
Figure 3.1: The LinYuvo KS10 controller shown alongside a Nintendo Switch console, illustrating its compatibility.
3.3. Pairing with Windows/SteamOS
- Ensure your Windows PC or SteamOS device has Bluetooth enabled.
- Vai alle impostazioni Bluetooth sul tuo dispositivo e seleziona "Aggiungi Bluetooth o altro dispositivo".
- Premere e tenere premuto il tasto Pulsante di associazione on the LinYuvo KS10 controller until the indicator lights flash rapidly.
- Select the controller from the list of available devices to complete pairing.
3.4. Associazione con dispositivi iOS
- Sul tuo dispositivo iOS, vai a Impostazioni > Bluetooth e assicurati che il Bluetooth sia attivato.
- Premere e tenere premuto il tasto Pulsante di associazione on the LinYuvo KS10 controller until the indicator lights flash rapidly.
- Look for the controller in the "Other Devices" list and tap to connect.
3.5. Funzione di riattivazione
To activate a connected Switch console from sleep mode, simply press and hold the "CASA" sul controller per circa 3 secondi.

Figure 3.2: The controller's ergonomic design and the instruction to hold the HOME button for 3 seconds to wake up the Switch console.
4. Istruzioni per l'uso
4.1. Controlli di base
The LinYuvo KS10 controller features standard button layouts including A, B, X, Y buttons, D-pad, Left/Right joysticks, L/R and ZL/ZR shoulder buttons, HOME, SELECT, START, and screenshot buttons. Refer to in-game instructions for specific button functions.
4.2. Funzione Turbo
The Turbo function allows for rapid, continuous input of a selected button. It has three adjustable speeds: 5 shots/second, 12 shots/second, and 20 shots/second.
- Per attivare Turbo: Premere e tenere premuto il tasto Pulsante Turbo (T), then press the desired action button (e.g., A, B, X, Y, L, R, ZL, ZR). The button will now continuously fire when held down.
- Per regolare la velocità Turbo: Mentre si tiene premuto il Pulsante Turbo (T), premere il tasto Meno (-) button to decrease speed or the Più (+) button to increase speed. The corresponding light will flash slowly, medium, or fast to indicate the speed level.
- Per disattivare Turbo: Premere e tenere premuto il tasto Pulsante Turbo (T), then press the action button again.

Figure 4.1: Visual representation of the adjustable Turbo function with three speed settings (5/s, 12/s, 20/s) and instructions for adjustment.
4.3. Gyroscope Motion Control
The integrated six-axis gyroscope provides motion control capabilities for games that support it. This allows for immersive gameplay where tilting and moving the controller translates into in-game actions.

Figure 4.2: A user demonstrating gyroscope motion control with the LinYuvo KS10 controller in a racing game scenario.
4.4. Adjustable Vibration Feedback
The controller features dual motors for haptic feedback. The vibration intensity can be adjusted to suit personal preference.
- To adjust vibration: Premere e tenere premuto il tasto Vibration button (UM), quindi utilizzare il Su/Giù directional buttons on the D-pad to increase or decrease intensity.
- Available levels typically include 0%, 30%, 50%, 75%, and 100%.

Figure 4.3: Illustration of the adjustable vibration feedback levels (0%, 30%, 50%, 75%, 100%) provided by the integrated dual motors.
4.5. Effetti di luce colorati
The controller includes customizable RGB lighting to enhance the gaming ambiance. There are various lighting modes and colors.
- To change lighting mode/color: Premere il tasto Lighting button (often represented by a lightbulb icon or a specific combination) to cycle through different colors (Blue, Red, Yellow, Green, Orange, Purple, Pink) or breathing patterns (e.g., rainbow breathing).
- Per regolare la luminosità: Premere e tenere premuto il tasto Pulsante di illuminazione e utilizzare il Tasto Y. per regolare i livelli di luminosità.
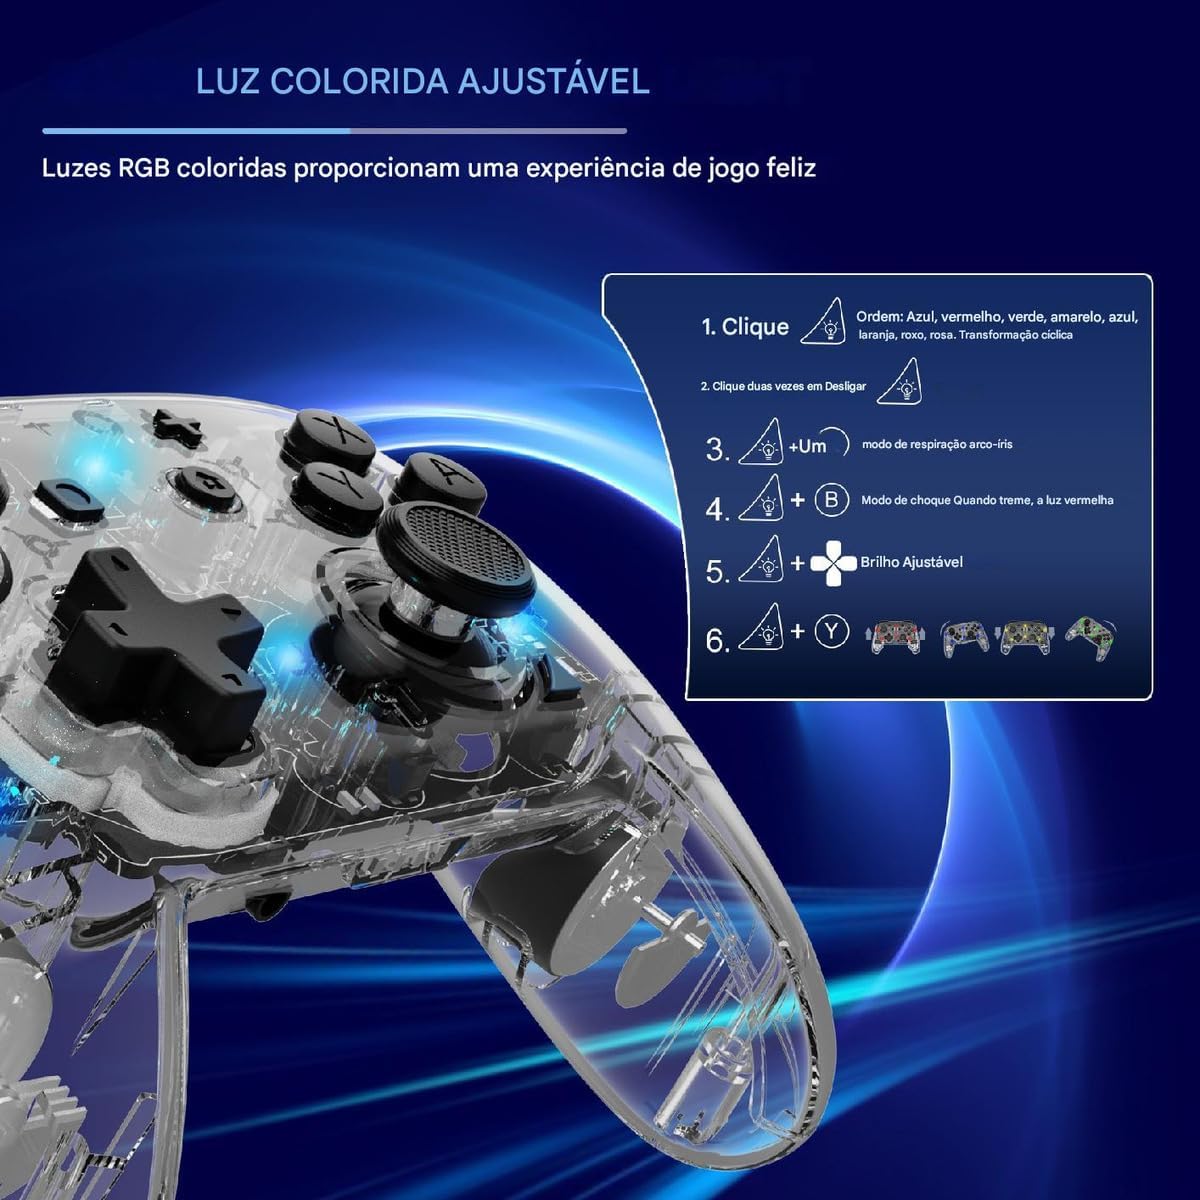
Figure 4.4: Diagram illustrating how to adjust the colorful RGB lighting, including color order and brightness settings.
4.6. Macro Programming (Back-Keys)
The back-keys on the controller can be programmed with custom macros, allowing for complex button sequences to be executed with a single press.
- To enter Macro Programming Mode: Refer to the specific instructions provided with your controller for the exact button combination (e.g., a dedicated Macro button + the back-key you wish to program).
- To record a Macro: While in programming mode, press the sequence of buttons you want to record.
- To save the Macro: Press the Macro button again to save the sequence to the selected back-key.
- To use a Macro: Press the programmed back-key to execute the recorded sequence.
Note: Detailed macro programming steps may vary. Consult the included quick start guide or manufacturer's website for precise instructions.
5. Manutenzione
- Pulizia: Utilizzare un panno morbido e asciutto per pulire il controller. Non utilizzare prodotti chimici aggressivi o materiali abrasivi.
- Magazzinaggio: Conservare il controller in un luogo fresco e asciutto, lontano dalla luce solare diretta e da temperature estreme.
- Cura della batteria: Evitare di scaricare completamente la batteria frequentemente. Caricare il controller regolarmente, anche se non utilizzato per periodi prolungati, per preservare la salute della batteria.
- Evitare gocce: Proteggere il controller da cadute e urti che potrebbero danneggiare i componenti interni.
6. Risoluzione Dei Problemi
| Problema | Possibile causa | Soluzione |
|---|---|---|
| Il controller non si accende. | Batteria scarica. | Caricare il controller per almeno 30 minuti. |
| Impossibile associare il dispositivo. | Bluetooth not enabled; controller not in pairing mode; interference. | Ensure Bluetooth is on. Put controller in pairing mode (flashing lights). Move closer to the device. Restart both devices. |
| Ritardo di input o disconnessione. | Batteria scarica; troppo lontano dal dispositivo; interferenza wireless. | Charge controller. Move closer to device. Reduce other wireless activity. |
| Pulsanti o joystick non rispondono. | Problema software; danno fisico. | Restart the controller and the connected device. If problem persists, contact support. |
| La vibrazione non funziona. | Vibration level set to 0%; game does not support vibration. | Adjust vibration intensity (Section 4.4). Check game settings. |
7. Specifiche
- Modello: KS10
- Connettività: Wireless (Bluetooth)
- Compatibilità: Nintendo Switch, Windows, SteamOS, iOS
- Caratteristiche speciali: Six-axis gyroscope, adjustable vibration, customizable RGB lighting, Turbo function, macro programming back-keys, metal joysticks.
- Fonte di energia: Batteria interna ricaricabile
- Porta di ricarica: USB-C
- Paese di origine: Cina
- ASIN: B0F18PLLLF
8. Garanzia e supporto
For warranty information and technical support, please refer to the documentation included with your purchase or contact the retailer. Keep your proof of purchase for any warranty claims.
This product is not an official Nintendo product but is compatible with the Nintendo Switch console.


