Introduzione
This manual provides detailed instructions for the safe and efficient operation of your HAYEAR 8MP Digital Microscope Camera, Model HY-6700. This high-performance camera is equipped with an 8MP sensor, capable of capturing images and videos in 4K Ultra HD and 1080P resolutions. It supports simultaneous USB and HDMI output, making it suitable for various applications including industrial inspection, laboratory research, quality control, and detailed observation with image and video recording capabilities. Please read this manual thoroughly before use and retain it for future reference.
Prodotto finitoview
Caratteristiche principali
- Alta risoluzione: 8MP sensor for 4K Ultra HD and 1080P image and video capture.
- Doppia uscita: Simultaneous USB and HDMI output for connection to PCs, monitors, or TVs.
- Applicazioni versatili: Ideal for industrial inspection, laboratory observation, quality control, and educational purposes.
- Image & Video Recording: Features still image capture and video recording functions for detailed documentation.
- Compatibilità del sistema: USB connection compatible with Windows, Mac OS, and Linux systems.
Contenuto della confezione
Verifica che tutti gli articoli elencati di seguito siano inclusi nel tuo pacchetto:
- 1 x HAYEAR Digital Microscope Camera (Model HY-6700)
- 1 cavo HDMI
- 1 cavo USB
- 1 x Manuale di istruzioni

Figura 1: Package contents including the camera, HDMI cable, USB cable, and instruction manual.
Impostare
Camera Interface and Buttons
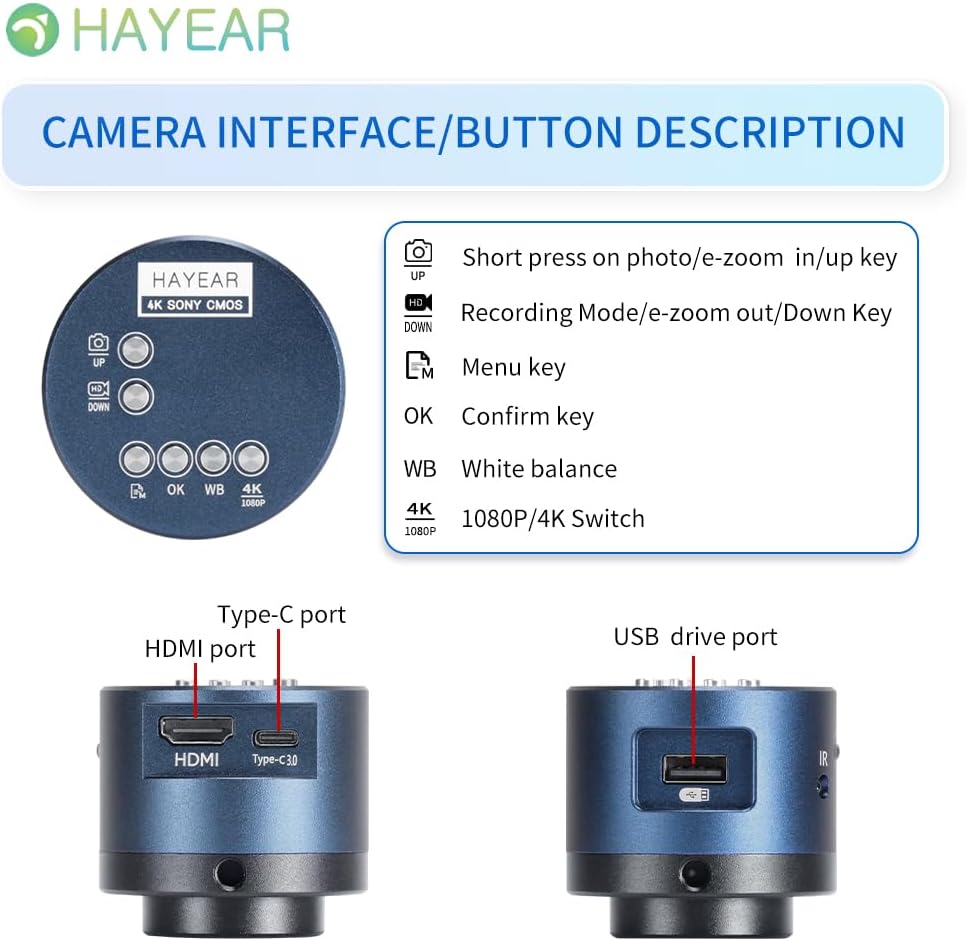
Figura 2: Sopraview of the camera's control buttons and ports.
- Photo/E-Zoom In/Up Key: Short press to take a photo or zoom in. Use for navigation (Up).
- Recording Mode/E-Zoom Out/Down Key: Short press to switch to recording mode or zoom out. Use for navigation (Down).
- Tasto Menù: Access the camera's settings menu.
- Tasto OK: Conferma le selezioni o le azioni.
- WB (White Balance) Key: Regola le impostazioni del bilanciamento del bianco.
- 4K/1080P Switch: Toggle between 4K and 1080P resolution output.
- Porta HDMI: Connect to an HDMI display (monitor, TV).
- Porta di tipo C: Ingresso di potenza e trasferimento dati.
- Porta unità USB: Connect to a computer for data transfer or use as a webCamera.
Collegamento a un display
The camera supports simultaneous HDMI and USB output. Choose the connection method suitable for your application.
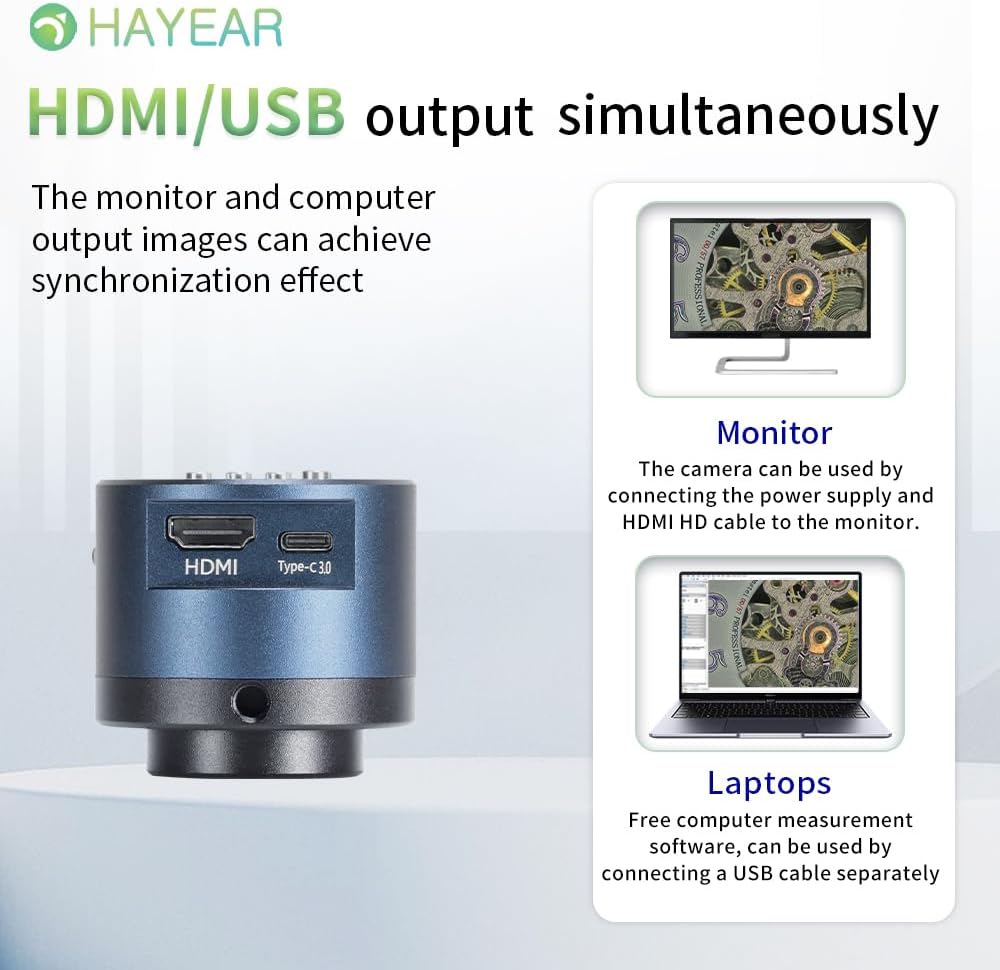
Figura 3: Illustrates simultaneous HDMI and USB output capabilities.
- Connessione HDMI: Connect the camera to an HDMI monitor or TV using the provided HDMI cable. Ensure the camera is powered via the Type-C port. This allows for direct display of the microscope's output.
- Connessione USB: Connect the camera to a computer (Windows, Mac, or Linux) using the provided USB cable. The camera can function as a webcam or be used with dedicated measurement software.
Accensione/spegnimento
The product powers on automatically when connected to a power source via the Type-C port. To turn off the device, disconnect the power plug from the camera or the power outlet.
Istruzioni per l'uso
Funzionamento di base
- Scattare foto: Short press the "Photo/E-Zoom In/Up" key to capture a still image.
- Registrazione di video: Short press the "Recording Mode/E-Zoom Out/Down" key to switch to video recording mode, then press again to start/stop recording.
- Funzione zoom: Use the "Photo/E-Zoom In/Up" key to zoom in and the "Recording Mode/E-Zoom Out/Down" key to zoom out.
- Resolution Switch: Press the "4K/1080P" key to toggle between 4K and 1080P output resolutions.
Regolazione del bilanciamento del bianco
To achieve accurate color representation, adjust the white balance using the WB key. For one-touch white balance adjustment:
- If the image appears with a blue tint, open the camera's one-touch white balance function.
- Place a white paper under the light source.
- Adjust the light source from its darkest setting gradually to its brightest.
- The camera will automatically adjust the blue tint to a normal white balance state.
Navigazione nei menu
Press the "Menu" key to access the camera's settings. Use the "Up" and "Down" keys to navigate through options and the "OK" key to select or confirm.
Manutenzione
- Pulizia: Utilizzare un panno morbido e asciutto per pulire il corpo macchina. Per l'obiettivo, utilizzare un panno e una soluzione specifici per la pulizia delle lenti. Evitare materiali abrasivi o sostanze chimiche aggressive.
- Magazzinaggio: Store the camera in a dry, dust-free environment when not in use. Protect it from extreme temperatures and humidity.
- Gestione: Handle the camera with care to prevent physical damage. Avoid dropping or subjecting it to strong impacts.
Risoluzione dei problemi
In caso di problemi, fare riferimento ai seguenti problemi comuni e alle relative soluzioni:
- Nessuna immagine visualizzata:
- Assicurarsi che la telecamera sia correttamente accesa e che il cavo di alimentazione sia collegato saldamente.
- Check the HDMI or USB cable connection to both the camera and the display/computer.
- Verify that the display input source is correctly selected (e.g., HDMI 1, USB).
- Image Appears Blue/Incorrect Colors:
- Perform a one-touch white balance adjustment as described in the "Operating Instructions" section.
- Ensure the lighting conditions are stable and appropriate for observation.
- Cannot Record Images/Videos:
- Ensure a compatible TF memory card (up to 128GB) is inserted correctly into the camera.
- Verificare che la scheda di memoria abbia spazio libero sufficiente.
- Verify that you are in the correct recording mode.
- Camera Not Recognized by PC (USB):
- Assicurarsi che il cavo USB sia collegato saldamente.
- Prova a connetterti a un'altra porta USB del tuo computer.
- Riavvia il computer e la fotocamera.
- Ensure your operating system (Windows/Mac/Linux) has the necessary drivers installed (usually plug-and-play).
For further assistance, please contact technical support.
Specifiche
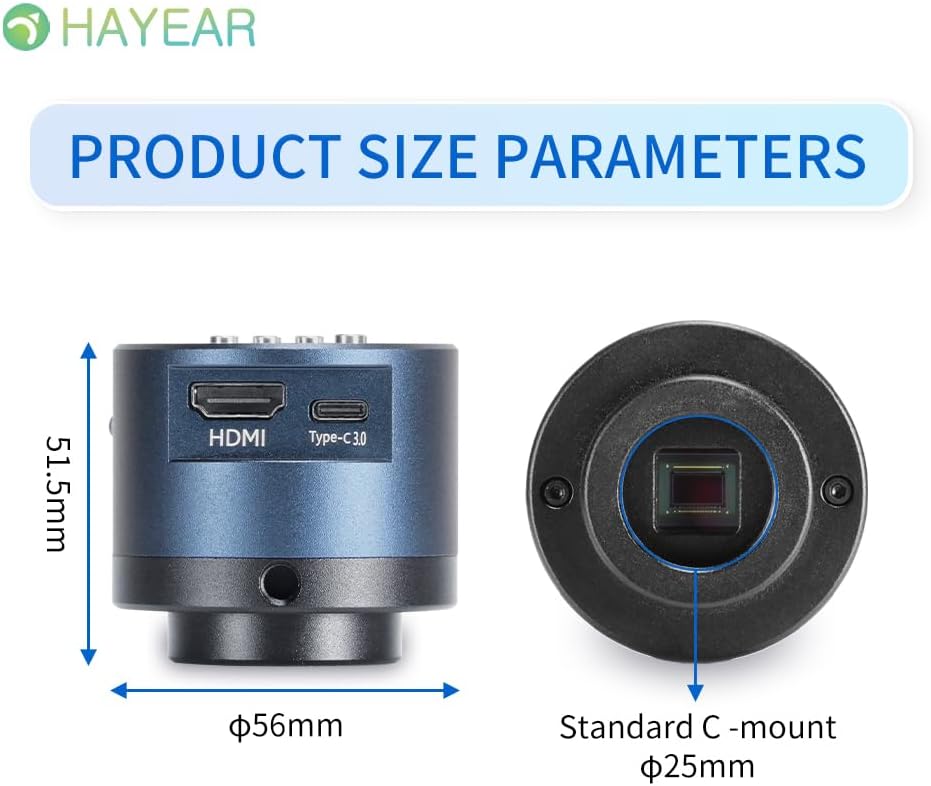
Figura 4: Dimensions of the HAYEAR Digital Microscope Camera.
| Caratteristica | Specificazione |
|---|---|
| Modello | HY-6700 |
| Sensore | 8 Megapixel |
| Uscita video | 4K/2K/1080P (HDMI Output) |
| Dimensioni del sensore | 1/2.8 pollici |
| Dimensione pixel | 2.0 x 2.0 micron |
| Risoluzione | 3840x2160@30FPS (4K); 1920x1080P@30FPS |
| Registrazione video | Supports 4K video recording |
| Uscita USB | 1920x1080P@30FPS; 1280x720P@30FPS |
| Lunghezza d'onda | 400nm ~ 1000nm |
| Interfaccia di uscita | HDMI / USB (Simultaneous Support) |
| Bilanciamento del bianco | One-touch / Auto / Manual |
| Tipo di lente | Standard C/CS Interface |
| Magazzinaggio | TF Memory Card, up to 128GB |
| Supporto per PC | Windows / Mac / Linux Systems |
| Zoom dell'immagine | 7x Optical Zoom / Digital Zoom |
| Dimensioni | 15 x 15 x 8 cm (dimensioni del prodotto) |
| Peso | 500 grammi |
| Potenza in ingresso | 5 Volt |
Garanzia e supporto
Informazioni sulla garanzia
- All products undergo a thorough inspection before shipment to ensure quality.
- Customers are advised to inspect the package upon receipt.
- A one-year free warranty is provided for all machines. This warranty does not cover damage caused by human error or misuse.
Supporto tecnico
Free technical support is always available. If you encounter any issues not covered in this manual or require further assistance, please contact HAYEAR customer service. Refer to the product packaging or official websito per i contatti.