1. Introduzione
Thank you for choosing the Johgee 3 Zones Water Timer. This device is designed to automate your garden watering, providing flexible and efficient irrigation for lawns, plants, and other areas. It features three independently programmable outlets, rain delay functionality, and manual watering options. Please read this manual thoroughly before installation and operation to ensure proper use and longevity of the product.
2. Informazioni sulla sicurezza
- This product is intended for outdoor use with cold water only. Do not use with hot water or in freezing conditions.
- Do not immerse the timer in water. The unit is IPX5 waterproof, meaning it is protected against low-pressure water jets, but not submersion.
- Use only 2x 1.5V AA alkaline batteries. Do not mix old and new batteries, or different types of batteries.
- Rimuovere le batterie se il timer non viene utilizzato per un periodo prolungato per evitare perdite.
- Tenere il dispositivo fuori dalla portata dei bambini e degli animali domestici per evitare attivazioni accidentali o danni.
- Ensure all connections are tight to prevent leaks. Use the provided sealing washer and thread seal tape.
3. Contenuto della confezione
Si prega di verificare che tutti gli articoli siano presenti nel pacco:
- Johgee 3 Zones Water Timer Unit
- Manuale d'uso
- Sealing Washers (pre-installed or separate)
- Nastro sigillante per filettature
4. Prodotto finitoview
Familiarize yourself with the components of your Johgee Water Timer:

Immagine: Frontale view of the Johgee 3 Zones Water Timer, showing the LCD display, control buttons, and rotary dial.
- Schermo LCD: Shows current time, program settings, and battery status.
- Quadrante rotante: Utilizzato per selezionare diverse modalità di programmazione (OFF, AUTO, Imposta orologio, Ora di inizio, Per quanto tempo, Con quale frequenza).
- Pulsante Zona: Selects which of the three output zones to program or operate manually.
- Pulsante OK: Conferma le selezioni e le impostazioni.
- +/- Delay Buttons: Adjusts values (time, duration, frequency) and activates rain delay.
- Pulsante manuale: Initiates temporary manual watering.
- Ingresso in ottone: Connects to your garden faucet (3/4" external thread). Features a reinforced design and integrated filter.
- Water Outlets (x3): Connect to garden hoses for individual watering zones.
5. Impostazione
5.1 Installazione della batteria
- Individuare il vano batterie sul retro del timer.
- Aprire il coperchio del vano.
- Inserire due (2) batterie alcaline AA da 1.5 V nuove, assicurandosi della corretta polarità (+/-).
- Chiudere bene il coperchio del vano batteria per mantenere la tenuta stagna.
The timer features a low battery warning and an automatic shut-off valve to prevent water waste when battery levels are critically low.
5.2 Collegamento del timer per l'acqua
- Ensure your garden faucet is turned off.
- Inspect the brass inlet for the pre-installed sealing washer. If missing, insert one.
- Apply thread seal tape (provided) to the threads of your garden faucet for an extra secure, leak-proof connection.
- Screw the Johgee Water Timer onto your standard 3/4" garden faucet. Hand-tighten firmly. Do not overtighten.
- Connect your garden hoses to the three independent water outlets at the bottom of the timer. Ensure these connections are also tight.

Image: The Johgee Water Timer connected to a garden faucet, with three hoses attached to its outlets, ready for use.

Immagine: Un dettaglio view of the reinforced brass inlet, highlighting its robust construction and integrated metal filter for preventing debris from entering the timer.
6. Istruzioni per l'uso
6.1 Setting the Current Time (Clock)
- Ruotare la manopola su IMPOSTA OROLOGIO.
- La cifra dell'ora lampeggerà. Utilizzare il + or - pulsanti per regolare l'ora. Premere OK per confermare.
- The minute digit will flash. Use the + or - pulsanti per regolare i minuti. Premere OK per confermare.
- L'orologio è ora impostato.
6.2 Programmazione dell'irrigazione automatica
The timer allows for independent programming of each of its three zones.

Image: The Johgee Water Timer connected to a faucet, with three hoses extending to different garden areas labeled Zone 1, Zone 2, and Zone 3, illustrating its multi-zone capability.
- Ruotare la manopola su AUTO.
- Premere il tasto ZONA button to select the desired watering zone (1, 2, or 3) you wish to program.
- Ruotare la manopola su ORA DI INIZIO. Utilizzo + or - per impostare l'ora di inizio desiderata per l'irrigazione. Premere OK per confermare.
- Ruotare la manopola su PER QUANTO. Utilizzo + or - to set the watering duration (1 to 360 minutes). Press OK per confermare.
- Ruotare la manopola su QUANTE VOLTE. Utilizzo + or - to set the watering frequency (e.g., every 1, 3, 6, 12 hours, or every 1 to 30 days). Press OK per confermare.
- Repeat steps 2-5 for each zone you wish to program.
- Once programming is complete, turn the rotary dial back to AUTO per il funzionamento automatico.

Image: The LCD screen displaying options for setting start time, watering duration, and frequency, indicating the timer's programmable capabilities.

Image: An infographic detailing the customizable settings for automatic watering schedules, including setting the clock, start time, watering duration (1-360 minutes), and frequency (1 hour to 30 days).
6.3 Irrigazione manuale
Manual watering allows you to water immediately without interrupting your preset automatic schedule.
- Ensure the rotary dial is set to AUTO or SPENTO.
- Premere il tasto MANUALE pulsante.
- Utilizzare il + or - buttons to set the desired manual watering duration (1 to 360 minutes).
- Premere OK per avviare l'irrigazione manuale.
- Per interrompere l'irrigazione manuale, premere MANUALE di nuovo o ruotare la manopola su SPENTO.

Image: A person using a hose to manually water a garden, demonstrating the manual watering feature of the Johgee Water Timer. The timer's display shows a manual watering countdown.
6.4 Funzione di ritardo pioggia
The rain delay function allows you to temporarily suspend your watering schedule for a specified period, conserving water during rainy weather.
- Ensure the rotary dial is set to AUTO.
- Premere e tenere premuto il tasto RITARDO button (part of the + pulsante).
- Utilizzare il + or - buttons to select the desired delay duration (1 to 15 days).
- Premere OK to activate the rain delay. The display will show the remaining delay time.
- Per annullare il ritardo pioggia, tenere premuto il tasto RITARDO nuovamente il pulsante finché il ritardo non viene annullato.

Image: The Johgee Water Timer shown during rainfall, with its display indicating an active rain delay. This feature helps conserve water by pausing scheduled watering during wet conditions.
6.5 Child Lock Mode
The child lock feature prevents accidental changes to your watering schedule by children or pets.
- Per attivare: tenere premuto il tasto OK button for 3 seconds until a lock icon appears on the display.
- Per disattivare: tenere premuto il tasto OK per 3 secondi finché l'icona del lucchetto non scompare.

Image: A child's hand interacting with the Johgee Water Timer, illustrating the child lock function designed to prevent unintended changes to settings.
7. Manutenzione
7.1 Sostituzione della batteria
When the low battery indicator flashes on the display, replace the batteries promptly to ensure continuous operation and prevent the timer from shutting off unexpectedly. Follow the battery installation steps in Section 5.1.
7.2 Pulizia del filtro
The brass inlet contains an integrated metal filter to prevent debris from entering the timer. Periodically check and clean this filter to maintain optimal water flow. To clean:
- Turn off the water supply and disconnect the timer from the faucet.
- Carefully remove the filter screen from the brass inlet.
- Sciacquare il filtro sotto l'acqua corrente per rimuovere eventuali detriti accumulati.
- Reinsert the clean filter and reconnect the timer to the faucet.
7.3 Rimessaggio invernale
Prima della prima gelata, scollegare il timer dal rubinetto e dai tubi. Rimuovere le batterie. Conservare il timer in un luogo asciutto e al riparo dal gelo per evitare danni causati dal congelamento dell'acqua.
8. Risoluzione Dei Problemi
| Problema | Possibile causa | Soluzione |
|---|---|---|
| Timer does not turn on / LCD is blank. | Batterie scariche o installate in modo errato. | Sostituire le batterie con nuove batterie alcaline AA da 1.5 V, assicurandosi della corretta polarità. |
| Water is leaking from the faucet connection. | Loose connection, missing/damaged washer, or insufficient thread seal tape. | Ensure the timer is tightly screwed onto the faucet. Check that the sealing washer is properly seated. Apply more thread seal tape if necessary. |
| Water is leaking from hose connections. | Loose hose connection or damaged hose washer. | Tighten hose connections. Replace hose washers if they are worn or damaged. |
| Watering does not start at the programmed time. | Timer is in OFF mode, rain delay is active, or program is incorrect. | Ensure the dial is set to AUTO. Check if rain delay is active and cancel if needed. Verify program settings for start time, duration, and frequency. |
| One or more valves run continuously / will not shut off. | Internal valve issue, possibly due to debris or a temporary malfunction. | Remove batteries for 30 seconds to reset the unit, then reinsert. If the problem persists, contact customer support. |
| No water flow from an outlet. | Water supply off, clogged filter, or hose kinked. | Ensure the faucet is fully open. Check and clean the inlet filter (Section 7.2). Inspect hoses for kinks or blockages. |
9. Specifiche
- Numero modello: YZD03-T
- Temperatura di lavoro: 4.5°C - 45°C (40.1°F - 113°F)
- Pressione di esercizio: 0.05Mpa - 0.8Mpa (7.25 psi - 116 psi)
- Grado di impermeabilità: Grado di protezione IPX5
- Alimentazione elettrica: 2 batterie alcaline AA da 1.5 V (non incluse)
- Collegamento del rubinetto del tubo: Filettatura esterna da 3/4"
- Dimensioni del prodotto: Dimensioni: 7 x 15 x 12 cm
- Peso dell'articolo: 600 grammi
- Materiale: Metallo, Plastica
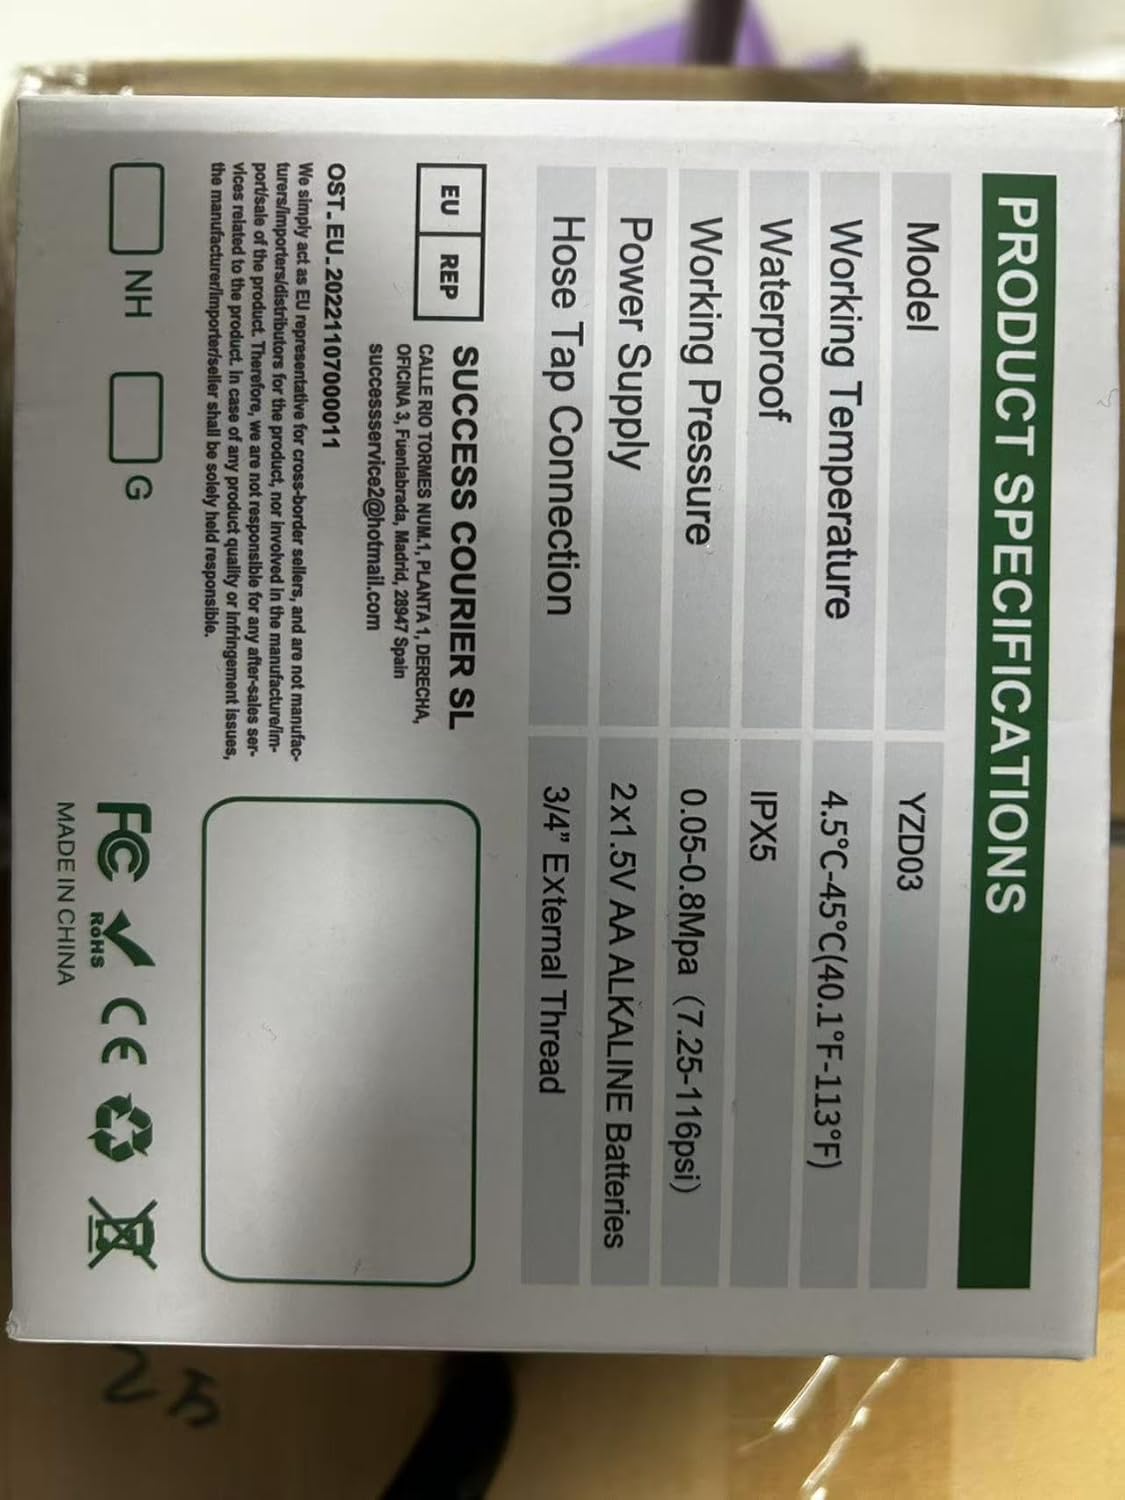
Image: A technical diagram illustrating the dimensions of the Johgee Water Timer, including its height (133mm) and width (155mm).
10. Garanzia e supporto
The Johgee 3 Zones Water Timer is backed by a manufacturer's warranty. For specific warranty details, including duration and coverage, please refer to the product packaging or contact the seller directly. If you encounter any issues or require technical assistance, please reach out to Johgee customer support through the retailer's platform or the contact information provided on the product packaging.
For online support and additional resources, you may visit the Johgee Store on Amazon.