302M231172, 302M231170, 302M231181, 302M231180
Instruction Manual: Kyocera Printer Paper Feed Shaft Gear
Model Numbers: 302M231172, 302M231170, 302M231181, 302M231180
1. Introduzione
This manual provides comprehensive instructions for the installation, operation, maintenance, and troubleshooting of the Lilianos Clutch Paper Feed Shaft Gear B Z38S. This component is designed as a direct replacement part for specific Kyocera printer models to ensure optimal paper feeding performance.

Figure 1.1: Packaging of the Lilianos Clutch Paper Feed Shaft Gear B Z38S.
2. Informazioni sulla sicurezza
Always observe the following safety precautions when handling or installing this component:
- Disconnessione dell'alimentazione: Before attempting any installation or maintenance, ensure the printer is completely powered off and unplugged from the electrical outlet.
- Elettricità statica: Discharge any static electricity from your body by touching a grounded metal object before handling internal printer components.
- Gestione dei componenti: Handle the gear by its edges to avoid touching the teeth or shaft, which could introduce contaminants or cause damage.
- Utilizzo dello strumento: Use appropriate tools for disassembly and reassembly. Avoid excessive force.
- Assistenza professionale: In caso di dubbi su un passaggio, consultare un tecnico qualificato.
3. Modelli di stampante compatibili
This Clutch Paper Feed Shaft Gear is compatible with the following Kyocera printer models:
- Kyocera FS-1025MFP
- Kyocera FS-1120mfp
- Kyocera FS-1040
- Kyocera FS-1060
- Kyocera FS-1020mfp
Refer to your printer's service manual for specific instructions on accessing and replacing the paper feed shaft gear.
4. Guida all'installazione
The following steps outline the general procedure for replacing the paper feed shaft gear. Specific disassembly and reassembly steps may vary by printer model. Always refer to your printer's official service manual for detailed instructions.
- Preparare la stampante: Ensure the printer is turned off and unplugged from the power source. Allow it to cool down if it has been recently in use.
- Access the Paper Feed Mechanism: Carefully open the printer covers and remove any components (e.g., toner cartridge, drum unit, paper trays) that obstruct access to the paper feed mechanism. You may need to remove screws or release clips.
- Trova il vecchio ingranaggio: Identify the existing paper feed shaft gear that needs replacement. It is typically located near the paper pickup rollers.
- Rimuovere il vecchio ingranaggio: Gently disengage and remove the old gear. This may involve releasing a retaining clip or carefully sliding it off the shaft. Note its orientation for correct installation of the new gear.
- Inspect the New Gear: Before installation, inspect the new Lilianos Clutch Paper Feed Shaft Gear for any visible defects or damage.
- Installa la nuova attrezzatura: Carefully slide the new gear onto the shaft, ensuring it is correctly aligned and seated. If there was a retaining clip, reattach it securely.
- Rimontare la stampante: Reinstall all removed components and close the printer covers. Ensure all screws and clips are securely fastened.
- Test the Printer: Plug the printer back in and power it on. Perform a test print to verify that the paper feeding mechanism is functioning correctly.
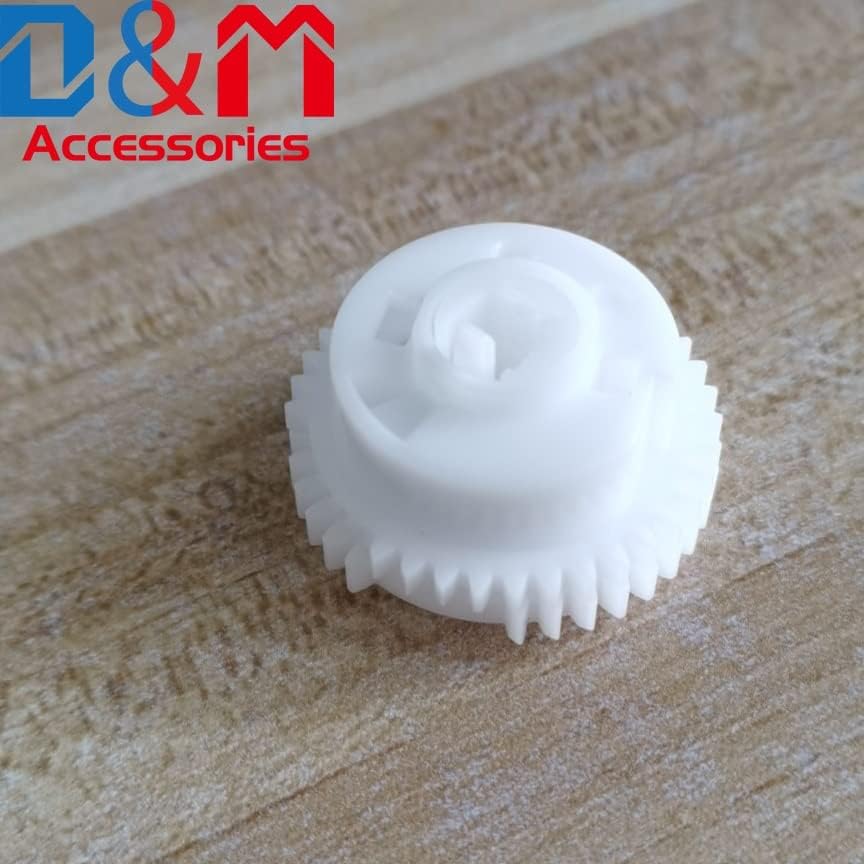
Figura 4.1: Fronte view of the Lilianos Clutch Paper Feed Shaft Gear.

Figura 4.2: Angolato view of the gear, highlighting its design for proper paper feeding.
5. Funzionamento
The Clutch Paper Feed Shaft Gear is an integral part of your printer's paper handling system. Its primary function is to precisely control the movement of paper from the tray through the printer's internal path. The clutch mechanism allows for smooth, consistent paper pickup and prevents multiple sheets from being fed simultaneously, ensuring reliable printing operations.
Once correctly installed, the gear operates automatically as part of the printer's normal functions. No user intervention is required for its operation.
6. Manutenzione
Regular maintenance of the paper feed mechanism can extend the life of your printer and its components. While the gear itself requires minimal maintenance, consider the following:
- Polvere e detriti: Periodically inspect the area around the paper feed shaft gear for accumulation of paper dust, toner residue, or other debris. Use a soft, lint-free cloth or a small brush to gently remove any foreign material.
- Lubrificazione: The gear is designed for long-term operation without additional lubrication. Do not apply oils or greases unless specifically instructed by the printer's service manual.
- Pulizia dei rulli: Ensure that the paper pickup rollers, which work in conjunction with this gear, are clean and free of residue. Refer to your printer's manual for instructions on cleaning the rollers.
7. Risoluzione Dei Problemi
If you experience issues related to paper feeding after installing the new gear, consider the following:
| Problema | Possibile causa | Soluzione |
|---|---|---|
| Inceppamenti della carta | Incorrect gear installation, debris in paper path, worn rollers. |
|
| Multiple Sheets Fed | Worn separation pad, issue with clutch mechanism, incorrect paper loading. |
|
| No Paper Pickup | Gear not engaging, worn pickup rollers, empty paper tray. |
|
If problems persist after following these steps, it is recommended to consult a professional printer technician or refer to your printer's comprehensive service manual.
8. Specifiche
| Attributo | Dettaglio |
|---|---|
| Nome del prodotto | Clutch Paper Feed Shaft Gear B Z38S |
| Numeri di parte | 302M231172, 302M231170, 302M231181, 302M231180 |
| Marca | Generic (Lilianos) |
| Colore | White (as per typical product images) |
| Compatibilità | Kyocera FS-1025MFP, 1120mfp, 1040, 1060, 1020mfp |
| Materiale | Composito plastico durevole |
9. Informazioni sulla garanzia
Questo prodotto è coperto dalla garanzia standard del produttore contro difetti di materiali e fabbricazione. Il periodo di garanzia inizia generalmente dalla data di acquisto. Si prega di conservare la prova d'acquisto per eventuali reclami in garanzia.
The warranty does not cover damage resulting from improper installation, misuse, neglect, unauthorized modification, or normal wear and tear. For specific warranty terms and conditions, please refer to the documentation provided with your purchase or contact the seller directly.
10. Assistenza clienti
For technical assistance, questions regarding installation, or warranty inquiries, please contact your point of purchase or the product manufacturer. When contacting support, please have your product model number and purchase details ready.
Risorse online: For additional support and resources, you may visit the manufacturer's or seller's official websito.
Ask a question about this manual
Ask about setup, troubleshooting, compatibility, parts, safety, or missing instructions. Manuals+ will review the question and use this page’s manual context to help answer it.