
1. Introduzione
Welcome to your Yosoo Fingerprint Cabinet Lock. This manual provides detailed instructions for the installation, setup, operation, and maintenance of your new keyless biometric lock. Please read this manual thoroughly before installation and use to ensure proper function and longevity of the product.
2. Informazioni sulla sicurezza
- Non esporre la serratura a temperature estreme o alla luce solare diretta per periodi prolungati.
- Avoid contact with water or other liquids. This product is designed for indoor and protected outdoor use.
- Use only 4 AAA dry batteries. Do not mix old and new batteries, or different types of batteries.
- Do not attempt to disassemble or modify the lock. This may void the warranty and cause damage.
- Keep the reset pointer and small accessories out of reach of children.
3. Contenuto della confezione
Si prega di verificare che tutti gli articoli elencati di seguito siano inclusi nel pacchetto:
- 1 x Cabinet Lock Unit
- 1 x Tappo
- 1 x Reset Pointer
- 14 x Screws (various sizes for installation)
- 4 x Accessories (mounting plates/brackets)
- 2 x Positioning Paper (for drilling guidance)
4. Prodotto finitoview e specifiche
The Yosoo Fingerprint Cabinet Lock provides secure, keyless access using advanced fingerprint recognition technology. It is suitable for various applications including drawers, lockers, and desks.
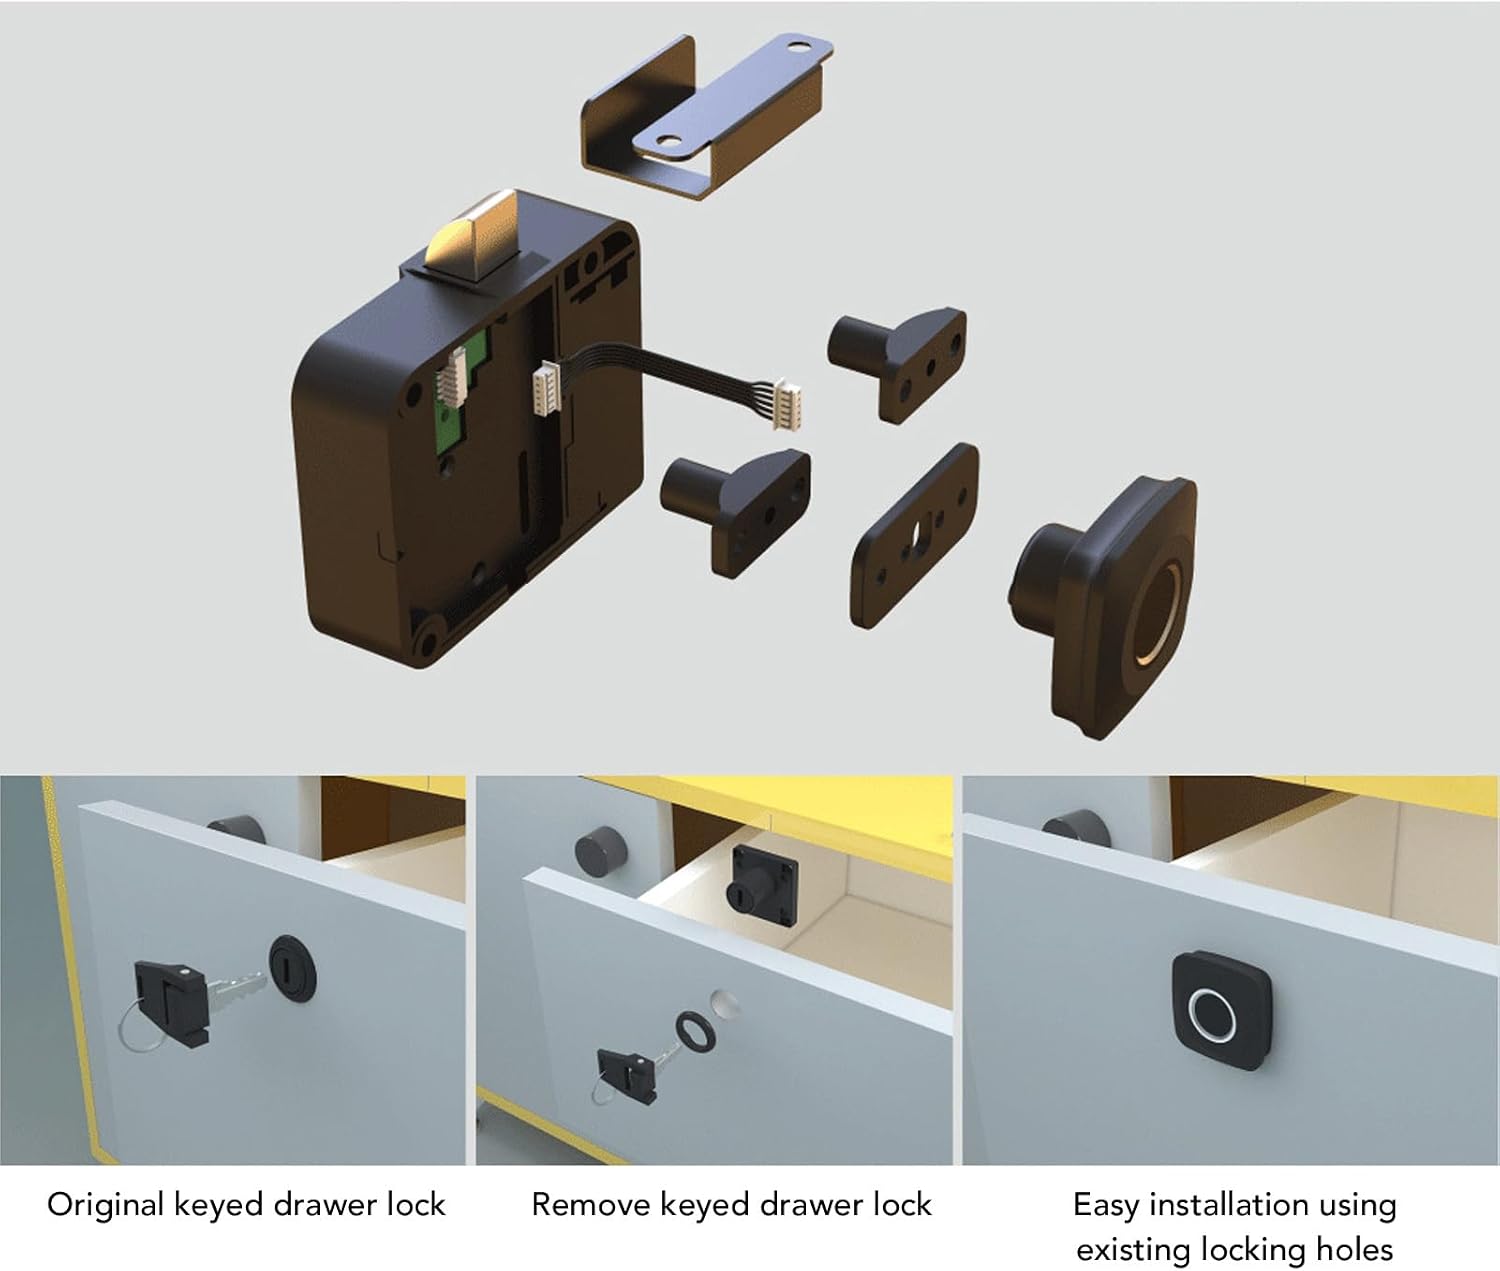
Figura 1: Esploso view of the Yosoo Fingerprint Cabinet Lock components, showing the main lock body, fingerprint sensor, and various mounting accessories.

Figura 2: Dimensions of the fingerprint sensor unit, measuring 36mm / 1.4 inches on each side.
Specifiche:
| Caratteristica | Descrizione |
|---|---|
| Tipo di articolo | Serratura per armadietto con impronte digitali |
| Materiale del prodotto | ABS, Zinc Alloy |
| Fonte di alimentazione | 4 x AAA Dry Batteries (not included) |
| Peso lordo | 145 g / 5.1 once |
| Nome del modello | Yosoor6e0dnkcf8 |
5. Guida all'installazione
5.1 Prima dell'installazione
- Ensure the cabinet or drawer material is suitable for drilling.
- Gather necessary tools: drill, screwdriver, pencil.
- Insert 4 AAA batteries into the main lock unit.
5.2 Installazione passo passo
Follow these steps carefully for proper installation. Refer to the installation diagram (Figure 3) for visual guidance.
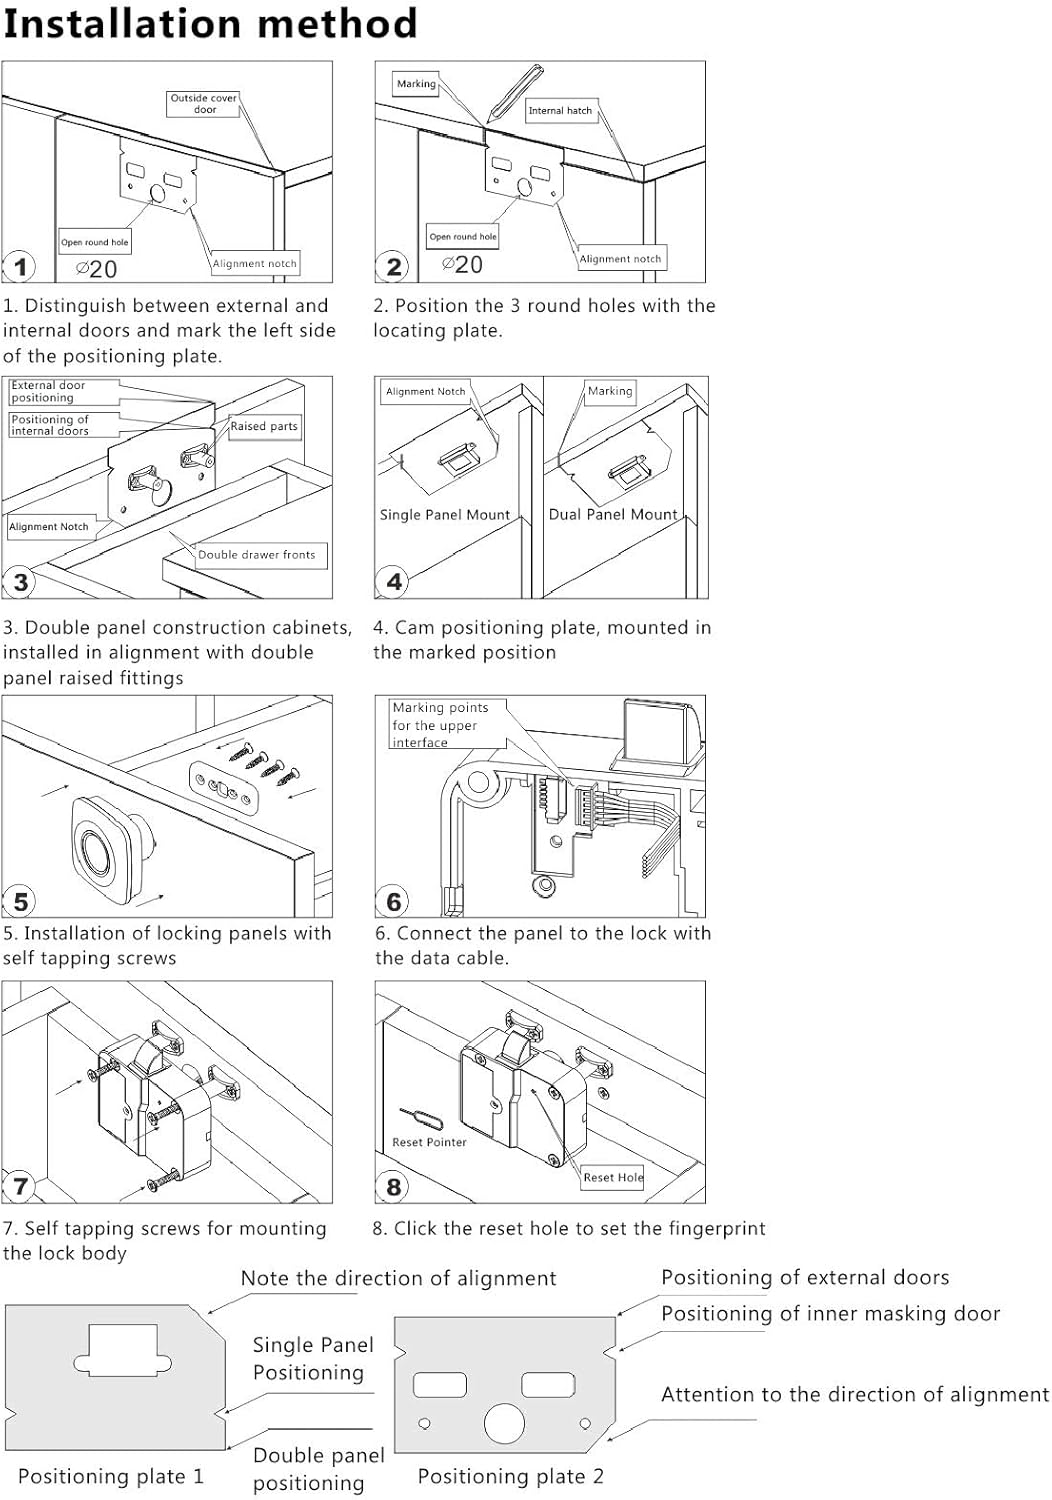
Figura 3: Detailed installation method diagram, illustrating steps for mounting the lock and sensor.
- Distinguish External and Internal Doors: Identify the external and internal sides of your cabinet or drawer. Position the fingerprint sensor on the external side and the main lock unit on the internal side.
- Positioning Plate: Use the provided positioning paper to mark the location for the fingerprint sensor and the three round holes for the locating plate. Drill the marked holes.
- Double Panel Construction: For cabinets with double panel construction, install the lock in alignment with the double panel raised fittings.
- Cam Positioning Plate: Mount the cam positioning plate in the marked position on the internal side of the cabinet.
- Locking Panels Installation: Install the locking panels using self-tapping screws.
- Collegare il cavo dati: Connect the data cable from the fingerprint sensor to the main lock unit. Ensure the connection is secure.
- Mount Lock Body: Securely mount the main lock body using self-tapping screws.
- Reset Fingerprint: After installation, use the reset pointer to press the reset hole on the main lock unit to clear any pre-existing data and prepare for new fingerprint registration.

Figura 4: Visual guide demonstrating the replacement of an original keyed drawer lock with the Yosoo Fingerprint Cabinet Lock, utilizing existing locking holes for easy installation.
6. Istruzioni per l'uso
6.1 Initial Setup (Admin Fingerprint Registration)
- After installation and reset (if performed), the lock is in initial setup mode.
- Place your finger on the fingerprint sensor. The indicator light will flash blue.
- Lift and place your finger repeatedly (typically 5-10 times) until the indicator light turns green, indicating successful registration of the administrator fingerprint.
- The first registered fingerprint is automatically designated as the administrator.
6.2 Aggiunta delle impronte digitali dell'utente
- Place the administrator's finger on the sensor and hold until the blue light flashes.
- While the blue light is flashing, have the new user place their finger on the sensor.
- Lift and place the new user's finger repeatedly until the indicator light turns green.
- Repeat for additional user fingerprints. The lock can store multiple fingerprints.
6.3 Sblocco
To unlock the cabinet or drawer:
- Posizionare il dito registrato sul sensore delle impronte digitali.
- If the fingerprint is recognized, the indicator light will turn green, and the lock will disengage.
- If the fingerprint is not recognized, the indicator light will flash red. Try again or use another registered finger.

Figura 5: The fingerprint sensor in use, demonstrating the quick identification process for unlocking.
6.4 Deleting Fingerprints / Factory Reset
To delete all registered fingerprints and perform a factory reset:
- Locate the reset hole on the main lock unit (refer to Figure 3, step 8).
- Use the provided reset pointer or a similar thin object to press and hold the reset button for approximately 5-10 seconds.
- The indicator light will flash, then turn off, indicating that all fingerprints have been cleared and the lock has been reset to factory defaults.
- You will need to register a new administrator fingerprint after a factory reset.
7. Manutenzione
7.1 Sostituzione della batteria
The lock is powered by 4 AAA dry batteries. When the battery power is low, the indicator light may flash red rapidly or emit a warning sound during operation. Replace batteries promptly to ensure continuous functionality.
- Individuare il vano batteria sull'unità di blocco principale.
- Aprire il coperchio del vano.
- Remove the old batteries and insert 4 new AAA dry batteries, ensuring correct polarity (+/-).
- Chiudere il coperchio del vano batterie.
7.2 Pulizia
Per mantenere prestazioni ottimali:
- Wipe the fingerprint sensor and lock body with a soft, dry cloth.
- Non utilizzare detergenti abrasivi, solventi o prodotti chimici aggressivi, poiché potrebbero danneggiare la superficie o i componenti interni.
8. Risoluzione Dei Problemi
- Il lucchetto non risponde: Check battery levels and replace if necessary. Ensure the data cable between the sensor and lock unit is securely connected.
- Impronta digitale non riconosciuta: Ensure your finger is clean and dry. Try placing your finger in different positions on the sensor. If the issue persists, re-register your fingerprint.
- Indicator light flashes red rapidly: This indicates low battery. Replace all 4 AAA batteries immediately.
- Cannot register new fingerprints: Ensure you are using an administrator fingerprint to initiate the registration process. If the lock is full, consider performing a factory reset to clear all existing fingerprints.
9. Garanzia e supporto
Yosoo products are manufactured to high-quality standards. For warranty information, technical support, or any questions regarding your Fingerprint Cabinet Lock, please refer to the contact information provided with your purchase or visit the official Yosoo website. Please have your model number (Yosoor6e0dnkcf8) available when contacting support.