Protectli VP2430
Protectli Vault Pro VP2430-4 User Manual
Modello: VP2430
1. Introduzione
This manual provides detailed instructions for the setup, operation, maintenance, and troubleshooting of your Protectli Vault Pro VP2430-4 Micro Appliance/Mini PC. The VP2430-4 is a compact, fanless device designed for network security applications, featuring an Intel N150 Quad Core CPU and four 2.5G network interfaces. This barebones unit requires the installation of RAM and an M.2 SATA SSD for full functionality.
2. Contenuto della confezione
Verify that all items are present in your package. If any components are missing or damaged, please contact Protectli support.
- Protectli Vault Pro VP2430-4 Micro Appliance
- Adattatore di alimentazione e cavo di alimentazione
- USB Type-C Console Cable
- Piastra di montaggio VESA e viti
- Thermal Pads for M.2 SSD
- SATA Power/Data Cable (for 2.5" drive, if applicable)

Image: All components included in the Protectli Vault Pro VP2430-4 package, including the appliance, power supply, cables, and mounting hardware.
3. Impostazione
3.1. Internal Component Installation (RAM and SSD)
The VP2430-4 is a barebones unit and requires the installation of DDR5 RAM and an M.2 SATA SSD. Follow these steps carefully:
- Spegni: Ensure the device is completely powered off and disconnected from the power source.
- Telaio aperto: Carefully remove the screws securing the bottom cover of the appliance.
- Installa RAM: Locate the DDR5 SODIMM slot(s) on the motherboard. Insert the RAM module(s) at a 45-degree angle and push down until the clips secure it in place.
- Install M.2 SATA SSD: Locate the M.2 slot. Insert the M.2 SATA SSD into the slot and secure it with the provided screw. Apply thermal pads if included and recommended by the manufacturer.
- Telaio chiuso: Riposizionare il coperchio inferiore e fissarlo con le viti.
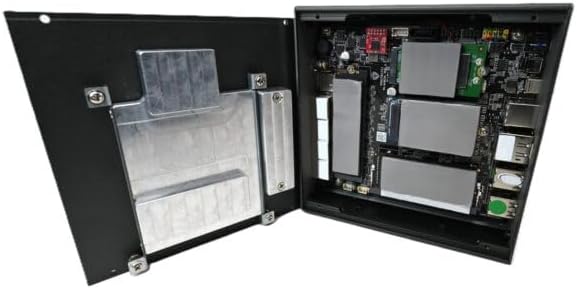
Immagine: Interna view of the Protectli Vault Pro VP2430-4, showing the motherboard with slots for RAM and M.2 SSD.
3.2. Connessioni esterne
Connect the necessary peripherals and power to the device.
- Energia: Connect the DC 12V power adapter to the DC-in port on the rear panel and then plug the adapter into a power outlet.
- Rete: Connect your network cables to the 2.5G NIC ports (labeled 1-4) on the front panel.
- Display: If a display is required for initial setup, connect a monitor to the HDMI or DisplayPort (DP) output on the rear panel.
- Dispositivi USB: Connect any USB keyboards, mice, or other peripherals to the available USB 2.0 or USB 3.2 Type-C ports.
- Consolle: For serial console access, connect the USB Type-C console cable to the console port and to your computer.
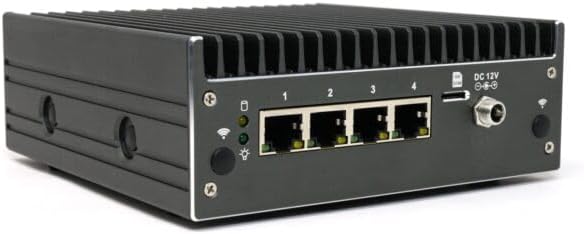
Image: Front panel of the Protectli Vault Pro VP2430-4, highlighting the four 2.5G network ports, power button, and status LEDs.

Image: Rear panel of the Protectli Vault Pro VP2430-4, showing USB 2.0, USB 3.2 Type-C, HDMI, DisplayPort, and console port.
4. Istruzioni per l'uso
4.1. Accensione/Spegnimento
- Accensione: Press the power button located on the front panel. The power LED will illuminate.
- Spegni: To safely power off, initiate a shutdown from your installed operating system. Alternatively, press and hold the power button for 5 seconds to force a shutdown.
4.2. BIOS Access and Configuration
The VP2430-4 ships with an AMI BIOS. To access the BIOS setup utility:
- Connect a keyboard and monitor to the device.
- Accendere il dispositivo.
- Premere ripetutamente il tasto DEL or F2 key during startup to enter the BIOS setup.
Within the BIOS, you can configure boot order, system time, and other hardware settings. Refer to the AMI BIOS documentation for detailed options.
4.3. Installazione del sistema operativo
The Protectli Vault Pro VP2430-4 does not come with a pre-installed operating system. It is compatible with various firewall software and open-source solutions, including OPNsense, pfSense, and VyOS. To install an operating system:
- Prepare a bootable USB drive with your desired operating system installer.
- Connect the USB drive to one of the USB ports.
- Access the BIOS and configure the boot order to prioritize the USB drive, or select it from the boot menu (usually by pressing F10 or F12 durante l'avvio).
- Follow the on-screen instructions of your chosen operating system installer.
5. Manutenzione
5.1. Pulizia
As a fanless device, the VP2430-4 requires minimal cleaning. Periodically wipe the exterior with a soft, dry cloth. Ensure the heatsink fins are free from dust accumulation to maintain optimal thermal performance. Do not use liquid cleaners directly on the device.
5.2. Aggiornamenti del firmware
Protectli may release BIOS or firmware updates to improve performance, stability, or add new features. Check the official Protectli website for the latest firmware versions and update instructions. The device supports Coreboot, an open-source firmware, which may offer additional customization and security benefits.
5.3. Component Upgrades
RAM and M.2 SATA SSDs can be upgraded. Refer to section 3.1 for instructions on accessing the internal components. Ensure compatibility with the device's specifications (e.g., DDR5 SODIMM RAM).
6. Risoluzione Dei Problemi
This section addresses common issues you might encounter with your Protectli Vault Pro VP2430-4.
- Nessun potere:
- Assicurarsi che l'adattatore di alimentazione sia collegato saldamente sia al dispositivo sia a una presa di corrente funzionante.
- Verificare che la presa di corrente funzioni.
- Controllare che l'adattatore di alimentazione non presenti danni visibili.
- Nessuna uscita di visualizzazione:
- Ensure the monitor is correctly connected to the HDMI or DisplayPort and is powered on.
- Provare un cavo di visualizzazione o un monitor diverso.
- If using a console cable, ensure the correct serial port settings are configured on your computer.
- Problemi di connettività di rete:
- Check that network cables are securely plugged into the 2.5G NIC ports and your network switch/router.
- Observe the LED indicators on the network ports; they should show activity.
- Verificare la configurazione di rete all'interno del sistema operativo installato.
- Device Not Booting from USB:
- Ensure the USB drive is properly formatted and contains a bootable operating system image.
- Check the BIOS boot order settings to prioritize the USB drive.
- Try a different USB port or USB drive.
For further assistance, refer to the support section or contact Protectli technical support.
7. Specifiche
Below are the technical specifications for the Protectli Vault Pro VP2430-4:
| Caratteristica | Specificazione |
|---|---|
| Nome del modello | VP2430 |
| Processore | Intel N150 Quad Core CPU (up to 3.6GHz, 6MB Cache) |
| Piattaforma hardware | PC |
| Tipo di memoria | DDR5 RAM (Barebones, user-installed) |
| Stoccaggio a bordo | 32 GB eMMC |
| Spazio di archiviazione aggiuntivo | M.2 SATA SSD (Barebones, user-installed) |
| Interfacce di rete | 4x Intel I226-V 2.5G NICs |
| Porte USB | 2x USB 3.2 Type-C (with DisplayPort), 4x USB 2.0 Type-A |
| Uscite video | 1x HDMI, 1x DisplayPort (DP) |
| Porta della console | 1x USB Type-C Console |
| Coprocessore grafico | Grafica integrata |
| Dimensioni (LxWxH) | 5.67 x 5.63 x 2.17 pollici |
| Peso dell'articolo | 4.1 libbre |
| Colore | Grigio |
| Fonte di alimentazione | CC 12V |
| BIOGRAFIA | AMI BIOS (Coreboot supported) |
| AES-NI Support | SÌ |
8. Informazioni sulla garanzia
Protectli products typically come with a manufacturer's warranty. For specific details regarding the warranty period and terms for your VP2430-4, please refer to the warranty documentation included with your purchase or visit the official Protectli websito. Conservare la prova d'acquisto per eventuali reclami in garanzia.
9. Supporto
For technical assistance, troubleshooting, or general inquiries, please contact Protectli's US-based support team. You can find contact information and additional resources, such as a knowledge base and FAQs, on the official Protectli websito:
When contacting support, please have your product model (VP2430-4) and any relevant purchase information ready.
Ask a question about this manual
Ask about setup, troubleshooting, compatibility, parts, safety, or missing instructions. Manuals+ will review the question and use this page’s manual context to help answer it.