
1. Introduzione
Thank you for choosing the DEDRA MC0932 Mini Laser Distance Meter. This compact and precise device is designed for quick and accurate distance measurements in various indoor applications. Please read this manual carefully before using the device to ensure safe and proper operation.
1.1 Informazioni sulla sicurezza
ATTENZIONE: Radiazione laser
- This device emits Class II laser radiation. Do not stare directly into the laser beam or direct it towards other people's eyes.
- Do not disassemble or modify the device. Unauthorized modifications may result in hazardous laser radiation exposure.
- Tenere il dispositivo fuori dalla portata dei bambini.
- Utilizzare solo le batterie specificate. Non mischiare batterie vecchie e nuove o tipi diversi di batterie.
- Rimuovere le batterie se il dispositivo non verrà utilizzato per un periodo prolungato per evitare perdite.
2. Contenuto della confezione
Disimballare con attenzione la scatola e assicurarsi che tutti gli articoli elencati di seguito siano presenti e in buone condizioni:
- DEDRA MC0932 Mini Laser Distance Meter
- Sacchetto protettivo
- Cinturino da polso
- Batterie AAA (2x)

Image: The DEDRA MC0932 Mini Laser Distance Meter, its protective pouch, wrist strap, and two AAA batteries.
3. Prodotto finitoview
3.1 Disposizione del dispositivo
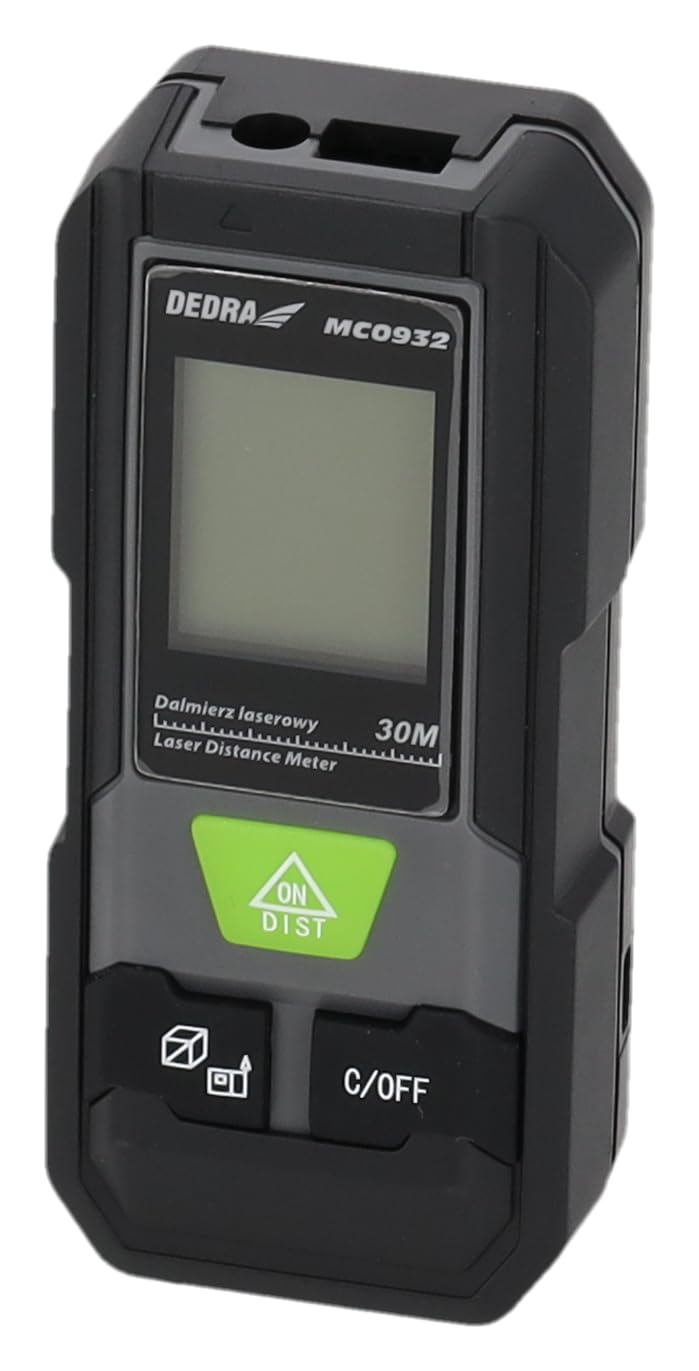
Immagine: Frontale view of the DEDRA MC0932 showing the display and control buttons.
- Lente ad emissione laser
- Lente di ricezione laser
- Schermo di visualizzazione
- ON / DIST Button (Power On / Single Measurement / Continuous Measurement)
- C / OFF Button (Clear / Power Off)
- Function / Unit Button (Mode Selection / Unit Switching)
- Reference Point Button (Front/Rear Edge Measurement)

Immagine: Indietro view of the DEDRA MC0932, highlighting the battery compartment.
- Vano batteria
4. Impostazione
4.1 Installazione della batteria
- Individuare il coperchio del vano batteria sul retro del dispositivo.
- Per aprire il vano, far scorrere il coperchio verso il basso.
- Inserire due (2) batterie AAA, assicurandosi della corretta polarità (+/-) come indicato all'interno del vano.
- Chiudere il coperchio del vano batteria facendolo scorrere nuovamente in posizione finché non scatta in posizione.
5. Istruzioni per l'uso
5.1 Accensione/spegnimento
- Per accendere: Premere il tasto ON/DIST button once. The laser will activate, and the display will light up.
- Per spegnere: Premere e tenere premuto il tasto C/OFF pulsante per circa 2 secondi. Il dispositivo si spegnerà automaticamente dopo 180 secondi di inattività.
5.2 Misurazione della distanza singola
- Turn on the device by pressing ON/DIST. The laser will activate.
- Puntare il raggio laser sul punto bersaglio.
- Premere il tasto ON/DIST button again. The measurement will be taken and displayed on the screen.
5.3 Misurazione continua (monitoraggio)
- Accendi il dispositivo.
- Premere e tenere premuto il tasto ON/DIST button for approximately 2 seconds. The device will enter continuous measurement mode, displaying real-time distance as you move the device.
- To stop continuous measurement, press the C/OFF button once. The last measured value will remain on the display.
5.4 Misurazione dell'area
- Accendi il dispositivo.
- Premere il tasto Function / Unit button repeatedly until the area icon (a square with 'm²' or 'ft²') appears on the display.
- Misurare il primo lato (ad esempio, la lunghezza) premendo ON/DIST.
- Misurare il secondo lato (ad esempio, larghezza) premendo ON/DIST Ancora.
- Il dispositivo calcolerà e visualizzerà automaticamente l'area.
5.5 Misura del volume
- Accendi il dispositivo.
- Premere il tasto Function / Unit button repeatedly until the volume icon (a cube with 'm³' or 'ft³') appears on the display.
- Misurare il primo lato (ad esempio, la lunghezza) premendo ON/DIST.
- Misurare il secondo lato (ad esempio, larghezza) premendo ON/DIST Ancora.
- Measure the third side (e.g., height) by pressing ON/DIST una terza volta.
- Il dispositivo calcolerà e visualizzerà automaticamente il volume.
5.6 Commutazione unità
To change the measurement unit (meters, feet, inches), press and hold the Function / Unit button for approximately 2 seconds. The unit will cycle through m, ft, and in.
5.7 Impostazione del punto di riferimento
The device can measure from its front edge or its rear edge. To switch the reference point, press the Punto di riferimento button. An icon on the display will indicate whether the measurement is taken from the front or rear of the device.
6. Manutenzione
6.1 Pulizia
- Utilizzare un morbido, damp panno per pulire il dispositivo casing. Non utilizzare detergenti abrasivi o solventi.
- Gently wipe the laser lenses with a clean, lint-free cloth. Avoid touching the lenses with your fingers.
6.2 Conservazione
- Conservare il dispositivo nella sua custodia protettiva in un luogo fresco e asciutto, lontano dalla luce solare diretta e da temperature estreme.
- Remove the batteries if the device will not be used for an extended period (e.g., more than one month) to prevent battery leakage and damage.
6.3 Sostituzione della batteria
When the low battery indicator appears on the display, replace both AAA batteries with new ones following the instructions in Section 4.1.
7. Risoluzione Dei Problemi
| Problema | Possibile causa | Soluzione |
|---|---|---|
| Il dispositivo non si accende | Le batterie sono scariche o inserite in modo errato. | Sostituire le batterie o controllare la polarità. |
| Messaggio di "Errore" sul display | Laser path is obstructed, target surface is too reflective/absorbent, or measurement range exceeded. | Ensure clear laser path, use a target plate if necessary, ensure target is within 0.03m-30m range. |
| Misurazioni imprecise | Lenses are dirty, device is unstable, or environmental interference. | Clean lenses, ensure device is stable during measurement, avoid strong light sources. |
| Il display è scuro o tremolante | Batteria scarica. | Sostituire le batterie. |
8. Specifiche
| Campo di misura | 0.03 m - 30 m |
| Precisione della misurazione | ±2 mm |
| Unità di misura | m / ft / in |
| Classe laser | Classe II |
| Tipo di laser | 635 nm, <1 mW |
| Spegnimento automatico del laser | 30 secondi |
| Spegnimento automatico del dispositivo | 180 secondi |
| Tipo di batteria | 2 x AAA (si consigliano batterie alcaline) |
| Temperatura di esercizio | da 0°C a 40°C (da 32°F a 104°F) |
| Temperatura di conservazione | -20°C a 60°C (-4°F a 140°F) |
| Dimensioni (circa) | 100 x 35 x 20 mm (3.9 x 1.4 x 0.8 pollici) |
| Peso (con batterie) | 200 g (7.05 once) |
| Grado di protezione IP | IP54 (protetto da polvere e schizzi) |
9. Garanzia e supporto
DEDRA products are manufactured to high-quality standards. For warranty information, please refer to the warranty card included with your purchase or contact your local DEDRA dealer or the seller directly. For technical support or service inquiries, please reach out to the point of purchase or the official DEDRA customer service channels.