1. Introduzione
Thank you for choosing the QJA EM653 Espresso Machine with Grinder. This manual provides essential information for the safe operation, setup, maintenance, and troubleshooting of your new appliance. Please read it thoroughly before first use and retain it for future reference.
1.1 Importanti istruzioni di sicurezza
- Leggere tutte le istruzioni prima di mettere in funzione l'apparecchio.
- Non immergere l'apparecchio, il cavo di alimentazione o la spina in acqua o altri liquidi.
- Assicurare il volumetage indicato sull'apparecchio corrisponde al vol . della rete localetage prima di effettuare la connessione.
- È necessaria un'attenta supervisione quando l'apparecchio viene utilizzato da bambini o in loro presenza.
- Scollegare dalla presa quando non in uso e prima di pulire. Lasciare raffreddare prima di mettere o togliere parti e prima di pulire l'apparecchio.
- Non utilizzare alcun apparecchio con un cavo o una spina danneggiati oppure dopo che l'apparecchio stesso non funziona correttamente o è stato danneggiato in qualsiasi modo.
- Utilizzare solo gli accessori consigliati dal produttore.
- Non posizionare sopra o vicino a un fornello a gas o elettrico caldo, oppure in un forno caldo.
- Prima di iniziare la preparazione, assicurarsi sempre che il serbatoio dell'acqua sia riempito fino al livello appropriato.
- Exercise caution when handling hot steam and hot surfaces. The steam wand can cause burns.
2. Prodotto finitoview
The QJA EM653 is a professional-grade espresso machine featuring an integrated conical burr grinder, 20 bar pressure pump, and an anti-scalding milk frother steam wand. It offers 30 grinding settings and 5 temperature levels for customized coffee preparation.
2.1 Componenti
Familiarize yourself with the various parts of your espresso machine and its accessories:

Figura 2.1: Accessori inclusi. This image displays the QJA EM653 Espresso Machine alongside its comprehensive set of accessories, including various filters, a milk jug, cleaning tools, and the user manual.
- Unità principale: Espresso machine with integrated grinder, control panel, brewing head, and steam wand.
- Serbatoio dell'acqua: Staccabile per facilitare il riempimento e la pulizia.
- Tramoggia dei fagioli: Detachable container for whole coffee beans.
- Portafiltro: 58mm professional-grade portafilter.
- Cestelli filtranti: Single and Double shot filter screens.
- Tamplui: Per compattare il caffè macinato nel portafiltro.
- Brocca del latte: Stainless steel jug for frothing milk.
- Dosing Funnel: Accessory to prevent coffee powder spillage during grinding.
- Spazzole per la pulizia: For maintaining the grinder, brewing head, and blade disc.
3. Impostazione
3.1 Disimballaggio e posizionamento
- Rimuovere con cautela tutti i materiali di imballaggio e gli accessori.
- Posizionare la macchina su una superficie stabile, piana e resistente al calore, lontano da fonti di acqua e calore.
- Garantire uno spazio adeguato attorno alla macchina per la ventilazione.
3.2 Installazione del serbatoio dell'acqua
- Rimuovere il serbatoio dell'acqua rimovibile dal retro della macchina.
- Riempire il serbatoio con acqua fresca e fredda filtrata fino alla linea MAX.
- Carefully place the water tank back into its position, ensuring it is seated correctly.

Figure 3.1: Detachable Water Tank. The image illustrates the easy removal and re-insertion of the large-capacity water tank for refilling and cleaning.
3.3 Installazione del Bean Hopper
- Place the detachable bean hopper onto the top of the machine, aligning it with the grinder opening.
- Rotate the hopper clockwise until it locks into place.
- Fill the hopper with whole roasted coffee beans.
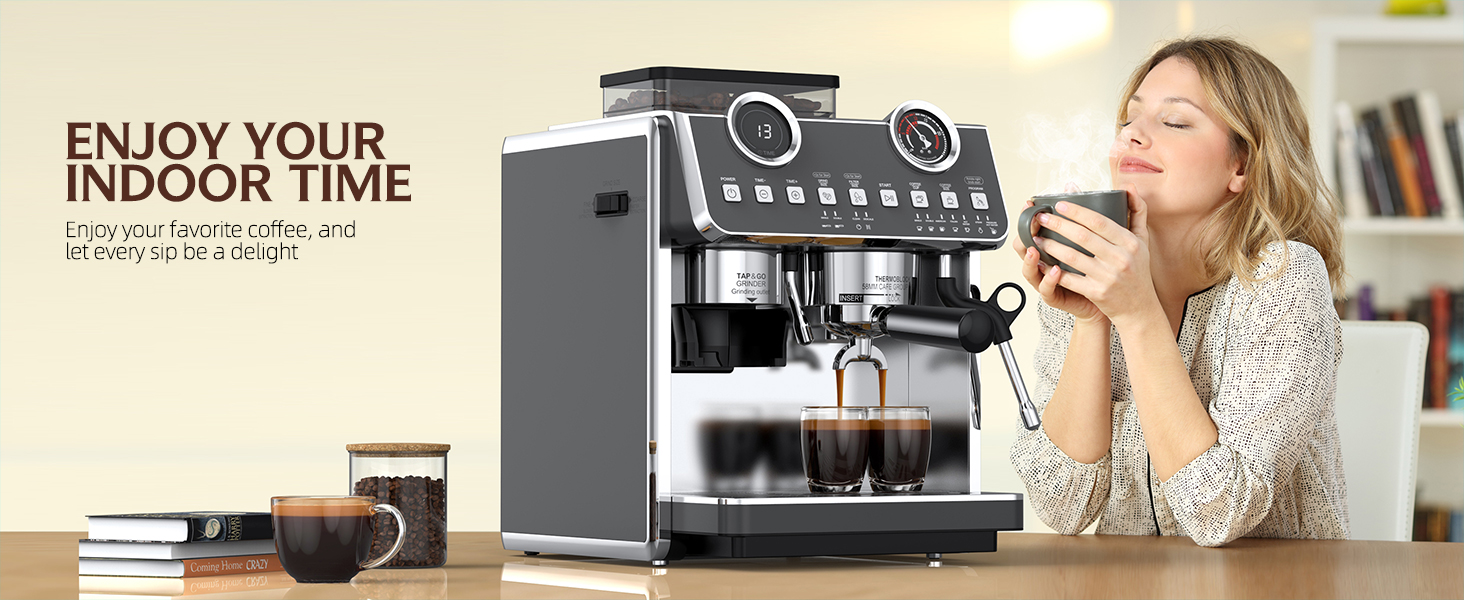
Figure 3.2: Detachable Bean Hopper. This image shows the bean hopper being placed on the machine, highlighting its detachable design for easy cleaning and maintenance of the grinder.
3.4 Initial Cleaning Cycle (First Use)
- Assicurarsi che il serbatoio dell'acqua sia pieno.
- Posizionare un contenitore capiente sotto la testa di erogazione e la lancia vapore.
- Power on the machine. Allow it to preheat.
- Run a cycle of hot water through the brewing head without coffee.
- Attivare la lancia vapore per rilasciare acqua calda per alcuni secondi.
- Repeat steps 4 and 5 two to three times to clean internal components.
4. Funzionamento
4.1 Macinazione dei chicchi di caffè
- Assicurarsi che il contenitore dei chicchi di caffè sia riempito con chicchi di caffè freschi e interi.
- Select your desired grind setting using the dial on the bean hopper. The machine offers 30 grinding choices, from coarse to fine. Finer settings are suitable for espresso, while coarser settings are for filter coffee.

Figure 4.1: Conical Burr Grinder. This image highlights the machine's conical burr grinder with 30 adjustable settings, demonstrating the visual difference between coarse, medium, and fine grinds.
- Insert the portafilter into the grinding outlet. You may use the included dosing funnel to prevent spillage.
- Press the grind button to start grinding. The machine will grind the beans directly into the portafilter.
- Once the desired amount is ground, remove the portafilter.
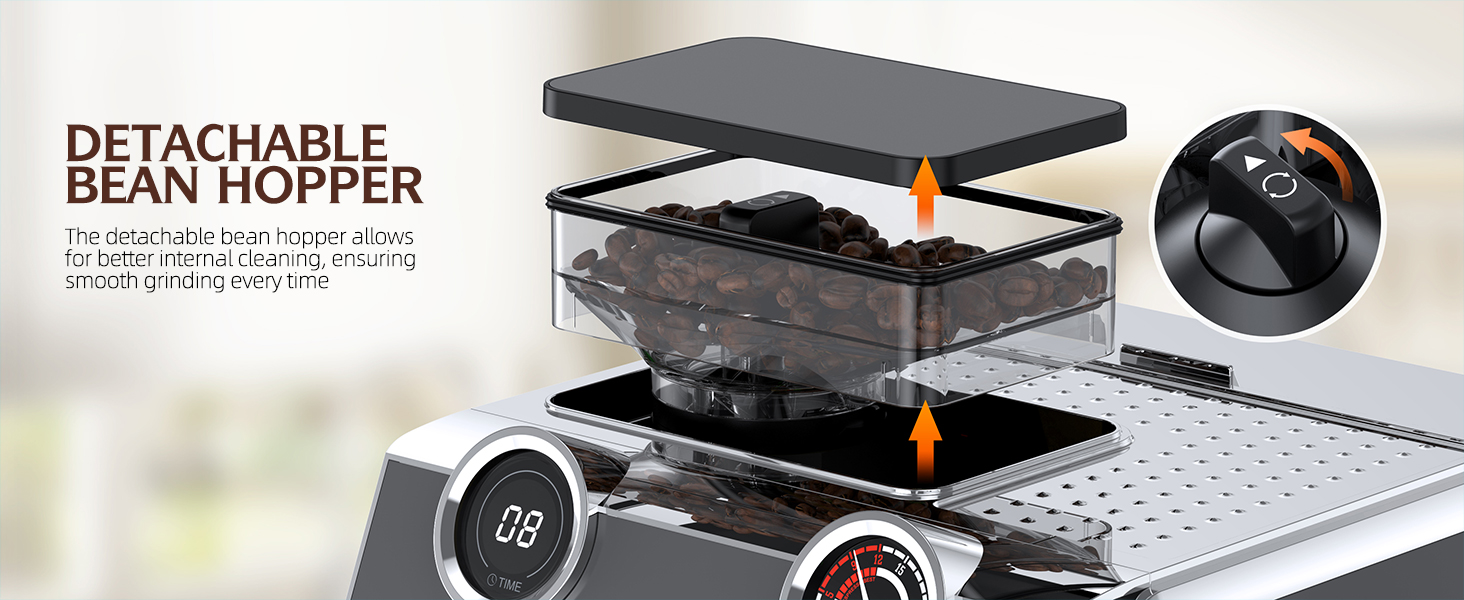
Figure 4.2: 30 Grind Settings & Dosing Funnel. This image focuses on the grinding mechanism, showing how the dosing funnel helps contain coffee grounds during the grinding process, preventing waste and mess.
4.2 Preparazione dell'espresso
- After grinding, ensure the portafilter contains the correct amount of coffee grounds (e.g., 7-9g for single, 14-18g for double).
- Usa la tamper to press the coffee grounds firmly and evenly. Wipe any excess grounds from the rim of the portafilter.
- Insert the portafilter into the brewing head and rotate it to lock it securely in place.
- Posizionare la/le tazzina/e per l'espresso sulla vaschetta raccogli-gocce sotto il portafiltro.
- Select your desired coffee type (e.g., Italian or American) and cup size (single or double) on the control panel.
- Press the START button to begin brewing. The machine will extract espresso at 20 bar pressure.
- La macchina si fermerà automaticamente quando verrà raggiunto il volume programmato.

Figure 4.3: Brewing Espresso. This image shows the QJA EM653 in action, dispensing two perfect shots of espresso into small glass cups, demonstrating its primary function.
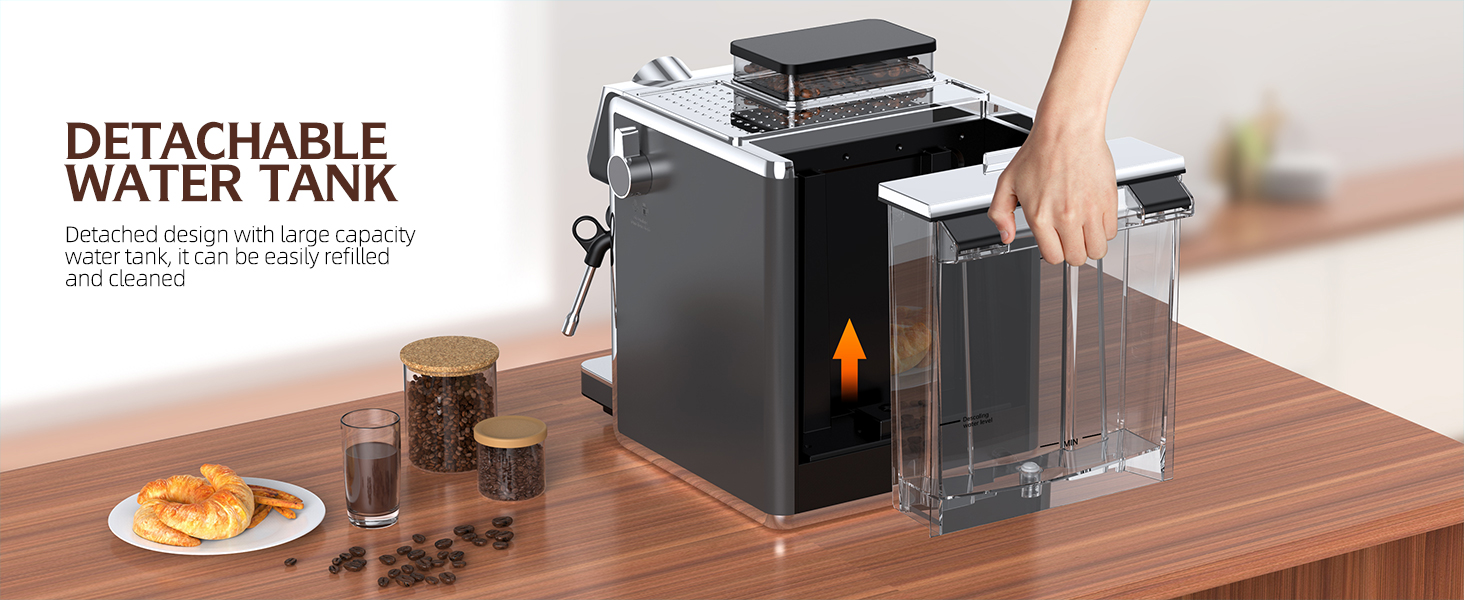
Figure 4.4: How to Make Coffee and Milk Foam. A visual step-by-step guide detailing the process from adding water and adjusting grind to tamping coffee, brewing, and finally frothing milk.
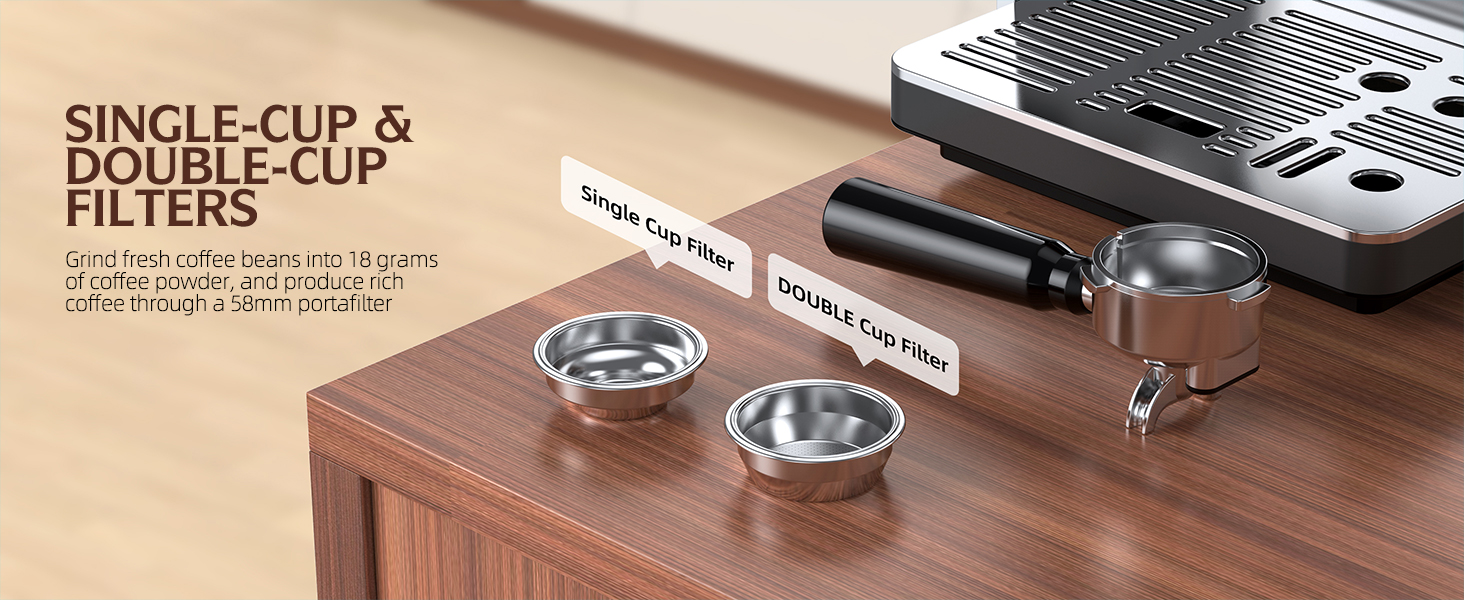
Figure 4.5: Single-Cup & Double-Cup Filters. This image displays the two types of filter baskets provided, allowing for preparation of single or double espresso shots.
4.3 Schiumare il latte
- Fill the stainless steel milk jug with cold milk (dairy or non-dairy) to just below the spout.
- Posizionare la lancia vapore nel latte, appena sotto la superficie.
- Attivare la funzione vapore sul pannello di controllo.
- Rotate the knob to release steam. Move the jug up and down to create foam.
- Once desired texture and temperature are reached, turn off the steam function and remove the jug.
- Pulire immediatamente la lancia del vapore con un pannoamp panno per evitare che i residui di latte si asciughino.

Figure 4.6: Powerful Steam System. The image demonstrates the machine's robust steam system in use, effectively frothing milk for lattes and cappuccinos.
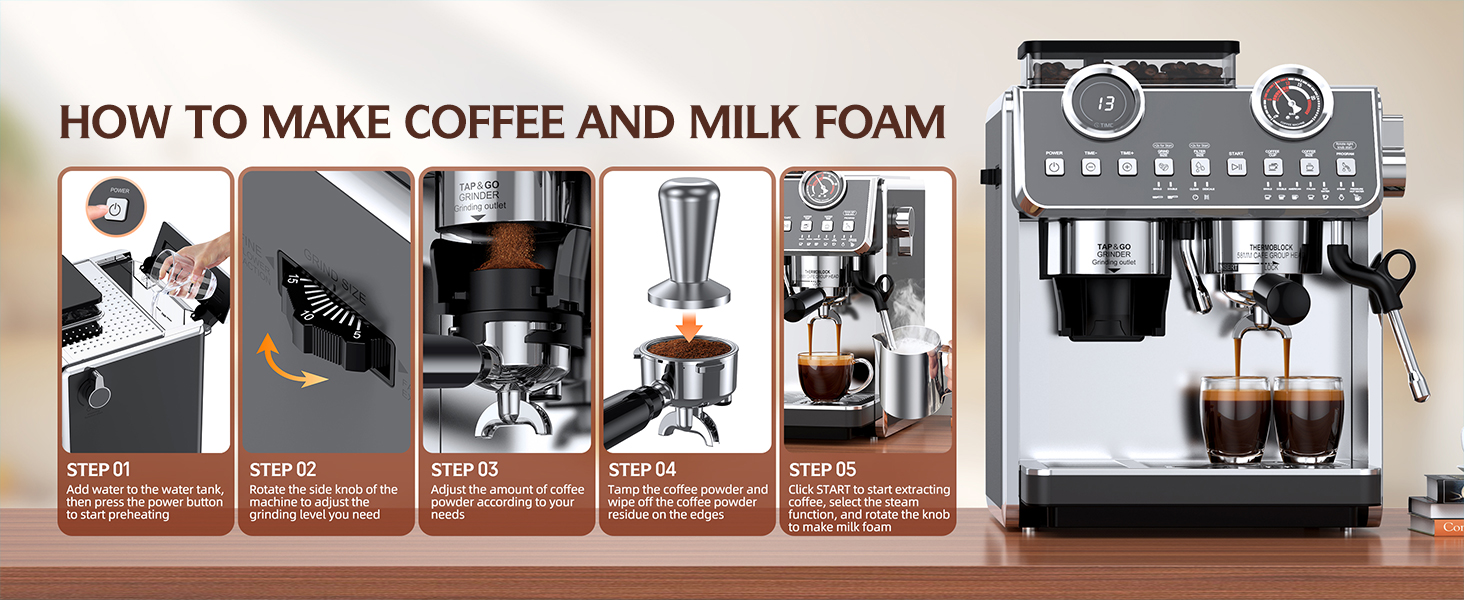
Figure 4.7: Powerful Milking Function. This diagram illustrates the 360-degree adjustable steam wand and the control knob for activating the hot water function, enhancing versatility.
4.4 Adjustable Temperature
The QJA EM653 allows you to adjust the brewing temperature with 5 available levels. After the machine preheats, select the Italian coffee option and then use the temperature adjustment buttons to cycle through the settings. This feature enables you to fine-tune the extraction based on bean type, roast level, and personal preference.
4.5 Funzione autopulente
The machine includes a self-cleaning mode to maintain hygiene and ensure consistent coffee quality by removing coffee oils and bacteria. Refer to the control panel for specific instructions on activating this mode.

Figure 4.8: Self-Cleaning. This diagram illustrates the internal self-cleaning process, which helps maintain hygiene and ensures consistent coffee flavor by removing residues.
5. Manutenzione
5.1 Pulizia giornaliera
- Portafiltro e filtri: Dopo ogni utilizzo, rimuovere il portafiltro, gettare via i fondi di caffè e sciacquare il portafiltro e il filtro sotto l'acqua calda.
- Lancia vapore: Subito dopo aver montato il latte, pulire la lancia vapore con un pannoamp un panno per rimuovere eventuali residui di latte. Spurgare brevemente la lancia per eliminare eventuali ostruzioni interne.
- vassoio antigoccia: Svuotare e sciacquare la vaschetta raccogligocce ogni giorno o quando l'indicatore indica che è piena.
- Esterno: Pulire l'esterno della macchina con un panno morbido, damp stoffa. Non utilizzare detergenti abrasivi o spugnette abrasive.
5.2 Decalcificazione
Regular descaling is crucial to prevent mineral buildup and maintain optimal machine performance. The frequency depends on your water hardness and usage. It is recommended to descale every 2-3 months or as indicated by the machine.
- Utilizzare una soluzione decalcificante commerciale specificatamente studiata per le macchine da caffè espresso, seguendo le istruzioni del produttore.
- Riempire il serbatoio dell'acqua con la soluzione decalcificante e la miscela di acqua.
- Run the solution through the brewing head and steam wand as if making coffee and frothing milk, until the tank is empty.
- Sciacquare accuratamente il serbatoio dell'acqua e riempirlo con acqua fresca.
- Run several cycles of fresh water through the machine to remove any residual descaling solution.
6. Risoluzione Dei Problemi
Per i problemi più comuni e le relative soluzioni, fare riferimento alla tabella sottostante.
| Problema | Possibile causa | Soluzione |
|---|---|---|
| Nessuna erogazione di caffè / Flusso lento | Water tank empty; Portafilter clogged; Coffee ground too fine; Too much coffee in filter; Machine needs descaling. | Refill water tank; Clean portafilter/filter; Adjust grind setting coarser; Reduce coffee amount; Perform descaling. |
| Coffee is watery / Too fast flow | Coffee ground too coarse; Not enough coffee in filter; Insufficient tamping. | Adjust grind setting finer; Increase coffee amount; Tamp più saldamente. |
| Nessun vapore dalla lancia | Lancia vapore intasata; la macchina non ha raggiunto la temperatura del vapore. | Clean steam wand hole with a pin; Allow machine to fully preheat for steam function. |
| La macchina perde acqua | Serbatoio dell'acqua non posizionato correttamente; vaschetta raccogligocce piena; problema con i componenti interni. | Riposizionare il serbatoio dell'acqua; Svuotare la vaschetta raccogli-gocce; Contattare l'assistenza clienti se il problema persiste. |
| Il macinacaffè non funziona | Bean hopper empty; Beans jammed; Grinder clogged. | Fill bean hopper; Clear any jammed beans; Clean grinder components. |
7. Specifiche
| Caratteristica | Dettaglio |
|---|---|
| Marca | QJA |
| Nome del modello | Modello EM653 |
| Dimensioni del prodotto | 15.55"P x 20.04"L x 16.93"A |
| Peso dell'articolo | 36.2 libbre |
| Tipo di caffettiera | Macchina per caffè espresso |
| Modalità di funzionamento | Semiautomatico |
| Pressione | 20 barra |
| Impostazioni di macinazione | 30 |
| Dimensione del portafiltro | 58mm |
| Voltage | 120 Volt |
| Caratteristiche speciali | Adjustable Brew Strength, Cup Warmer, Milk Frother, Removable Tank, Self-Cleaning |
| Componenti inclusi | Filter, Milk Frother, Dosing Funnel, Cleaning Brushes |
8. Informazioni sulla garanzia
The QJA EM653 Espresso Machine is covered by a manufacturer's warranty against defects in materials and workmanship. The specific terms and duration of your warranty may vary by region and retailer. Please retain your proof of purchase for warranty claims.
For detailed warranty information, please refer to the warranty card included with your product or contact QJA customer support.
9. Assistenza clienti
If you encounter any issues or have questions regarding your QJA EM653 Espresso Machine that are not addressed in this manual, please contact our customer support team.
Websito: Visit the QJA Store on Amazon
Please have your model number (EM653) and purchase date ready when contacting support.