
Introduzione
This manual provides detailed instructions for the installation, operation, and configuration of your ChongXiao Brushless Motor Controller and accompanying LCD Display. This universal controller supports various voltage and power configurations, making it suitable for a wide range of e-bikes and e-scooters.
Specifiche
Specifiche del controller
- Voltage: 36V / 48V / 52V / 60V / 72V (Universal)
- Attuale: 26A - 33A
- Number of Transistors: 9
- Potenza nominale: 500W - 800W - 1000W (Compatible)
- Tipo di freno: High-level brake, Low brake, Linear brake (Thumb brake)
- Altre caratteristiche: Reverse gear, Hall (5 wires), PAS, Headlight/Taillight power, Regenerative brake, Intelligent recognition, Ignite, XT60 battery connector, Phase line.
LCD Display Specifications
- Volume di lavorotage: 36V, 48V, 52V, 60V, 72V (Default 36V, user adjustable)
- Protocollo di comunicazione: UART
- Interfaccia a 5 filo:
- Rosso: Cavo di alimentazione del misuratore
- Blu: Cavo di controllo dell'alimentazione del controller
- Nero: Instrument ground wire
- Verde: Linea di ricezione dati del contatore
- Giallo: Data transmission line of the meter
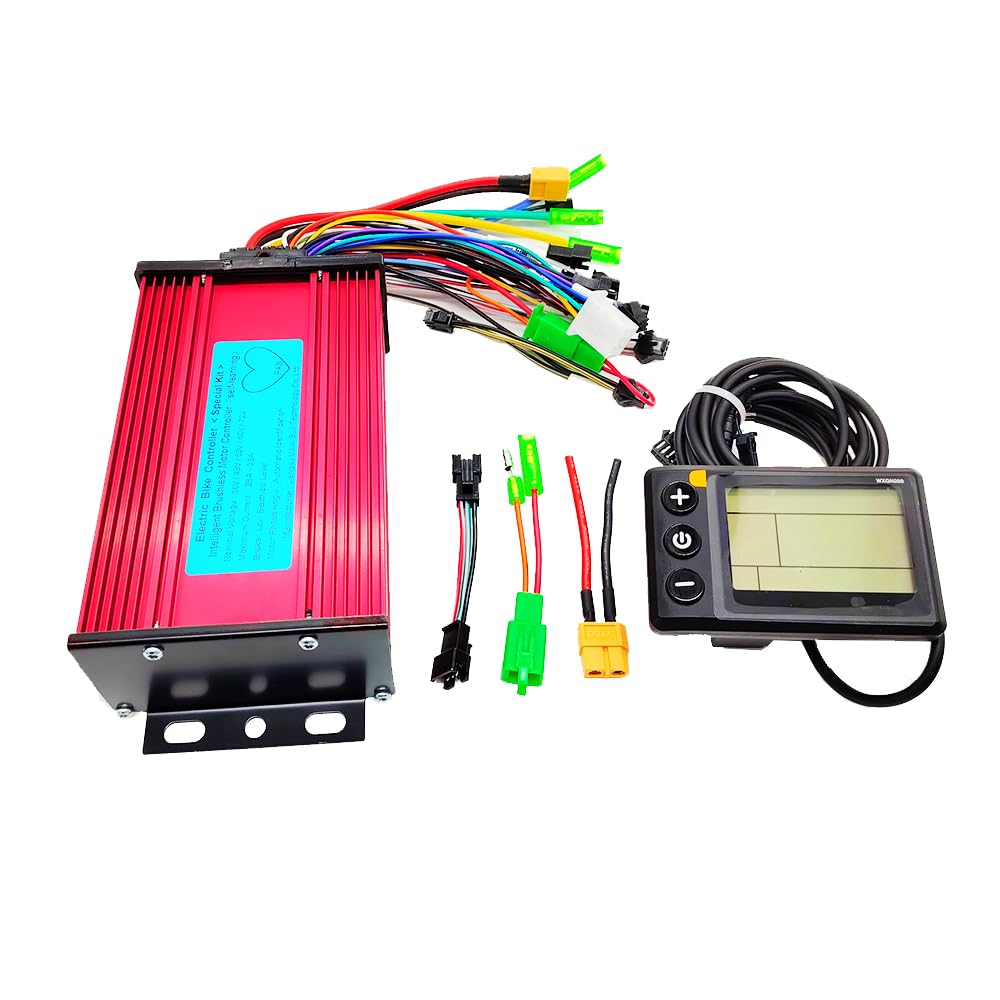
Image: The ChongXiao Brushless Motor Controller, showing its red aluminum alloy casing and label with specifications.

Image: Dimensions of the ChongXiao Brushless Motor Controller, measuring 176mm in length, 88mm in width, and 50mm in height.
Installazione e cablaggio
Follow these steps carefully to connect the controller and LCD display to your e-bike or e-scooter system.

Image: Detailed wiring diagram showing numbered connections for the controller. Key connections include high-level brake, brake light power, throttle handle, reverse gear, low brake, Hall (5 wires), linear brake, PAS, headlight/taillight power, regenerative brake, intelligent recognition, LCD, ignite, XT60 battery, and phase line.
- Phase Line Connection: Connect the phase lines, matching colors.
- Collegamento della linea Hall: Connect the Hall lines, matching colors (ensure 5 wires are connected).
- Battery Line Connection: Connect the battery lines. The red wire is for battery positive (+), and the black wire is for battery negative (-).
- LCD Line and Ignition Switch Connection: Connect the controller's LCD line. Connect the ignition switch. If your throttle does not have an ignition switch, the controller's two ignition wires must be shorted together.
- Intelligent Recognition (Motor Direction Setup):
- Spegnere la corrente.
- Connect the two intelligent recognition lines together.
- Turn on the power. The wheel will either move forward or reverse.
- If the wheel moves forward, separate the intelligent recognition lines.
- If the wheel moves in reverse, separate the intelligent recognition lines. Then, connect the two intelligent recognition lines together again. If the wheel now moves forward, separate the intelligent recognition lines.
- This function allows the controller to intelligently identify the battery voltage and adjust the motor's rotation direction.
- NOTA: When using the throttle, the intelligent recognition lines must be separated.
- Altre funzioni: Connect other functions as needed (e.g., brakes, PAS, lights) according to the wiring diagram.
Istruzioni per l'uso
Display LCD finitoview

Image: The ChongXiao LCD Display showing battery level, speed, mileage, and power assist gear. It features three buttons: Plus (+), Power (M), and Minus (-).
Operazioni con i pulsanti
The LCD display features an 'M' (Power) button, an 'Up' button, and a 'Down' button. Operations are categorized into short press, long press, and combination key long press.
- Accensione/spegnimento: Premere a lungo il pulsante 'M'.
- Cambia modalità di visualizzazione: After the screen is on, short press the 'M' button to cycle through data displays (e.g., ODO, Trip).
- Modify Assist/Speed Gear:
- Short press the 'Up' button to increase assist/speed gear.
- Short press the 'Down' button to decrease assist/speed gear.
- Switch Speed Display Mode: Long press the 'M' and 'Up' buttons simultaneously.
- Turn Headlights On/Off: Premere a lungo il pulsante 'Su'.
Impostazioni dei parametri (Impostazioni P)
To enter the parameter setting interface, press and hold the 'Up' and 'Down' keys simultaneously. Use the 'Up' or 'Down' keys to adjust values. Short press the 'M' button to save the current parameter and move to the next. To exit and save, long press 'Up' and 'Down' simultaneously, or wait 10 seconds for automatic exit and save.
| Parametro | Descrizione | Gamma/Opzioni |
|---|---|---|
| P01 | Luminosità della retroilluminazione | 0001 (darkest) - 0003 (brightest) |
| P02 | Unità di chilometraggio | 0000: KM; 0001 MIGLIO |
| P03 | Voltage livello | 36V, 48V, 52V, 60V, 72V (Default 36V) |
| P04 | Tempo di sonno | 0 (no sleep); 1-60 minutes |
| P05 | Ingranaggio servoassistito | 3rd, 5th, or 9th gears adjustable |
| P06 | Diametro della ruota | Unit: inch; Precision: 0.1 |
| P07 | Number of speed measuring magnets | Intervallo: 1-255 |
| P08 | Limite di velocità | 0-100 km/h (100 means max speed limit). Note: Display converts to miles, but menu value remains in km. |
| P09 | Modalità di avvio | 0: Zero start; 1: Non-zero start |
| P10 | Impostazione della modalità di guida | 0000: Power-assisted drive (throttle invalid) 0001: Electric drive (booster gear invalid) 0002: Power-assisted and electric drive coexist (electric drive zero start invalid) |
| P11 | Boost sensitivity | Intervallo: 1-24 |
| P12 | Power-assisted start strength | Intervallo: 1-5 |
| P13 | Power-assisted magnetic steel discs | 5, 8, or 12 magnets |
| P14-P18 | Valori standard | Non può essere cambiato |
Importante: It is recommended not to change settings P01-P10 unless necessary. For P11-P18, review them but avoid changes unless you understand their function completely.
Troubleshooting (Error Codes)
The LCD display may show error codes to indicate specific issues. Refer to the table below for their meanings and potential solutions.
| Codice | Senso | Azione |
|---|---|---|
| E-06 | Livello batteria bassotage | Check battery charge level and connections. Recharge or replace battery if necessary. |
| E-07 | Guasto al motore | Verify Hall sensor wires (5 wires) are correctly connected color-to-color. Inspect motor for damage. |
| E-08 | Guasto alla maniglia dell'acceleratore | Check throttle wiring and function. Replace throttle if faulty. |
| E-09 | Guasto del controller | Contact support or consider controller replacement if other checks fail. |
| E-10 | Errore di ricezione della comunicazione | Check connections between LCD and controller, especially the green data receiving line. |
| E-11 | Errore di invio della comunicazione | Check connections between LCD and controller, especially the yellow data transmission line. |
| E-12 | Errore di comunicazione BMS | Inspect battery management system (BMS) connections and battery health. |
| E-13 | Guasto al faro | Check headlight wiring and bulb/LED. |
Manutenzione
The ChongXiao Brushless Motor Controller and LCD Display are designed for durability. Regular maintenance typically involves:
- Keeping the controller and display clean and free from dust and moisture.
- Periodically checking all wiring connections to ensure they are secure and free from corrosion or damage.
- Avoiding exposure to extreme temperatures or direct sunlight for prolonged periods.
- Ensuring the controller's heat sink fins are not obstructed to allow for proper cooling.
No specific routine maintenance procedures are required for the internal components of the controller or display.
Informazioni sulla garanzia
According to product specifications, this product is sold without an explicit warranty. Please refer to the retailer's return policy for any issues encountered shortly after purchase.
Assistenza clienti
For further assistance or inquiries regarding your ChongXiao Brushless Motor Controller and LCD Display, please contact the seller or refer to the product page where you made your purchase. Provide your product model number (36-72V 26-33A) and a detailed description of your issue for efficient support.