
1. Introduzione
This manual provides essential instructions for the safe and effective use of your GEPRC Vapor-D6 O4 Pro FPV Drone. Please read this manual thoroughly before operating the drone to ensure proper setup, flight, and maintenance. The Vapor-D6 O4 Pro is a high-performance FPV racing quadcopter designed for cinematic HD footage and dynamic flight experiences, featuring seamless integration with the O4 Air Unit Pro VTX.

Immagine 1.1: Dall'alto verso il basso view del drone FPV GEPRC Vapor-D6 O4 Pro, mostratoasinil suo telaio in fibra di carbonio e la disposizione dell'elica.
2. Precauzioni di sicurezza
Operating an FPV drone requires adherence to strict safety guidelines to prevent injury or damage. Always prioritize safety.
- Normative locali: Always comply with local aviation laws and regulations. Obtain necessary permits or licenses if required.
- Controllo pre-volo: Before each flight, inspect the drone for any damage, loose components, or obstructions. Ensure propellers are securely attached and undamaged.
- Sicurezza della batteria: Use only recommended batteries (6S LiPo 1500mAh – 2000mAh). Handle LiPo batteries with care, avoiding punctures or overcharging. Store them in a fireproof bag.
- Pericolo elica: Keep hands, face, and loose clothing away from rotating propellers. Propellers can cause severe injury.
- Ambiente: Volare in aree aperte, lontano da persone, animali, edifici e linee elettriche. Evitare di volare in caso di vento forte, pioggia o altre condizioni meteorologiche avverse.
- Linea di vista: Maintain visual line of sight with the drone at all times, even when using FPV goggles.
- Interferenza: Be aware of potential radio interference sources that could affect control.
- Procedure di emergenza: Familiarize yourself with emergency disarming procedures for your flight controller and radio transmitter.
3. Contenuto della confezione
Verify that all items listed below are included in your package. If any items are missing or damaged, contact your retailer or GEPRC support.
- 1 drone Vapor-D6 O4 Pro FPV
- 2 x HQprop 6X3.5X3 Propellers (sets)
- 2 x cuscinetti antiscivolo per batteria
- 1 confezione di viti di ricambio (include viti M3*10mm, M3*8mm, M3*6mm, M5*28mm, dado flangiato M5, dadi rivettati M3)
- 1 x pannello laterale Vapor
- 2 cinghie per batteria M20*250mm
- 1 cacciavite a forma di L da 1.5 mm
- 1 cacciavite a forma di L da 2.0 mm
- 1 supporto GoPro
- Optional: GEP-M10 GPS module (if purchased with GPS option)
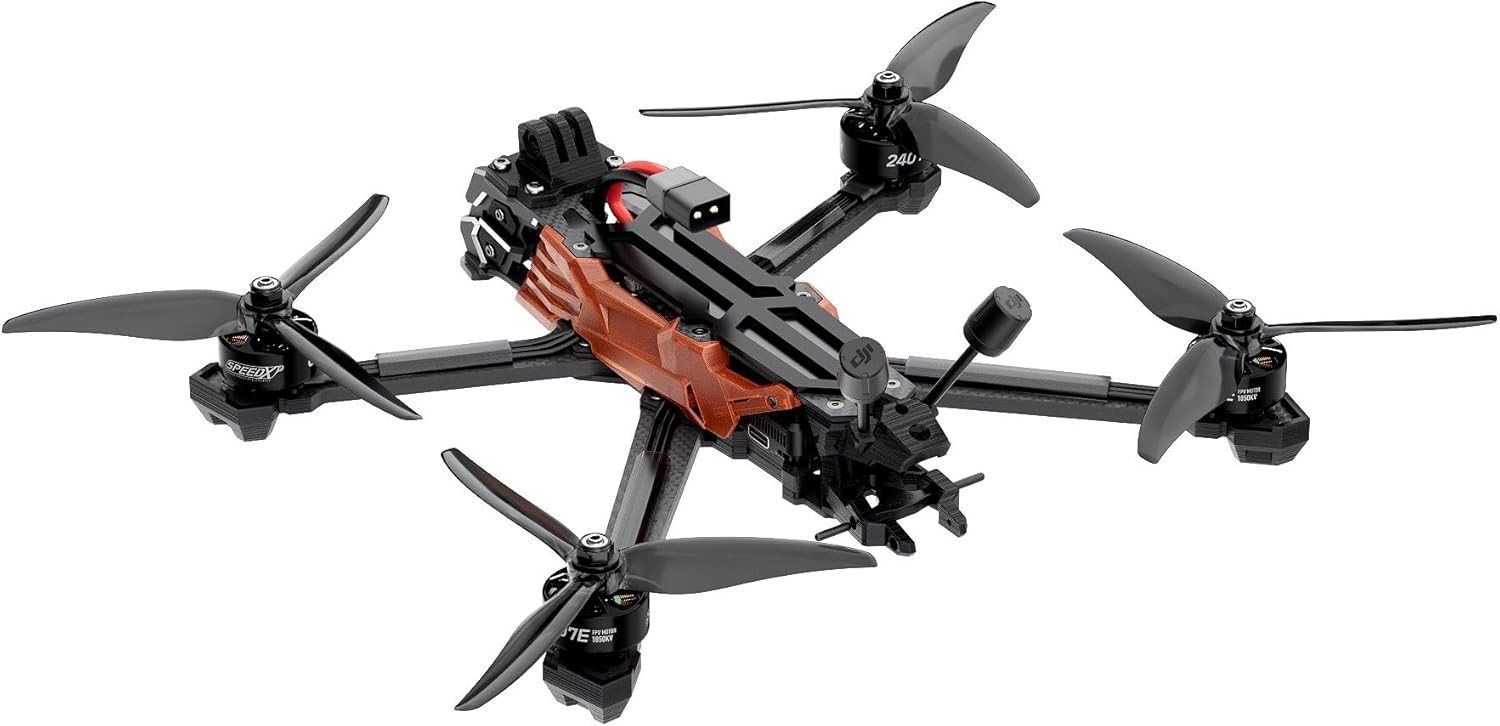
Immagine 3.1: Angolata view of the GEPRC Vapor-D6 O4 Pro FPV Drone, showing the integrated O4 Air Unit Pro and antenna.
4. Impostazione
4.1 Installazione dell'elica
- Identificare la direzione di rotazione corretta per ciascuna elica (CW e CCW).
- Align the propeller with the motor shaft and secure it using the provided nuts. Ensure they are tightened sufficiently but do not overtighten.
- Double-check that all propellers are firmly attached and spin freely without obstruction.
4.2 Collegamento della batteria
The Vapor-D6 O4 Pro uses an XT60 connector for battery input. Ensure your battery is fully charged before connecting.
- Collegare una batteria LiPo 6S completamente carica (consigliata da 1500 mAh a 2000 mAh) al connettore XT60 del drone.
- Secure the battery to the top plate using the provided battery straps and anti-slip pads to prevent movement during flight.
4.3 O4 Air Unit Pro Integration
The drone is designed for seamless integration with the O4 Air Unit Pro Transmission Module and Camera, which provides enhanced image clarity and light sensitivity for FPV and recording.
- Ensure the O4 Air Unit Pro is correctly seated and connected according to the manufacturer's instructions for the air unit.
- Verify the O4 Air Unit Pro Antenna is securely attached and positioned for optimal signal transmission.
4.4 Optional GPS Module Installation (GEP-M10 GPS)
If you have the optional GEP-M10 GPS module, follow these steps for installation:
- Mount the GPS module in the designated location on the drone frame, typically away from other electronics to minimize interference.
- Connect the GPS module to the flight controller (GEP-F722-HD v2) using the appropriate port (UART). Refer to the flight controller diagram for specific pinouts.
- Configure the GPS settings within the Betaflight configurator (see section 4.6).
4.5 Binding del ricevitore
The drone supports PNP (Plug-N-Play), GEPRC ELRS24, or TBS Nano RX receivers. Refer to your specific receiver's manual for binding procedures with your radio transmitter.
- Ensure your receiver is correctly wired to the flight controller.
- Follow the binding instructions for your chosen receiver and radio transmitter.
- Verify successful binding through the Betaflight configurator (Receiver tab).
4.6 Configurazione Betaflight
The drone comes with a GEP-F722-HD v2 flight controller. Basic configuration is typically pre-tuned, but adjustments may be necessary.
- Scarica e installa l'ultima versione del software Betaflight Configurator sul tuo computer.
- Collega il drone al computer tramite un cavo USB.
- In Betaflight, verify sensor calibration (Gyro: ICM42688-P, Barometer).
- Check motor direction and ESC settings (TAKER H60_BLS 60A 4IN1 ESC).
- Configure OSD (On-Screen Display) elements as desired.
- If using GPS, enable and configure the GPS module in the Ports and Configuration tabs.

Immagine 4.1: In alto view of the GEPRC Vapor-D6 O4 Pro FPV Drone, highlighting the central electronics stack and battery mounting area.
5. Istruzioni per l'uso
5.1 Controlli pre-volo
- Assicurarsi che la batteria sia completamente carica e montata saldamente.
- Verify propellers are undamaged and correctly installed.
- Verificare la presenza di cavi o componenti allentati.
- Power on your radio transmitter and FPV goggles.
- Confirm clear FPV video feed and strong radio signal.
- Check for GPS lock if the module is installed and enabled.
5.2 Inserimento e disinserimento
The drone must be armed before motors will spin. The default arming procedure is typically a stick command (e.g., throttle down and yaw right). Refer to your Betaflight configuration for specific arming switches or stick commands.
- Armamento: Perform the configured arming command. The motors will typically spin slowly, indicating the drone is armed.
- Disinserimento: Perform the configured disarming command (usually throttle down and yaw left, or a dedicated switch). Motors will stop. Always disarm immediately after landing or in an emergency.
5.3 Volo
The Vapor-D6 O4 Pro is equipped with high-performance SPEEDX2 2407E 1750KV motors and factory-tuned PID controls for stable flight.
- Decollare: Gently increase throttle after arming. The drone should lift off smoothly.
- Controllare: Use the left stick for throttle and yaw, and the right stick for pitch and roll (Mode 2). Practice gentle movements initially.
- Tempo di volo: Expect approximately 14-19 minutes of flight time with a recommended 6S LiPo 1500mAh – 2000mAh battery, depending on flight style and conditions.
- Landing: Reduce throttle slowly to descend. Disarm the drone immediately upon landing.
5.4 Cinematic HD Footage
The integrated O4 Air Unit Pro provides high-quality video for both FPV and recording. Ensure your O4 Air Unit Pro is configured for recording before flight if you intend to capture cinematic footage.

Immagine 5.1: Lato view of the GEPRC Vapor-D6 O4 Pro FPV Drone, showing the robust carbon fiber arms and motor mounts.
6. Manutenzione
Una manutenzione regolare garantisce la longevità e le prestazioni del tuo drone.
- Pulizia: After each flight, clean the drone to remove dirt, dust, and debris. Use a soft brush or compressed air. Avoid using liquids directly on electronics.
- Ispezione dell'elica: Inspect propellers for cracks, bends, or nicks before and after every flight. Replace damaged propellers immediately.
- Ispezione del telaio: Check the carbon fiber arms (5.0 mm thickness) and other frame components for any signs of stress, cracks, or damage. Tighten any loose screws.
- Ispezione del motore: Ensure motors (SPEEDX2 2407E 1750KV) spin freely and quietly. Check for any debris lodged in the motor bells.
- Cablaggio: Periodically inspect all wiring for fraying, cuts, or loose connections.
- Cura della batteria: Follow LiPo battery best practices: do not overcharge or over-discharge, store at storage voltage, and inspect for swelling or damage.
7. Risoluzione Dei Problemi
Questa sezione affronta i problemi più comuni che potresti incontrare.
| Problema | Possibile causa | Soluzione |
|---|---|---|
| Il drone non si arma | Throttle not at minimum; arming switch not engaged; pre-arm checks failed (e.g., low battery, no receiver signal) | Ensure throttle is at zero. Check arming switch. Verify receiver is bound and connected. Check Betaflight OSD for pre-arm warnings. |
| Nessun feed video FPV | O4 Air Unit Pro not powered; antenna loose; channel mismatch; goggles not powered | Check power to the drone and O4 Air Unit Pro. Secure antenna. Ensure goggles and O4 Air Unit Pro are on the same channel. Charge goggles. |
| Volo instabile / Deriva | Damaged propeller; unbalanced motor; incorrect PID tuning; sensor calibration issue | Inspect and replace damaged propellers. Check motors for debris. Recalibrate accelerometer in Betaflight. Consult GEPRC support for PID tuning advice if needed. |
| Breve tempo di volo | Battery degradation; incorrect battery size; aggressive flying style | Inspect battery for swelling or damage, replace if necessary. Use recommended 6S LiPo 1500-2000mAh batteries. Adjust flying style. |
| GPS not locking (if installed) | Poor satellite visibility; incorrect configuration; interference | Fly in an open area with clear sky. Verify GPS settings in Betaflight. Ensure GPS module is mounted away from other electronics. |
8. Specifiche
Detailed technical specifications for the GEPRC Vapor-D6 O4 Pro FPV Drone.
- Modello: Vapor-D6 O4 Pro
- Telaio: Telaio GEP-Vapor-D6 O4 Pro
- Passo: 274.60 millimetri
- Top Plate Thickness: 2.0 millimetri
- Middle Plate Thickness: 2.0 millimetri
- Bottom Plate Thickness: 2.5 millimetri
- Arm Thickness: 5.0 millimetri
- Flight Controller (FC): GEP-F722-HD v2
- MCU: STM32F722
- Giroscopio: ICM42688-P (SPI)
- Barometro: SÌ
- OSD: Betaflight OSD con AT7456E
- ESC: TAKER H60_BLS 60A 4IN1 ESC
- VTX: Modulo di trasmissione O4 Air Unit Pro
- Telecamera: O4 Air Unit Pro Transmission Module Camera
- Antenna: Antenna O4 Air Unit Pro
- Connettore: XT60
- GPS opzionale: GEP-M10 GPS
- Motori: GEPRC SPEEDX2 2407E 1750KV
- Eliche: Propulsore HQprop 6X3.5X3
- PNP Version Weight: 465g±5g
- Opzioni del ricevitore: PNP/GEPRC ELRS24/TBS Nano RX
- Batteria consigliata: Batteria LiPo 6S da 1500 mAh – 2000 mAh
- Estimated Flight Time: Da 14 a 19 minuti
- Dimensioni del prodotto: 10.75 cm L x 11 cm P x 3.15 cm A
- Peso dell'articolo: 1005 Grams (shipping weight, includes packaging)

Immagine 8.1: In basso view of the GEPRC Vapor-D6 O4 Pro FPV Drone, showing the motor mounts and structural design.
9. Garanzia e supporto
GEPRC products are covered by a manufacturer's warranty against defects in materials and workmanship. The specific terms and duration of the warranty may vary by region and product type. Please retain your proof of purchase for warranty claims.
- Richieste di garanzia: For warranty service, contact the retailer where you purchased the product or GEPRC customer support directly.
- Supporto tecnico: For technical assistance, setup guidance, or troubleshooting beyond this manual, visit the official GEPRC websito o contattare il loro team di assistenza clienti.
- Risorse online: Additional resources, firmware updates, and community forums may be available on the GEPRC websito.