1. Introduzione
Thank you for choosing the LYUWO LW 12V Cordless Electric Ratchet Wrench. This tool is designed for efficient fastening and loosening of bolts and nuts in various applications, offering cordless convenience and powerful performance. Please read this manual thoroughly before operation to ensure safe and effective use of your new tool.
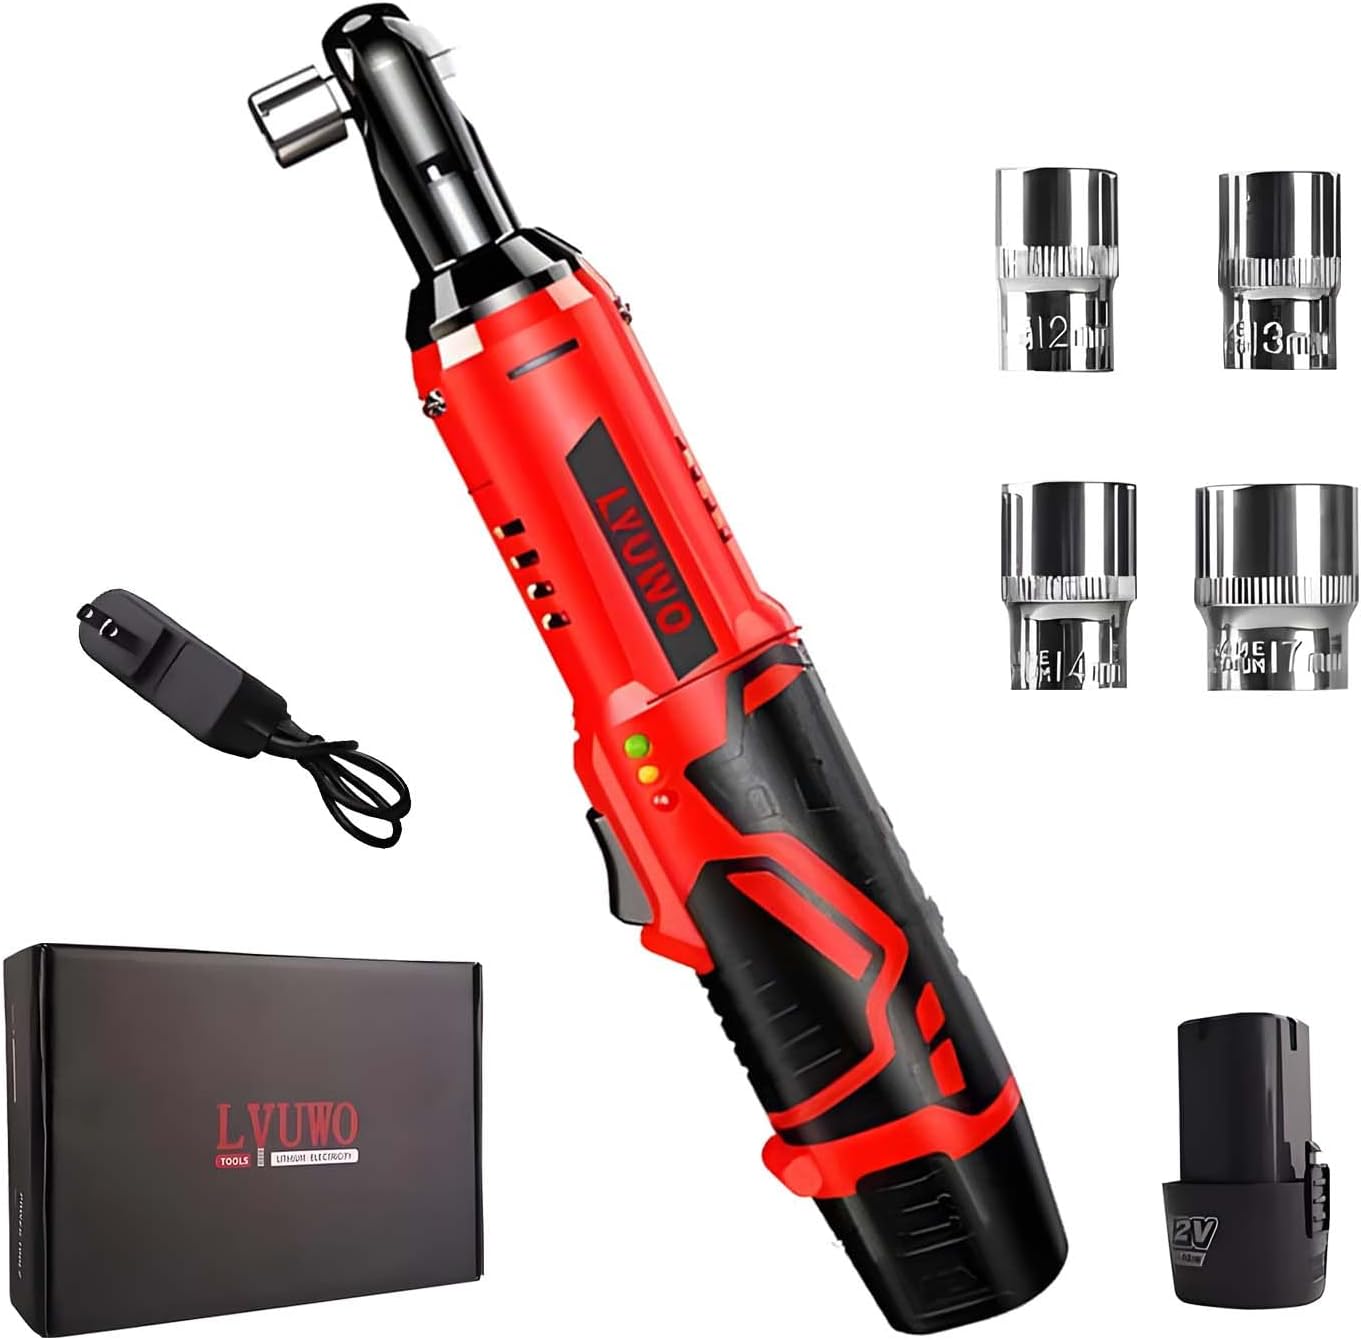
Image 1.1: The LYUWO 12V Cordless Electric Ratchet Wrench kit, including the wrench, charger, battery, and four sockets (12mm, 13mm, 14mm, 17mm).
2. Istruzioni di sicurezza
Seguire sempre le precauzioni di sicurezza di base per ridurre il rischio di incendio, scosse elettriche e lesioni personali.
- Sicurezza dell'area di lavoro: Mantenete l'area di lavoro pulita e ben illuminata. Aree disordinate o buie possono favorire incidenti. Non utilizzate utensili elettrici in atmosfere esplosive, ad esempio in presenza di liquidi, gas o polveri infiammabili.
- Sicurezza elettrica: Evitare il contatto del corpo con superfici messe a terra (ad esempio tubi, termosifoni, cucine, frigoriferi). Non esporre gli elettroutensili alla pioggia o all'umidità.
- Sicurezza personale: Indossare sempre protezioni per gli occhi. Utilizzare protezioni acustiche quando si lavora per periodi prolungati. Vestirsi in modo appropriato; evitare abiti larghi o gioielli. Raccogliere i capelli lunghi.
- Uso e cura dello strumento: Non forzare l'utensile elettrico. Utilizzare l'utensile corretto per l'applicazione. Scollegare la batteria dall'utensile prima di effettuare qualsiasi regolazione, sostituire accessori o riporre l'utensile elettrico.
- Sicurezza del pacco batteria: Ricaricare solo con il caricabatterie specificato dal produttore. Non bruciare la batteria, anche se gravemente danneggiata.
3. Contenuto della confezione
Verificare che tutti gli articoli siano presenti al momento del disimballaggio:
- Wireless Ratchet Wrench (x1)
- Caricabatterie (x1)
- 12mm Socket (x1)
- 13mm Socket (x1)
- 14mm Socket (x1)
- 17mm Socket (x1)
4. Componenti del prodotto
Familiarize yourself with the parts of your LYUWO Cordless Electric Ratchet Wrench:

Image 4.1: Detailed diagram showing the main components of the ratchet wrench, including the 3/8" quadrilateral head, motor, switch, shield, handle, and lithium battery.
- 3/8" Quadrilateral Head: Per il fissaggio delle prese.
- Motore: Provides the rotational power.
- Interruttore: Power trigger for operation.
- Positive and Negative Indicator: Shows rotation direction.
- Scudo: Protettivo casing.
- Maniglia: Ergonomic grip.
- Batteria al litio: Fonte di alimentazione rimovibile.
5. Specifiche
| Caratteristica | Specificazione |
|---|---|
| Marca | LYUWO |
| Numero di modello | LW |
| Voltage | 12V |
| Coppia massima | 45 Ft-lbs (61 N.M) |
| Velocità a vuoto | 380 giri al minuto |
| Dimensioni unità | 3/8 pollici |
| Tipo di batteria | 2.0 Ah agli ioni di litio |
| Tempo di ricarica | Circa 60 minuti |
| Materiale | Acciaio ad alto tenore di carbonio |
| Lunghezza dell'articolo | 12 pollici |
| Peso dell'articolo | 0.3 libbre (solo utensile) |
| Componenti inclusi | Wrench, Charger, Battery, 12/13/14/17mm Sockets |
6. Impostazione
6.1 Caricamento della batteria
- Assicurarsi che il caricabatterie sia collegato a una presa di corrente standard.
- Insert the 2.0Ah Lithium-Ion battery into the charger.
- The charger indicator light will show the charging status. A full charge typically takes about 60 minutes.
- Una volta caricata completamente, rimuovere la batteria dal caricabatterie.
6.2 Collegamento/rimozione delle prese
- Ensure the tool is off and the battery is securely inserted.
- Align the desired socket with the 3/8" quadrilateral drive head.
- Push the socket firmly onto the drive head until it clicks into place.
- To remove, pull the socket firmly off the drive head.
7. Istruzioni per l'uso
7.1 Accensione/spegnimento e velocità variabile
Insert the charged battery into the tool. The tool is activated by pressing the trigger switch. The variable speed trigger allows for precise control over the rotation speed, from 0 to 380 RPM, by varying the pressure applied to the trigger.
7.2 Funzionamento avanti/indietro
The direction of rotation is controlled by the forward/reverse switch located on the head of the wrench.

Image 7.1: Illustration of the forward/reverse switch. Push 'R' for reverse (unscrewing) and 'F' for forward (tightening).
- Push the switch to the 'F' position for forward rotation (tightening bolts).
- Push the switch to the 'R' position for reverse rotation (unscrewing bolts).
- Ensure the switch is fully engaged in the desired direction before operating.
7.3 Integrated LED Light and Battery Indicator
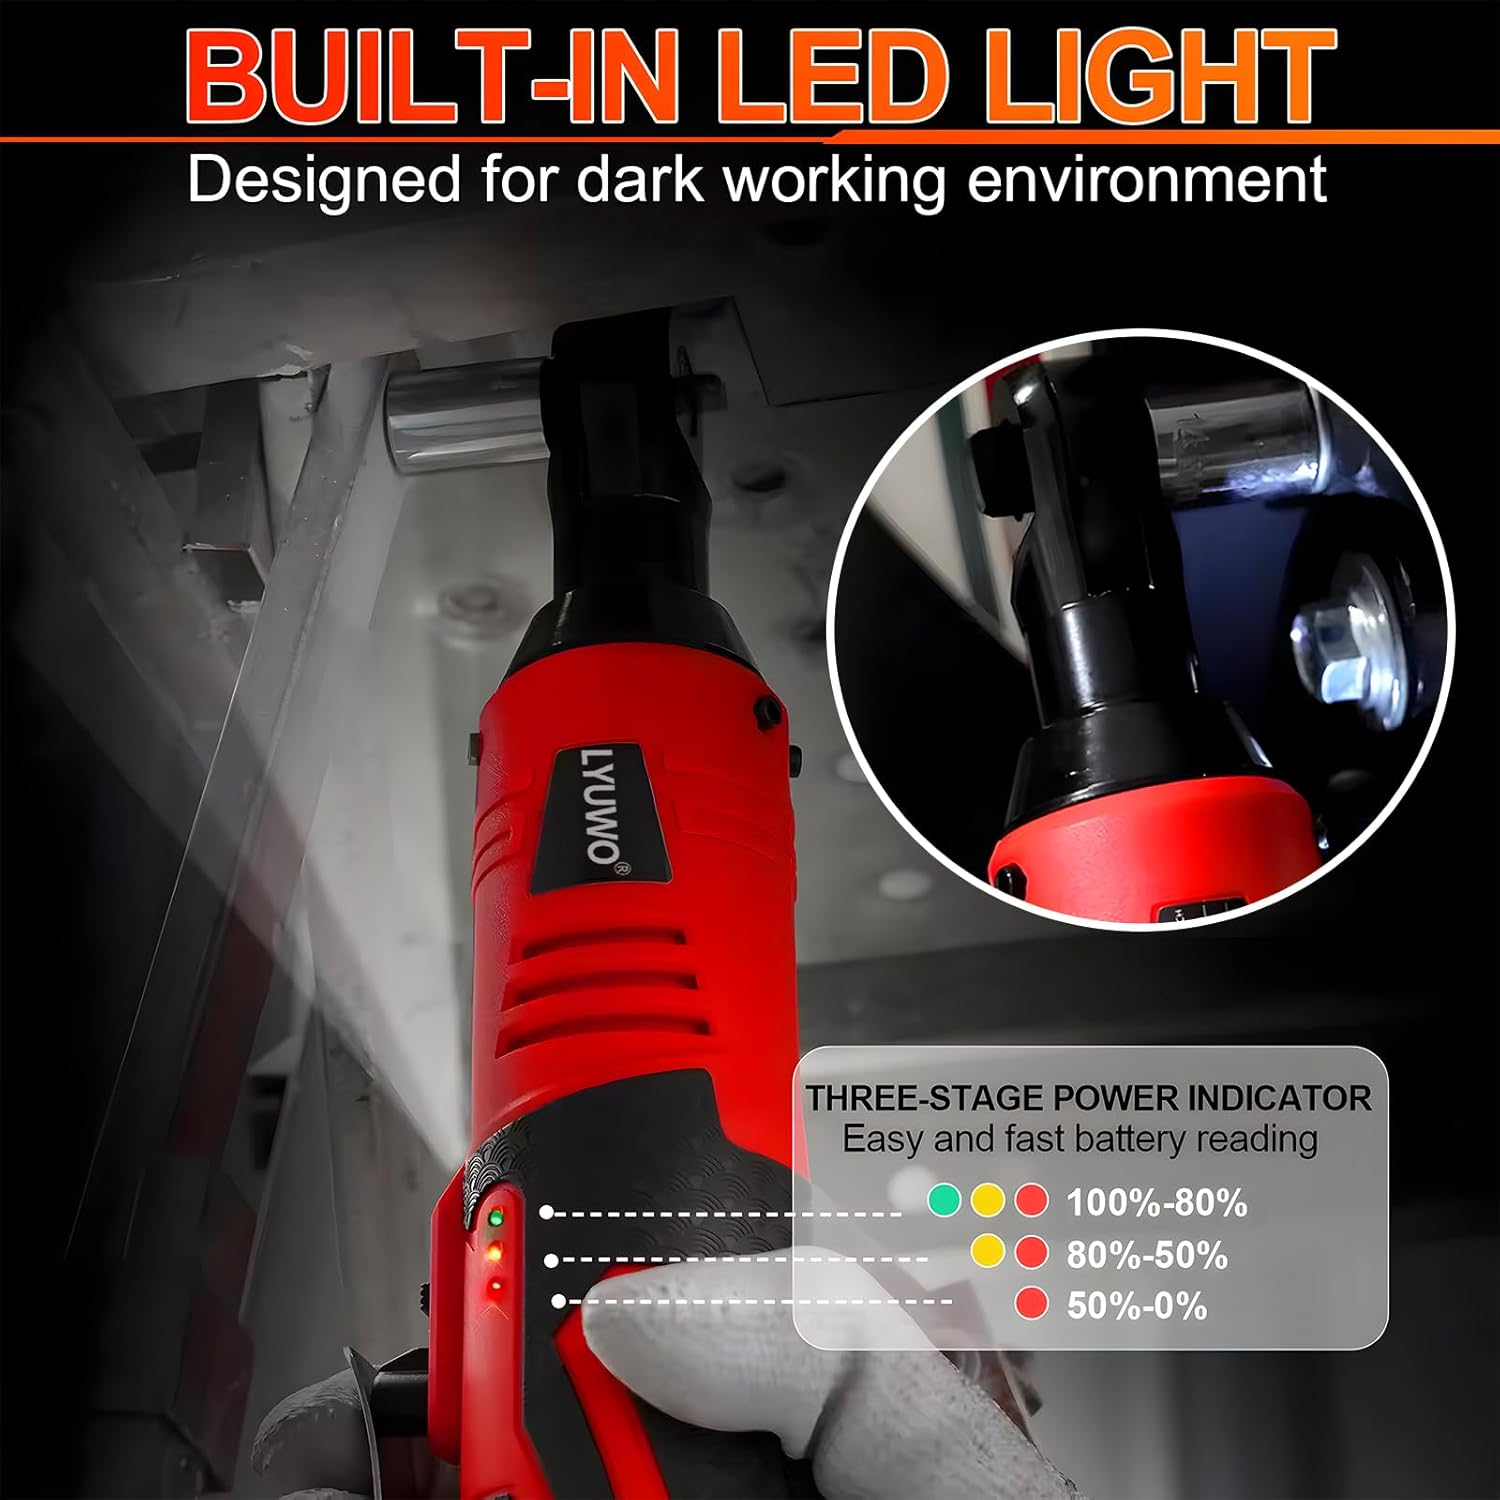
Image 7.2: The built-in LED light illuminates the workspace, and the three-stage power indicator shows battery charge level (Green: 100%-80%, Yellow: 80%-50%, Red: 50%-0%).
The tool features a built-in LED light that activates when the trigger is pressed, illuminating the work area. A three-stage power indicator displays the remaining battery charge:
- Verde: 100% -80% di carica
- Giallo: 80% -50% di carica
- Rosso: 50%-0% charge (Recharge soon)
8. Applicazioni
The LYUWO Cordless Electric Ratchet Wrench is suitable for a variety of tasks:
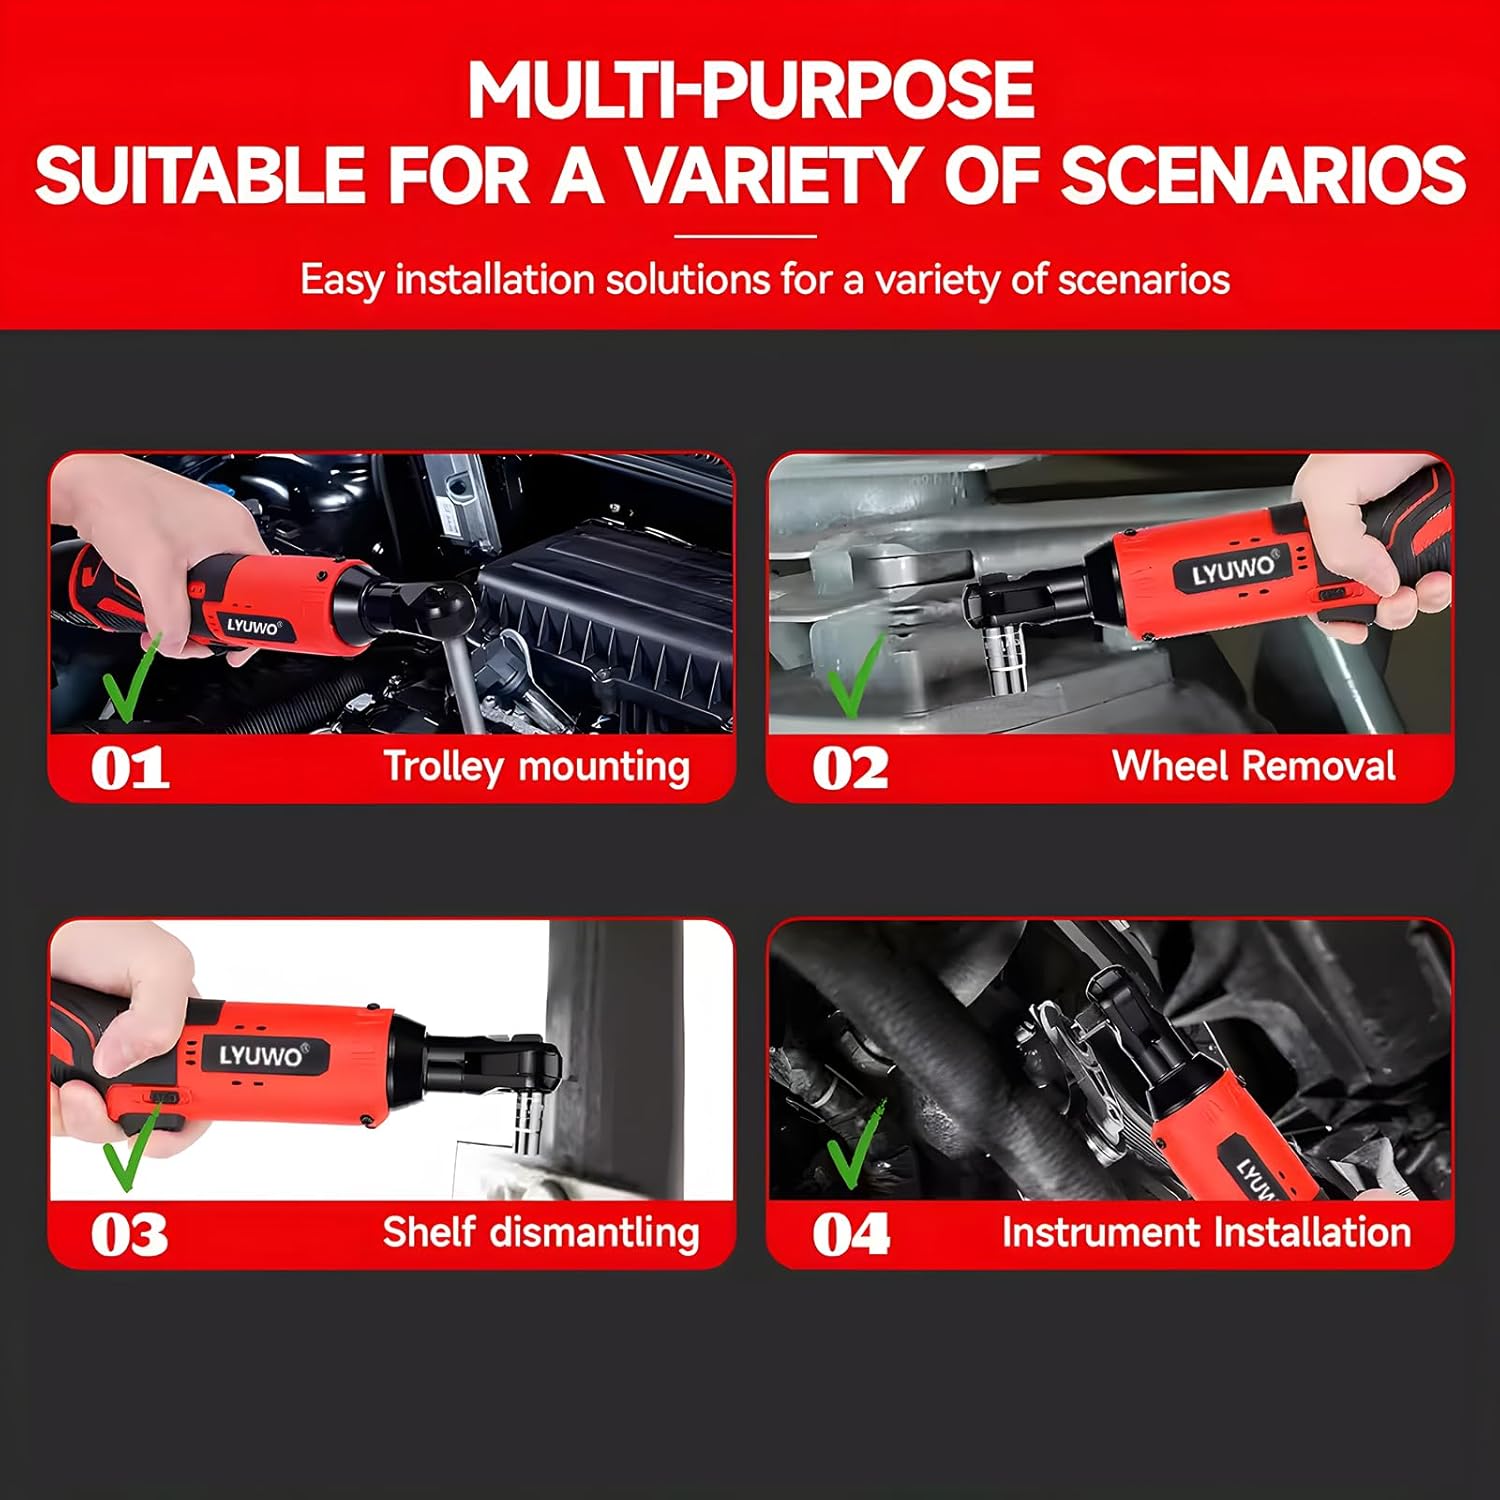
Immagine 8.1: Es.amples of common applications including trolley mounting, wheel removal, shelf dismantling, and instrument installation.
- Automotive repair and maintenance (e.g., engine compartments, wheel removal).
- Home DIY projects and furniture assembly.
- Industrial maintenance and equipment installation.
- Any task requiring fastening or loosening of bolts and nuts in confined spaces.
9. Manutenzione
9.1 Pulizia generale
Keep the tool clean and free from dust, dirt, and grease. Use a soft, damp panno per la pulizia. Non utilizzare prodotti chimici aggressivi o detergenti abrasivi.
9.2 Cura della batteria
- Conservare le batterie in un luogo fresco e asciutto, lontano dalla luce solare diretta e da temperature estreme.
- Non conservare le batterie scariche per periodi prolungati. Ricaricarle periodicamente se non vengono utilizzate.
- Evitare di far cadere o di sottoporre le batterie a urti.
9.3 Conservazione
When not in use, store the tool and accessories in a dry, secure location out of reach of children.
10. Risoluzione Dei Problemi
| Problema | Possibile causa | Soluzione |
|---|---|---|
| Lo strumento non si avvia | Batteria non carica o inserita in modo errato. | Assicurarsi che la batteria sia completamente carica e inserita correttamente. |
| Potenza/coppia ridotta | Batteria scarica. | Ricaricare la batteria. |
| La presa non si collega saldamente | Incorrect socket size or debris in drive head. | Use correct socket size. Clean drive head. |
| L'utensile si ferma durante il funzionamento | Protezione da sovraccarico attivata o batteria scarica. | Ridurre il carico. Ricaricare la batteria. |
11. Garanzia e supporto
For warranty information or technical support, please refer to the documentation provided at the time of purchase or contact your retailer. Specific warranty terms and conditions may vary.