
VEICHI AC10 Series (specifically AC10-T/S2-1R5G-B-220V and compatible variants)
VEICHI AC10 Series Frequency Converter User Manual
Model: AC10-T/S2-1R5G-B-220V and Compatible Variants
1. Introduzione
This manual provides essential information for the safe and efficient installation, operation, and maintenance of the VEICHI AC10 series frequency converters. Please read this manual thoroughly before using the product to ensure proper handling and to prevent damage or injury.
The VEICHI AC10 series frequency converters are designed for general-purpose applications, offering reliable motor control and energy efficiency. This manual covers models such as AC10-T/S2-R75G-B-220V, AC10-T/S2-1R5G-B-220V, AC10-T/S2-2R2G-B-220V, AC10-T3-R75G-B-380V, and AC10-T3-1R5G-B-380V.
2. Precauzioni di sicurezza
Always observe the following safety precautions to prevent electric shock, fire, or personal injury. Failure to comply may result in severe consequences.
- Personale qualificato: Installation, wiring, operation, and maintenance must be performed by qualified electrical personnel only.
- Disconnessione dell'alimentazione: Always disconnect all power sources before performing any wiring or maintenance. Wait at least 5 minutes after power off for the capacitor discharge indicator to extinguish.
- Messa a terra: Ensure the frequency converter is properly grounded according to local electrical codes.
- Condizioni ambientali: Do not operate the converter in environments exceeding specified temperature, humidity, or dust levels.
- Coperture protettive: Do not remove protective covers or touch internal components while power is applied.
3. Prodotto finitoview
The VEICHI AC10 series frequency converter features a compact design with an integrated control panel for easy operation and monitoring.
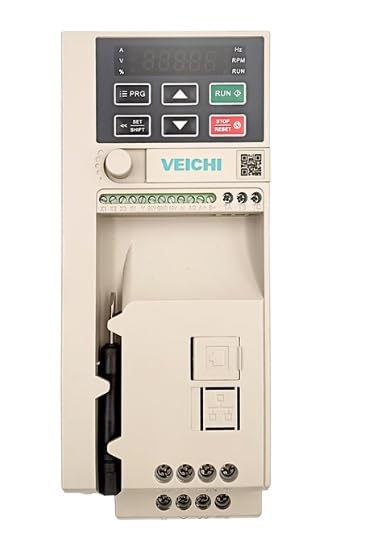
Figura 3.1: Fronte view of the VEICHI AC10 Frequency Converter. This image displays the main unit, highlighting the digital display for parameters, control buttons for programming and operation, and the various terminal blocks for power and control wiring. A screwdriver is visible in the side compartment.
3.1. Layout del pannello di controllo
The control panel consists of a digital display and several function buttons:
- Display: Shows operational parameters, fault codes, and programming values.
- PRG (Programma): Entra/esce dalla modalità di impostazione dei parametri.
- Frecce SU/GIÙ: Navigate through parameters, adjust values.
- CORRERE: Avvia il motore.
- ARRESTO/RESET: Stops the motor, resets fault conditions.
- SET/SHIFT: Confirms parameter settings, shifts cursor during input.
4. Configurazione e installazione
4.1. Montaggio
Mount the frequency converter vertically on a flat, non-flammable surface. Ensure adequate ventilation space around the unit (at least 10 cm above and below, 5 cm on sides) for heat dissipation.
4.2. Cablaggio
Refer to the wiring diagram provided with your specific model for detailed connections. General wiring guidelines:
- Ingresso alimentazione (R, S, T o L1, L2): Connect to the main power supply. Ensure correct voltage (220V o 380V a seconda del modello).
- Uscita motore (U, V, W): Collegare ai terminali del motore.
- Terra (PE): Collegarsi a un punto di messa a terra affidabile.
- Terminali di controllo: For external control signals (e.g., start/stop, speed reference, fault output).
Warning: Incorrect wiring can lead to severe damage to the unit or personal injury. Consult a qualified electrician if unsure.
5. Istruzioni per l'uso
5.1. Accensione iniziale
- After completing all wiring, apply power to the frequency converter.
- The display will light up, typically showing "0.00" or a default frequency.
5.2. Basic Operation (Keypad Control)
- Imposta frequenza: Premere il tasto PRG button to enter parameter mode. Navigate to the frequency setting parameter (e.g., F0.01) using the SU/GIÙ frecce. premere SET/SHIFT to edit, adjust value, then SET/SHIFT di nuovo per confermare. Premere PRG per uscire.
- Avviamento del motore: Premere il tasto CORRERE pulsante. Il motore accelererà fino alla frequenza impostata.
- Arresto motore: Premere il tasto ARRESTO/RIPRISTINO pulsante. Il motore decelera e si ferma.
5.3. Impostazioni dei parametri
The AC10 series has a comprehensive set of parameters for various functions. Refer to the detailed parameter list in the full product manual for advanced configurations (e.g., acceleration/deceleration times, motor parameters, control modes).
Exampparametri del file:
- Domanda 0.00: Run command source (keypad, terminal, communication)
- Domanda 0.01: Frequency setting source (keypad, analog input, communication)
- Domanda 0.03: Frequenza massima di uscita
- Domanda 0.04: Tempo di accelerazione
- Domanda 0.05: Tempo di decelerazione
6. Manutenzione
Regular maintenance ensures the longevity and reliable operation of your frequency converter.
- Pulizia: Periodically clean the cooling fins and fan to prevent dust accumulation, which can hinder heat dissipation. Use compressed air or a soft brush. Ensure power is off before cleaning.
- Controllo del terminale: Annually check all wiring terminals for tightness. Loose connections can cause overheating or intermittent operation.
- Controllo ambientale: Verificare che l'ambiente operativo rimanga entro gli intervalli di temperatura e umidità specificati.
- Sostituzione della ventola: Cooling fans have a limited lifespan. Consider replacing them every 3-5 years, depending on operating conditions, to maintain optimal cooling.
7. Risoluzione Dei Problemi
This section provides common issues and their potential solutions. For complex problems, contact technical support.
| Problem/Fault Code | Possibile causa | Soluzione |
|---|---|---|
| Nessun display/alimentazione | Nessuna alimentazione in ingresso; fusibile bruciato; guasto interno. | Check power supply; Check fuses; Contact support. |
| Overcurrent (OC) Fault | Motor overload; Short circuit in motor wiring; Rapid acceleration/deceleration. | Check motor load; Inspect motor wiring; Increase acceleration/deceleration time. |
| Sovravoltage (OV) Fault | Ingresso voltage too high; Rapid deceleration with high inertia load. | Controllare l'input voltage; Aumentare il tempo di decelerazione; Prendere in considerazione la resistenza di frenatura. |
| Sottovoltage (UV) Fault | Ingresso voltage too low; Power supply dip. | Controllare l'input voltage; Garantire un'alimentazione elettrica stabile. |
| Overheat (OH) Fault | Ambient temperature too high; Fan failure; Blocked ventilation. | Improve ventilation; Clean cooling fins; Check fan operation. |
To reset a fault, press the ARRESTO/RIPRISTINO button after resolving the cause.
8. Specifiche
The following specifications are typical for the VEICHI AC10 series. Specific values may vary slightly by model.
| Parametro | Valore/Intervallo |
|---|---|
| Ingresso volumetage | Single-phase 220V (AC10-T/S2 models) or Three-phase 380V (AC10-T3 models) |
| Frequenza di uscita | 0.00 Hz - 400.00 Hz |
| Modalità di controllo | V/F control, Sensorless vector control |
| Capacità di sovraccarico | 150% of rated current for 60 seconds |
| Caratteristiche di protezione | Sovracorrente, Sovravoltage, Sottovoltage, Overheat, Overload, Short circuit |
| Temperatura di esercizio | da -10°C a 40°C (da 14°F a 104°F) |
| Umidità | Meno dell'90% di umidità relativa (senza condensa) |
| Dimensioni (circa) | Varies by power rating (e.g., 2 x 2 x 2 inches for smaller models) |
| Peso (circa) | Varies by power rating (e.g., 4.41 Pounds for smaller models) |
Note: For precise specifications of your specific model, refer to the product label or the comprehensive technical datasheet.
9. Garanzia e supporto
9.1. Informazioni sulla garanzia
This product is typically covered by a manufacturer's warranty against defects in materials and workmanship for a period specified at the time of purchase. Please retain your proof of purchase for warranty claims. The warranty does not cover damage caused by improper installation, misuse, unauthorized modification, or operation outside of specified environmental conditions.
For specific warranty terms and conditions, please refer to the documentation provided with your purchase or contact the seller.
9.2. Supporto tecnico
If you encounter issues that cannot be resolved using the troubleshooting guide, or require further technical assistance, please contact your supplier or the manufacturer's authorized service center.
Quando contatti l'assistenza, tieni a portata di mano le seguenti informazioni:
- Product Model Number (e.g., AC10-T/S2-1R5G-B-220V)
- Numero di serie (se applicabile)
- Data di acquisto
- Detailed description of the problem, including any fault codes displayed.
Ask a question about this manual
Ask about setup, troubleshooting, compatibility, parts, safety, or missing instructions. Manuals+ will review the question and use this page’s manual context to help answer it.