
Introduzione
Grazie per l'acquistoasing the Pinmoco 47'' High Gloss TV Stand with LED Lights. This manual provides essential information for the safe assembly, operation, and maintenance of your new entertainment center. Please read these instructions carefully before assembly and retain them for future reference.
Caratteristiche principali:
- Design moderno ed elegante: High-gloss finish suitable for various room aesthetics.
- RGB Remote Control LED Lights: Features 7 main colors and 22 dynamic modes for customizable ambiance.
- Archiviazione intelligente: Includes 2 open shelves and 2 large side compartments for organizing media devices and accessories.
- Adjustable & Spacious: Transparent glass shelves with 3-height adjustment options.
- Costruzione robusta: Made from P2 board and tempered glass, supporting up to 100 lbs.
Contenuto della confezione
Before beginning assembly, ensure all parts and hardware are present. Refer to the included parts list in your packaging. If any components are missing or damaged, please contact customer support.

Image 1: Pinmoco 47-inch High Gloss TV Stand with LED Lights, displaying a television, gaming consoles, and various accessories neatly arranged on its shelves. The LED lights are illuminated, creating an ambient glow.
Installazione e assemblaggio
Assembly of the TV stand requires basic tools, which are typically included in the package. Follow the step-by-step instructions and diagrams provided in the separate assembly guide for detailed instructions.
- Disimballare i componenti: Estrarre con cautela tutti i componenti dall'imballaggio e disporli su una superficie pulita e morbida per evitare graffi.
- Identificare le parti: Match each component with the parts list in the assembly guide.
- Montare il telaio: Begin by assembling the main frame of the TV stand according to the diagrams. Ensure all connections are secure.
- Installa scaffali: Insert the glass shelves into the designated slots. The height of the glass shelves can be adjusted to three different positions.
- Collegare luci LED: Follow the instructions for attaching the LED light strips to the stand.
- Controllo finale: Once assembled, ensure the stand is stable and all screws are tightened.
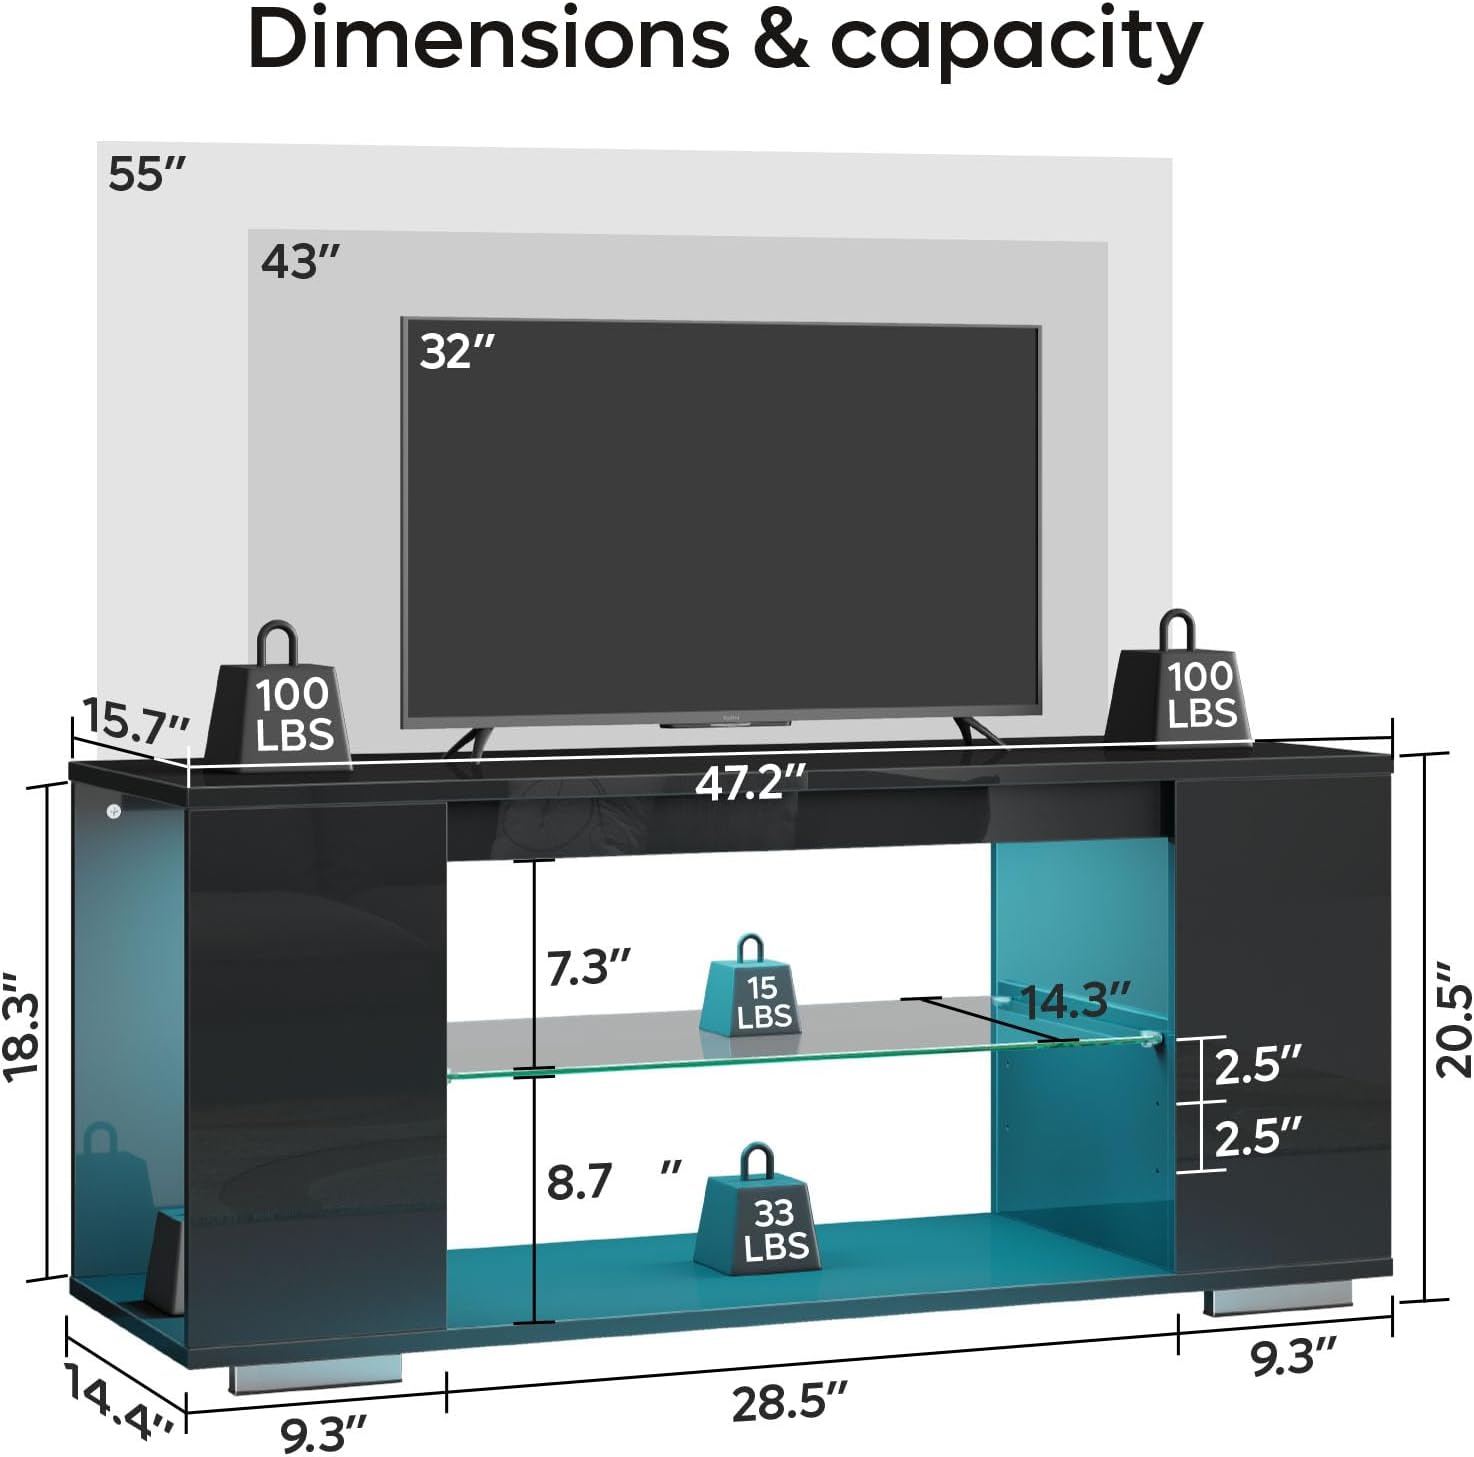
Image 2: A diagram illustrating the dimensions of the TV stand (47.2" L x 15.7" W x 20.5" H) and its weight capacities. The top surface supports 100 lbs, and the internal shelves support 15 lbs and 33 lbs respectively.
Luci LED operative
The integrated LED lighting system is controlled via a remote control, allowing you to customize the ambiance of your entertainment area.
- Accensione/spegnimento: Premere il pulsante di accensione sul telecomando per accendere o spegnere le luci LED.
- Selezione del colore: Use the dedicated color buttons or the RGB color wheel on the remote to select from 7 main colors.
- Selezione della modalità: Cycle through 22 dynamic lighting modes using the 'MODE' button to achieve various effects.
- Regolazione della luminosità: Adjust the brightness levels using the '+' and '-' buttons.
- Regolazione della velocità: For dynamic modes, adjust the speed of the effects using the 'SPEED' buttons.

Image 3: A hand holding the remote control for the LED lights, demonstrating its functionality. The remote features buttons for power, color selection, mode changes, and brightness/speed adjustments. The TV stand's LED lights are shown illuminated in a vibrant color.
Manutenzione
- Pulizia: Pulire le superfici lucide con un panno morbido eamp cloth. Avoid abrasive cleaners or harsh chemicals that may damage the finish. For glass shelves, use a glass cleaner.
- Spolverare: Spolverare regolarmente tutte le superfici con un panno asciutto e morbido.
- Luci LED: Ensure the LED light strips and connections are free from dust and debris. Do not attempt to disassemble the LED components.
- Controllo di stabilità: Periodically check all screws and connections to ensure the stand remains stable. Tighten if necessary.
Risoluzione dei problemi
| Problema | Possibile causa | Soluzione |
|---|---|---|
| Le luci LED non si accendono. |
|
|
| Il telecomando non risponde. |
|
|
| Il supporto sembra instabile. |
|
|
Specifiche
| Numero di modello | L103720X-YBLK |
| Marca | Pinmoco |
| Materiale | P2 Board, Tempered Glass |
| Colore | Nero |
| Dimensioni del prodotto (L x P x A) | 47 x 15 x 20 pollici (119.4 x 38.1 x 50.8 cm) |
| Peso dell'articolo | 36 libbre (16.3 kg) |
| Capacità di peso (superficie superiore) | 100 libbre (45.3 kg) |
| Weight Capacity (Glass Shelves) | 15 lbs (6.8 kg) and 33 lbs (15 kg) |
| Caratteristiche LED | 7 Main Colors, 22 Dynamic Modes, Remote Control |
Garanzia e supporto
This product is subject to a 30-day return policy from the date of purchase. For specific warranty details, product support, or to report missing/damaged parts, please contact Pinmoco customer service directly. You can often find contact information on the packaging or by visiting the official Pinmoco Brand Store.