
1. Introduzione
Thank you for choosing the PUTORSEN Triple Monitor Mount EMPT09-C036P-35B. This heavy-duty monitor mount is designed to provide a stable and adjustable solution for multi-screen workstations, supporting up to three monitors, each up to 35 inches in size and weighing up to 12 kg (26.4 lbs). It features fully articulating gas spring arms for precise positioning and includes options for both desk clamp e montaggio tramite passacavo.
2. Informazioni sulla sicurezza
- Leggere attentamente tutte le istruzioni: Prima di procedere, assicurarsi di aver compreso tutti i passaggi di assemblaggio e installazione.
- Capacità di peso: Do not exceed the maximum weight capacity of 12 kg (26.4 lbs) per arm. Exceeding this limit may result in instability and potential damage.
- Dimensioni del monitor: Questo supporto è progettato per monitor da 17 a 35 pollici.
- Spessore della scrivania: Ensure your desk meets the required thickness for the chosen mounting method (Clamp: 10-45mm; Grommet: 10-40mm).
- Compatibilità VESA: Verify your monitors have VESA mounting patterns of 75x75mm or 100x100mm.
- Montaggio: Montare il prodotto su una superficie morbida e pulita per evitare graffi.
- Regolazione della molla a gas: Adjust the gas spring tension only after the monitor is mounted to prevent the arm from springing up or down unexpectedly.
- Bambini: Tenere le parti di piccole dimensioni lontano dalla portata dei bambini.
3. Contenuto della confezione
Please verify that all components are present before beginning assembly. Refer to the parts list in your physical manual for detailed identification.

Figura 3.1: All components included in the package. This diagram illustrates the various parts such as the main pole, gas spring arms, VESA plates, desk clamp, grommet base, and hardware.
4. Specifiche
| Marca | PUTORI |
| Numero di modello | EMPT09-C036P-35B |
| Tipo di montaggio | Supporto da tavolo (Clamp o Occhiello) |
| Tipo di movimento | Articolazione, rotazione, inclinazione, rotazione |
| Materiale | Acrilonitrile-butadiene-stirene (ABS), acciaio legato |
| Colore | Nero |
| Minimum Supported Screen Size | 17 pollici |
| Maximum Supported Screen Size | 35 pollici (ciascuno) |
| Capacità di peso | 12 kg (26.4 lbs) per arm |
| Compatibilità VESA | 75x75mm, 100x100mm |
| Scrivania Clamp Spessore | 0.39"-1.77" (10mm-45mm) |
| Spessore del supporto passacavo | 0.39"-1.57" (10mm-40mm) |
| Diametro del foro del passacavo | 0.39"-2.36" (10mm-60mm) |
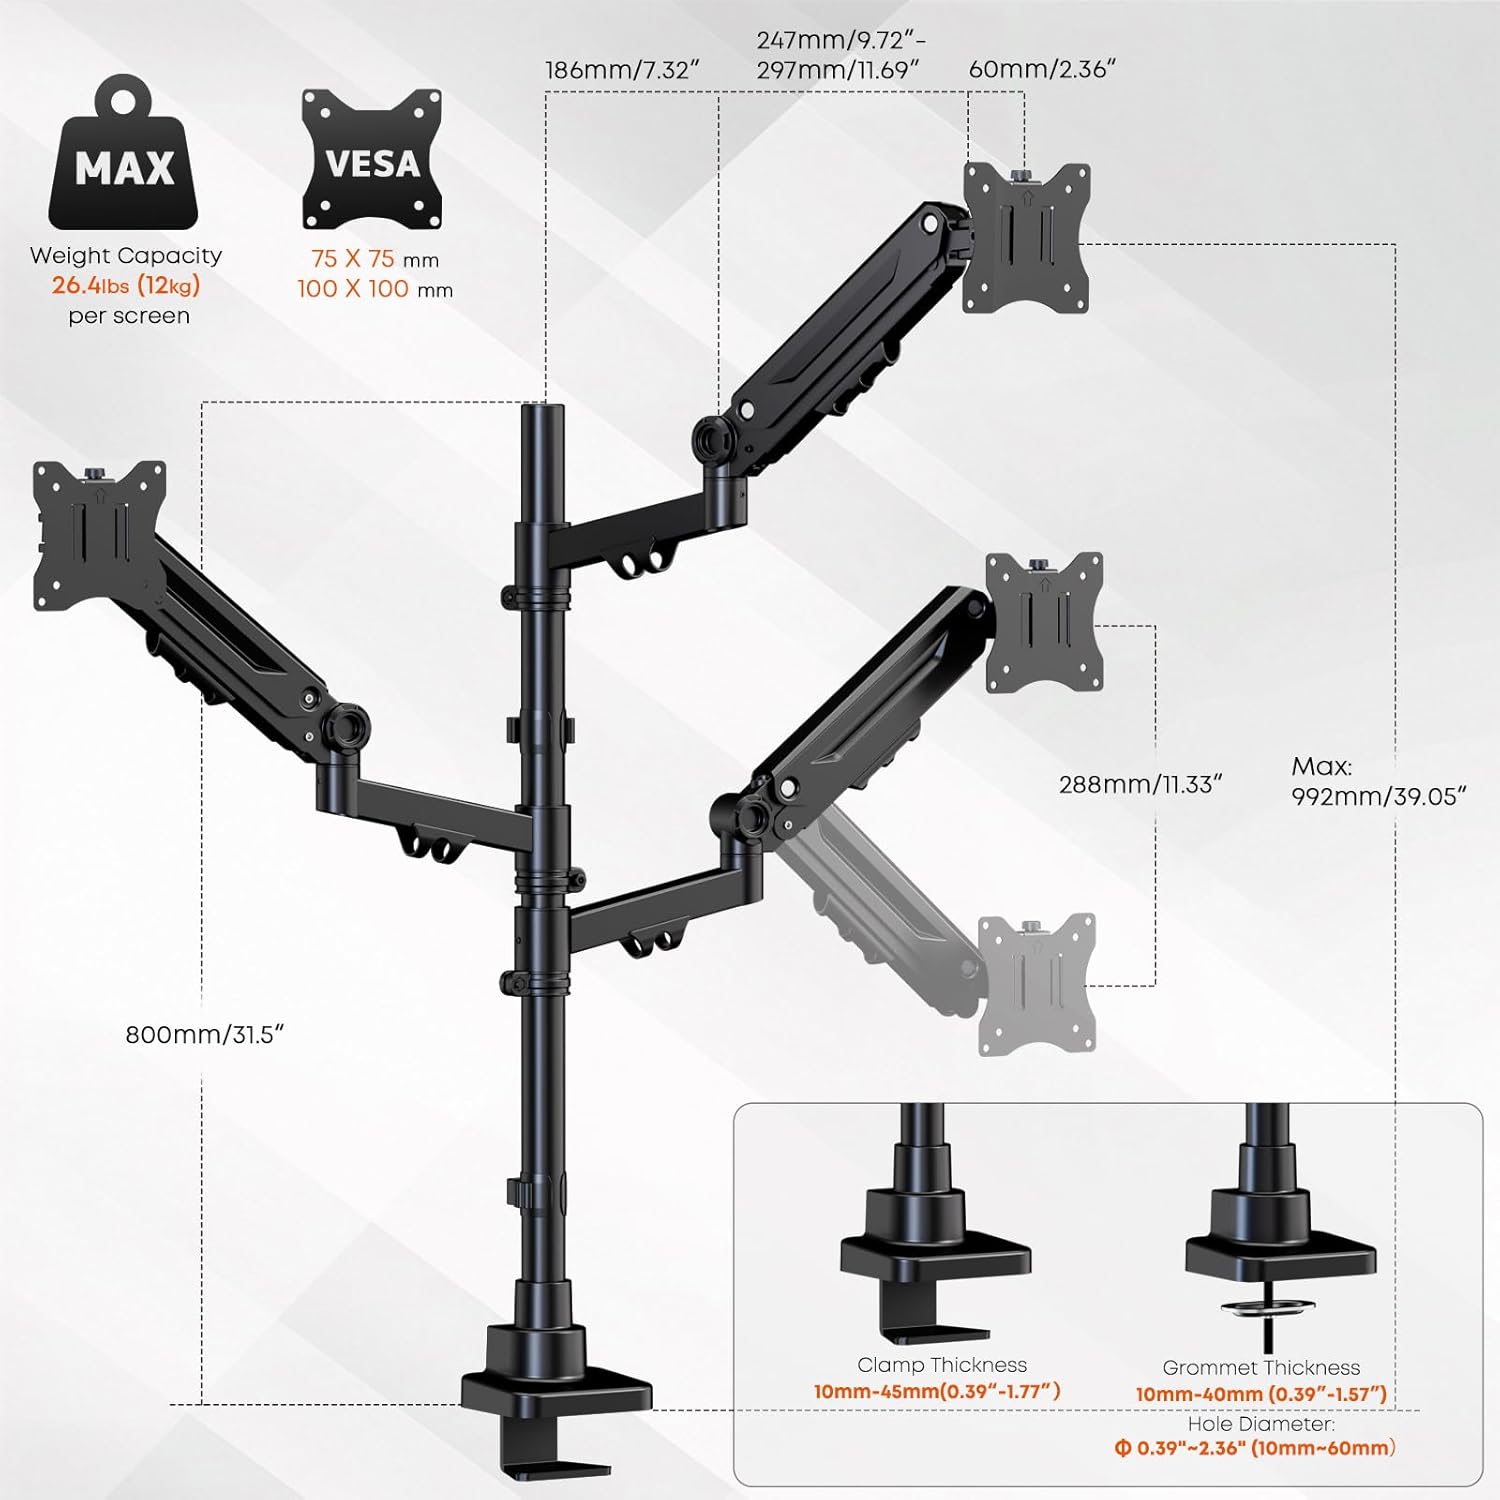
Figura 4.1: Detailed specifications and dimensions of the monitor mount, including VESA patterns, weight capacity, and desk compatibility for clamp e montaggio tramite passacavo.
5. Configurazione e installazione
Follow these steps to properly install your PUTORSEN Triple Monitor Mount.
5.1 Scegli il tuo metodo di montaggio
The mount supports two installation methods: C-clamp or grommet mount. Select the method suitable for your desk.
- C-Clamp Installazione: Allega il C-clamp to the edge of your desk. Ensure the desk thickness is between 10mm and 45mm. Tighten the clamp in modo sicuro per impedirne il movimento.
- Installazione passacavo: If your desk has a grommet hole (10mm-60mm diameter) and a thickness between 10mm and 40mm, use the grommet base. Secure the base through the hole using the provided hardware.
5.2 Assemble the Pole and Arms
- Attach the main pole to your chosen desk base (C-clamp o gommino).
- Slide the gas spring arms onto the main pole. The arms can be positioned at desired heights. Secure them using the provided collars and screws.
5.3 Attach Monitors
- Attach the VESA plates to the back of each monitor using the appropriate screws (M4x12, M4x30, M5x12, M5x30). Ensure the screws are tightened securely but do not overtighten.
- Carefully slide the monitors (with VESA plates attached) onto the gas spring arms. Ensure they click into place or are secured with the locking mechanism.

Figura 5.1: The triple monitor mount with monitors installed, demonstrating the gas spring arms and support for up to 35-inch screens.
6. Funzionamento e regolazioni
The PUTORSEN Triple Monitor Mount offers extensive adjustability for optimal viewcomfort.
6.1 Regolazione della tensione della molla a gas
After mounting your monitors, you may need to adjust the gas spring tension to ensure the arms hold the monitors in place without sagging or floating. Use the included Allen key to turn the adjustment screw on each arm:
- Giro in senso orario (-) per diminuire la tensione nei monitor più leggeri.
- Giro in senso antiorario (+) per aumentare la tensione per i monitor più pesanti.
Adjust gradually until the monitor stays at the desired height when released.
6.2 Posizionamento del monitor
Each arm allows for independent adjustment:
- Regolazione dell'altezza: Move the arms up or down along the main pole, or use the gas spring mechanism for vertical movement.
- Inclinazione: Adjust the monitor screen vertically by tilting it up or down (±35°).
- Girevole: Rotate the monitor horizontally left or right (±90°).
- Rotazione: Ruotare il monitor di 360° per orientarlo in verticale o in orizzontale.

Figura 6.1: Demonstrating the full range of motion including tilt, swivel, and 360-degree rotation for optimal monitor positioning.
6.3 Gestione dei cavi
Utilize the integrated cable management clips along the arms and pole to route and organize your monitor cables. This helps maintain a clean and clutter-free workspace.

Figura 6.2: Integrated cable management system for a tidy setup.
7. Manutenzione
Una manutenzione regolare garantisce la longevità e il funzionamento sicuro del supporto per monitor.
- Pulizia: Pulisci il supporto con un panno morbido eamp panno. Evitare detergenti abrasivi o solventi.
- Ispezione periodica: Controllare periodicamente tutte le viti e i collegamenti per assicurarsi che siano ben serrati. Serrare nuovamente se necessario.
- Gas Spring Check: If monitors begin to sag or drift over time, re-adjust the gas spring tension as described in Section 6.1.
8. Risoluzione Dei Problemi
Se riscontri problemi con il supporto del monitor, fai riferimento ai seguenti problemi comuni e alle relative soluzioni:
| Problema | Possibile causa | Soluzione |
|---|---|---|
| Il monitor si abbassa o si abbassa | La tensione della molla a gas è troppo bassa per il peso del monitor. | Aumentare la tensione della molla a gas ruotando la vite di regolazione in senso antiorario (+). |
| Il monitor galleggia verso l'alto o è difficile da spingere verso il basso | La tensione della molla a gas è troppo elevata per il peso del monitor. | Per ridurre la tensione della molla a gas, ruotare la vite di regolazione in senso orario (-). |
| Mount feels unstable or wobbles | Scrivania clamp or grommet base is not securely tightened. | Assicurare la scrivaniaamp o la base del passacavo sia ben serrata alla scrivania. Controllare tutti i collegamenti del braccio. |
| I monitor non sono livellati | Minor variations in arm height or VESA plate alignment. | Adjust individual monitor tilt and rotation. Ensure arms are at the same height on the pole. |
| Cables do not fit into management clips | Troppi cavi o cavi troppo spessi. | Reduce the number of cables or use thinner cables if possible. Use external cable ties if clips are insufficient. |
9. Garanzia e supporto
9.1 Informazioni sulla garanzia
This PUTORSEN Triple Monitor Mount is covered by a Garanzia di 10 anno from the date of purchase. This warranty covers manufacturing defects and material flaws under normal use. It does not cover damage caused by improper installation, misuse, accidents, or unauthorized modifications.
9.2 Assistenza clienti
For technical assistance, warranty claims, or any questions regarding your PUTORSEN product, please contact our customer support team. Refer to the contact information provided in your product packaging or visit the official PUTORSEN websito per i dettagli del supporto.
Risorse online: For additional information, FAQs, and video tutorials, please visit the PUTORSEN Store on Amazon.