1. Introduzione
The LONGER Ray5 Mini 2.5W Laser Engraver is a compact and high-precision tool designed for detailed engraving and cutting across a wide range of materials. Featuring a 0.04 × 0.04 mm ultra-fine laser spot and a speed of up to 12,000 mm/min, it offers exceptional performance for both beginners and experienced users. This manual provides essential information for safe setup, operation, and maintenance of your device.

Figure 1: LONGER Ray5 Mini Laser Engraver Product Box
2. Informazioni sulla sicurezza
Your safety is paramount. The Ray5 Mini is equipped with multiple protection features to ensure a secure operating environment. Always adhere to the following guidelines:
- Protezione degli occhi: Always wear the provided safety goggles to protect your eyes from direct laser light.
- Copertura protettiva: Utilize the included acrylic protective cover during operation.
- Arresto di emergenza: In case of any malfunction or emergency, immediately press the emergency stop switch.
- X-Y Axis Limit Switches: The device includes X and Y axis limit switches for safe homing and positioning.
- Ventilazione: Operate the engraver in a well-ventilated area to dissipate fumes and odors produced during engraving.

Figura 2: Funzioni di protezione multiple
3. Impostazione
The LONGER Ray5 Mini comes pre-assembled for quick setup. Follow these steps to prepare your engraver for use:
3.1 Disimballaggio e controllo dei componenti
Carefully open the product box and remove all components. Verify that all items listed in the packing list are present and undamaged.
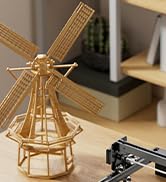
Figura 3: Componenti inclusi
3.2 Assemblaggio iniziale e collegamenti
- Install the laser module onto the X-axis assembly and tighten the thumb screws.
- Connect all necessary cables, including the motor cables and limit switch cables, ensuring they are plugged in tightly.
- Check if the X-axis moves smoothly. If it feels loose, adjust the eccentric nut on the X-axis assembly until it moves without excessive play.
- Plug in the DC power adapter, turn on the emergency stop switch (if it's pressed in, twist to release), and then flip the rocker switch to ON.
Video 1: LONGER RAY5mini Unboxing, Assembly, and Software Setup
3.3 Installazione del software
The Ray5 Mini supports popular laser engraving software such as LaserGRBL (free) and LightBurn (paid). Download and install your preferred software from the official websites. Ensure you install any necessary drivers (e.g., CH340 driver) for proper communication between your computer and the engraver.
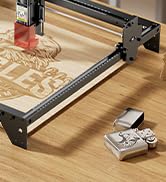
Figure 4: Multi-Platform and Software Support
4. Istruzioni per l'uso
Once your engraver is set up and software is installed, you can begin your engraving projects.
4.1 Messa a fuoco del laser
Before starting any engraving, ensure the laser is properly focused on your material. Place the material on the working area, then adjust the laser module's height until the laser spot is at its smallest and sharpest point on the material's surface. Some models may include a focusing tool or require manual adjustment via a knob.
4.2 Preparazione del progetto
- Importa il tuo disegno file (image or vector) into your chosen software (LightBurn or LaserGRBL).
- Adjust engraving parameters such as speed, power, and number of passes according to your material and desired effect. Refer to material test guides for recommended settings.
- Position your design on the software's canvas to match the physical placement of your material on the engraver's bed. Use the 'Frame' or 'Border Trace' function to preview la zona di incisione.
4.3 Avvio dell'incisione
After confirming all settings and safety precautions, initiate the engraving process from your software. Monitor the engraving throughout its duration.
Video 2: Engraving Acrylic with RAY5 Mini
4.4 Versatile Engraving and Cutting
The Ray5 Mini can engrave and cut over 300 materials, including wood, leather, metal, and acrylic. Its compact size makes it ideal for various creative projects, personalized gifts, and small workshops.

Figure 5: Material Versatility and Project Examples
5. Manutenzione
Una manutenzione regolare garantisce la longevità e le prestazioni ottimali del vostro incisore laser.
- Pulisci la lente laser: Per mantenere la qualità dell'incisione, pulire periodicamente la lente laser con un panno morbido e privo di lanugine e una soluzione detergente per lenti adeguata.
- Ispezionare cinghie e guide: Check the tension of the drive belts and ensure the guide rails are clean and free of debris. Lubricate rails if necessary according to manufacturer recommendations.
- Sistema di ventilazione: Keep the working area and the engraver's fan clear of dust and debris to ensure proper airflow and cooling.
6. Risoluzione Dei Problemi
If you encounter issues with your Ray5 Mini, refer to the following common problems and solutions:
- Engraver Not Connecting: Ensure all cables are securely connected. Verify that the correct drivers are installed on your computer and the software is configured for the correct COM port. Restart both the engraver and your computer.
- Scarsa qualità dell'incisione: Check the laser focus. Adjust power and speed settings in your software. Ensure your material is flat and securely placed. Clean the laser lens.
- Macchina non in movimento: Confirm the power supply is connected and the emergency stop button is disengaged. Check for any obstructions in the movement path of the laser module.
- Problemi di connettività WiFi: Ensure the engraver is within range of your WiFi network. Verify correct network credentials if using app control.
7. Specifiche
| Caratteristica | Specificazione |
|---|---|
| Produttore | Più lungo |
| Numero di modello | RAGGIO5 |
| Codice articolo | RAY5 mini 2.5w |
| Dimensioni (confezione) | Dimensioni: 34.2 x 33.79 x 21.2 cm |
| Peso dell'articolo | 2.33 chilogrammi |
| Tipo di alimentazione | AC_DC |
| Componenti inclusi | RAY5 mini 2.5w |
| Dimensioni del punto laser | Dimensioni: 0.04 × 0.04 mm |
| Velocità di incisione | Fino a 12,000 mm/min |
| Area di lavoro | 130 x 140 millimetri |
8. Garanzia e supporto
LONGER provides dedicated customer service and technical assistance for your Ray5 Mini Laser Engraver. Should you require support, please contact the technical support team:
- Supporto tecnico: (+1) 888-575-9099
- Orari di apertura: Monday-Friday: 9:00 AM - 6:00 PM (EST, UTC-5), Sunday-Thursday: 8:30 PM - 7:00 AM (EST, UTC-5)
Customer service is always available for technical assistance. For detailed warranty information, please refer to the product documentation included in your package or visit the official LONGER websito.
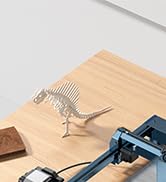
Figura 6: Informazioni sull'assistenza clienti