
1. Introduzione
The HIKVISION HiWatch HWD-7104MH-G4(E) is a professional 5-in-1 Digital Video Recorder (DVR) designed for advanced surveillance solutions. This DVR supports multiple video input technologies including HDTVI, HDCVI, AHD, CVBS, and IP cameras, with compatibility for cameras up to 8 MP resolution. It offers efficient recording using advanced compression formats such as H.265 Pro+/H.265+/H.264+, synchronized 4-channel playback, and intelligent features like AI 2.0-based motion detection for people and vehicles.
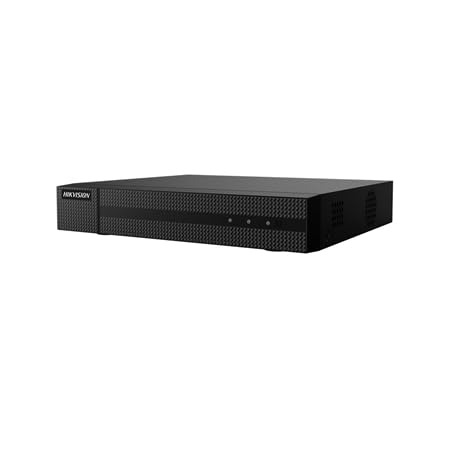
Figura 1: Fronte view of the HIKVISION HWD-7104MH-G4(E) DVR. This image shows the compact design of the unit.
2. Caratteristiche principali
- Supporto multitecnologico: Compatible with 5 video technologies: IP, HDCVI, HDTVI, AHD, and CVBS.
- High-Resolution Input: Supports up to 4 analog BNC channels, each up to 8 MP, and up to 4 additional IP channels (enhanced mode) also up to 8 MP.
- Compressione video avanzata: Utilizes H.265 Pro+, H.265 Pro, H.265, H.264+, and H.264 formats for efficient storage.
- Riproduzione sincronizzata: Allows simultaneous playback of 4 channels.
- Uscite video: Features simultaneous HDMI and VGA outputs at 1080p resolution.
- Rilevamento intelligente del movimento: Includes AI 2.0-based motion detection capable of distinguishing between people and vehicles.
- Capacità audio: Provides 1 RCA audio input and 1 RCA audio output, plus 4 coaxial audio inputs (G.711u format).
- Magazzinaggio: Supports 1 SATA HDD up to 10 TB capacity (HDD not included).
- Connettività di rete: Full network connectivity with RJ45 Ethernet (10/100M), support for P2P, DDNS, Onvif, and WiFi via USB dongle.
- Accesso remoto: Supports remote access via web browser and Hik-Connect app for up to 32 simultaneous users.
3. Contenuto della confezione
Verificare che tutti gli articoli siano presenti nel pacco:
- HIKVISION HWD-7104MH-G4(E) DVR Unit
- External Power Supply (12 V DC, 1.5 A)
- Manuale dell'utente (questo documento)
- Mounting Screws for HDD (if applicable, check packaging)
- SATA Cables (if applicable, check packaging)
Nota: l'unità disco rigido (HDD) non è inclusa e deve essere acquistata separatamente.
4. Impostazione
4.1. Installazione dell'unità disco rigido (HDD)
The DVR requires a SATA HDD for video storage (up to 10 TB). Follow these steps to install the HDD:
- Spegni: Ensure the DVR is powered off and disconnected from the power source.
- Apri Casing: Svitare e rimuovere il coperchio superiore del DVR.
- Collegare i cavi: Connect the SATA data cable and SATA power cable to the HDD.
- Montare HDD: Align the HDD with the mounting holes in the DVR chassis and secure it with the provided screws.
- Chiudi Casing: Riposizionare il coperchio superiore e fissarlo con le viti.
Important: Handle the HDD with care to avoid damage.
4.2. Connessioni fisiche
Connect the necessary cables to the rear panel of the DVR:
- Ingressi video (BNC): Connect your analog HDTVI, HDCVI, AHD, or CVBS cameras to the BNC ports.
- Video Outputs (HDMI/VGA): Collegare un monitor alla porta HDMI o VGA per la visualizzazione locale.
- Ingresso/uscita audio (RCA): Connect external audio devices if required.
- Rete (RJ45): Connect an Ethernet cable from the DVR to your network router or switch for network access.
- Porte USB: Connect a mouse for local control and/or a USB dongle for Wi-Fi connectivity (if supported and desired).
- Potenza in ingresso: Connect the external power supply to the DVR's power input port.
Assicurarsi che tutte le connessioni siano sicure prima di accendere il dispositivo.
4.3. Accensione iniziale e configurazione
- Accensione: Plug the power adapter into an electrical outlet. The DVR will start automatically.
- Mago alle prime armi: Al primo avvio, una procedura guidata di installazione ti guiderà attraverso le configurazioni iniziali, come lingua, data/ora, impostazioni di rete e creazione della password.
- Inizializzazione HDD: If an HDD is installed, the system will prompt you to initialize (format) it. This step is crucial for recording.
- Rilevamento della fotocamera: The DVR will automatically detect connected analog cameras. For IP cameras, you may need to add them manually through the network settings.
5. Istruzioni per l'uso
5.1. Vivere View
Dopo l'installazione, il DVR visualizzerà il live view of connected cameras on the monitor. You can switch between single-channel view and multi-channel grid viewutilizzando i controlli sullo schermo o il mouse.
5.2. registrazione
- Registrazione continua: Configurato per registrare 24 ore su 24, 7 giorni su 7.
- Registrazione di rilevamento del movimento: Registra solo quando viene rilevato un movimento.
- Registrazione programmata: Registrazioni effettuate durante specifici periodi di tempo.
- Registrazione dell'evento: Records based on alarms or other triggered events.
Accedi al Registra le impostazioni menu to configure recording schedules and modes for each channel. The DVR supports H.265 Pro+, H.265 Pro, H.265, H.264+, and H.264 compression formats.
5.3. Riproduzione
per riview registrato footage:
- Dal vivo view, fare clic con il tasto destro e selezionare Riproduzione.
- Choose the desired date and time from the calendar.
- Select the channels you wish to play back. The DVR supports synchronized 4-channel playback.
- Utilizzare i controlli di riproduzione (riproduzione, pausa, avanzamento rapido, riavvolgimento) per navigare attraverso il footage.
5.4. Rilevamento del movimento 2.0
The AI 2.0-based motion detection feature can differentiate between human and vehicle movement, reducing false alarms. To configure:
- Vai a Configurazione > Evento > Rilevamento movimento.
- Enable motion detection for the desired channels.
- Adjust sensitivity and define detection areas.
- Configure linkage actions, such as recording, notification, or alarm output.
5.5. Remote Access (Hik-Connect)
The Hik-Connect app allows remote viewing and management of your DVR from a smartphone or tablet. To set up:
- Assicurarsi che il DVR sia connesso a Internet.
- Enable the Hik-Connect service in the DVR's network settings.
- Scarica l'app Hik-Connect dall'app store del tuo dispositivo.
- Create an account and add your DVR by scanning the QR code or entering the serial number.
Remote access is also possible via a web browser by entering the DVR's IP address.
6. Manutenzione
6.1. Hard Disk Drive (HDD) Management
Regularly check the status of your HDD. If the HDD is full, the DVR will typically overwrite the oldest recordings. You can configure this behavior in the storage settings. Periodically back up important footage su un dispositivo di archiviazione esterno.
6.2. Aggiornamenti del firmware
Hikvision periodically releases firmware updates to improve performance, add features, and address security vulnerabilities. Check the official Hikvision website for the latest firmware for your model. Follow the provided instructions carefully when performing updates to avoid damaging the device.
6.3. Pulizia
Keep the DVR unit clean and free from dust. Use a soft, dry cloth to wipe the exterior. Do not use liquid cleaners or abrasive materials. Ensure proper ventilation around the unit to prevent overheating.
7. Risoluzione Dei Problemi
| Problema | Possibile causa | Soluzione |
|---|---|---|
| Nessuna uscita video sul monitor. | Cavo HDMI/VGA allentato, ingresso selezionato in modo errato sul monitor, DVR non acceso. | Check cable connections. Ensure monitor is set to the correct input source. Verify DVR power. |
| Le telecamere non visualizzano. | Loose BNC cable, camera power issue, incorrect video standard. | Check camera connections and power. Ensure cameras are compatible with DVR's supported technologies (HDTVI, AHD, CVI, CVBS, IP). |
| Nessuna registrazione. | HDD not installed or initialized, recording schedule not set, HDD full. | Install and initialize HDD. Configure recording schedules. Check HDD status and capacity. |
| Impossibile accedere al DVR da remoto. | Network connection issue, Hik-Connect not enabled, incorrect network settings. | Verify DVR's network connection. Ensure Hik-Connect is enabled and configured correctly. Check router settings (port forwarding if not using P2P). |
| Motion detection not working correctly. | Sensitivity too low/high, detection area not configured, AI 2.0 settings incorrect. | Adjust motion detection sensitivity and detection areas. Review AI 2.0 settings for people/vehicle detection. |
8. Specifiche
| Caratteristica | Dettaglio |
|---|---|
| Modello | HWD-7104MH-G4(E) |
| Formati video | H.265 Pro+, H.265 Pro, H.265, H.264+, H.264 |
| Analog Video Inputs | 4 BNC channels (convertible to IP) |
| IP Video Inputs | Standard (4+2), Enhanced (4+4) - up to 8 MP |
| Risoluzione di registrazione | Fino a 8 MP |
| Coaxial Compatibility | HDCVI, HDTVI, AHD, CVBS (PAL/NTSC) |
| Ingresso/uscita audio | 1 RCA input / 1 RCA output + 4 coaxial audio inputs (G.711u) |
| Uscite video | HDMI and VGA (1080p simultaneous) |
| Riproduzione sincronizzata | 4 canali |
| Magazzinaggio | 1 SATA interface, up to 10 TB HDD capacity (HDD not included) |
| Interfaccia di rete | RJ45 Ethernet (10/100M), WiFi via USB dongle |
| Protocolli di rete | TCP/IP, DHCP, Hik-Connect, DDNS, NTP, HTTPS, etc. |
| Accesso remoto | Browser, Hik-Connect app, up to 32 users |
| Consumo energetico | ≤15 W (without HDD) |
| Alimentazione elettrica | 12 V CC, 1.5 A |
| Temperatura di esercizio | Da -10°C a +55°C (da 14°F a 131°F) |
| Umidità di esercizio | 10% a 90% RH (senza condensa) |
| Dimensioni (L × P × A) | 260 × 222 × 45 mm (10.2 × 8.7 × 1.8 pollici) |
| Peso | ≤1.16 kg (2.56 lbs) (without HDD) |
9. Garanzia e supporto
Per informazioni sulla garanzia, fare riferimento alla scheda di garanzia inclusa con il prodotto o visitare il sito ufficiale Hikvision website. Technical support is available through Hikvision's authorized service centers and online resources. Please have your product model number (HWD-7104MH-G4(E)) and serial number ready when contacting support.
For the latest documentation, software, and support, please visit the official Hikvision support portal.