
1. Introduzione
Thank you for choosing the Kanto SUB6 Sealed Powered Subwoofer. This manual provides essential information for the proper setup, operation, and maintenance of your new audio device. The SUB6 is engineered to deliver precise and impactful low-frequency sound, enhancing your music, movies, and gaming experiences without occupying excessive space.
Key features of the Kanto SUB6 include:
- Design ultracompatto: Its small footprint allows for versatile placement, fitting comfortably in various environments.
- Low-Frequency Precision: A sealed enclosure design ensures accurate and distortion-free bass reproduction.
- Room-Filling Power: Equipped with a 100 W RMS (200 W Peak) Class-D amplifier and a 6-inch paper cone driver for dynamic bass.
- Integrazione perfetta: Features an adjustable crossover filter (40 Hz - 175 Hz) and a 0°/180° phase switch for optimal matching with your existing audio system.
- Costruzione durevole: Built with acoustic-grade MDF cabinets for long-lasting quality and aesthetic appeal.
2. Importanti istruzioni di sicurezza
Please read all instructions carefully before operating your SUB6 subwoofer. Retain this manual for future reference.
- Fonte di energia: Connect the subwoofer only to an AC power source as indicated on the unit.
- Ventilazione: Ensure adequate ventilation around the unit. Do not block any ventilation openings.
- Acqua e umidità: Do not expose the unit to water, rain, or moisture. Do not place objects filled with liquids, such as vases, on the unit.
- Calore: Tenere l'unità lontana da fonti di calore quali termosifoni, bocchette di ventilazione, stufe o altri apparecchi che producono calore.
- Pulizia: Pulire solo con un panno asciutto. Scollegare l'unità dalla presa a muro prima di pulirla.
- Manutenzione: Non tentare di riparare questo prodotto da soli. Affidare tutte le operazioni di manutenzione a personale di assistenza qualificato.
- cavi: Proteggere il cavo di alimentazione per evitare che venga calpestato o schiacciato, in particolare in corrispondenza delle spine, delle prese di corrente e del punto in cui esce dall'apparecchio.
3. Cosa c'è nella scatola
Verificare che tutti i componenti siano presenti prima di procedere con la configurazione:
- Kanto SUB6 Powered Subwoofer
- Cavo di alimentazione
- Manuale d'uso
4. Impostazione
4.1 Posizionamento
The compact design of the SUB6 allows for flexible placement. Consider the following guidelines:
- Vicino ai relatori principali: Placing the subwoofer near your main speakers can help create a more cohesive soundstage.
- Room Corners: Corners often provide the most bass output, but can sometimes lead to boomy or uneven bass. Experiment with distance from the corner.
- Posizione di ascolto: The "subwoofer crawl" method can help find the best placement. Place the subwoofer at your primary listening position, then crawl around the room to find where the bass sounds best. Place the subwoofer in that spot.
- Under Desks or Furniture: Its small size makes it ideal for discreet placement in smaller rooms or under furniture.

4.2 Connessioni
The SUB6 connects to your audio system via RCA cables.
- Spegni: Assicurati che il tuo ricevitore audio/amplifier and the SUB6 are powered off before making any connections.
- Ingresso RCA: Connect an RCA cable from the "SUB OUT" or "LFE OUT" port on your receiver/amplifier to the "SUB IN" (L or R) port on the SUB6. If your receiver has a single LFE output, you can use either the L or R input on the SUB6. For stereo RCA outputs, connect both L and R inputs.
- Collegamento elettrico: Connect the provided power cord to the AC input on the SUB6 and then to a wall outlet.
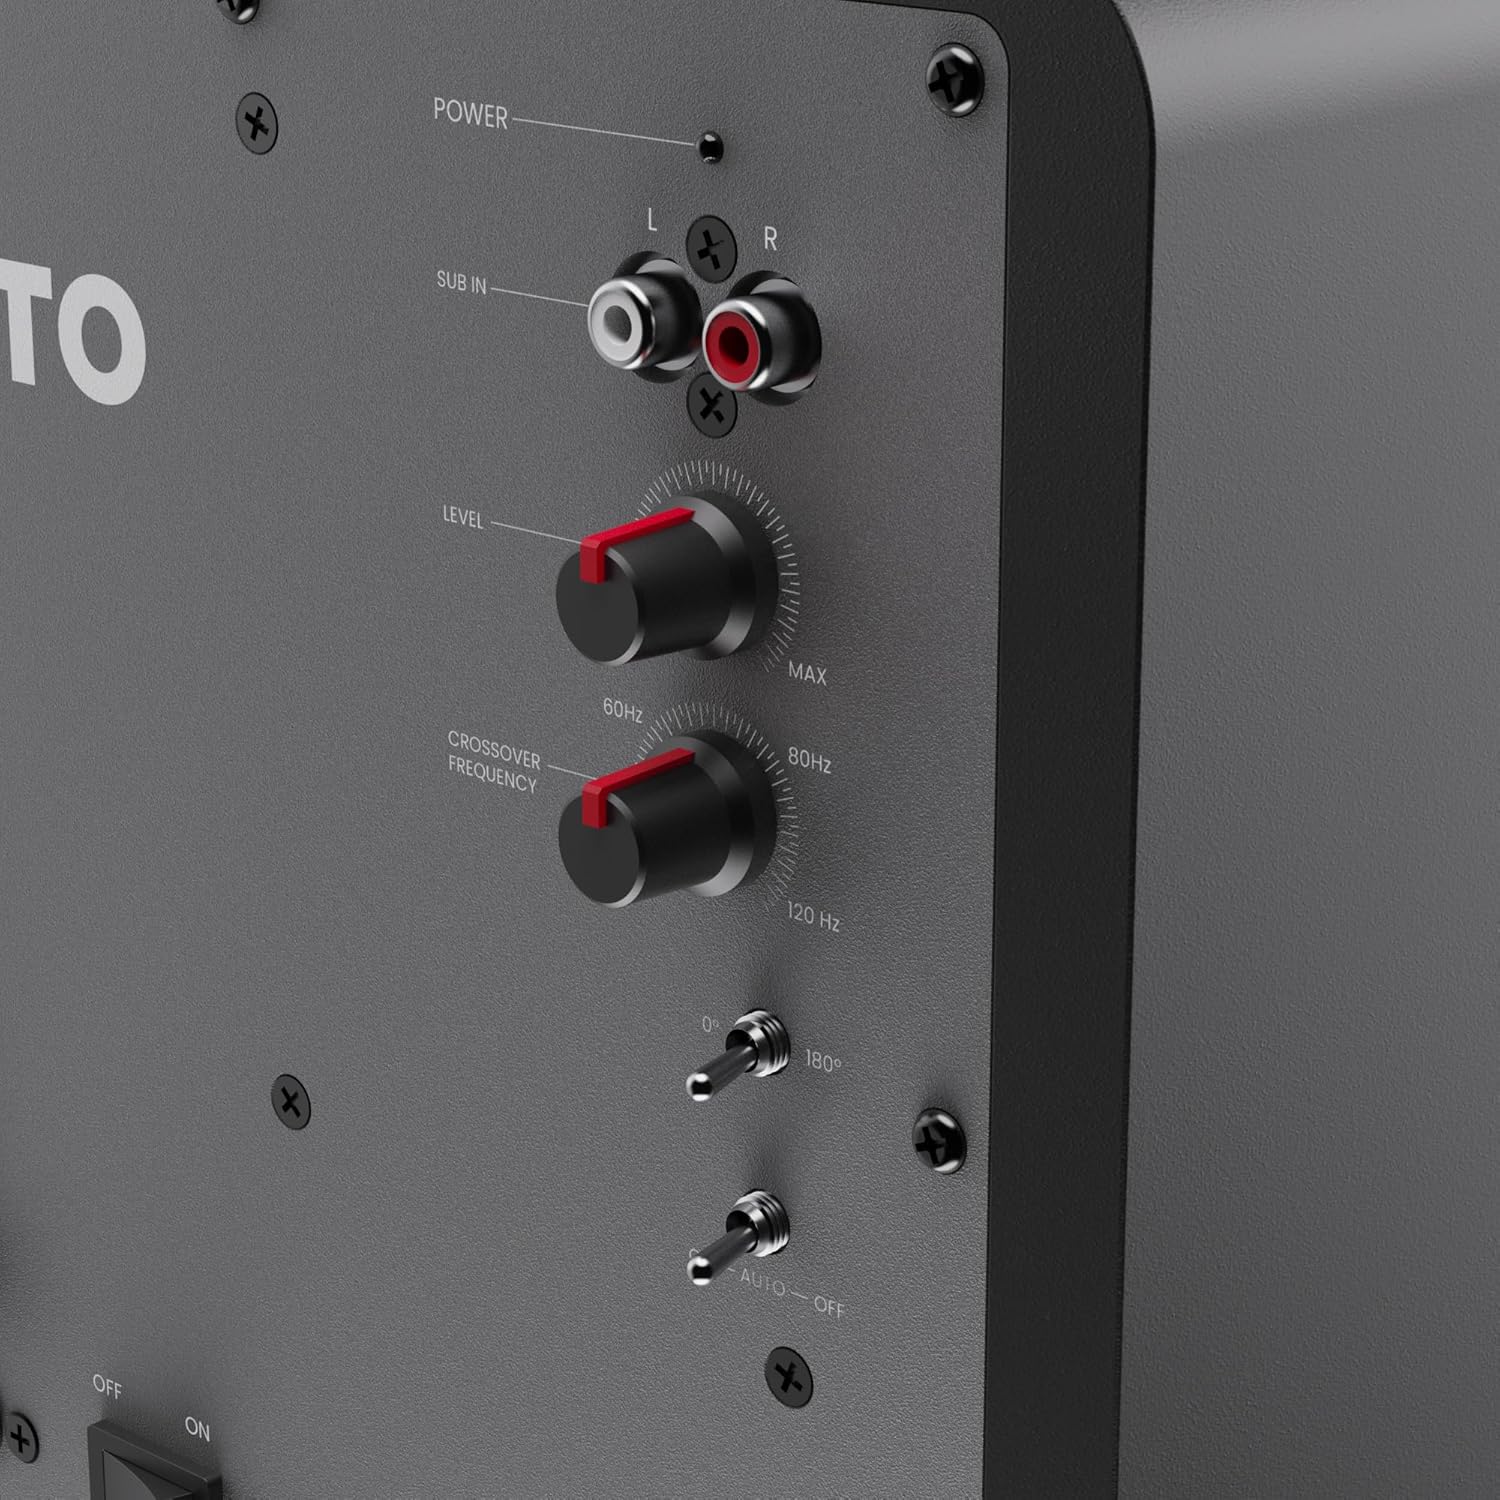
4.3 Regolazioni iniziali
After connecting, you will need to adjust the subwoofer's settings to blend it seamlessly with your main speakers.
- Level (Volume): Start with the 'LEVEL' knob set to its minimum position.
- Frequenza di crossover: Set the 'CROSSOVER FREQUENCY' knob to match the low-frequency extension of your main speakers. A common starting point is 80 Hz. If your main speakers are small, you might set it higher (e.g., 100-120 Hz). If they are larger, you might set it lower (e.g., 60 Hz). If your receiver has an LFE output and manages the crossover, set the SUB6 crossover to its maximum (175 Hz).
- Interruttore di fase: Set the 'PHASE' switch to 0°. You may experiment with 180° later to see which setting provides more impactful and coherent bass at your listening position.
- Auto-Off Switch: Set the 'AUTO-OFF' switch to 'ON' for automatic power management, or 'OFF' for continuous power.
5. Operating Your SUB6 Subwoofer
5.1 Accensione/spegnimento
Once connected, power on your receiver/amplifier first, then the SUB6. If the 'AUTO-OFF' switch is set to 'ON', the subwoofer will automatically enter standby mode after approximately 15 minutes of no audio signal and will power on when a signal is detected. If set to 'OFF', the subwoofer will remain on continuously.
5.2 Fine-Tuning the Sound
Play some familiar music or movie scenes with strong bass content and adjust the following:
- Livello: Slowly increase the 'LEVEL' knob until the subwoofer's bass output blends smoothly with your main speakers. The subwoofer should not overpower the main speakers but rather extend their low-frequency response.
- Frequenza di crossover: Adjust the 'CROSSOVER FREQUENCY' knob up or down. The goal is to find a setting where the bass transitions seamlessly from your main speakers to the subwoofer, without any noticeable gaps or overlaps in frequency.
- Interruttore di fase: Toggle the 'PHASE' switch between 0° and 180°. Listen for the setting that provides the most impactful and coherent bass at your listening position. This adjustment helps ensure the subwoofer's sound waves are in sync with your main speakers.

6. Manutenzione
Proper care will ensure the longevity and optimal performance of your SUB6 subwoofer.
- Pulizia: Use a soft, dry cloth to clean the cabinet. Avoid using abrasive cleaners, waxes, or solvents as they may damage the finish.
- Polvere: Regularly dust the unit to prevent accumulation, especially around the driver and rear panel.
- Posizionamento: Evitare di posizionare il subwoofer alla luce diretta del sole o vicino a fonti di calore o umidità eccessivi.
- Gestione: Quando si sposta il subwoofer, sollevarlo con cautela dalla base. Evitare di farlo cadere o di sottoporlo a forti urti.
7. Risoluzione Dei Problemi
If you encounter issues with your SUB6, refer to the following common problems and solutions:
| Problema | Possibile causa | Soluzione |
|---|---|---|
| Nessun suono dal subwoofer |
|
|
| Bassi distorti o rimbombanti |
|
|
| Bassi deboli o sottili |
|
|
| Suono di ronzio o ronzio |
|
|
8. Specifiche
| Caratteristica | Dettaglio |
|---|---|
| Marca | Canto |
| Numero di modello | SOTTO6VMB |
| Tipo di altoparlante | Subwoofer |
| Diametro del woofer | 6 pollici |
| Potenza massima in uscita dell'altoparlante | 200 Watt (picco) / 100 Watt (RMS) |
| Risposta in frequenza | 40 Hz - 175 Hz |
| Tecnologia di connettività | RCA |
| Modalità di uscita audio | Stereo (with subwoofer) |
| Tipo di montaggio | Da terra |
| Materiale di recinzione | Acoustic grade MDF cabinets, sealed construction |
| Caratteristiche aggiuntive | 0° and 180° Phase Switch, Adjustable Crossover Filter, Class D Amppiù vivace |
| Metodo di controllo | Knobs, Switches |
| Impedenza | 3 Ohm |
| Dimensioni dell'articolo (P x L x A) | 8.7"P x 8.7"L x 9.5"A |
| Peso dell'articolo | 5 chilogrammi |
| Fonte di alimentazione | AC |
9. Informazioni sulla garanzia
Kanto Living Inc. (Kanto) warrants the equipment it manufactures to be free from defects in material and workmanship for a limited warranty period. The specific duration of the warranty may vary by region and product. Please refer to the official Kanto website or your purchase documentation for detailed warranty terms and conditions applicable to your SUB6 subwoofer.
This warranty covers parts and labor for repair or replacement of the product. It does not cover damages resulting from misuse, improper installation, accident, neglect, or unauthorized modification. Proof of original purchase is required for warranty service.
10. Assistenza clienti
If you have any questions, require technical assistance, or need to arrange for warranty service, please contact Kanto customer support:
- Websito: Visita www.kantoaudio.com per FAQ, articoli di supporto e informazioni di contatto.
- E-mail: Refer to the support section of the Kanto website for the appropriate email address.
- Telefono: Contact details for regional support lines can be found on the Kanto websito.
Please have your product model (SUB6) and serial number ready when contacting support.