
MEDALight F30
Manuale utente del mini flash per fotocamera MEDALight F30
Modello: Modello F30 | Marca: MEDALight
1. Introduzione
Grazie per l'acquistoasing the MEDALight F30 Mini Camera Flash. This compact and powerful manual hot shoe flash is designed to provide versatile lighting for your photography needs. With its GN15 guide number and 7 power levels, it offers precise control over light output. Please read this manual thoroughly before using the product to ensure proper operation and to maximize its performance.
2. Cosa c'è nella scatola
- MEDALight F30 Mini Camera Flash
- Scatola regalo
3. Informazioni sulla sicurezza
Per evitare danni al prodotto o lesioni a se stessi o ad altri, osservare le seguenti precauzioni di sicurezza:
- Do not disassemble, repair, or modify the flash unit.
- Mantenere il flash asciutto. Non esporlo a pioggia, umidità o umidità elevata.
- Non toccare il tubo flash subito dopo lo scatto, perché potrebbe essere molto caldo.
- Tenere fuori dalla portata dei bambini.
- Use only the specified battery type (9V battery). Ensure correct polarity when inserting batteries.
- Rimuovere le batterie se il flash non verrà utilizzato per un periodo prolungato.
4. Identificazione delle parti
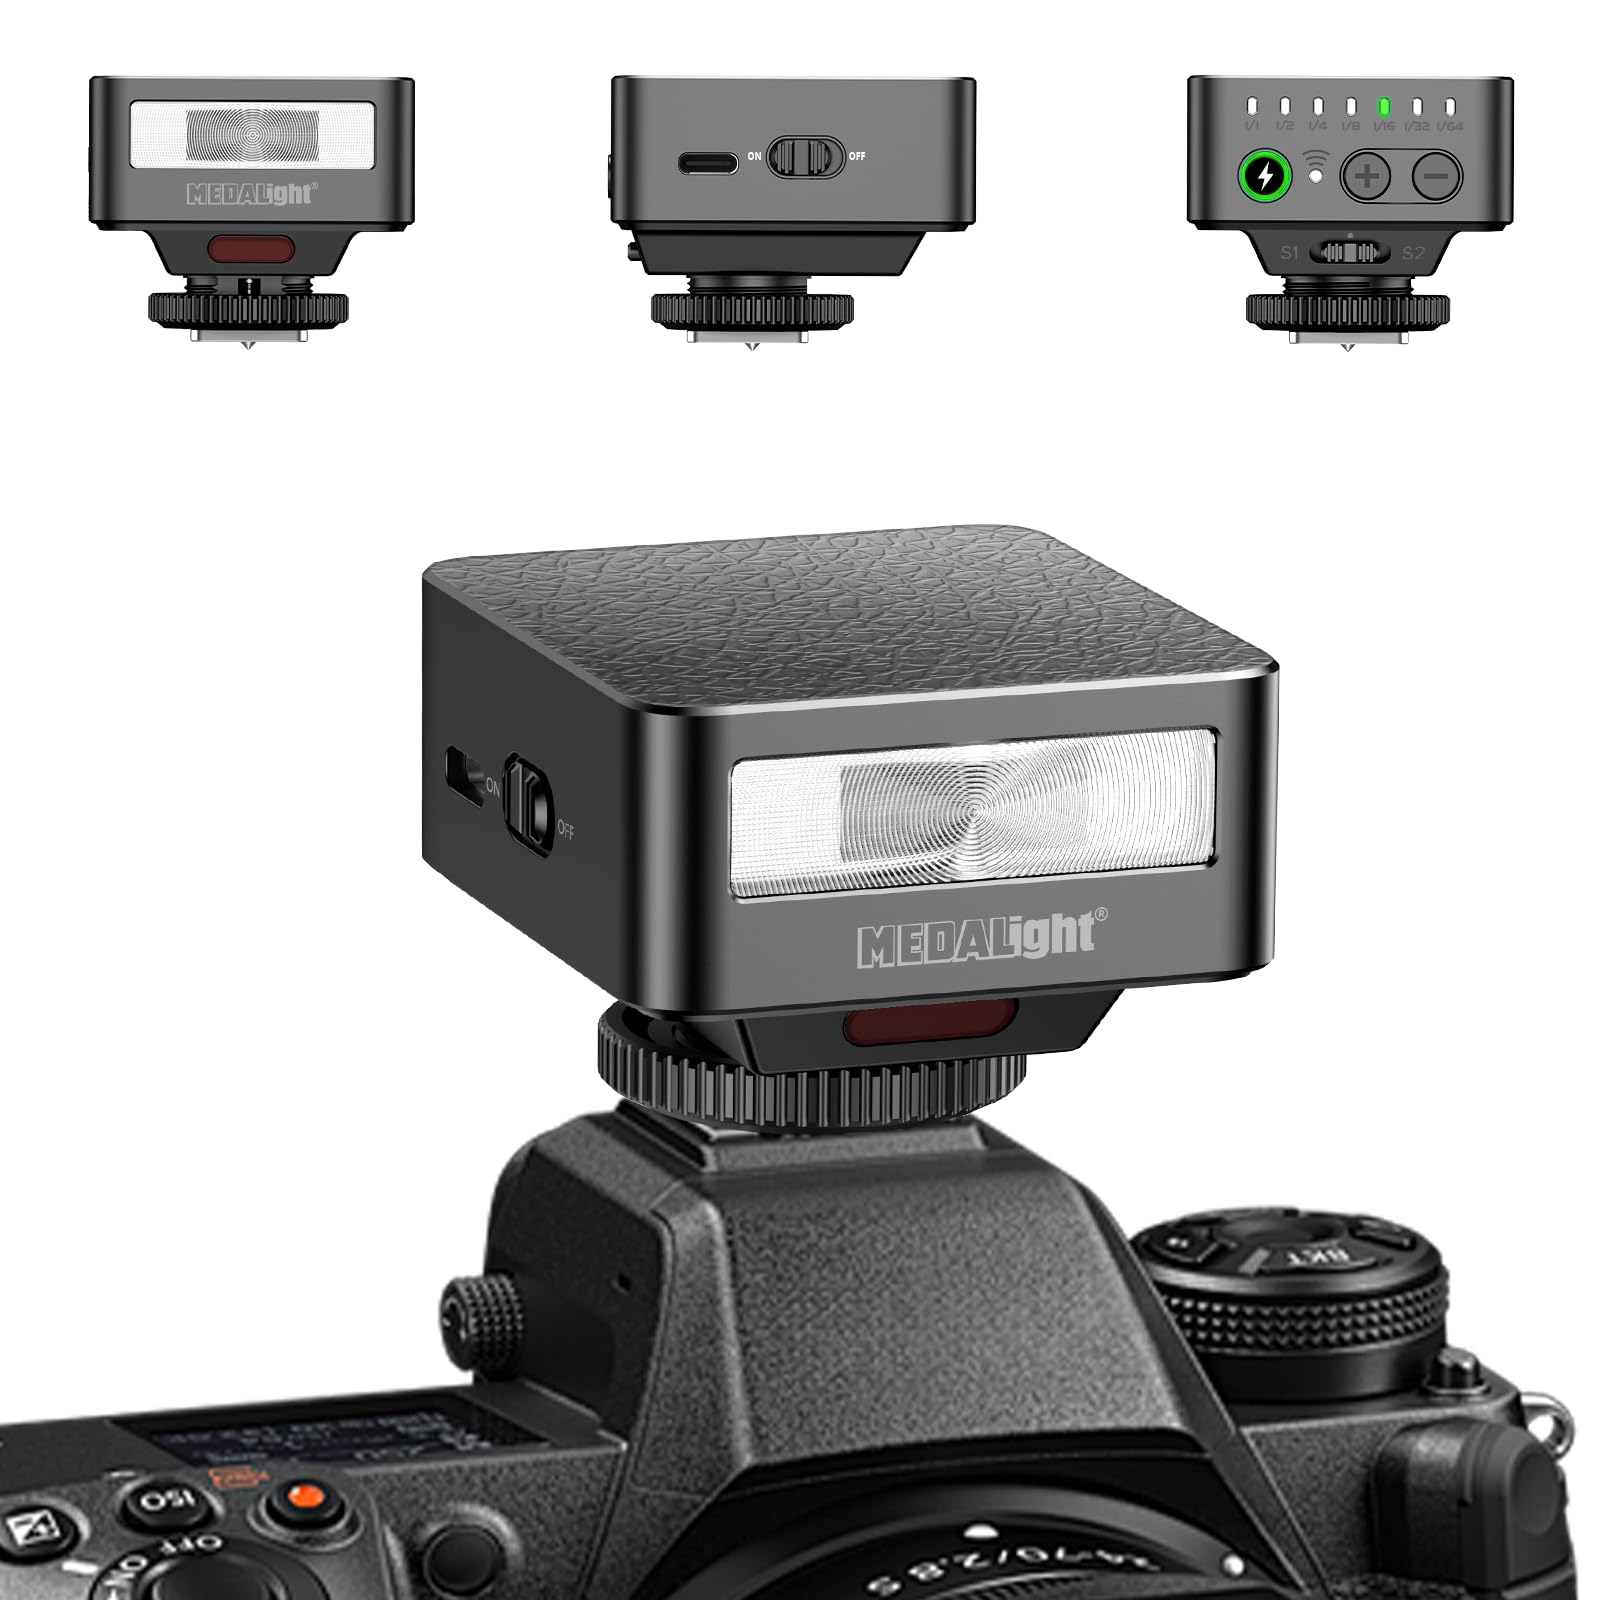
This image displays the MEDALight F30 Mini Camera Flash. The main view shows the flash unit attached to a camera's hot shoe. In the upper left, a front view of the flash highlights the flash tube and the 'MEDALight' logo. In the upper center, a side view reveals the 'ON/OFF' switch. In the upper right, a top view shows the power level indicators (1/1 to 1/64), a charge indicator, and '+' and '-' buttons for adjustment, along with S1 and S2 optical slave modes.
- Tubo flash: Emette luce per l'illuminazione.
- Interruttore ON/OFF: Accende o spegne l'unità flash.
- Indicatori del livello di potenza: LEDs indicating the current power output (1/1, 1/2, 1/4, 1/8, 1/16, 1/32, 1/64).
- Indicatore di carica: LED that illuminates when the flash is ready to fire.
- Pulsante '+': Increases flash power output.
- Pulsante '-': Decreases flash power output.
- Attacco slitta: Collega il flash alla slitta a contatto caldo della fotocamera.
- S1/S2 Optical Slave Sensors: Detect other flash bursts for off-camera triggering.
5. Impostazione
5.1 Installazione della batteria
- Locate the battery compartment cover on the flash unit.
- Aprire il coperchio.
- Insert one 9V battery (included) into the compartment, ensuring correct polarity (+/-).
- Chiudere saldamente il coperchio del vano batterie.
5.2 Montaggio sulla telecamera
- Slide the hot shoe mount of the F30 flash into your camera's hot shoe slot.
- Tighten the locking ring on the flash unit to secure it firmly to the camera.
- Ensure the flash is properly seated and stable before use.
6. Istruzioni per l'uso
6.1 Accensione/Spegnimento
Fai scorrere il ACCESO/SPENTO switch to the 'ON' position to power on the flash. Slide it to 'OFF' to power off.
6.2 Regolazione dei livelli di potenza
Once powered on, the flash will begin charging. The charge indicator LED will illuminate when the flash is ready to fire. Use the '+' E '-' buttons to adjust the flash power output. The power level indicators will show the current setting, ranging from 1/1 (full power) down to 1/64.
- Premere '+' to increase power (e.g., from 1/64 to 1/32).
- Premere '-' to decrease power (e.g., from 1/1 to 1/2).
6.3 Using Optical Slave Modes (S1/S2)
The F30 flash features S1 and S2 optical slave modes for off-camera triggering. These modes allow the F30 to fire in sync with another flash unit.
- Modalità S1: The flash will fire when it detects the first flash burst from a master flash. This is suitable for manual flash systems.
- Modalità S2: The flash will ignore the pre-flash (if any) from a master flash and fire on the second flash burst. This is suitable for TTL flash systems that emit a pre-flash.
To activate S1 or S2 mode, ensure the flash is powered on and then press the appropriate button (S1 or S2) on the top panel. The corresponding indicator will light up.
6.4 Nota di compatibilità
This flash is compatible with Sony ZV1, ZV-E10, Ricoh GR3, Nikon, Canon, Fuji, Digital Film Cameras, and DSLR Cameras. It is NOT compatible with Sony ZV-1F.
7. Manutenzione
7.1 Pulizia
To clean the flash unit, use a soft, dry cloth. Do not use abrasive cleaners, solvents, or strong chemicals, as they may damage the surface or internal components.
7.2 Conservazione
When not in use for an extended period, store the flash unit in a cool, dry place. Remove the 9V battery to prevent leakage and potential damage to the flash.
8. Risoluzione Dei Problemi
| Problema | Possibile causa | Soluzione |
|---|---|---|
| Il flash non si accende. | La batteria è scarica o non è inserita correttamente. | Controllare la polarità della batteria o sostituirla con una nuova batteria da 9 V. |
| Il flash non si attiva. | Flash not fully charged; hot shoe connection loose; camera settings incorrect. | Wait for charge indicator to light up; ensure flash is securely mounted; check camera's flash settings. |
| Flash fires inconsistently in slave mode. | Incorrect slave mode (S1/S2) selected; sensor obstructed; ambient light interference. | Ensure correct S1/S2 mode for your master flash; clear any obstructions from the sensor; test in different lighting conditions. |
9. Specifiche
- Modello: F30
- Numero Guida (GN): 15
- Livelli di potenza: 7 (1/1, 1/2, 1/4, 1/8, 1/16, 1/32, 1/64)
- Velocità di sincronizzazione flash: 1/500s
- Tipo di flash della fotocamera: hotshoe
- Batterie: 1 batteria da 9 V (inclusa)
- Peso dell'articolo: 3.52 once (circa 100 g)
- Dimensioni della confezione: 3.94 x 3.94 x 0.79 pollici (10 x 10 x 2 cm)
- Supporti compatibili: Sony ZV1, ZV-E10, Ricoh GR3, Nikon, Canon, Fuji, Digital Film Cameras, DSLR Cameras (Not Compatible for Sony ZV-1F)
- Produttore: Zhuhai jingjia technology co.,ltd
10. Garanzia e supporto
Per informazioni sulla garanzia o assistenza tecnica, consultare la documentazione fornita con l'acquisto o contattare direttamente il venditore/produttore. Conservare la prova d'acquisto per eventuali reclami in garanzia.
Ask a question about this manual
Ask about setup, troubleshooting, compatibility, parts, safety, or missing instructions. Manuals+ will review the question and use this page’s manual context to help answer it.