

1. Introduzione
The PGST Smart WiFi Security Alarm System provides comprehensive protection for your home or office. This system integrates WiFi and GSM connectivity, allowing for remote control and notifications via a smartphone application, SMS, or calls. It includes a 1080p 360° camera, motion sensors, door/window sensors, and supports voice control through Amazon Alexa and Google Assistant.
This manual will guide you through the installation, operation, and maintenance of your security system to ensure optimal performance and reliability.
2. Contenuto della confezione
Si prega di verificare che tutti gli articoli elencati di seguito siano inclusi nel pacchetto:
- 1 x Alarm Base Unit
- 4 x Door Sensors (with battery)
- 2 x Wireless PIR Detectors (with battery)
- 2 x Remote Controls (with battery)
- 2 RFID Tags
- 1 x 360° Camera
- 1 x Wired Siren (120DB)
- 1 x Manuale utente
- 1 x Caricabatterie (USB Tipo-C)
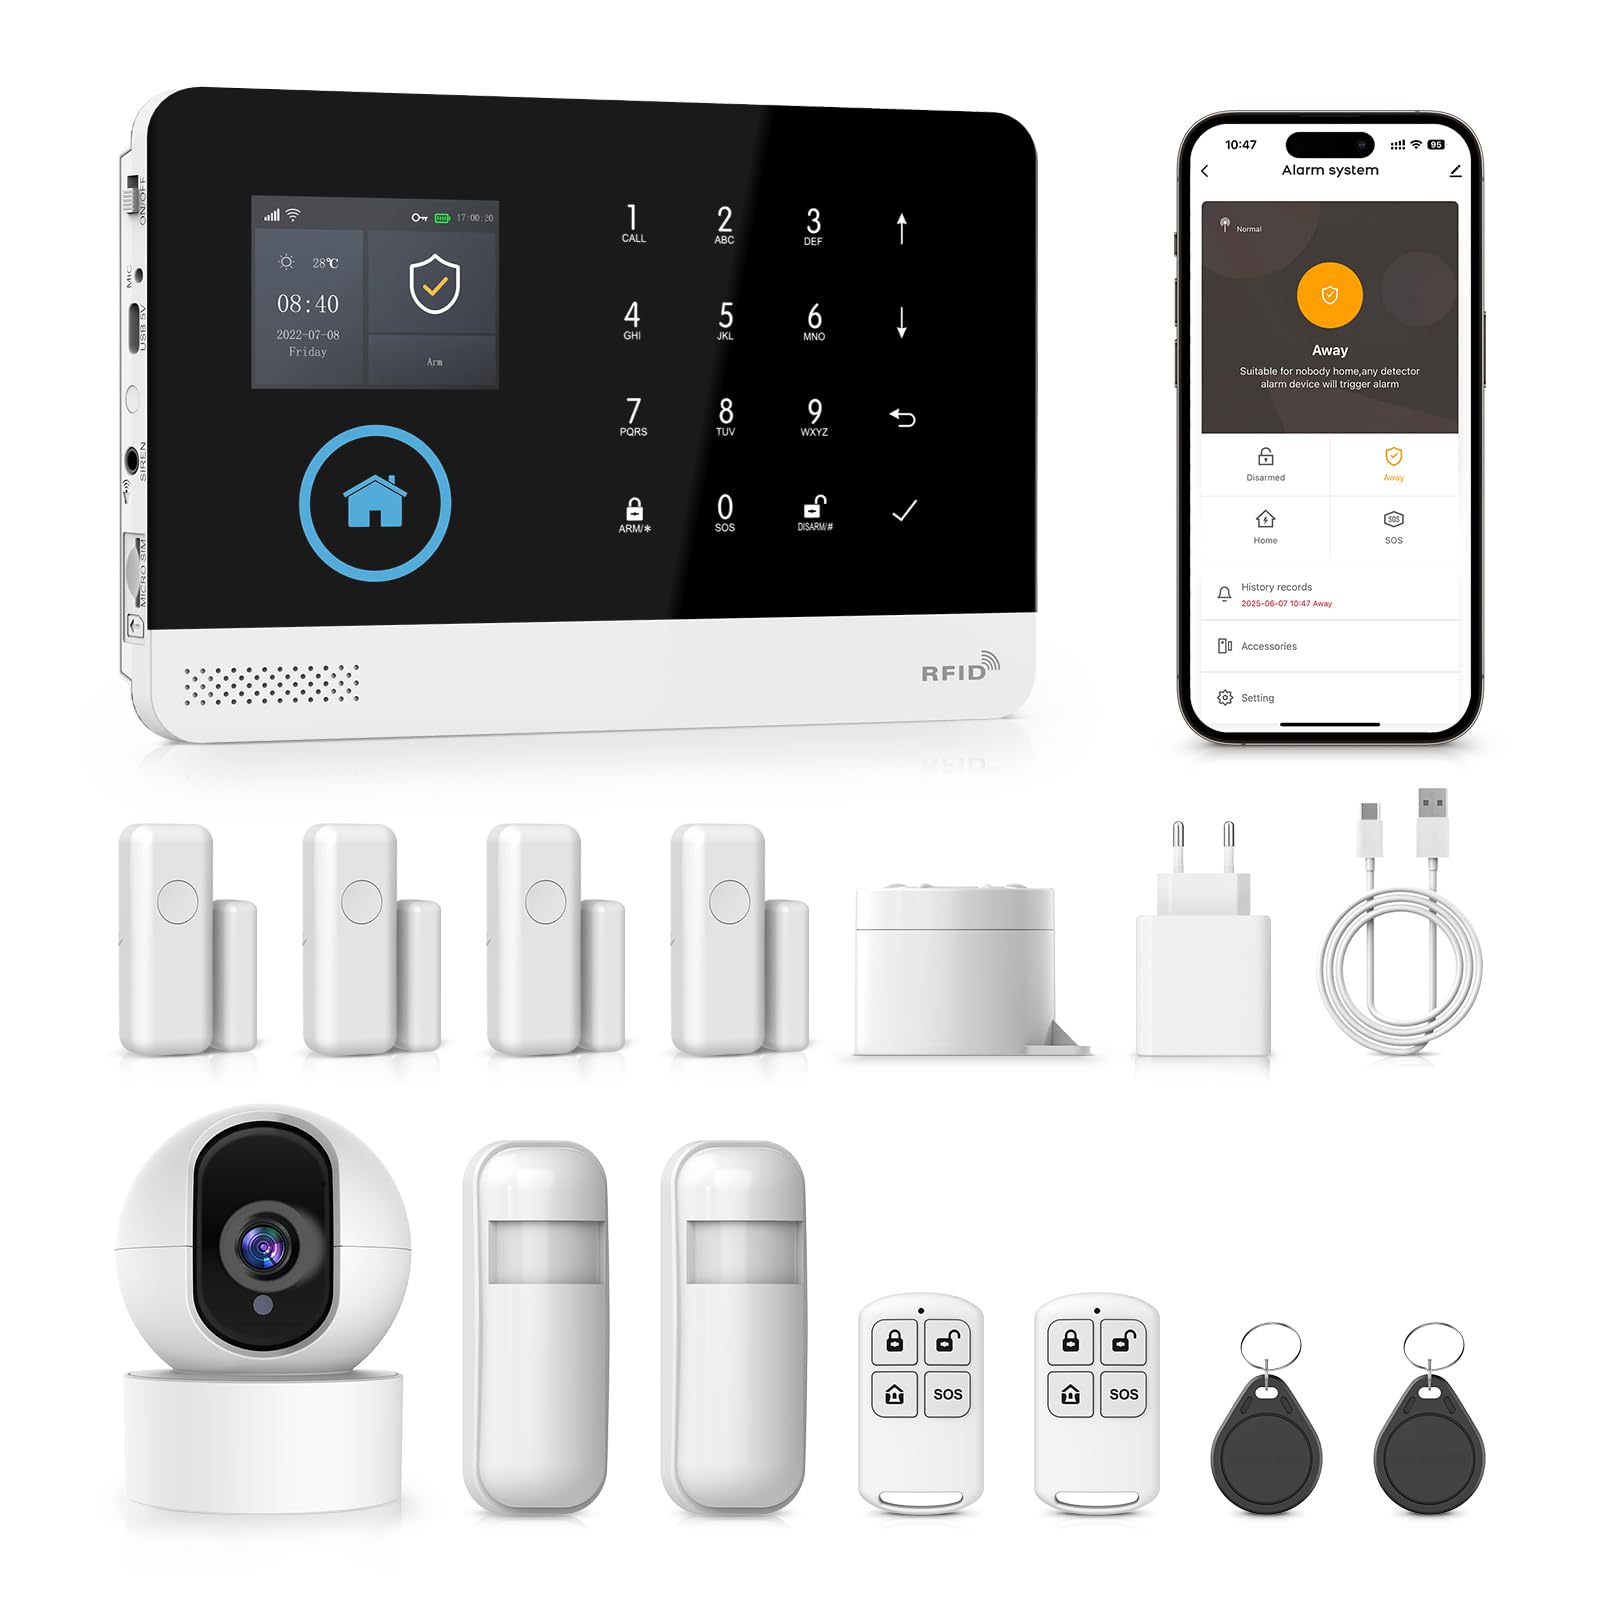
Immagine: Oltreview of the PGST Smart Security System kit, showing the alarm panel, camera, sensors, and accessories.
3. Specifiche
| Caratteristica | Specificazione |
|---|---|
| Ingresso volumetage | CC 5 V (USB di tipo C) |
| Corrente di esercizio | <250mA |
| Allarme corrente | <650mA |
| Frequenza RF wireless | 433.92 MHz (ASK modulation) |
| Formato di codifica | 1527/2262 (receive), 1527 or 2262 (transmit) |
| Supporto GSM | 2G |
| WiFi standard | IEEE802.11b/g/n (2.4 GHz, 5G not supported) |
| Batteria di backup | Polimeri di litio da 3.7 V/1000 mAh |
| Temperatura di esercizio | da -10℃ a 55℃ (da 14°F a 131°F) |
| Umidità relativa | <80% (senza condensa) |
| Dimensioni del prodotto | 185 x 125 x 14.7 mm (Length x Height x Thickness) |
| Peso | 600 grammi |

Immagine: frontale e laterale view of the alarm panel, highlighting the 2.4 TFT display and physical dimensions.
4. Impostazione
4.1 Accensione iniziale
- Connect the alarm base unit to a power source using the provided USB Type-C charger.
- The unit will power on automatically. The TFT display will illuminate.
4.2 SIM Card Installation (Optional for GSM Functionality)
- Locate the SIM card slot on the side of the alarm base unit.
- Insert a 2G compatible SIM card into the slot, ensuring correct orientation.
- The system will detect the SIM card and display network status on the screen.
4.3 Installazione dell'app e connessione WiFi
- Download the companion application (e.g., Tuya Smart App) from your smartphone's app store (iOS or Android).
- Registrati o accedi al tuo account.
- On the alarm base unit, navigate to the WiFi settings.
- Follow the in-app instructions to add a new device. This typically involves selecting your 2.4 GHz WiFi network and entering the password.
- The alarm unit will connect to your WiFi network. A confirmation message will appear on the display and in the app.
4.4 Adding Sensors and Camera
The system supports up to 99 wireless sensors and 3 wired zones.
- Sensori per porte/finestre: Mount the two parts of the sensor on a door or window frame, ensuring they are aligned and within 1 cm of each other when closed. Pair them with the alarm unit via the app or panel settings.
- Rilevatori di movimento PIR: Install PIR detectors in areas where motion detection is desired, such as hallways or living rooms. Ensure they have a clear line of sight. Pair them with the alarm unit.
- Telecamera a 360°: Connect the camera to power. Follow the camera's specific instructions to connect it to your WiFi network and link it to your security system app.

Image: Diagram illustrating a home layout with various PGST security components installed, including the alarm host, door sensors, motion sensors, and an IP camera, demonstrating easy DIY installation.
5. Istruzioni per l'uso
5.1 Attivazione e disattivazione del sistema
- Tramite pannello di allarme: Use the keypad to enter your security code and press the 'Arm' or 'Disarm' button.
- Tramite telecomando: Press the 'Arm' button (often a closed padlock icon) to arm the system, or the 'Disarm' button (open padlock icon) to disarm.
- Tramite app mobile: Open the app and tap the 'Arm' or 'Disarm' icon.
- Attivazione/disattivazione programmata: Set custom schedules through the app for automatic arming and disarming at specific times.
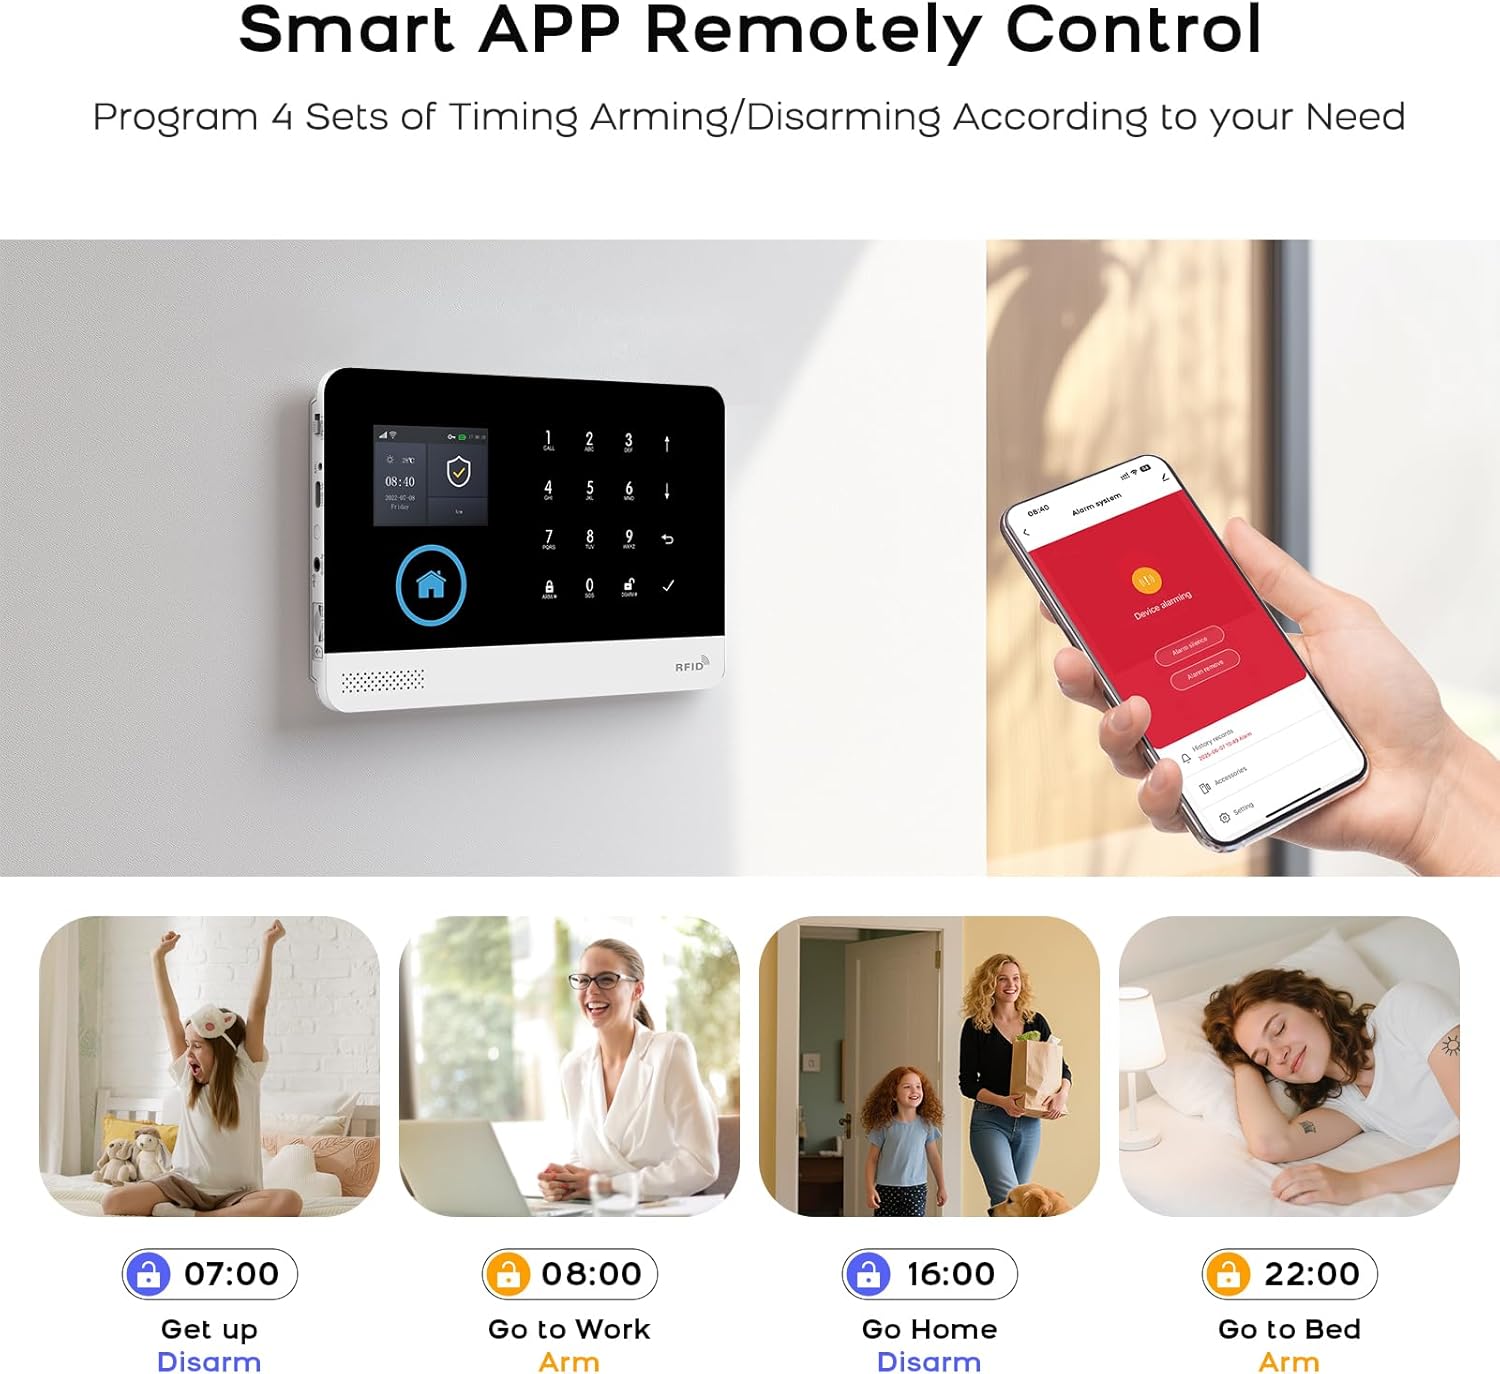
Image: Illustration of the mobile app interface for remote control, showing options for arming and disarming the system, along with examples of scheduled operations.
5.2 Interfono vocale bidirezionale
The alarm base unit supports two-way voice communication. When an alarm is triggered or a call is initiated, you can speak and listen through the unit.
- Effettuare le chiamate: Use the dialing buttons on the panel or the app to initiate a call.
- Ricevere chiamate: Answer incoming calls directly from the panel or through the app.

Image: Depiction of the two-way voice intercom feature, showing a child interacting with the alarm panel and an adult responding via a smartphone, illustrating remote communication.
5.3 Integrazione del controllo vocale
Il sistema è compatibile con Amazon Alexa e Google Assistant per comodi comandi vocali.
- Enable the PGST skill/action in your Alexa or Google Home app.
- Link your PGST account.
- Use commands such as "Alexa, arm my home" or "Hey Google, disarm the security system."
Image: Scene showing a user interacting with the alarm system using voice commands through an Amazon Alexa device, demonstrating smart home integration.
5.4 Funzionamento della fotocamera
The 1080p 360° camera provides live video feed and recording capabilities.
- Vivere View: Access the camera's live feed through the mobile app at any time.
- Rilevamento del movimento: La telecamera può rilevare il movimento e inviare avvisi al telefono.
- Audio bidirezionale: Communicate through the camera using its built-in microphone and speaker.
- Visione notturna a infrarossi: In condizioni di scarsa illuminazione, la telecamera passa automaticamente alla visione notturna.
- Riproduzione video: Review registrato footage tramite l'app.

Image: A 360-degree home security WiFi camera on a table, with icons illustrating its features: 1080p resolution, motion detection, 2-way audio, video replay, infrared night vision, and app control.
6. Manutenzione
6.1 Sostituzione della batteria per i sensori
The system will notify you via the app or panel display when sensor batteries are low.
- Identify the sensor with a low battery warning.
- Aprire con cautela il sensore casing.
- Replace the old battery with a new one of the same type (e.g., CR2032 for door sensors, AA for PIR detectors).
- Chiudete il casing securely. The system should automatically recognize the new battery.
Image: Visual representation of low battery warnings for wireless sensors (PIR and door sensor), and how these alerts are displayed on the alarm host and mobile app.
6.2 Pulizia
Wipe the alarm base unit, camera, and sensors with a soft, dry cloth. Avoid using abrasive cleaners or solvents that could damage the devices.
7. Risoluzione Dei Problemi
- Il sistema non si connette al Wi-Fi: Ensure your WiFi network is 2.4 GHz. Check your WiFi password and router signal strength. Restart the alarm unit and your router.
- I sensori non attivano l'allarme: Verify that sensors are correctly paired and have fresh batteries. Check their placement to ensure proper detection range and alignment.
- Nessun segnale GSM: Ensure the 2G SIM card is correctly inserted and active. Check for network coverage in your area.
- Notifiche dell'app non ricevute: Check your phone's notification settings for the app. Ensure the app has background data access and is not restricted by power-saving modes.
- Il controllo vocale non funziona: Confirm that the PGST skill/action is enabled and linked in your smart assistant app (Alexa/Google Home). Ensure your voice commands are clear and match the supported phrases.
8. Garanzia e supporto
PGST products are designed for reliability and performance. For specific warranty details, please refer to the warranty card included in your product packaging or visit the official PGST website. If you encounter any issues or require technical assistance, please contact PGST customer support through the contact information provided on our websito o all'interno dell'applicazione mobile.