1. Introduzione
Thank you for choosing the Aeitto Nugget Ice Maker. This manual provides essential information for the safe and efficient operation, maintenance, and troubleshooting of your new ice maker. Please read it thoroughly before first use and keep it for future reference.
Video: Sopraview of the Aeitto Nugget Ice Maker's features and operation. This video demonstrates the ice making process and various uses for nugget ice.
2. Importanti misure di sicurezza
Per ridurre il rischio di incendi, scosse elettriche o lesioni durante l'utilizzo della macchina per il ghiaccio, seguire queste precauzioni di base:
- Leggere tutte le istruzioni prima dell'uso.
- Non toccare l'evaporatore o il cestello del ghiaccio quando l'unità è in funzione.
- Non immergere l'apparecchio, il cavo di alimentazione o la spina in acqua o altri liquidi.
- Sorvegliare i bambini quando l'apparecchio è in uso.
- Unplug the ice maker from the outlet when not in use, before cleaning, or during servicing.
- Non utilizzare alcun apparecchio con un cavo o una spina danneggiati oppure dopo che l'apparecchio stesso non funziona correttamente o è stato danneggiato in qualsiasi modo.
- Utilizzare solo acqua potabile nella macchina del ghiaccio.
- Assicurare una ventilazione adeguata attorno all'unità. Mantenere almeno 5 cm di spazio libero su tutti i lati.
3. Componenti del prodotto
Familiarize yourself with the parts of your Aeitto Nugget Ice Maker:
- Unità di produzione del ghiaccio
- Cestino di ghiaccio
- Paletta di ghiaccio
- Vassoio raccogli gocce
- Tubo di scarico

Immagine: The Aeitto Nugget Ice Maker showing its compact dimensions (7.3"W x 13.0"D x 12.8"H) and included accessories: an ice scoop, ice basket, and drip tray. The ice basket can store up to 1.8 lbs of nugget ice.
4. Prima del primo utilizzo
Before operating your ice maker for the first time, perform the following steps:
- Disimballare: Remove all packaging materials and check that all accessories are present.
- Pulito: Wash the ice basket and ice scoop with warm water and mild detergent. Rinse thoroughly and dry.
- Posizione: Posizionare la macchina del ghiaccio su una superficie stabile e piana, lontano dalla luce solare diretta e da fonti di calore. Garantire un'adeguata ventilazione attorno all'unità.
- Ciclo di pulizia iniziale: It is recommended to run a self-cleaning cycle before making ice for consumption. Refer to the "Self-Cleaning Function" section for detailed instructions.
5. Istruzioni per l'uso
5.1 Produzione di ghiaccio
Follow these simple steps to produce nugget ice:
- Aggiungere acqua: Open the lid and pour potable water into the water reservoir up to the MAX fill line.
- Inserire il cestello del ghiaccio: Place the ice basket securely inside the unit.
- Avviare la produzione di ghiaccio: Press the "ICE" button on the control panel. The ice maker will begin the ice-making cycle.
- Raccogli il ghiaccio: The first batch of ice may take approximately 5 minutes. The unit will continue to produce ice until the ice basket is full or the water reservoir is empty.
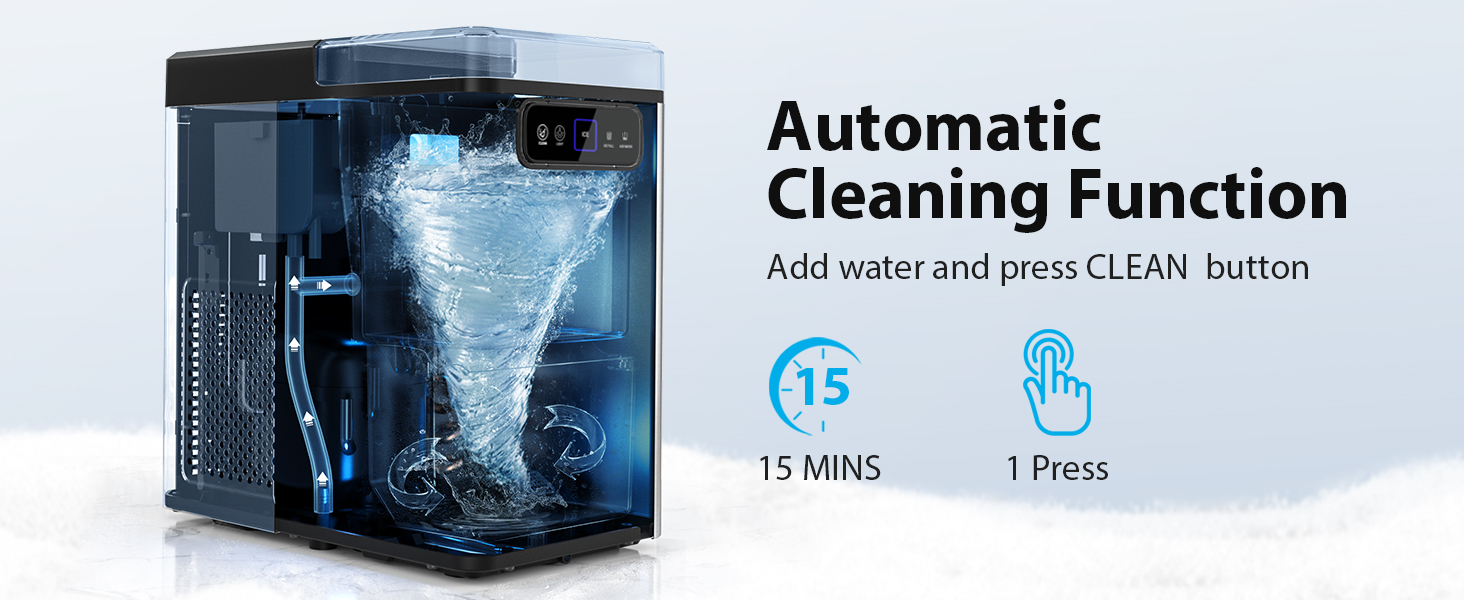
Immagine: A visual guide demonstrating the three steps to make nugget ice: 1. Add water to the reservoir. 2. Press the "ICE" button on the control panel. 3. Enjoy the freshly made nugget ice.
5.2 Promemoria ghiaccio pieno
The ice maker is equipped with an "Ice Full" sensor. When the ice basket is full, the unit will automatically stop ice production to prevent overflow and save energy. Production will resume once ice is removed from the basket.

Immagine: The ice maker's control panel showing the "ICE FULL" indicator light, which illuminates when the ice basket is full, signaling the unit to pause ice production.
6. Pulizia e manutenzione
6.1 Funzione autopulente
The ice maker features an automatic self-cleaning function for convenience and hygiene:
- Acqua vuota: Assicurarsi che il serbatoio dell'acqua sia vuoto.
- Add Water for Cleaning: Fill the reservoir with clean, potable water. You may add a small amount of white vinegar or a descaling solution (follow product instructions) for enhanced cleaning.
- Inizia la pulizia: Press and hold the "CLEAN" button for 3 seconds. The unit will initiate a 15-minute cleaning cycle.
- Scaricare l'acqua: After the cycle, drain the water from the unit using the drain hose.
- Risciacquo: Repeat the process with fresh water only to rinse out any cleaning solution residue.

Immagine: The internal mechanism of the ice maker during a self-cleaning cycle, showing water circulating to clean the components. The process takes 15 minutes and is activated with a single press of the clean button.
6.2 Draining the Unit
To drain water from the ice maker:
- Locate the drain pipe at the back of the unit.
- Remove the stopper from the drain pipe.
- Direct the drain pipe into a sink or container to collect the water.
- Once drained, replace the stopper firmly.

Immagine: A close-up of the ice maker's unique water outlet design, showing how the drain pipe is connected and used to easily discharge water into a sink, preventing leaks.
6.3 Decalcificazione
Mineral buildup from hard water can affect ice production and the lifespan of your machine. Descale your ice maker regularly:
- Mensile: In zone con acqua moderatamente dura.
- Ogni due o tre settimane: In zone con acqua dura o molto dura.
Use a descaling solution specifically designed for ice makers or a mixture of water and white vinegar (1:1 ratio). Follow the self-cleaning instructions, substituting the cleaning solution for water in the first step.

Immagine: A map illustrating hard water concentrations across the United States, with recommendations for descaling frequency based on water hardness: monthly for moderately hard water (1-60mg/L) and every 2-3 weeks for hard to very hard water (61-250mg/L).
7. Risoluzione Dei Problemi
If your ice maker is not functioning correctly, consult the table below for common issues and solutions:
| Problema | Possibile causa | Soluzione |
|---|---|---|
| La macchina del ghiaccio non produce ghiaccio. | Niente acqua nel serbatoio. | Aggiungi acqua al serbatoio. |
| Il cestino del ghiaccio è pieno. | Rimuovere il ghiaccio dal cestello. | |
| Unit is unplugged or power outage. | Assicurarsi che l'unità sia collegata e accesa. | |
| La produzione di ghiaccio è lenta. | Scarsa ventilazione. | Assicurare uno spazio adeguato attorno all'unità per il flusso d'aria. |
| Alta temperatura ambiente. | Operare in un ambiente più fresco. | |
| Il ghiaccio ha un sapore o un odore insolito. | Stale water or mineral buildup. | Perform a self-cleaning cycle and use fresh, potable water. Descale if necessary. |
| L'unità è rumorosa. | Rumori di normale funzionamento (compressore, pompa dell'acqua). | Questo è normale. Se il rumore è eccessivo o insolito, contattare l'assistenza clienti. |
8. Specifiche tecniche
| Specificazione | Dettaglio |
|---|---|
| Nome del modello | BLK23-24M |
| Dimensioni del prodotto | 12.99"P x 7.29"L x 12.79"A |
| Capacità (produzione di ghiaccio) | Fino a 40 libbre al giorno |
| Cosatage | 110 watt |
| Refrigerante | R600a |
| Materiale | Acciaio inossidabile |
| Peso dell'articolo | 19.36 libbre |
9. Garanzia e assistenza clienti
For warranty information or customer support, please refer to the warranty card included with your product or visit the official Aeitto website. If you encounter any issues not covered in this manual, please contact Aeitto customer service for assistance.
Informazioni sui contatti: Please refer to your product packaging or the official Aeitto websito per i dettagli di contatto più aggiornati.