1. Introduzione
This manual provides essential information for the safe and effective operation of your Andeman Ep155 or Ep177 Car Jump Starter with Air Compressor. Please read this manual thoroughly before using the device and retain it for future reference. This device is designed to jump start 12V vehicles and, for the Ep177 model, also functions as a portable tire inflator and power bank.
2. Informazioni sulla sicurezza
ATTENZIONE: L'uso improprio può causare lesioni o danni al dispositivo e al veicolo. Seguire sempre queste linee guida di sicurezza.
- Tenere fuori dalla portata dei bambini.
- Non immergere il dispositivo in acqua.
- Non utilizzare in atmosfere esplosive, ad esempio in presenza di liquidi, gas o polveri infiammabili.
- Garantire una ventilazione adeguata durante l'uso.
- Do not disassemble the device. Contact qualified service personnel for repairs.
- Evitare l'esposizione diretta alla luce solare o alle alte temperature.
- Utilizzare solo lo smart cl fornitoampse accessori.
- Per prestazioni ottimali, assicurarsi che il dispositivo sia completamente carico prima dell'uso.
- The device features 10 advanced safety protections, including Overload Protection, Sparks Protection, Reverse Charges Protection, Reverse Polarities Protection, Over Currents Protection, Low Temperature Protection, Over Charges Protection, and Short Circuits Protection.

3. Prodotto finitoview e componenti
Your Andeman Car Jump Starter is a multi-functional device designed for emergency vehicle starting, and for the Ep177 model, also includes a portable air compressor and power bank capabilities.
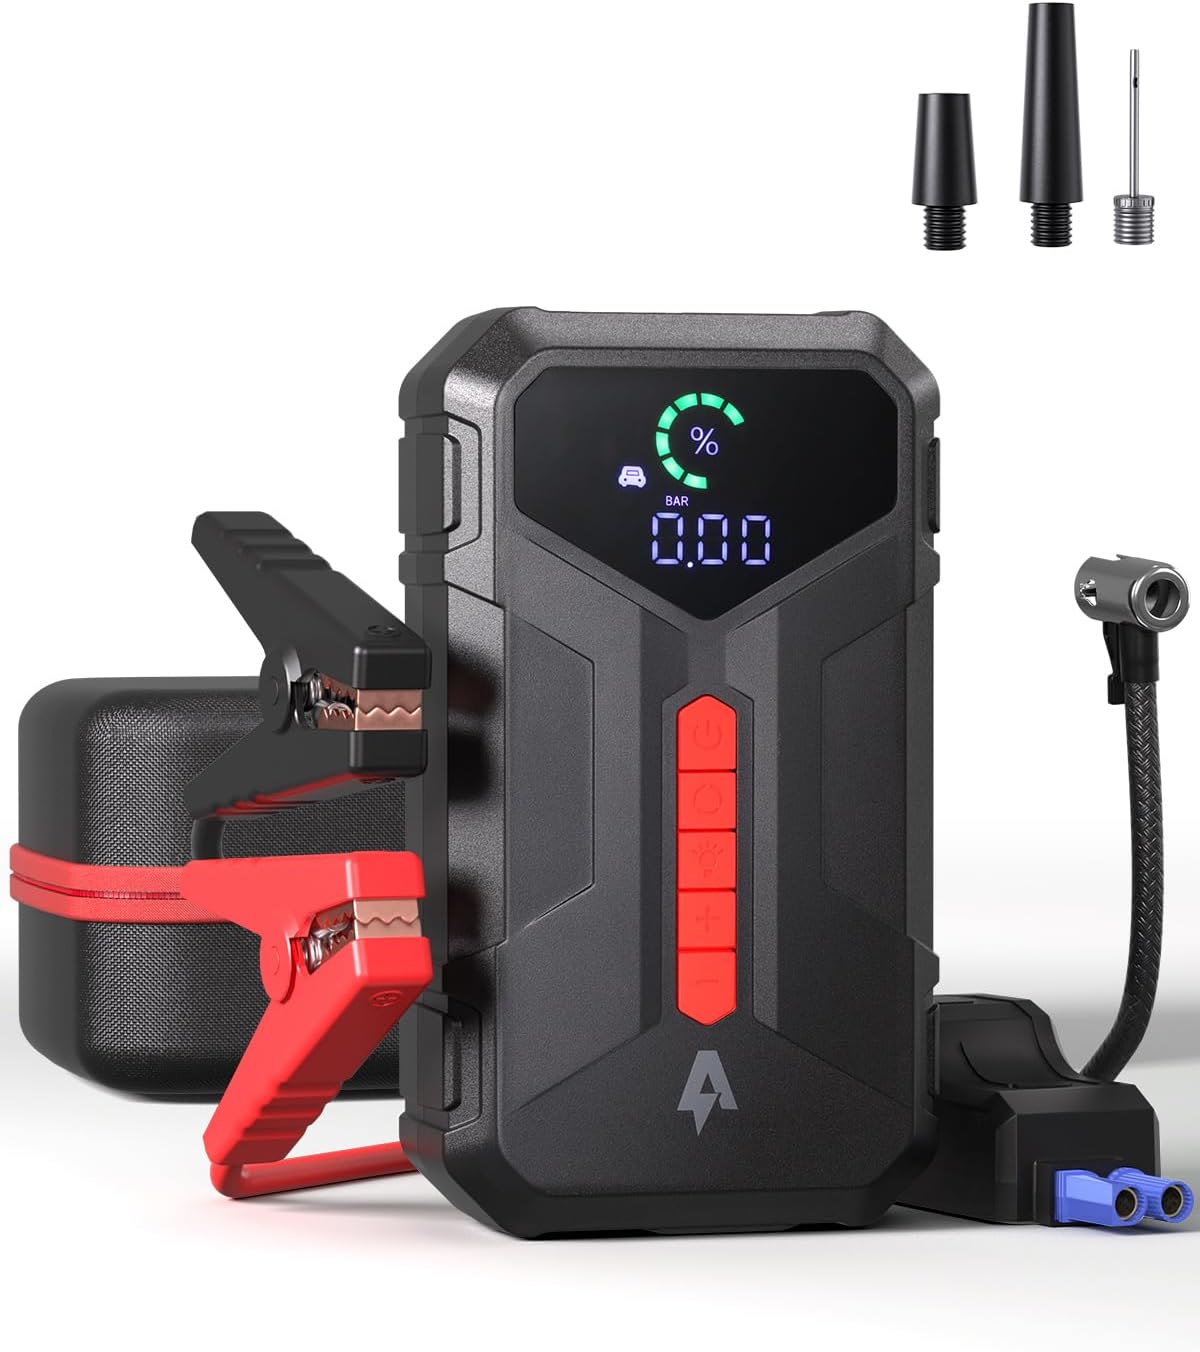

Contenuto della confezione:
- Andeman Car Jump Starter (Ep155 or Ep177)
- Batteria intelligente Clamps
- Cavo di ricarica USB-C
- Inflation Nozzles (for Ep177 model)
- Manuale d'uso
4. Specifiche
| Caratteristica | Ep155 Model | Ep177 Model |
|---|---|---|
| Corrente di picco | 3000A | 4000A |
| Capacità della batteria | 20000mAh | 24000mAh |
| Compatibilità del motore (benzina) | Fino a 9.0L | Fino a 8.5L |
| Compatibilità del motore (diesel) | Fino a 7.0L | Fino a 7.0L |
| Starts per Charge | Fino a 80 volte | Fino a 70 volte |
| Tempo di standby | 24 mesi | 48 mesi |
| Air Compressor (PSI) | N / A | Fino a 150 PSI |
| Ingresso di ricarica (tipo C) | 5V/3A, 9V/2A, 12V/1.5A | |
| Uscita USB-A | QC3.0 | |
| Uscita USB-B | 5V/3A | |
| DC Output | 15V | |
| Tempo di carica completa | Circa 1.8 ore | |
| Torcia LED | 240 Lumens, 36 hours battery life | |

5. Configurazione e ricarica
5.1 Addebito iniziale
Before first use, fully charge the jump starter. Connect the provided USB-C charging cable to the device's Type-C input port and a suitable USB power adapter (not included). The device supports bi-directional fast charging, achieving a full charge from 0% to 100% in approximately 1.8 hours.

5.2 Controllo del livello della batteria
The device features a digital display or indicator lights to show the current battery level. Ensure the device has sufficient charge before attempting to jump start a vehicle or inflate tires.
6. Istruzioni per l'uso
6.1 Avviamento di emergenza di un veicolo
- Assicurarsi che l'avviatore di emergenza sia carico almeno al 50%.
- Spegnere il motore del veicolo e tutti gli accessori.
- Collegare il rosso (+) clamp al terminale positivo (+) della batteria del veicolo.
- Collegare il nero (-) clamp to the vehicle's negative (-) battery terminal or a solid, unpainted metal part of the engine block.
- Collega lo smart clamp connector into the jump starter's port. The indicator light on the smart clamp should turn green, indicating a correct connection. If it's red or flashing, check connections and battery voltage.
- Start the vehicle. If it doesn't start immediately, wait 30 seconds before trying again. Do not crank for more than 3 seconds per attempt.
- Una volta avviato il veicolo, scollegare immediatamente la smart clamp connettore dall'avviatore di emergenza.
- Remove the black (-) clamp prima, poi il rosso (+) clamp dalla batteria del veicolo.
6.2 Using the Air Compressor (Ep177 Model Only)
The Ep177 model features a built-in air compressor capable of delivering up to 150PSI.
- Collegare il tubo dell'aria allo stelo della valvola del pneumatico. Assicurarsi che il collegamento sia saldo per evitare perdite d'aria.
- Power on the jump starter. The current tire pressure will be displayed.
- Utilizzare i pulsanti '+' e '-' per impostare la pressione desiderata.
- Press the inflation button to start the compressor. The compressor will automatically stop once the preset pressure is reached.
- Scollegare il tubo dell'aria dalla valvola del pneumatico.
Note: For continuous use, it is recommended to rest the compressor for 10 minutes after every 10 minutes of operation to prevent overheating. A full charge can inflate 195/60 R15 tires from 0 to full approximately 4-5 times.

6.3 Utilizzo come Power Bank
The jump starter can also function as a portable power bank to charge electronic devices.
- Connect your device's charging cable to the appropriate output port on the jump starter (USB-A QC3.0, USB-B 5V/3A, or Type-C 5V/3A, 9V/2A, 12V/1.5A).
- Il dispositivo inizierà automaticamente a caricarsi.
- The DC15V output port can power compatible devices like tire inflators (if not using the built-in one) or car refrigerators.

6.4 Utilizzo della torcia a LED
The built-in 240 lumens LED flashlight offers multiple modes for various situations.
- Press the flashlight button once to turn on the steady light.
- Press again for SOS mode (flashing slowly).
- Press a third time for Strobe mode (flashing rapidly).
- Premere una quarta volta per spegnere la torcia.
The flashlight provides up to 36 hours of battery life.

7. Manutenzione
7.1 Ricarica
To maintain optimal battery health, recharge the jump starter every 3-6 months, even if not in use. This prevents deep discharge and extends battery life.
7.2 Conservazione
- Conservare il dispositivo in un luogo fresco e asciutto, lontano dalla luce solare diretta e da temperature estreme.
- Keep the device and accessories in the provided carrying case to protect them from damage.
7.3 Pulizia
Pulisci il dispositivo con un panno morbido e asciutto. Non utilizzare prodotti chimici aggressivi o detergenti abrasivi.
8. Risoluzione Dei Problemi
8.1 Il veicolo non si avvia
- Controlla il livello della batteria: Assicurarsi che l'avviatore di emergenza abbia una carica sufficiente.
- Controlla i collegamenti: Verificare che la smart clampsiano collegati saldamente ai terminali corretti della batteria (rosso al positivo, nero al negativo).
- cl . intelligenteamp indicatore: If the indicator is red or flashing, refer to the smart clamp's instructions for error codes.
- Vehicle battery condition: If the vehicle battery is severely damaged or completely dead, the jump starter may not be able to start it.
8.2 Air Compressor Not Working (Ep177 Only)
- Controlla il livello della batteria: Assicurarsi che l'avviatore di emergenza abbia una carica sufficiente.
- Giunzione di tubi: Verify the air hose is securely connected to both the device and the tire valve.
- Surriscaldamento: If the compressor has been running for an extended period, it may have overheated. Allow it to cool down for 10-15 minutes before attempting to use it again.
8.3 Dispositivo non in carica
- Cavo: Assicurarsi che il cavo di ricarica USB-C non sia danneggiato e sia collegato correttamente.
- Adattatore di alimentazione: Verify the USB power adapter is functional and provides adequate power output.
9. Garanzia e supporto
Your Andeman jump starter is UL Certified, ensuring it meets stringent safety standards. For warranty information, technical support, or service inquiries, please refer to the contact information provided with your purchase or visit the official Andeman websito.
For further assistance, please contact Andeman customer support.