
1. Prodotto finitoview
The FNIRSI 2C53T is a versatile 3-in-1 handheld device combining the functionalities of a dual-channel digital oscilloscope, a 4.5-digit 19999-count multimeter, and a DDS signal generator. This compact instrument is designed for professionals, students, and hobbyists requiring a portable solution for electronic testing and waveform analysis.
Caratteristiche principali:
- Oscilloscopio a doppio canale: 50 MHz analog bandwidth, 250 MSa/s real-time sampling rate, 1 Kpts record depth, automatic measurement functions, maximum input voltage of 400V, vertical sensitivity from 10 mV/div to 10 V/div. Supports waveform image storage and export.
- 4.5-Digit, 19999-Count Multimeter: Measures AC Voltage (0-750 V), DC Voltage (0-999.9 V), DC/AC Current (0-9.999 A), Resistance (0-19.99 MΩ), and Capacitance (0-99.99 mF). Includes continuity measurement.
- Generatore di segnale DDS: Generates 13 types of waveforms with a maximum output frequency of 50 kHz and a 1 Hz interval.
- Data Saving Function: One-click saving and screening of data. Connects to PC via Type-C for saved image upload. Allows comparison of reference and measured waveforms on the same screen.
- Design robusto: Features an FPGA+MCU+ADC hardware architecture, integrated high-voltage protection module, 2.8-inch LCD display, and a built-in 3000 mAh lithium-ion battery providing up to 6 hours of standby time. Type-C interface supports 5V/1A charging.

Image 1.1: The FNIRSI 2C53T device showcasing its 3-in-1 capabilities as an oscilloscope, multimeter, and signal generator.
2. Informazioni sulla sicurezza
Please read all safety information carefully before using the device to prevent electric shock, injury, or damage to the instrument. Keep this manual for future reference.
- Utilizzare sempre i terminali di ingresso, la funzione e l'intervallo corretti per le misurazioni.
- Non applicare voltage or current that exceeds the maximum rated values specified for the device.
- Controllare i puntali per verificare la presenza di eventuali danni prima di ogni utilizzo. Non utilizzare se l'isolamento è danneggiato o se il metallo nudo è esposto.
- Non utilizzare il dispositivo in ambienti umidi o con le mani bagnate.
- Ensure the device is turned off and disconnected from any circuits before changing functions or connecting/disconnecting test leads.
- Refer to the specifications section for maximum input ratings for each function.
- Non tentare di riparare o modificare il dispositivo. Per l'assistenza, rivolgersi a personale qualificato.
3. Componenti del prodotto
The FNIRSI 2C53T package typically includes the following items:
- FNIRSI 2C53T 3-in-1 Device
- Sonde per oscilloscopio (x2)
- Cavi di prova per multimetro (rosso e nero)
- Cavo USB Type-C
- Manuale dell'utente (questo documento)
- Custodia per il trasporto (può variare in base alla confezione)
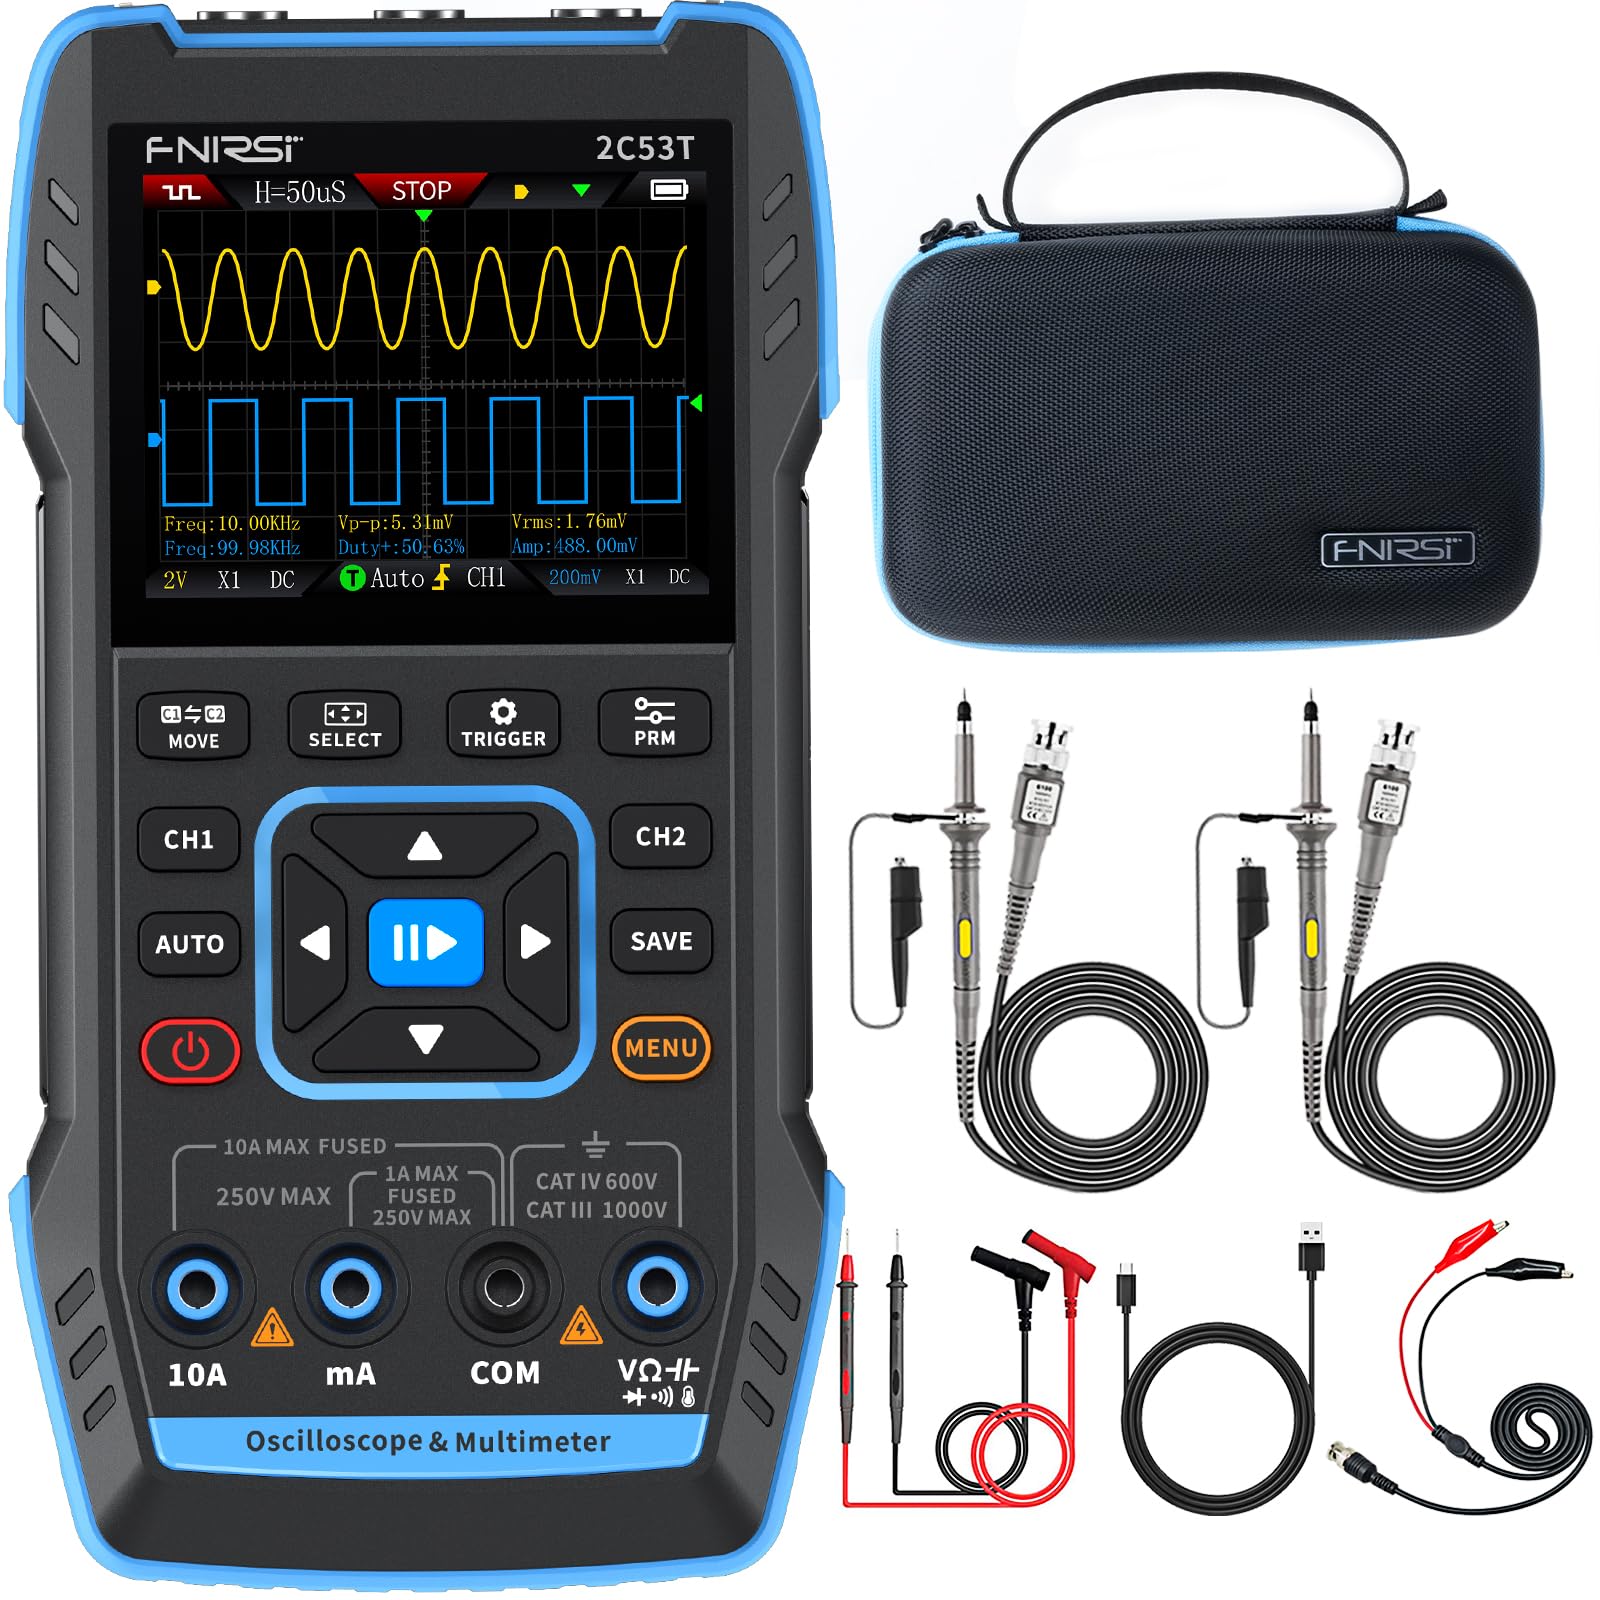
Image 3.1: The FNIRSI 2C53T device along with its standard accessories, including oscilloscope probes and multimeter test leads.
4. Configurazione e utilizzo iniziale
4.1 Ricarica del dispositivo
Before first use, fully charge the internal lithium-ion battery. Connect the supplied Type-C USB cable to the device's Type-C port and to a 5V/1A USB power adapter (not included). The charging indicator on the screen will show the charging status.
4.2 Accensione/spegnimento
Press and hold the power button (usually marked with a power symbol) for a few seconds to turn the device ON or OFF.
4.3 Collegamento di sonde e cavi di prova
The device features dedicated input ports for oscilloscope channels (CH1, CH2) and the signal generator (DDS), as well as multimeter input jacks (10A, mA, COM, VΩ+). Ensure correct connections for the desired function.

Immagine 4.1: Primo piano view of the FNIRSI 2C53T's input ports, including CH1, CH2 for oscilloscope, and DDS for signal generator output.
5. Istruzioni per l'uso
The FNIRSI 2C53T features a user-friendly interface with a central navigation pad and dedicated function buttons (MOVE, SELECT, TRIGGER, PRM, AUTO, SAVE, MENU, CH1, CH2).
5.1 Modalità oscilloscopio
To enter Oscilloscope mode, ensure the device is powered on. The default screen often displays the oscilloscope interface. Use the CH1 and CH2 buttons to enable or disable channels.
- Regolazione dei parametri: Use the navigation pad (up/down/left/right) to select and adjust parameters like vertical sensitivity (V/div), horizontal time base (s/div), and trigger level. The 'SELECT' button confirms selections.
- Impostazioni di attivazione: Press the 'TRIGGER' button to access trigger settings, including trigger mode (Auto, Normal, Single), trigger type (Edge, Pulse, Video), and source.
- Misurazione automatica: Press 'AUTO' for automatic waveform scaling and measurement display.
- Analisi della forma d'onda: The device supports various analysis functions. Access these through the 'MENU' button or dedicated options. These include Math Operations, Cursor Functions for precise measurements, Infinite Afterglow for observing signal changes over time, X-Y Mode for phase relationship analysis, and FFT Spectrum for frequency domain analysis.
- Salvataggio delle forme d'onda: Press the 'SAVE' button to store the current waveform display. Saved images can be transferred to a PC via the Type-C connection.

Image 5.1: The FNIRSI 2C53T displaying various waveform analysis features, including Math Operations, Cursor Functions, Infinite Afterglow, and X-Y Mode.
5.2 Modalità multimetro
To switch to Multimeter mode, press the 'MENU' button and navigate to the Multimeter option, or use a dedicated button if available. Connect the test leads to the appropriate input jacks (COM and VΩ+ for voltage/resistance/capacitance, 10A or mA for current).
- Voltage Misurazione (AC/DC): Select ACV or DCV. Connect test leads in parallel with the circuit or component.
- Misurazione della corrente (CA/CC): Select ACA or DCA. Connect test leads in series with the circuit. Ensure the correct current input jack (10A or mA) is used.
- Misura della resistenza: Select Ω. Connect test leads across the component when the circuit is de-energized.
- Misurazione della capacità: Select F. Connect test leads across the capacitor when the circuit is de-energized.
- Test di continuità: Select the continuity symbol. The device will emit an audible beep if continuity is detected.

Image 5.2: The FNIRSI 2C53T displaying its multimeter interface, showing voltage measurement and input jack labels.
5.3 Modalità generatore di segnale
To access the Signal Generator, press the 'MENU' button and select the Signal Generator option. Connect the DDS output to the circuit where the signal is needed.
- Selezione della forma d'onda: Use the navigation pad to choose from 13 available waveforms (e.g., Sine Wave, Square Wave, Sawtooth Wave).
- Regolazione dei parametri: Regola la frequenza, amplitude, and duty cycle (for certain waveforms) using the navigation pad and 'SELECT' button.

Image 5.3: The FNIRSI 2C53T displaying the various waveforms available from its DDS signal generator function.
6. Manutenzione
6.1 Pulizia
Pulire il dispositivo con un panno morbido, damp panno. Non utilizzare detergenti abrasivi o solventi. Assicurarsi che il dispositivo sia spento e scollegato da tutti i circuiti prima di pulirlo.
6.2 Cura della batteria
Per prolungare la durata della batteria, evitare di scaricarla completamente frequentemente. Se si conserva il dispositivo per un periodo prolungato, caricarlo fino a circa il 50% e ricaricarlo ogni pochi mesi.
6.3 Conservazione
Conservare il dispositivo in un luogo fresco e asciutto, lontano dalla luce solare diretta e da temperature estreme. Utilizzare la custodia in dotazione per proteggerlo durante il trasporto e lo stoccaggio.
7. Risoluzione Dei Problemi
- Il dispositivo non si accende: Ensure the battery is charged. Connect the Type-C cable to a power source and try again.
- Nessuna forma d'onda visualizzata in modalità Oscilloscopio: Check probe connections. Ensure the trigger settings are appropriate for the signal being measured. Adjust vertical and horizontal scales.
- Letture errate del multimetro: Verify test lead connections to the correct input jacks and ensure the correct measurement function is selected. Check if the circuit is de-energized for resistance and capacitance measurements.
- Il generatore di segnale non emette: Confirm the DDS output is connected correctly and the signal generator function is active with appropriate parameters set.
- Schermo bloccato o non risponde: Prova a riavviare il dispositivo tenendo premuto il pulsante di accensione. Se il problema persiste, contatta l'assistenza clienti.
8. Specifiche
| Caratteristica | Specificazione |
|---|---|
| Modello | FNIRSI 2C53T |
| Canali dell'oscilloscopio | 2 |
| Larghezza di banda analogica | 50 MHz |
| Samptasso di ling | 250 Msa/s |
| Record Depth | 1 nodi |
| Volume massimo in ingressotage | 400 Volt |
| Sensibilità verticale | 10 mV/div - 10 V/div |
| Cifre del multimetro | 4.5 |
| Conteggi del multimetro | 19999 |
| Volume ACtage Gamma | 0-750 V |
| Volume DCtage Gamma | 0-999.9 V |
| Gamma di corrente CC/CA | 0-9.999 A |
| Intervallo di resistenza | 0-19.99 MΩ |
| Intervallo di capacità | 0-99.99 mF |
| Signal Generator Max Freq. | 50 kHz |
| Forme d'onda del generatore di segnale | 13 tipi |
| Display | LCD da 2.8 pollici |
| Batteria | 3000 mAh agli ioni di litio |
| Tempo di standby | Fino a 6 ore |
| Interfaccia di ricarica | Tipo-C (5V/1A) |
| Dimensioni | Dimensioni: 21.3 x 14.1 x 9.9 cm |
| Peso | 890 grammi |
9. Garanzia e supporto
The FNIRSI 2C53T comes with a standard manufacturer's warranty. For warranty claims, technical support, or service inquiries, please contact your point of purchase or the official FNIRSI customer support channels. Keep your purchase receipt as proof of purchase.


