
1. Introduzione
This manual provides detailed instructions for the safe installation, operation, and maintenance of your PUTORSEN Motorized Flip-Down Ceiling TV Mount. Please read this manual thoroughly before installation and retain it for future reference.
The PUTORSEN Motorized Flip-Down Ceiling TV Mount is designed for flat and curved TVs ranging from 37 to 75 inches, supporting a maximum load of 99 lbs (45 kg). It features a smooth motorized drop with an adjustable tilt up to 80 degrees and horizontal leveling of ±2 degrees. The mount is compatible with various VESA patterns and can be installed on flat or pitched ceilings made of brick, concrete, or wood studs.
2. Informazioni sulla sicurezza
AVVERTIMENTO: Improper installation or use of this product can result in serious injury or damage. Always follow these safety guidelines:
- Do not install on drywall alone. The mounting surface must be capable of supporting the combined weight of the mount and the television.
- Installers are responsible for providing appropriate hardware for mounting situations not explicitly covered in this manual. Verify that the supporting surface will safely support the combined weight of the equipment and all attached hardware and components.
- Ensure all screws are securely tightened before use. Do not overtighten screws.
- Tenere bambini e animali domestici lontani dal supporto durante il funzionamento.
- Non superare la capacità di carico massima di 99 libbre (45 kg).
- Ensure the TV size is within the recommended range of 37-75 inches. Note: TVs with bottom-positioned VESA holes may be limited to 60 inches.
- Scollegare l'alimentazione prima di effettuare qualsiasi intervento di manutenzione o regolazione.
3. Contenuto della confezione
Verificare che tutti i componenti siano presenti e integri. Se qualche componente risulta mancante o danneggiato, contattare l'assistenza clienti.

Immagine: Oltreview di tutti i componenti inclusi nella confezione.
- Main Motorized Mount Assembly (A x1)
- Ceiling Mounting Plates (B x2)
- TV Bracket Arms (C x2)
- Installation Template (D x1)
- Extension Arms (E x2)
- Side Covers (F x1, G x1)
- Cable Management Clips (H x2)
- VESA Adapter Plate (I x2)
- Remote Control (J x1)
- Power Adapter (L x1)
- Various Screws, Washers, Spacers, and Anchors (M, N, O, P, Q, R, S, T, W-A, W-B, M-A, M-B, M-C, M-D, M-E, M-F, M-G)
4. Strumenti richiesti
Per l'installazione si consigliano i seguenti strumenti:

Image: Essential tools for mount installation.
- Cacciavite a stella
- Trapano elettrico
- Matita
- Stud Finder (for wood stud ceilings)
- Chiave a tubo
- Chiave
5. Istruzioni per l'installazione
It is highly recommended to have at least two people for the installation process due to the weight and size of the TV and mount.
Video: Step-by-step guide for installing the PUTORSEN Electric Ceiling TV Mount.
5.1 Prepare the Mount
- Unfold the Mount: Plug the mount into a power source using the provided power plug. Use the remote control to unfold the mount to its extended position. Once unfolded, unplug the mount.
- Fissare le staffe TV: Attach the TV bracket arms (C) to the main mount assembly. Secure them with the appropriate screws.
- Secure Side Covers: Attach the side covers (F, G) to the mount using the provided screws.
- Attach VESA Adapter Plate (if needed): If your TV's VESA holes are positioned lower, you may need to attach the VESA adapter plate (I) to the TV bracket arms to ensure the TV clears the ceiling when retracted.

Image: Powering on and unfolding the mount.

Image: Attaching the TV bracket arms.

Image: Securing the side covers.

Image: VESA adapter plate for lower VESA holes.
5.2 Mount to Ceiling
- Segnare i punti di foratura: Use the installation template (D) to mark the drilling points on your ceiling. Ensure the template is centered and aligned correctly.
- Forare i fori e inserire gli ancoraggi: Drill pilot holes at the marked points. For concrete ceilings, insert the appropriate anchors (W-B). For wood stud ceilings, ensure you drill into the center of the studs.
- Mount Ceiling Plates: Secure the ceiling mounting plates (B) to the ceiling using the appropriate screws (W-A or M-D) and washers (O).
- Attach Main Mount to Ceiling Plates: Carefully lift the main mount assembly and attach it to the installed ceiling plates. Slide it into position and secure it with the provided screws.

Image: Marking ceiling drill points.

Image: Drilling and anchor insertion.

Image: Securing ceiling plates.

Image: Attaching main mount to ceiling plates.
5.3 Attach TV to Mount
- Attach TV to Brackets: With assistance, carefully lift your TV and align its VESA holes with the mounting holes on the TV bracket arms. Secure the TV to the brackets using the appropriate screws (M-A, M-B, M-C, M-D) and spacers (M-E, M-F, M-G) if necessary. Ensure the mounting frame is centered on the back of the TV screen.
- Adjust Leveling: Use a Phillips screwdriver to adjust the leveling screws on the TV brackets to ensure the display is perfectly horizontal.
- Gestione dei cavi: Route your TV cables through the integrated cable management system and secure them with the provided clips (H) for a clean setup.

Image: Securing the TV to the mount.

Image: Adjusting TV leveling.
6. Istruzioni per l'uso
The mount is operated using the included wireless remote control.
Video: Detailed instructions on how to use the remote control for the PUTORSEN Motorized Ceiling TV Mount.
6.1 Accoppiamento telecomando
- Accensione: Ensure the mount is powered on.
- Abbinamento: Press and hold the "SET" button on the remote for 5 seconds. The remote will emit a signal, and the mount will pair. A successful pairing is indicated by a long beep from the mount.

Image: Remote control pairing process.
6.2 Movimento di base
- Movimento verso l'alto: Press the "▲" (Up) button to raise the TV towards the ceiling.
- Movimento verso il basso: Press the "▼" (Down) button to lower the TV from the ceiling.
- Stop Movement: Press the "HOME" button to stop the movement at any desired position.

Image: Remote control for upward movement.

Image: Remote control for downward movement.
6.3 Saving and Recalling Positions
- Save Position: Adjust the TV to your desired viewing angle. Press and hold either the "M1" or "M2" button on the remote for 3 seconds until you hear a long beep. This indicates the current position has been saved to that memory slot.
- Recall Position: To move the TV to a saved position, simply press the "M1" or "M2" button. The mount will automatically adjust to the stored position.

Image: Saving a custom TV position.
6.4 Modalità di ripristino
- Entra in modalità di ripristino: If the mount cannot reach its highest or lowest position, press and hold the "RST" button for 3 seconds. The mount will emit a long beep, indicating the reset process has started.
- Reset Confirmation: The mount will automatically move to its highest position, signaling that the reset is successful.

Image: Initiating reset mode.
7. Manutenzione
- Controllare regolarmente tutte le viti e i collegamenti per assicurarsi che siano sempre ben serrati.
- Pulire il supporto e la TV con un panno morbido e asciutto. Evitare detergenti abrasivi o solventi.
- Assicurarsi che il cavo di alimentazione non sia schiacciato o danneggiato.
8. Risoluzione Dei Problemi
- Mount not moving: Check if the power adapter is securely connected and the remote control is paired. Try resetting the mount (refer to Section 6.4).
- Il telecomando non risponde: Replace the batteries in the remote control. Ensure there are no obstructions between the remote and the mount. Re-pair the remote if necessary (refer to Section 6.1).
- TV non in piano: Adjust the leveling screws on the TV brackets (refer to Section 5.3, Step 10).
- TV not clearing ceiling: Ensure the VESA adapter plate (I) is installed if your TV has lower VESA holes (refer to Section 5.1, Step 4).
9. Specifiche
| Caratteristica | Specificazione |
|---|---|
| Marca | PUTORI |
| Modello | B0FNQD7J1Z |
| Tipo di montaggio | Montaggio a soffitto |
| Tipo di movimento | Inclinazione motorizzata |
| Materiale | Acrilonitrile-butadiene-stirene (ABS), acciaio legato |
| Colore | Nero |
| Dispositivi compatibili | Televisione |
| Compatibilità delle dimensioni dello schermo | 37 - 75 pollici |
| Capacità di carico massima | 99 libbre (45 kg) |
| Compatibilità VESA | 200x100, 200x200, 300x200, 300x300, 400x200, 400x300, 400x400, 600x200, 600x300, 600x400 mm |
| Angolo di inclinazione massimo | 80 gradi |
| Horizontal Leveling Adjustment | ±2 gradi |
| Full Extension Time | Fino a 25 secondi |
| Gamma di controllo remoto | Fino a 65 piedi |
| Compatibilità controsoffitto | Flat or Pitched (Brick, Concrete, Wood Stud) |
| Peso dell'articolo | 22.5 libbre |

Image: TV size, load capacity, and VESA compatibility.
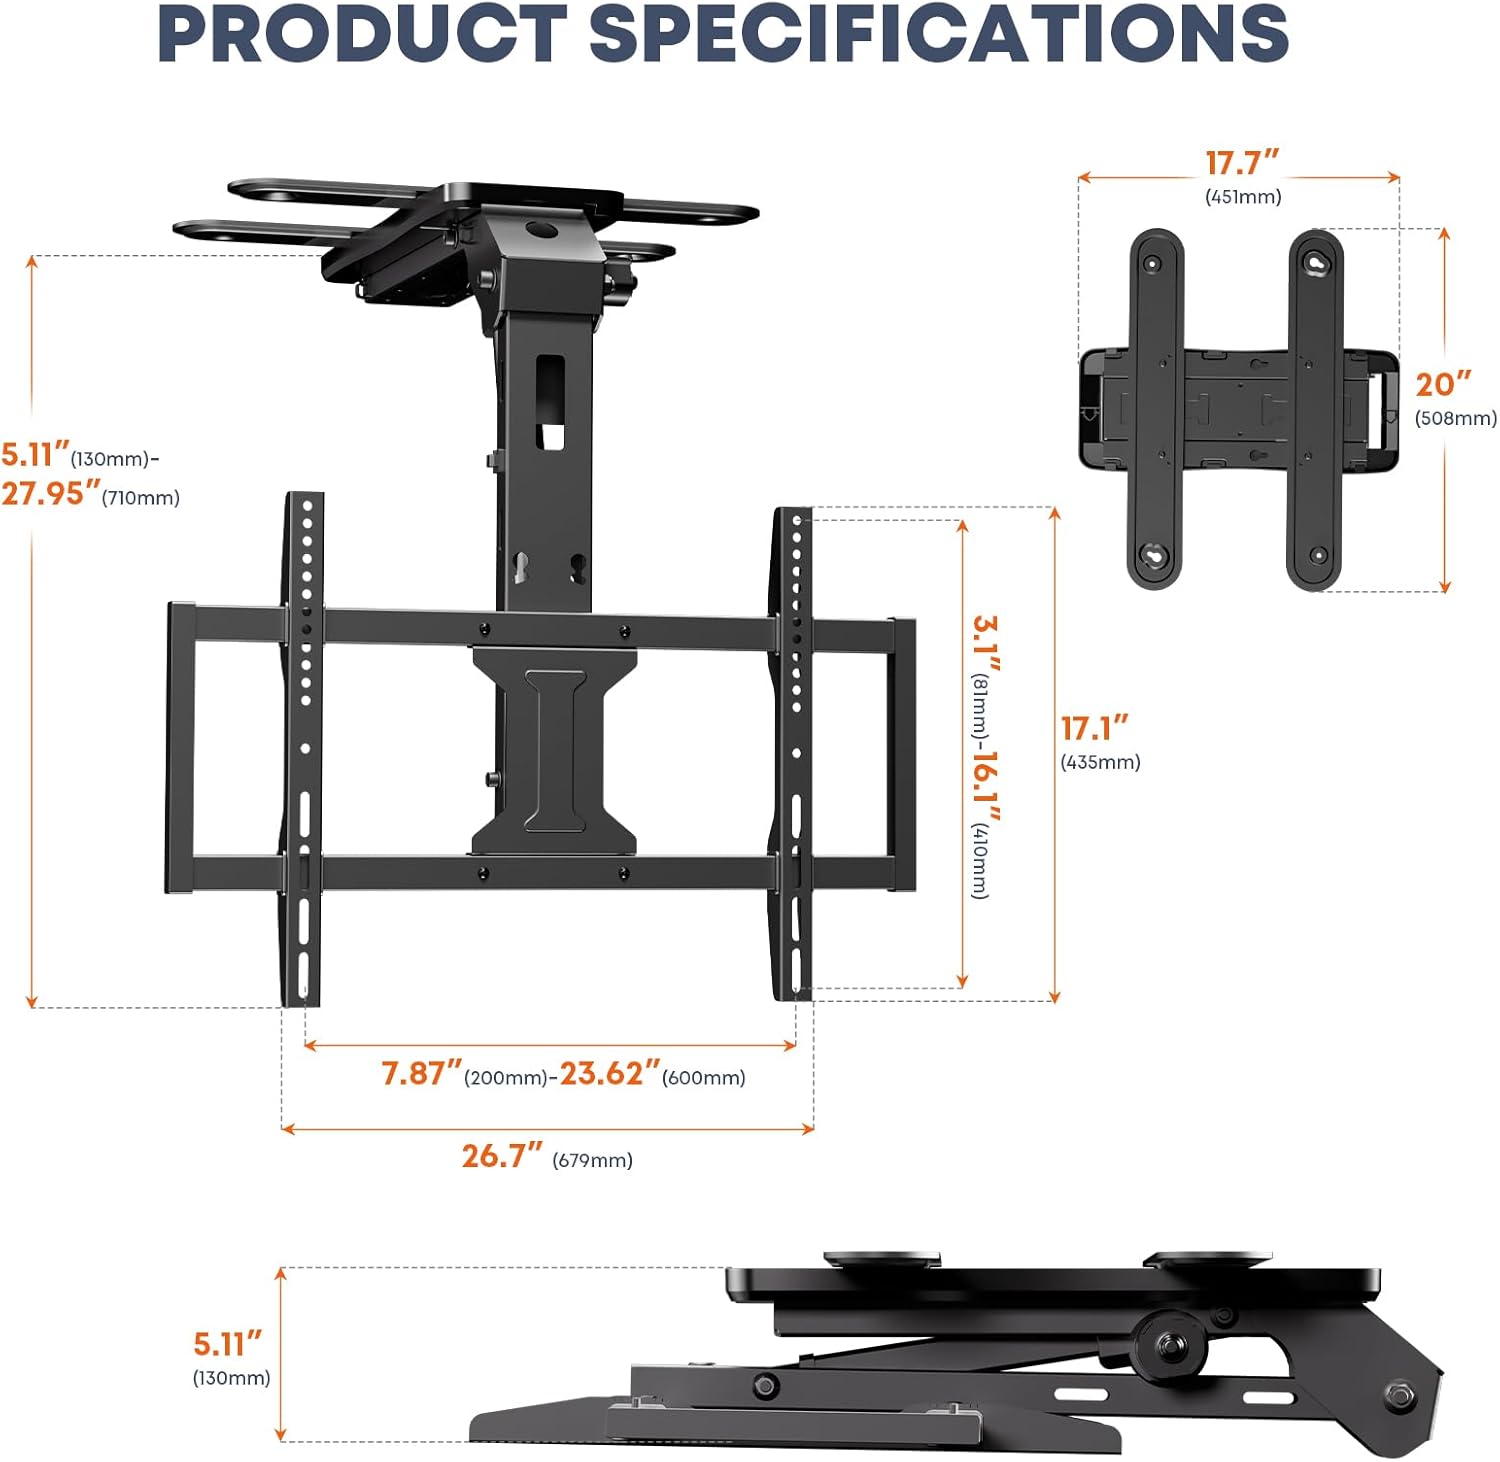
Immagine: Dimensioni del prodotto.
10. Garanzia e supporto
This PUTORSEN product comes with a Garanzia di 5 anno dalla data di acquisto. La presente garanzia copre i difetti di fabbricazione e i difetti dei materiali in condizioni di normale utilizzo.
For technical support, warranty claims, or missing parts, please contact PUTORSEN customer service through the retailer where the product was purchased or visit the official PUTORSEN websito per le informazioni di contatto.