1. Introduzione
This manual provides detailed instructions for the safe and effective use of your VILTROX Spark Z3-N TTL Flash for Nikon cameras. Please read this manual thoroughly before operating the device and retain it for future reference.
The VILTROX Spark Z3-N is a compact and powerful on-camera flash designed for Nikon systems, featuring TTL auto mode, manual control, and a high-capacity rechargeable battery.
2. Informazioni sulla sicurezza
- Non smontare o modificare l'unità flash. Riparazioni non autorizzate possono causare scosse elettriche o malfunzionamenti.
- Keep the device away from water and moisture to prevent electric shock or fire.
- Evitare l'esposizione diretta degli occhi alla luce del flash, soprattutto a distanza ravvicinata, poiché può causare danni temporanei alla vista.
- Per caricare la batteria, utilizzare esclusivamente il cavo di ricarica e l'adattatore di alimentazione specificati.
- Do not operate the flash in environments with flammable gases or liquids.
- Quando non lo si utilizza, conservare il flash in un luogo fresco e asciutto.
3. Contenuto della confezione
Verifica che tutti gli articoli siano presenti nel tuo pacco:
- VILTROX Spark Z3-N Flash Unit
- Soft Cover (Diffuser)
- Cavo di ricarica USB Type-C (non elencato esplicitamente ma implicito nella porta Type-C)
- Manuale di istruzioni (questo documento)

Image: Contents of the VILTROX Spark Z3-N package, including the flash unit, soft cover, and documentation.
4. Prodotto finitoview
Familiarize yourself with the components and controls of your VILTROX Spark Z3-N flash unit.

Immagine: in alto view of the VILTROX Spark Z3-N flash, highlighting its compact design and visible internal components.

Immagine: Lato view of the VILTROX Spark Z3-N flash, detailing the charging port, trigger mode switch, and battery indicator.
- Testa del flash: Emette luce.
- Attacco slitta: Si collega alla slitta a contatto caldo della fotocamera.
- Mode Dial (A/M): Selects between TTL Auto and Manual flash modes.
- Power Adjustment Dial (Full 1/2...): Adjusts flash output in Manual mode.
- S1/OFF/S2 Switch: Controls optical slave modes and power.
- Porta di ricarica di tipo C: Per ricaricare la batteria interna.
- Power Indicator/Ready Light: Shows power status and flash readiness.
5. Impostazione
5.1 Ricarica della batteria
The VILTROX Spark Z3-N features a built-in 3.7V/1800mAh rechargeable lithium battery. Before first use, fully charge the battery.
- Connect the provided USB Type-C cable to the flash unit's Type-C charging port.
- Collegare l'altra estremità del cavo a un adattatore di alimentazione USB da 5 V/2 A (non incluso).
- L'indicatore di carica mostrerà lo stato di carica. Una carica completa richiede circa 70 minuti.
- Una volta caricata completamente, scollegare il cavo.
The flash automatically enters sleep mode after 15 minutes of inactivity to conserve battery life.
5.2 Montaggio sulla telecamera
The flash unit is designed to mount onto a camera's hot shoe.
- Assicurarsi che sia la fotocamera che il flash siano spenti.
- Slide the flash's hot shoe mount into the camera's hot shoe slot until it clicks into place.
- Tighten the locking ring on the flash unit to secure it firmly to the camera.

Image: The VILTROX Spark Z3-N flash securely attached to a Nikon camera's hot shoe.

Image: Detail of the hot shoe mount, showing the contacts for communication with the camera.
5.3 Fissaggio del Softbox
The included soft cover acts as a diffuser to soften the flash light.
- Gently slide the soft cover over the flash head until it fits snugly.
- Ensure the soft cover is securely attached to prevent it from falling off during use.
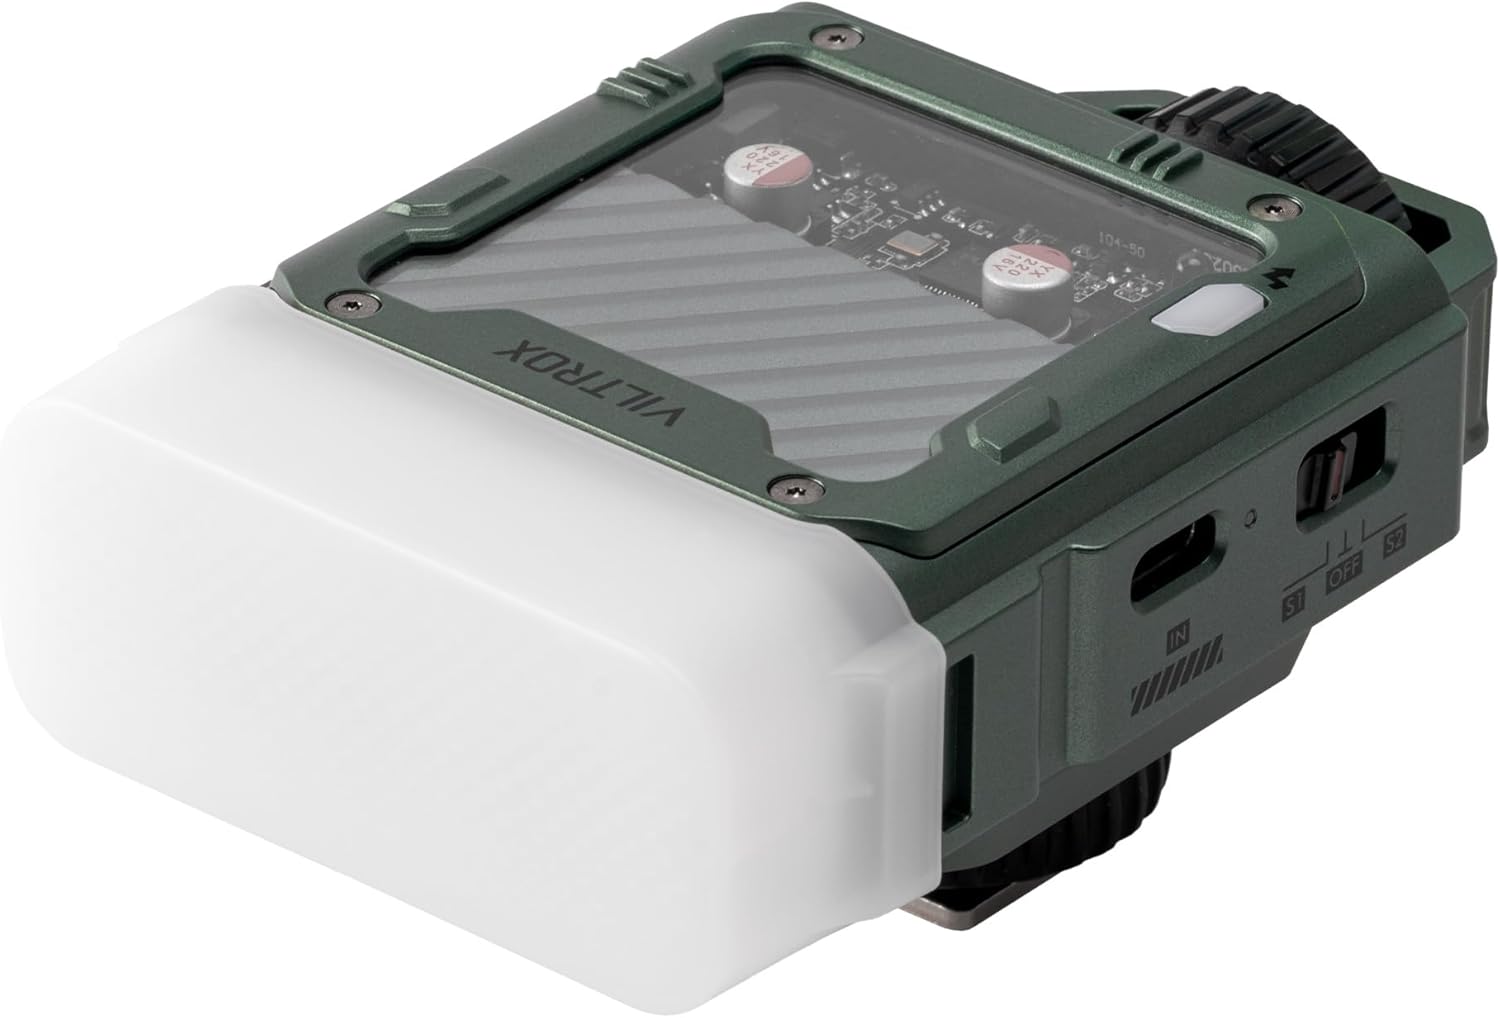
Image: The VILTROX Spark Z3-N flash with its softbox diffuser attached, ready for use.
6. Modalità operative
The VILTROX Spark Z3-N offers various operating modes to suit different photographic needs.
6.1 TTL Auto Mode (A)
In TTL (Through-The-Lens) mode, the flash automatically adjusts its output based on the camera's metering system, providing optimal exposure for your subject.
- Set the mode dial on the flash to 'A' (Auto).
- Ensure your camera's flash settings are configured for TTL operation.
- The flash will fire with appropriate power for balanced exposure.
6.2 Modalità manuale (M)
Manual mode allows precise control over the flash output, ideal for consistent lighting in controlled environments.
- Set the mode dial on the flash to 'M' (Manual).
- Use the power adjustment dial to select the desired flash output, ranging from 1/1 (full power) to 1/64.
- Adjust camera settings (aperture, ISO) to achieve the desired exposure in conjunction with the manual flash power.
6.3 S1 Synchronous Trigger Mode
S1 mode is an optical slave mode where the flash fires in response to another flash, without pre-flash suppression.
- Set the S1/OFF/S2 switch to 'S1'.
- The flash will trigger when it detects the main flash from another unit. This is suitable for main flashes that do not emit a pre-flash.
6.4 S2 Pre-flash Suppression Mode
S2 mode is an optical slave mode designed for use with main flashes that emit a pre-flash for TTL metering.
- Set the S1/OFF/S2 switch to 'S2'.
- The flash will ignore the pre-flash from the main unit and fire on the second, actual flash.
7. Manutenzione
- Clean the flash unit with a soft, dry cloth. Do not use solvents or abrasive cleaners.
- Keep the hot shoe contacts clean and free from dust or debris.
- When not in use for extended periods, store the flash in a protective case and charge the battery periodically to maintain its health.
- Evitare temperature estreme e umidità elevata.
8. Risoluzione Dei Problemi
| Problema | Possibile causa | Soluzione |
|---|---|---|
| Il flash non si attiva. | Low battery; Flash not powered on; Incorrect mode; Loose hot shoe connection. | Charge battery; Power on flash; Select correct mode (A or M); Re-seat and tighten flash on hot shoe. |
| La potenza del flash è troppo debole/forte. | Incorrect manual power setting; TTL metering issue. | Adjust manual power dial; Check camera's exposure compensation or flash exposure compensation. |
| Optical slave (S1/S2) not triggering. | Incorrect S1/S2 setting; Main flash too far or obstructed; Main flash type incompatible. | Ensure correct S1/S2 mode; Reduce distance or clear obstructions; Verify main flash compatibility (e.g., pre-flash for S2). |
| Flash not charging. | Cavo/adattatore difettoso; problema con la porta di ricarica. | Try a different USB Type-C cable and 5V/2A adapter; Contact customer support if issue persists. |
9. Specifiche
| Caratteristica | Dettaglio |
|---|---|
| Modello | Spark Z3-N |
| Numero guida (GN) | GN16 (ISO 100) |
| Uscita flash | 26 W/s |
| Temperatura del colore | 5600K |
| Regolazione della potenza | 7 livelli (da 1/1 a 1/64) |
| Riciclare il tempo | 1 secondo |
| Batteria | 3.7V/1800mAh rechargeable lithium battery (included) |
| Lampeggi per carica | Fino a 650 (piena potenza) |
| Porta di ricarica | Tipo-C (5V/2A) |
| Tempo di ricarica | Circa 70 minuti |
| Modalità trigger | TTL (A), Manual (M), S1, S2 |
| Dimensioni del prodotto | 3 x 2.6 x 2.2 pollici (7.6 x 6.6 x 5.6 cm) |
| Peso dell'articolo | 9.2 once (260 grammi) |
10. Garanzia e supporto
VILTROX products are covered by a limited warranty. For specific warranty terms and conditions, please refer to the warranty card included in your product packaging or visit the official VILTROX website. For technical support, troubleshooting assistance, or service inquiries, please contact VILTROX customer service through their official channels.
Conservare la prova d'acquisto per eventuali richieste di garanzia.


