
1. Introduzione
Thank you for choosing the CROSSIO Mid Century Modern Chandelier. This manual provides essential information for the safe installation, operation, and maintenance of your new lighting fixture. Please read these instructions thoroughly before beginning installation and retain them for future reference.

Image 1.1: The CROSSIO Mid Century Modern Chandelier with green glass shades.
2. Informazioni sulla sicurezza
AVVERTIMENTO: Per ridurre il rischio di incendi, scosse elettriche o lesioni personali, seguire sempre queste precauzioni di sicurezza:
- Scollegare l'alimentazione: Always turn off the electrical supply at the main fuse box or circuit breaker before beginning installation or performing any maintenance.
- Elettricista qualificato: Installation should be performed by a qualified electrician or a person with adequate electrical knowledge.
- Messa a terra: Ensure the fixture is properly grounded to avoid potential electrical shocks.
- Maneggiare con cura: Glass components are fragile. Handle them carefully to prevent breakage.
- Requisiti della lampadina: Use only G9 bulbs as specified. Do not exceed the maximum wattage indicato sull'apparecchio.
- Evitare l'acqua: Do not install this fixture in damp or wet locations. It is designed for indoor use only.
- Montaggio sicuro: Assicurarsi che la superficie di montaggio possa sostenere il peso dell'apparecchio.
3. Contenuto della confezione
Verify that all components are present before discarding packaging materials. If any parts are missing or damaged, contact customer support.
- Chandelier Frame Assembly
- Green Glass Shades (16 pieces + 1 replacement)
- Hardware di montaggio (tettuccio, piastra di montaggio, viti, dadi per cavi)
- Adjustable Downrods (2 x 11.8 inches, 2 x 23.62 inches)
- Manuale di istruzioni

Image 3.1: The package includes one replacement lampombra.
4. Specifiche
| Caratteristica | Dettaglio |
|---|---|
| Marca | CROSSIO |
| Nome del modello | GLS-HLP084GR |
| Colore | Gold+Green |
| Materiale | Vetro, Metallo |
| Stile | Mid Century Modern / Art Deco |
| Dimensioni del prodotto | 39"L x 10"W x 70.87"H (Maximum) |
| Fonte di alimentazione | Elettrico con cavo |
| Tipo di installazione | Montaggio semi-a filo |
| Tipo di sorgente luminosa | LED (G9 bulbs recommended, not included) |
| Numero di sorgenti luminose | 16 |
| Base della lampadina | G9 |
| Caratteristiche speciali | Adjustable Height, Dimmable, 180° Rotatable for Sloped Ceilings |
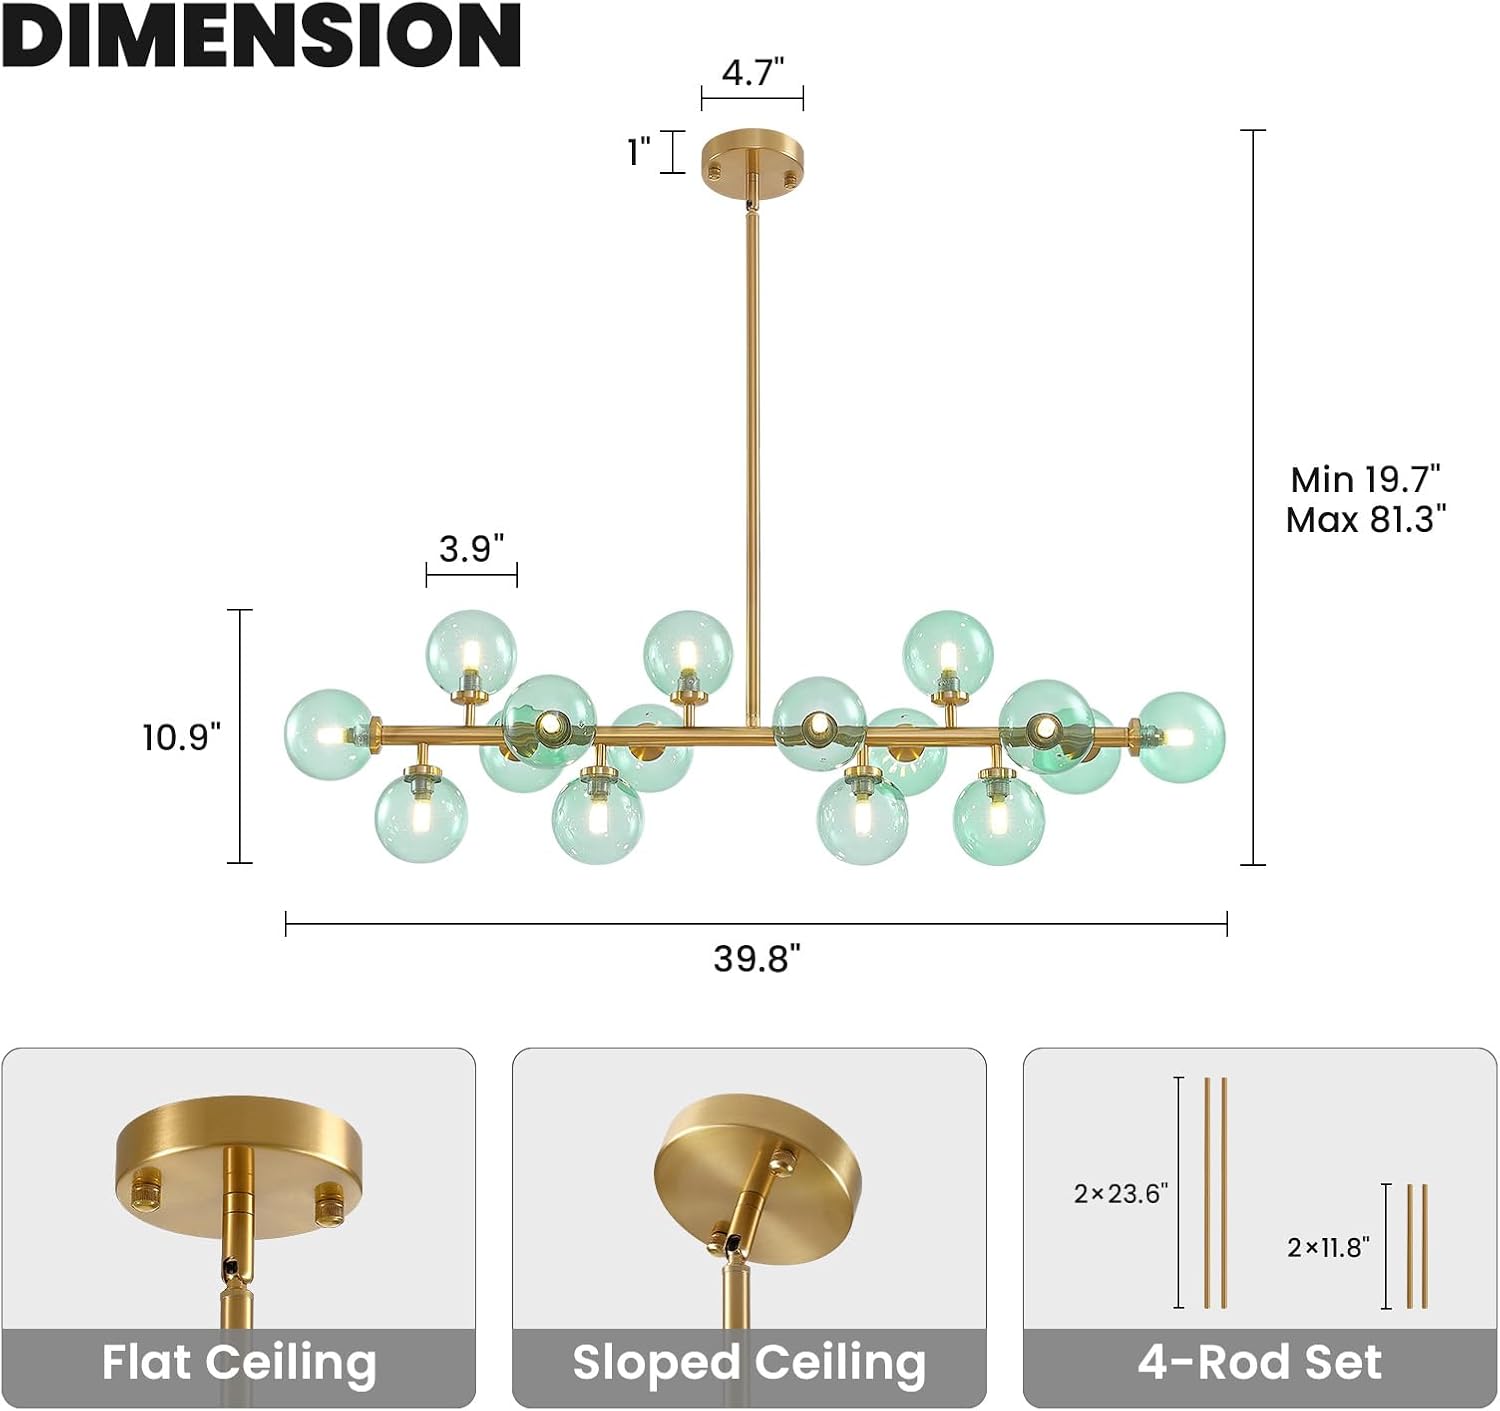
Image 4.1: Chandelier dimensions and adjustable downrod options.
5. Configurazione e installazione
Follow these steps for proper installation. It is recommended to have two people for installation due to the size and weight of the fixture.
- Prepararsi per l'installazione: Spegnere l'interruttore automatico. Sgomberare l'area di lavoro.
- Installazione della piastra di montaggio: Secure the mounting plate to the junction box in the ceiling using the provided screws. Ensure it is firmly attached.
- Regola l'altezza: Select the appropriate combination of downrods (11.8" x 2, 23.62" x 2) to achieve your desired hanging height. The fixture can be adjusted from a minimum of 19.7" to a maximum of 81.3". For sloped ceilings, the canopy is 180° rotatable.
- Connessioni dei cavi: Connect the fixture's wires to the household electrical wires according to local electrical codes. Typically, black to black (live), white to white (neutral), and green/bare copper to green/bare copper (ground). Secure connections with wire nuts.
- Attacco per tettuccio: Carefully push the wires into the junction box and secure the canopy to the mounting plate with the provided screws.
- Installa le lampadine: Insert 16 G9 bulbs (not included) into the lamp holders. Ensure bulbs are securely seated.
- Fissare le tende in vetro: Carefully screw each green glass shade onto its respective lamp holder. Avoid overtightening.
- Ripristina alimentazione: Una volta completata l'installazione, riattivare l'alimentazione tramite l'interruttore automatico.

Image 5.1: Equipped with four downrods for adjustable hanging height.

Image 5.2: The 180° rotatable canopy allows for installation on sloped ceilings.

Image 5.3: G9 LED light socket for easy bulb installation.
6. Funzionamento
The CROSSIO Chandelier is designed for ease of use and offers versatile lighting options.
6.1 Accensione/spegnimento
Operate the chandelier using a standard wall switch. Flip the switch to turn the light fixture on or off.

Image 6.1: Chandelier in a room, demonstrating on and off states.
6.2 Funzionalità dimmerabile
This chandelier is fully dimmable when used with compatible G9 dimmable bulbs and a suitable dimmer switch (both not included). This allows you to adjust the light intensity to create the desired ambiance.

Image 6.2: The chandelier is fully dimmable with compatible bulbs and dimmer switch.
6.3 Light Color Effects
If you use color-changing G9 bulbs (not included), you can achieve different light color effects (Cool White, Neutral White, Warm White) by quickly toggling your standard ON/OFF wall switch. This feature depends entirely on the capabilities of the bulbs you install.

Immagine 6.3: Es.ample of 3 light color effects achievable with compatible bulbs.
7. Manutenzione
Una manutenzione regolare garantisce la longevità e l'aspetto del tuo lampadario.
- Pulizia: Always turn off the power before cleaning. Use a soft, dry cloth to wipe the metal frame and glass shades. Do not use abrasive cleaners, solvents, or polishes as they may damage the finish.
- Sostituzione della lampadina: Ensure the fixture is cool before attempting to replace bulbs. Follow the safety instructions for disconnecting power.
- Ispezione: Controllare periodicamente tutti i collegamenti e l'hardware di montaggio per assicurarsi che siano sempre saldi.

Image 7.1: Product details including durable ceiling plate, sleek iron body, and G9 light socket.
8. Risoluzione Dei Problemi
Se riscontri problemi con il tuo lampadario, fai riferimento ai seguenti problemi comuni e alle relative soluzioni:
| Problema | Possibile causa | Soluzione |
|---|---|---|
| La luce non si accende | Nessuna corrente, cavi allentati, lampadina difettosa, interruttore difettoso. | Check circuit breaker. Ensure all wire connections are secure. Replace bulbs. Test the wall switch. |
| Le luci tremolano | Loose bulb, incompatible dimmer, loose wiring. | Tighten bulbs. Ensure dimmer switch and bulbs are compatible. Check wire connections. |
| Bulbs burn out frequently | Tipo di lampadina/wat erratotage, voltage fluctuations, poor quality bulbs. | Ensure G9 bulbs are used and wattage is not exceeded. Consider higher quality LED G9 bulbs. Consult an electrician for voltage problemi. |
| Glass shades fall off | Shades not tightened properly, damaged threads. | Ensure shades are securely screwed onto the lamp holders. Do not overtighten. If threads are damaged, contact support for replacement parts. |
9. Garanzia e supporto
CROSSIO is committed to providing quality products and customer satisfaction.
- Garanzia di 1 anni: This product is covered by a 1-year warranty. Contact us for free replacement if any quality issues arise within this period.
- Quality Service: If you have any questions or require assistance, our customer service team is available to provide a solution within 24 hours.
- Customization Service: For specific product customization inquiries, please feel free to contact us for consultation.

Image 9.1: CROSSIO Warranty and Service Information.
Per supporto, visita il sito CROSSIO Store on Amazon oppure contattaci direttamente tramite la tua piattaforma di acquisto.