Introduzione
This manual provides essential information for the setup, operation, maintenance, and troubleshooting of your AWOW Mini PC, Model BA7. Please read these instructions carefully before using the device.

Immagine: Oltreview of the AWOW BA7 Mini PC, highlighting its compact design and key features.
Contenuto della confezione
Verificare che tutti gli articoli siano presenti nel pacco:
- AWOW BA7 Mini PC
- Adattatore di alimentazione
- Viti di montaggio
- Staffa di montaggio VESA
- Cavo HDMI
- Manuale dell'utente (questo documento)

Image: Illustration of the AWOW BA7 Mini PC and its included accessories: power adapter, screws, VESA mount, HDMI cable, and user manual.
Istruzioni di installazione
- Connetti le periferiche: Connect your keyboard, mouse, and monitor(s) to the appropriate ports on the Mini PC.
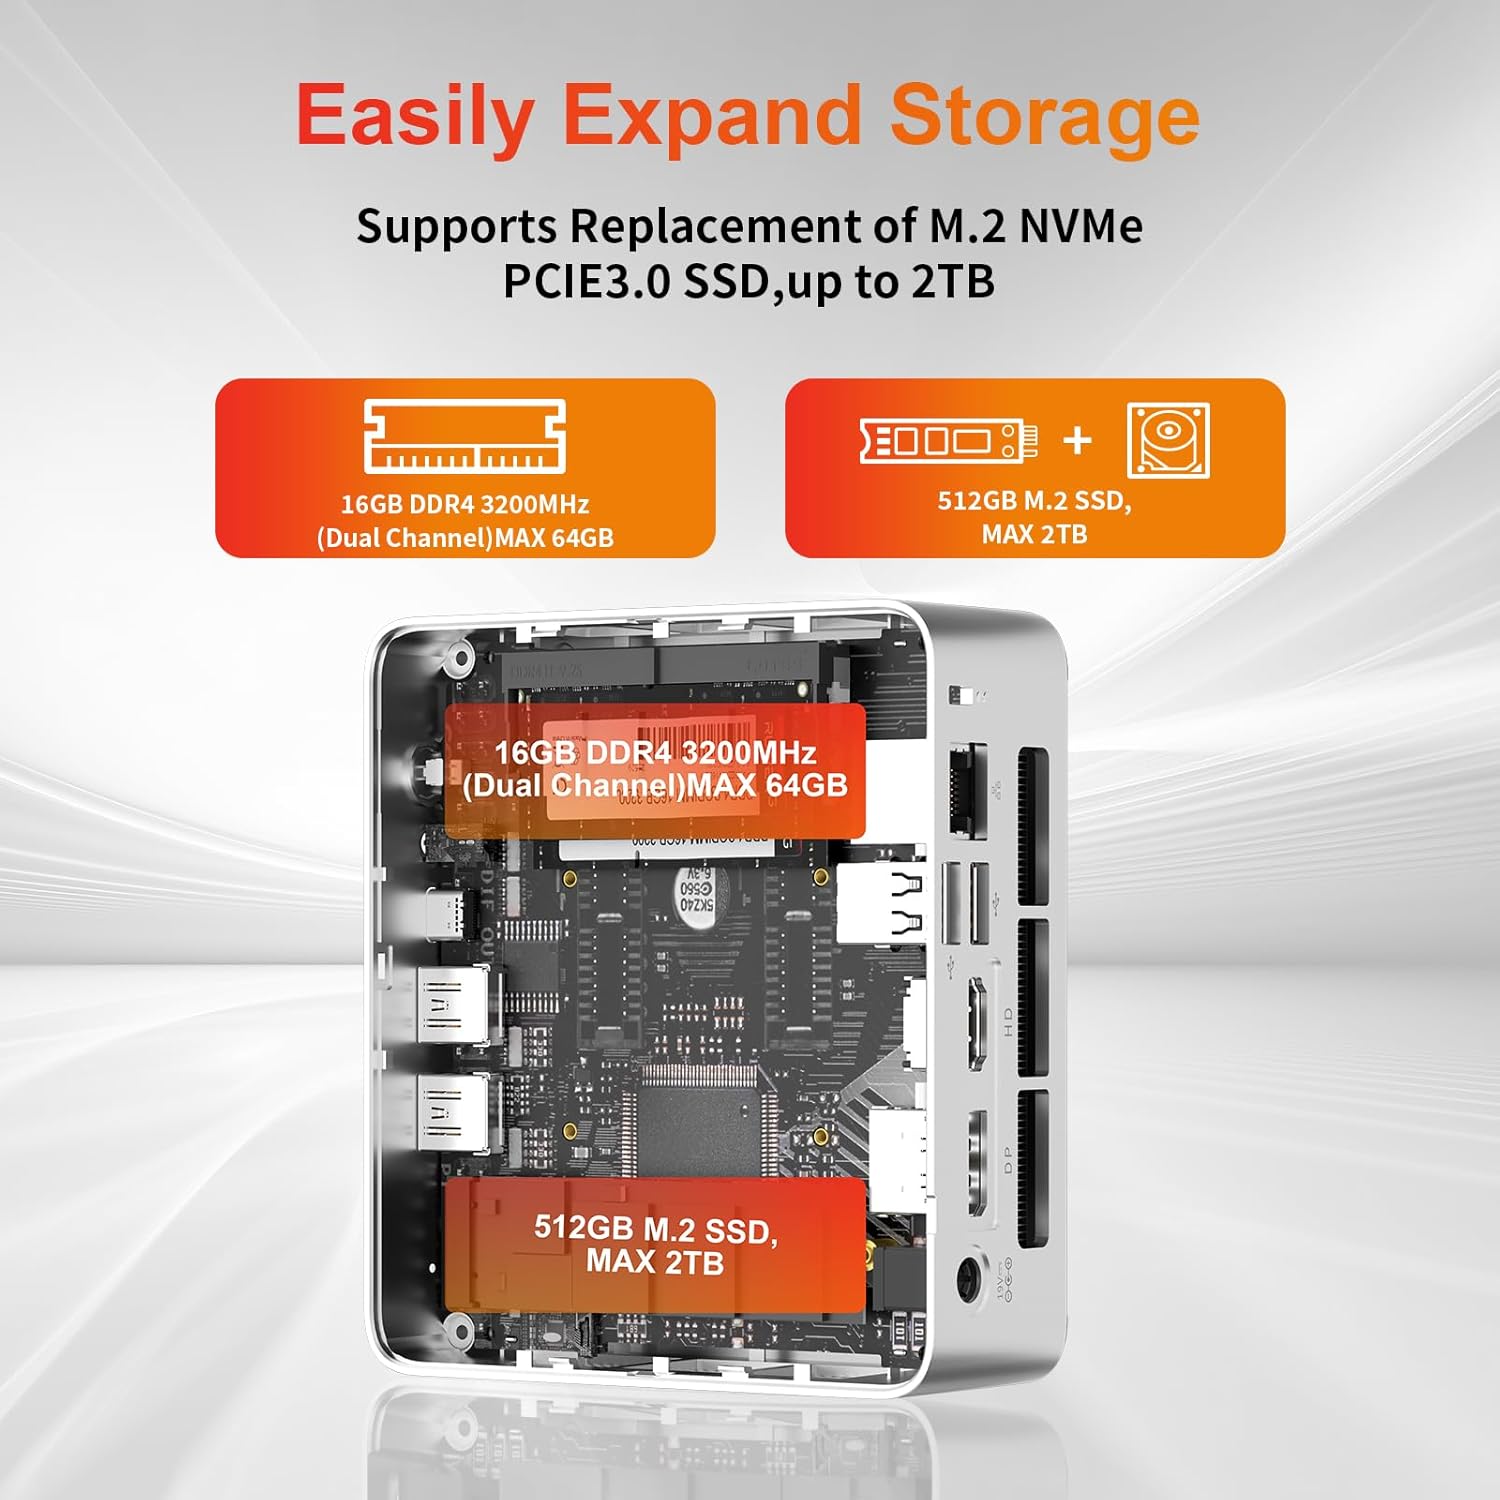
Immagine: Frontale view of the Mini PC showing the Power Button, Type-C port, USB 3.2 ports, and 3.5mm Audio Jack.

Immagine: Posteriore view of the Mini PC showing the DC IN, DP1.2, HDMI2.0, USB 2.0 ports, and RJ45 LAN port.
- Collegamento elettrico: Collegare l'adattatore di alimentazione alla porta DC IN del Mini PC, quindi collegare l'adattatore a una presa di corrente.
- Accensione: Premere il pulsante di accensione situato sulla parte anteriore del Mini PC. Il sistema si avvierà.
- Configurazione iniziale: Seguire le istruzioni visualizzate sullo schermo per completare la configurazione iniziale di Windows 11 Pro, inclusa la lingua, la regione, la connessione di rete e la creazione dell'account utente.
- Connessione di rete:
- Wired: Connect an Ethernet cable to the RJ45 LAN port for a stable wired connection.
- Senza fili: During Windows setup or via Windows settings, connect to your Wi-Fi network using the built-in WiFi 6.
Istruzioni per l'uso
Funzionamento di base
- Accensione/spegnimento: Press the power button to turn on the PC. To shut down, use the Windows Start menu options (Shut down, Restart, Sleep). A short press on the power button can put the PC to sleep. A long press (approx. 5 seconds) will force a shutdown.
- Uscita di visualizzazione: The Mini PC supports up to three 4K displays simultaneously via DP, HDMI, and USB-C. Connect your monitors and configure display settings in Windows.

Image: A user working with a triple monitor setup, demonstrating the Mini PC's multi-display capability.
- Connettività USB: Utilize the USB 2.0 and USB 3.0 ports for connecting external devices such as external hard drives, USB flash drives, printers, and other peripherals. The Type-C port also supports data transfer and display output.
- Audio: Collegare le cuffie o gli altoparlanti al jack audio da 3.5 mm.
Utilizzo avanzato
- Espansione dello spazio di archiviazione: The Mini PC supports replacement of the M.2 NVMe PCIe 3.0 SSD up to 2TB. It also supports memory expansion up to 64GB DDR4.

Image: Diagram illustrating the internal components and options for expanding storage (M.2 SSD up to 2TB) and RAM (DDR4 up to 64GB).
- Montaggio VESA: Use the included VESA mount bracket to attach the Mini PC to the back of a compatible monitor or to a wall mount, saving desk space.
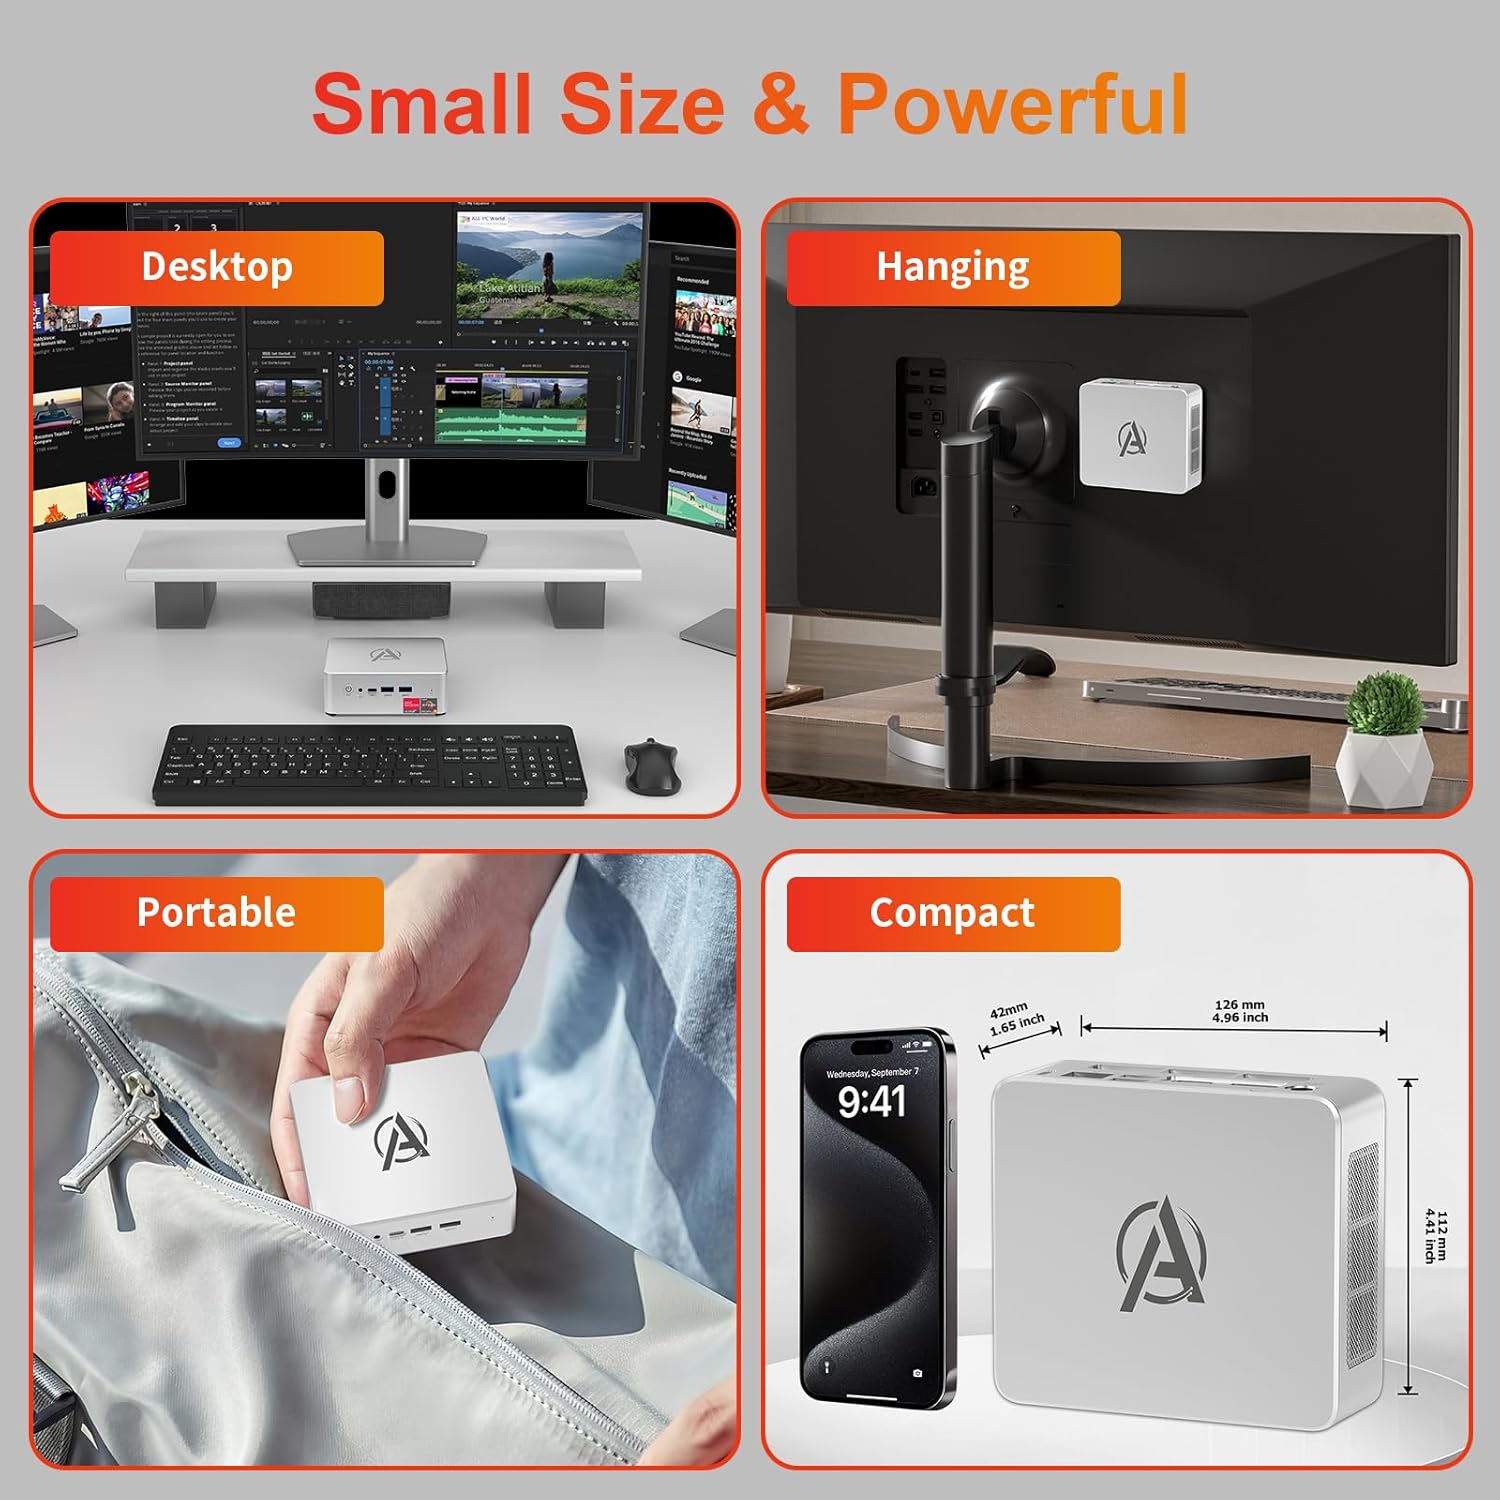
Image: Various usage scenarios for the Mini PC, including desktop, VESA-mounted behind a monitor, portable, and compact size comparison.
Manutenzione
- Pulizia: Use a soft, dry cloth to clean the exterior of the Mini PC. Do not use liquid cleaners or aerosols. Ensure ventilation openings are free from dust.
- Aggiornamenti software: Controlla e installa regolarmente gli aggiornamenti di Windows e dei driver per garantire prestazioni e sicurezza ottimali.
- Gestione del calore: Ensure the Mini PC is placed in a well-ventilated area. Avoid blocking the air vents. The intelligent cooling system is designed for low noise and efficient heat dissipation.

Image: Diagram illustrating the internal cooling fan and heat sink, showing airflow for efficient heat dissipation.
- Gestione della memoria: Pulire periodicamente ciò che non è necessario files and applications to maintain system performance.
Risoluzione dei problemi
- Nessun potere:
- Verificare che l'adattatore di alimentazione sia collegato saldamente sia al Mini PC sia alla presa di corrente.
- Assicurarsi che la presa di corrente sia funzionante.
- Prova una presa di corrente diversa.
- Nessuna visualizzazione:
- Verify that the HDMI/DP/USB-C cable is securely connected to both the Mini PC and the monitor.
- Assicurarsi che il monitor sia acceso e impostato sulla sorgente di input corretta.
- Se disponibile, provare un cavo di visualizzazione o un monitor diverso.
- Prestazioni lente:
- Chiudere le applicazioni non necessarie in esecuzione in background.
- Controlla e installa eventuali aggiornamenti di Windows o driver in sospeso.
- Assicurarsi che ci sia spazio libero sufficiente sull'SSD.
- Monitorare l'utilizzo di CPU e RAM in Task Manager per identificare i processi che richiedono molte risorse.
- Problemi di connettività di rete:
- For wired connections, ensure the Ethernet cable is properly connected and the router is working.
- For Wi-Fi, check if the Wi-Fi adapter is enabled and connected to the correct network. Restart your router/modem.
- Blocchi/arresti anomali del sistema:
- Riavviare il Mini PC.
- Assicurarsi che il sistema non si surriscaldi (controllare la ventilazione).
- Run a system diagnostic or check Windows Event Viewper i messaggi di errore.
Specifiche
| Modello | AWOW BA7 Mini PC |
| Processore | AMD Ryzen 5 7430U (6 core, 12 thread, fino a 4.3 GHz) |
| Grafica | Grafica AMD Raon integrata |
| Memoria RAM | 16 GB DDR4 (espandibile fino a 64 GB) |
| Magazzinaggio | 512GB PCIe 3.0 M.2 SSD (Expandable up to 2TB) |
| Sistema operativo | Windows 11 Pro |
| Uscita video | DP1.2 (4K@60Hz), HDMI2.0 (4K@60Hz), USB-C (4K@60Hz) - Supports Triple Display |
| Connettività | WiFi 6, Bluetooth 5.2, 1000Mbps RJ45 LAN |
| Porti | 2x USB 3.2, 2x USB 2.0, 1x Type-C (Full Function), 1x DP1.2, 1x HDMI2.0, 1x RJ45 LAN, 1x 3.5mm Audio Jack, 1x DC IN |
| Dimensioni | 126 mm x 112 mm x 42 mm (circa 4.96 x 4.41 x 1.65 pollici) |
| Peso | 398 g (solo dispositivo) Image: The Mini PC with its dimensions (126mm x 112mm x 42mm) and weight (398g) labeled. |
Garanzia e supporto
AWOW provides comprehensive support for its products.
- Garanzia: This product includes a 12-month service period from the date of purchase, covering manufacturing defects.
- Supporto tecnico: Lifetime technical support is available for all AWOW products.
- Contatto: For technical assistance, warranty claims, or any product-related inquiries, please visit the official AWOW websito o contattare il loro servizio clienti.

Image: AWOW brand message emphasizing fulfillment, lifetime technical support, and 12-month service.