
1. Introduzione
Thank you for choosing the KEENSTAR 20Bar Espresso Machine. This manual provides essential information for the safe operation, maintenance, and troubleshooting of your new espresso machine. Please read it thoroughly before first use and keep it for future reference.
2. Importanti istruzioni di sicurezza
- Leggere tutte le istruzioni prima di utilizzare l'apparecchio.
- Non toccare le superfici calde. Utilizzare maniglie o manopole.
- Per proteggersi da incendi, scosse elettriche e lesioni alle persone, non immergere il cavo, le spine o l'apparecchio in acqua o altri liquidi.
- È necessaria un'attenta supervisione quando un elettrodomestico viene utilizzato da bambini o nelle loro vicinanze.
- Scollegare dalla presa quando non in uso e prima di pulire. Lasciare raffreddare prima di mettere o togliere parti e prima di pulire l'apparecchio.
- Non utilizzare alcun apparecchio con un cavo o una spina danneggiati, dopo che l'apparecchio stesso non funziona correttamente o è stato danneggiato in qualsiasi modo.
- L'uso di accessori non consigliati dal produttore dell'apparecchio può causare incendi, scosse elettriche o lesioni alle persone.
- Non utilizzare all'aperto.
- Non lasciare che il cavo penda dal bordo del tavolo o del bancone o che tocchi superfici calde.
- Non posizionare sopra o vicino a un fornello a gas o elettrico caldo, oppure in un forno caldo.
- Collegare sempre prima la spina all'apparecchio, quindi collegare il cavo alla presa a muro. Per scollegarlo, posizionare un qualsiasi interruttore su "off", quindi rimuovere la spina dalla presa a muro.
- Non utilizzare l'apparecchio per scopi diversi da quelli previsti.
- Prestare la massima attenzione quando si smaltisce il vapore caldo.
- Questo apparecchio è destinato esclusivamente all'uso domestico.
3. Contenuto della confezione
Al momento di disimballare la confezione, controllare il contenuto per assicurarsi che tutti gli articoli siano presenti e integri.
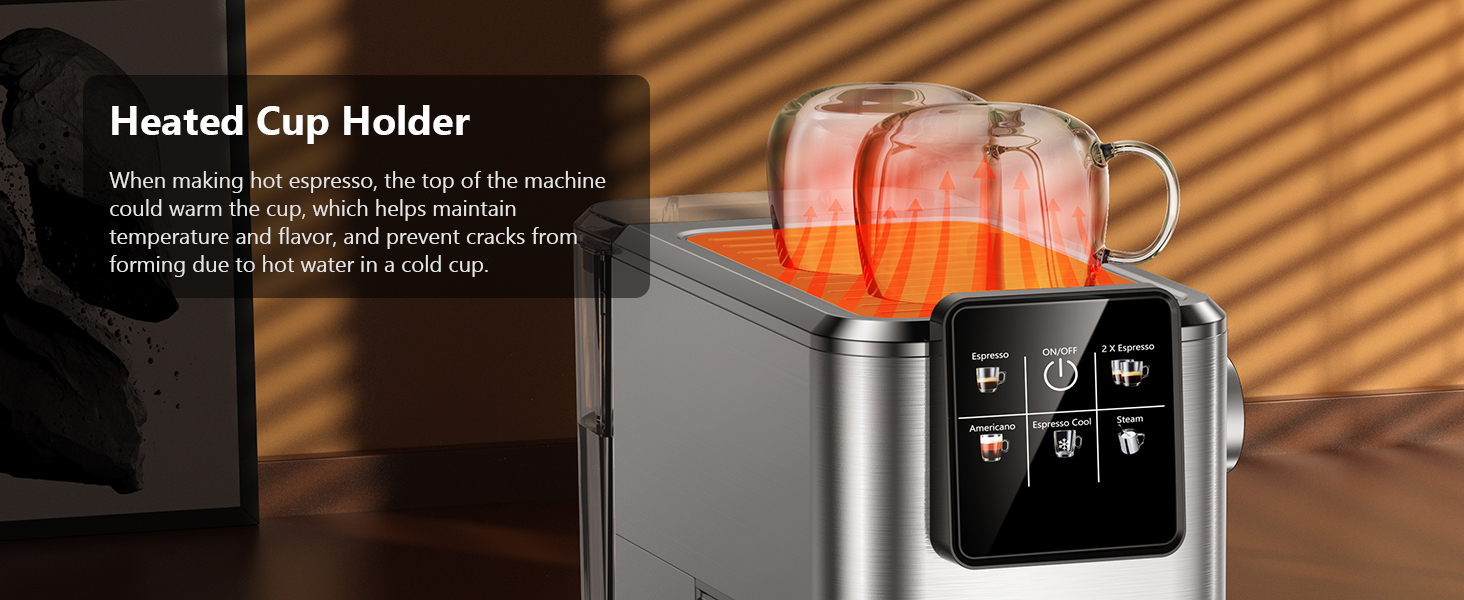
Immagine: All components included in the KEENSTAR 20Bar Espresso Machine package. This includes the main unit, portafilter with handle, single and double shot filters, coffee spoon with tamper, and a removable drip tray. The water tank and steam nozzle are also visible.
- KEENSTAR 20Bar Espresso Machine Main Unit
- Maniglia Portafiltro
- 1-Shot Filter Basket
- 2-Shot Filter Basket
- Cucchiaino da caffè con Tamper
- Vassoio raccogli gocce rimovibile
- Manuale d'uso
4. Prodotto finitoview
Familiarizza con le varie parti della tua macchina per l'espresso.

Immagine: Davanti view of the KEENSTAR 20Bar Espresso Machine, showcasing its sleek stainless steel design and key operational areas.
- Serbatoio dell'acqua: Detachable, 1.1 Liter capacity. Located at the back of the machine.
- Pannello di controllo: Intuitive touch screen for selecting brew options (Espresso, Americano, Espresso Cool, Steam, ON/OFF, 2X Espresso).
- Portafiltro: Contiene il caffè macinato per la preparazione.
- Lancia vapore: For frothing milk for lattes and cappuccinos. Features a 360-degree rotation.
- vassoio antigoccia: Rimovibile per una facile pulizia.
- Heated Cup Holder: Located on top of the machine to warm cups, maintaining coffee temperature.
5. Impostazione
5.1 Initial Use and Priming
Before first use, or if the machine has not been used for a long time, it is essential to prime the system to ensure proper operation and remove any air from the pipes.
- Fill the water tank with fresh water and place it back into the machine. Ensure the tank cover is properly closed.
- Plug the machine into a power outlet. The ON/OFF button on the touch screen will illuminate.
- Press the ON/OFF button to turn on the machine. The indicator lights will blink as the machine preheats.
- Once the indicator lights are steady, the machine is ready.
- Posizionare una tazza vuota sotto la lancia vapore.
- Turn the steam knob to the "ON" position. Water will run out from the steam wand like a line. Let it run for about 10-15 seconds to purge air.
- Turn the steam knob to the "OFF" position.
- Press the ON/OFF button to turn off the machine. The machine is now primed and ready for use.

Immagine: Visual steps for priming the espresso machine before its first use or after a period of inactivity. This process drains air from the internal pipes.
5.2 Riempimento del serbatoio dell'acqua
The water tank has a maximum capacity of 1200ml. Do not exceed the maximum fill line to prevent overflow.
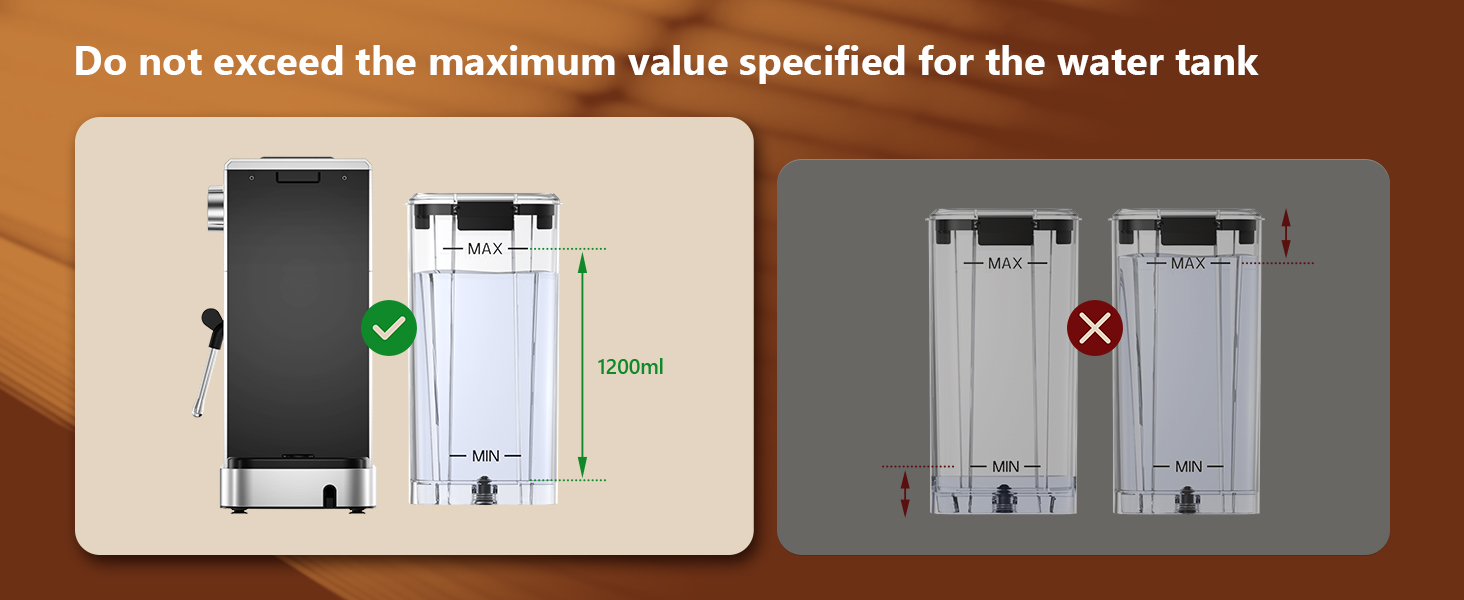
Immagine: Guidance on filling the water tank, indicating the 1200ml maximum fill level to avoid overfilling.
6. Istruzioni per l'uso
6.1 Preparazione dell'espresso
The machine features a 20-bar pressure system and pre-soak technology for rich espresso extraction.
- Ensure the steam knob is set to the "OFF" position before brewing coffee.
- Fill the water tank with fresh water and press the ON/OFF button to power on. Wait for the indicator to become steady, signifying preheating is complete.
- Select the appropriate filter basket (1-shot or 2-shot) and place it into the portafilter.
- Add ground coffee to the filter basket. Use medium ground coffee (greater than 0.5mm) for optimal results.
- Tamp the ground coffee firmly and evenly using the coffee tampeh.
- Attach the portafilter to the machine, ensuring it is fully locked into place.
- Posizionare la/le tazza/e sulla vaschetta raccogli-gocce sotto il portafiltro.
- Select "Espresso" for a single shot or "2 X Espresso" for a double shot on the touch screen. The machine will begin brewing.
- Una volta completata la preparazione, la macchina si fermerà automaticamente.

Immagine: Step-by-step visual instructions for brewing espresso, from preparing the machine to the final extraction.
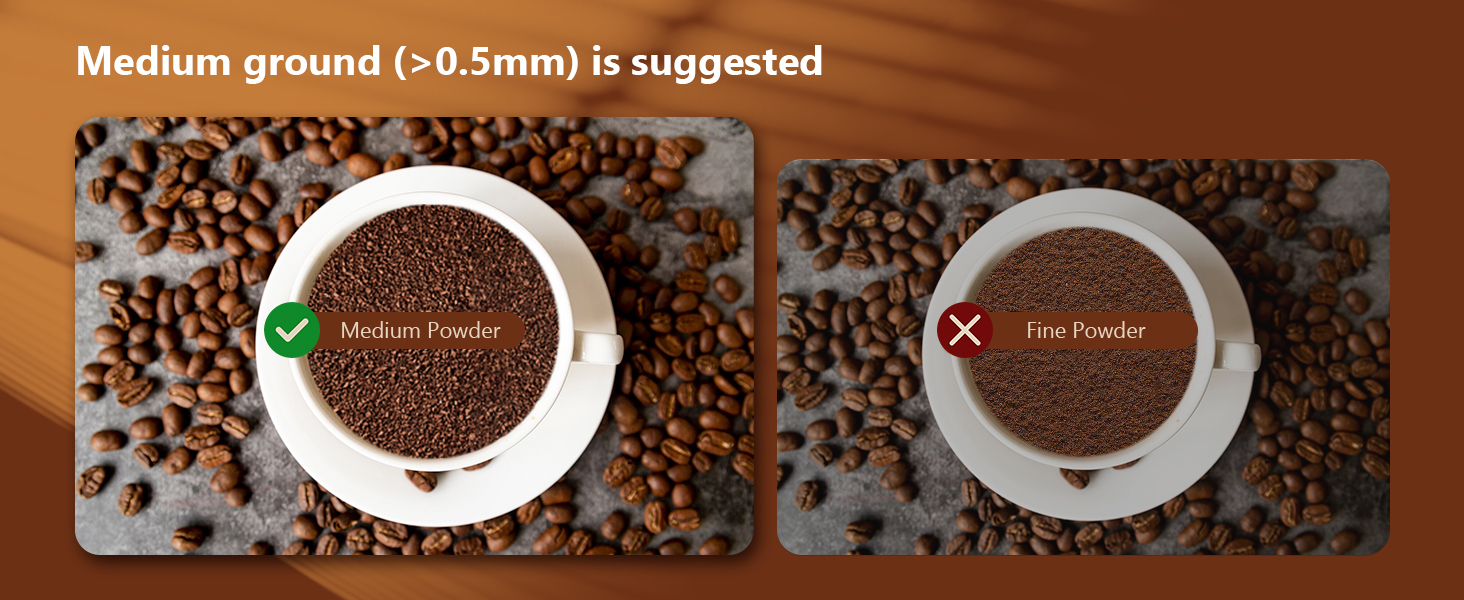
Immagine: Illustration demonstrating the correct way to lock the portafilter before brewing to prevent leaks and ensure proper extraction.

Immagine: Recommended coffee grind size (medium, >0.5mm) for optimal espresso extraction, contrasting it with fine ground coffee.
6.2 Making Cold Brew Espresso
This machine offers a rapid cold brew function, producing smooth cold brew in as little as 10 minutes.
- Ensure the water tank is filled with iced water for the cold brew function.
- Prepare the portafilter with ground coffee as described in Section 6.1.
- Attach the portafilter to the machine and place a cup underneath.
- Select "Espresso Cool" on the touch screen. The machine will begin the cold brew process.
- Enjoy your rapid cold brew espresso.

Immagine: The espresso machine preparing cold brew, emphasizing the requirement for iced water in the tank.
6.3 Schiumare il latte
The powerful steam wand allows you to create creamy microfoam for lattes and cappuccinos.
- Fill the water tank with fresh water and press the ON/OFF button to power on.
- Press the "Steam" button on the touch screen to preheat the steam function. The indicator will blink during preheating and become steady when ready.
- After preheating, turn the steam knob to the "ON" position to release any remaining water in the pipe before frothing.
- Insert the steam nozzle approximately 1 inch into the surface of your milk.
- Gradually turn the steam knob to increase steam until the desired foam consistency is achieved.
- Once finished, turn the steam knob to the "OFF" position and clean the steam wand immediately.
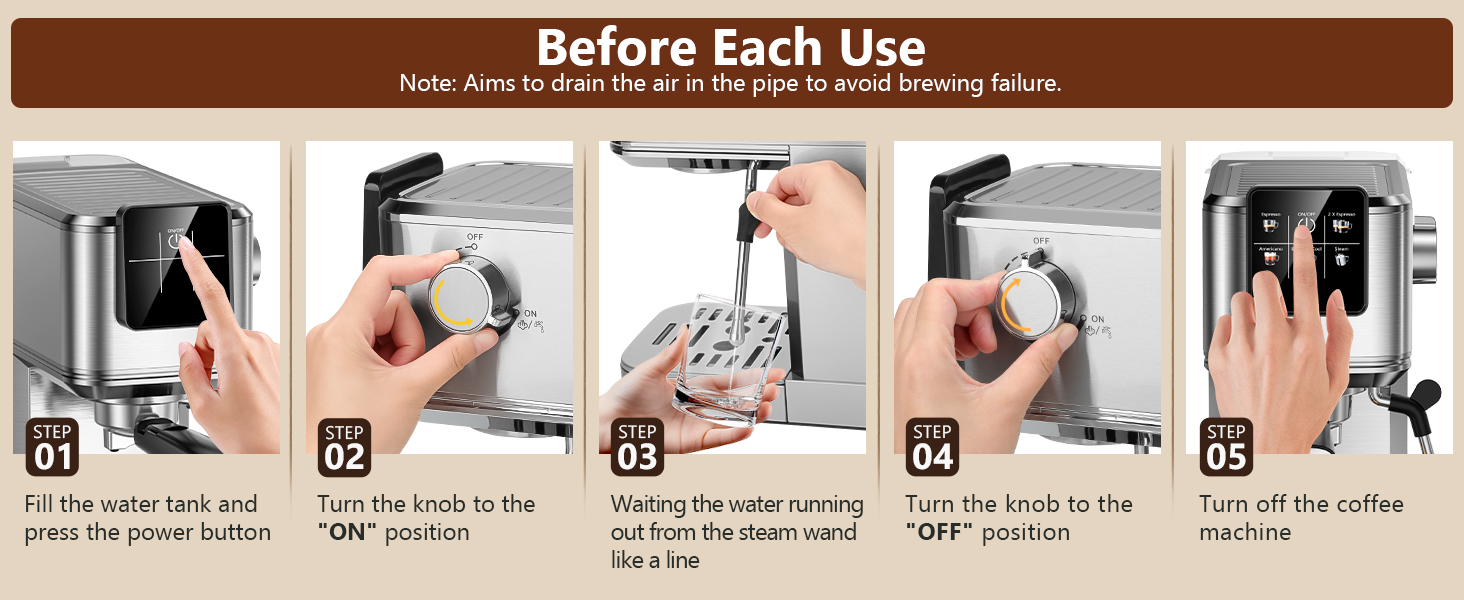
Immagine: Visual instructions for frothing milk, detailing the steps from preheating to creating microfoam.
7. Manutenzione e pulizia
Una pulizia regolare garantisce la longevità e le prestazioni ottimali della macchina per l'espresso.
- Pulizia generale: Pulire l'esterno della macchina con un pannoamp stoffa. Non utilizzare detergenti abrasivi o pagliette.
- vassoio antigoccia: The removable drip tray should be emptied and cleaned regularly.
- Portafiltro e filtri: Dopo ogni utilizzo, rimuovere il portafiltro e gettare i fondi di caffè. Sciacquare il portafiltro e il filtro sotto l'acqua corrente.
- Lancia vapore: Subito dopo aver montato il latte, pulire la lancia vapore con un pannoamp cloth to prevent milk residue from drying. Purge steam briefly to clear any internal blockages.
- Serbatoio dell'acqua: Pulire periodicamente il serbatoio dell'acqua con un detergente delicato e risciacquare abbondantemente.
- Decalcificazione: A seconda della durezza dell'acqua, decalcificare la macchina ogni 2-3 mesi. Seguire le istruzioni fornite con la soluzione decalcificante adatta.

Immagine: Important cleaning instruction: All accessories must be washed by hand and are not dishwasher safe.
8. Risoluzione Dei Problemi
Fare riferimento a questa sezione per i problemi più comuni e le relative soluzioni.
| Problema | Possibile causa | Soluzione |
|---|---|---|
| Nessuna erogazione di caffè / Flusso lento |
|
|
| Water leaks from portafilter edge |
|
|
| La lancia vapore non produce vapore |
|
|
| Il caffè non è abbastanza caldo |
|
|
9. Specifiche
- Marca: KEENSTAR
- Nome modello: Modello JH-C5210
- Sistema di pressione: 20 barra
- Energia: 1350W
- Capacità del serbatoio dell'acqua: 1.1 litri (37 once)
- Dimensioni del prodotto: 11.8"P x 12.6"L x 5.5"A
- Peso dell'articolo: 4.6 libbre
- Materiale: Acciaio inossidabile
- Caratteristica speciale: Programmable, Touch Screen, Milk Frother, Hot & Rapid Cold Brew
- Tipo di input del caffè: Caffè macinato
- Tipo di filtro: Riutilizzabile
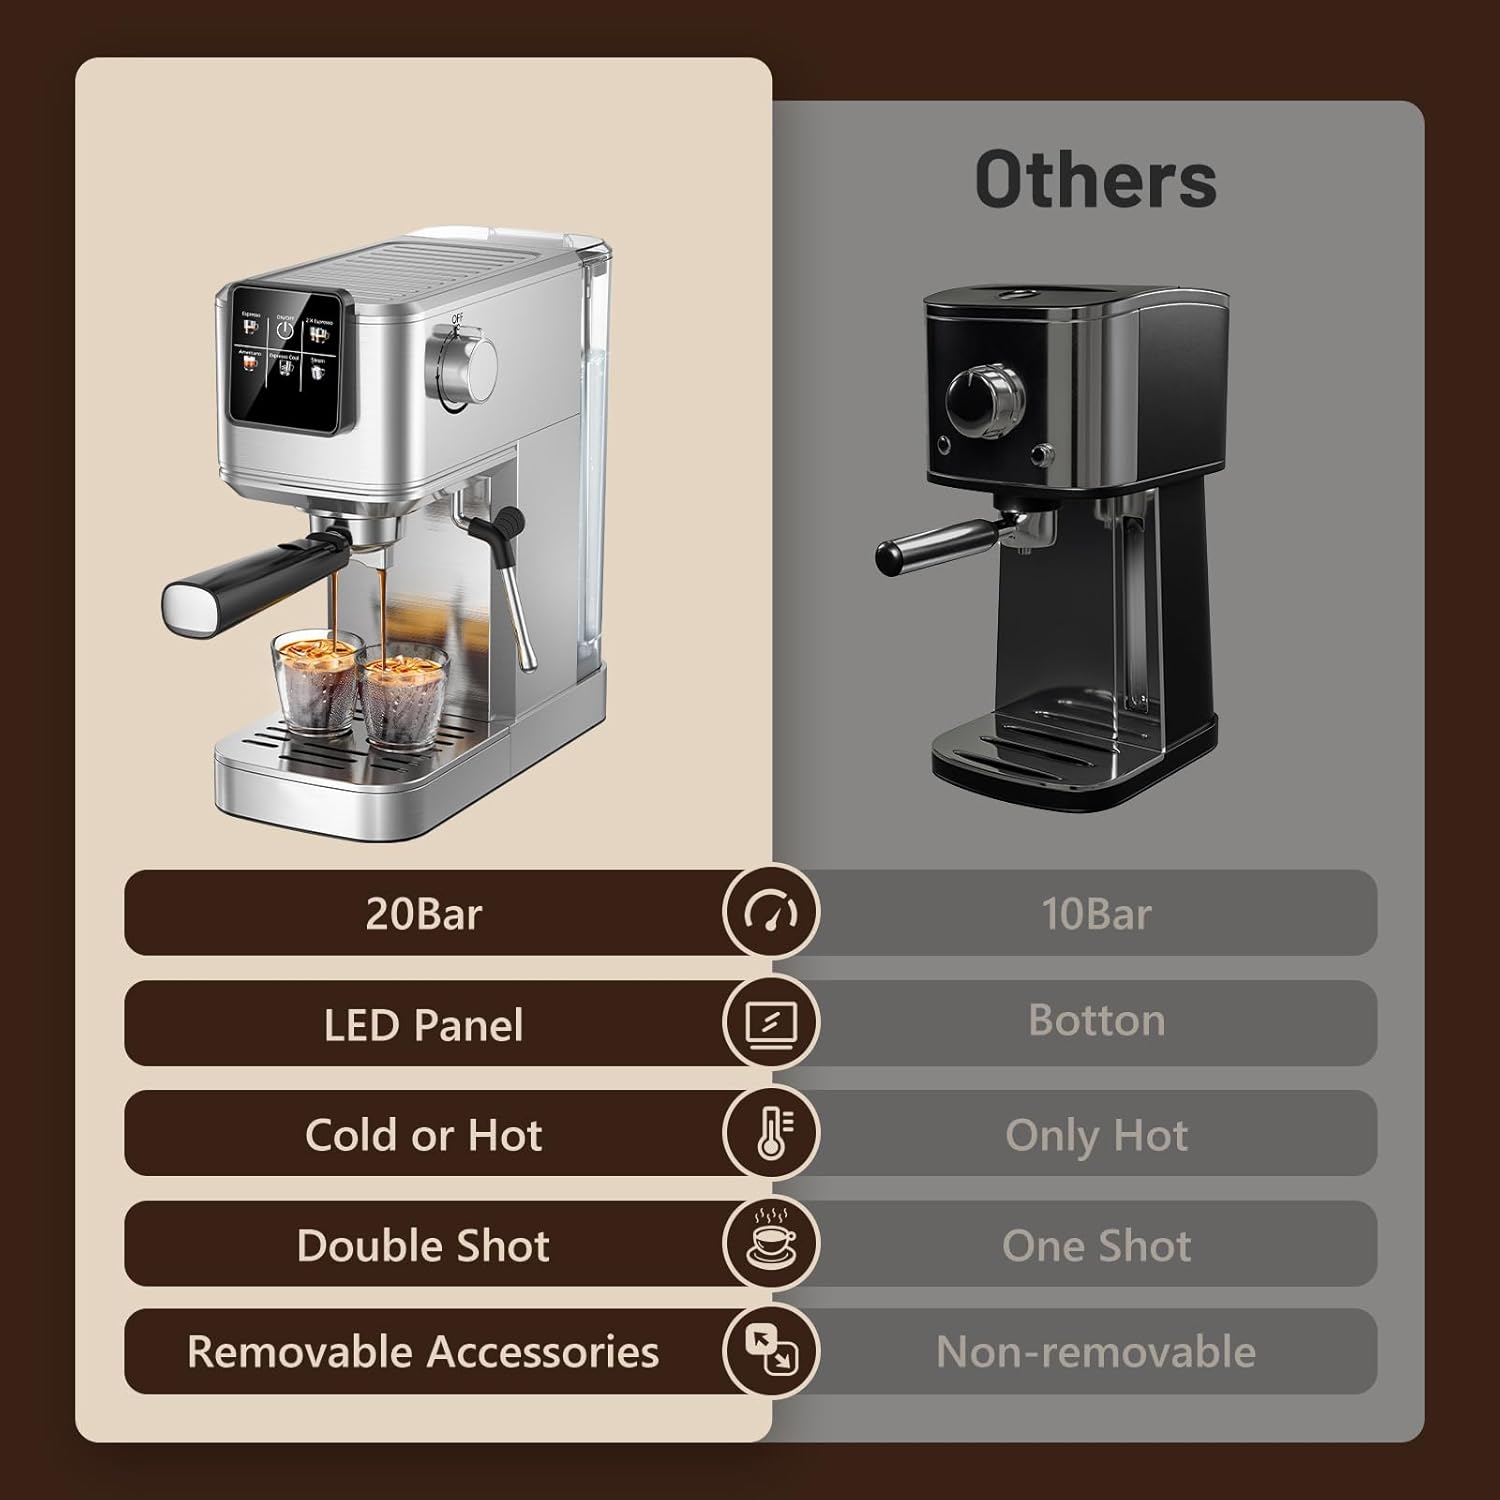
Immagine: Feature comparison of the KEENSTAR machine, emphasizing its 20Bar pressure, LED panel, and versatility for hot and cold beverages.

Immagine: Dimensions of the KEENSTAR espresso machine, indicating its compact size.
10. Garanzia e supporto
For warranty information or technical support, please refer to the contact details provided on the product packaging or visit the official KEENSTAR websito. Conservare la prova d'acquisto per eventuali reclami in garanzia.