Introduzione
This manual provides detailed instructions for the installation, operation, and maintenance of your AZDOME V600 Dual Dash Cam. Please read this manual thoroughly before using the device to ensure proper functionality and safety. The AZDOME V600 is designed to record both front road views and interior cabin activity simultaneously, offering comprehensive coverage for your vehicle.

Image: The AZDOME V600 Dual Dash Cam, illustrating its compact design and dual-channel recording capability for both front road and interior cabin views.
Contenuto della confezione
Verifica che tutti gli articoli elencati di seguito siano inclusi nel tuo pacchetto:
- Dash camera × 1
- Type-C Car Charger × 1
- Electrostatic Films × 2
- Adesivo 3M × 1
- Fermacavi × 5
- Pry Tool × 1
- Manuale dell'utente × 1

Image: A visual representation of all items included in the AZDOME V600 Dash Cam package, such as the camera, charger, mounting accessories, and user manual.
Prodotto finitoview
The AZDOME V600 features a compact design with a 3-inch screen, dual lenses for front and cabin recording, and intuitive controls. It is equipped with infrared night vision for clear interior recording in low light conditions.

Immagine: Un'illustrazioneview of the AZDOME V600 Dash Cam, highlighting its 2-channel 1080P recording, parking mode, G-sensor, loop recording, wide-angle lens, and night vision capabilities.
Registrazione a doppio canale
The V600 records both the road ahead and the vehicle's interior simultaneously. The front lens captures external road details, while the interior lens records cabin activity and audio.
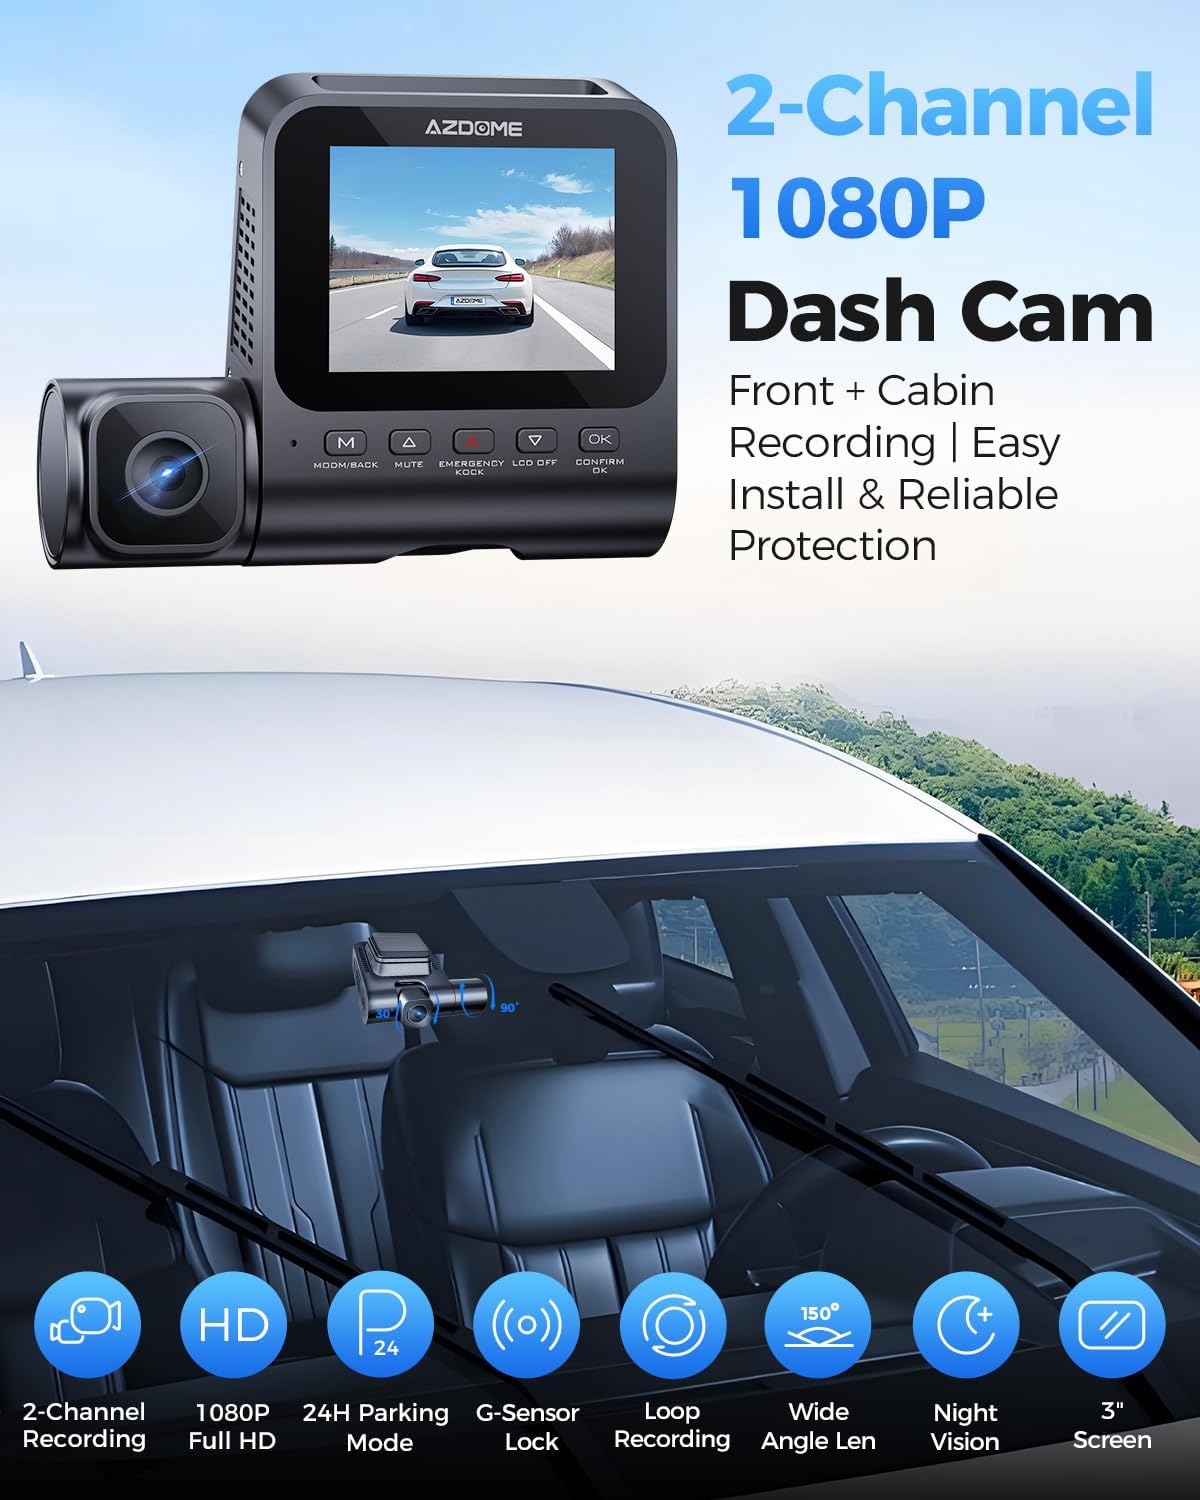
Immagine: Una divisione view demonstrating the front camera's perspective of the road and the interior camera's view of the cabin, both recording in 1080P Full HD.
Ampio campo di View
The dashcam system provides a wide field of view, with a 121° front lens and a 131° cabin lens, designed to capture more of the road and interior surroundings, reducing blind spots.
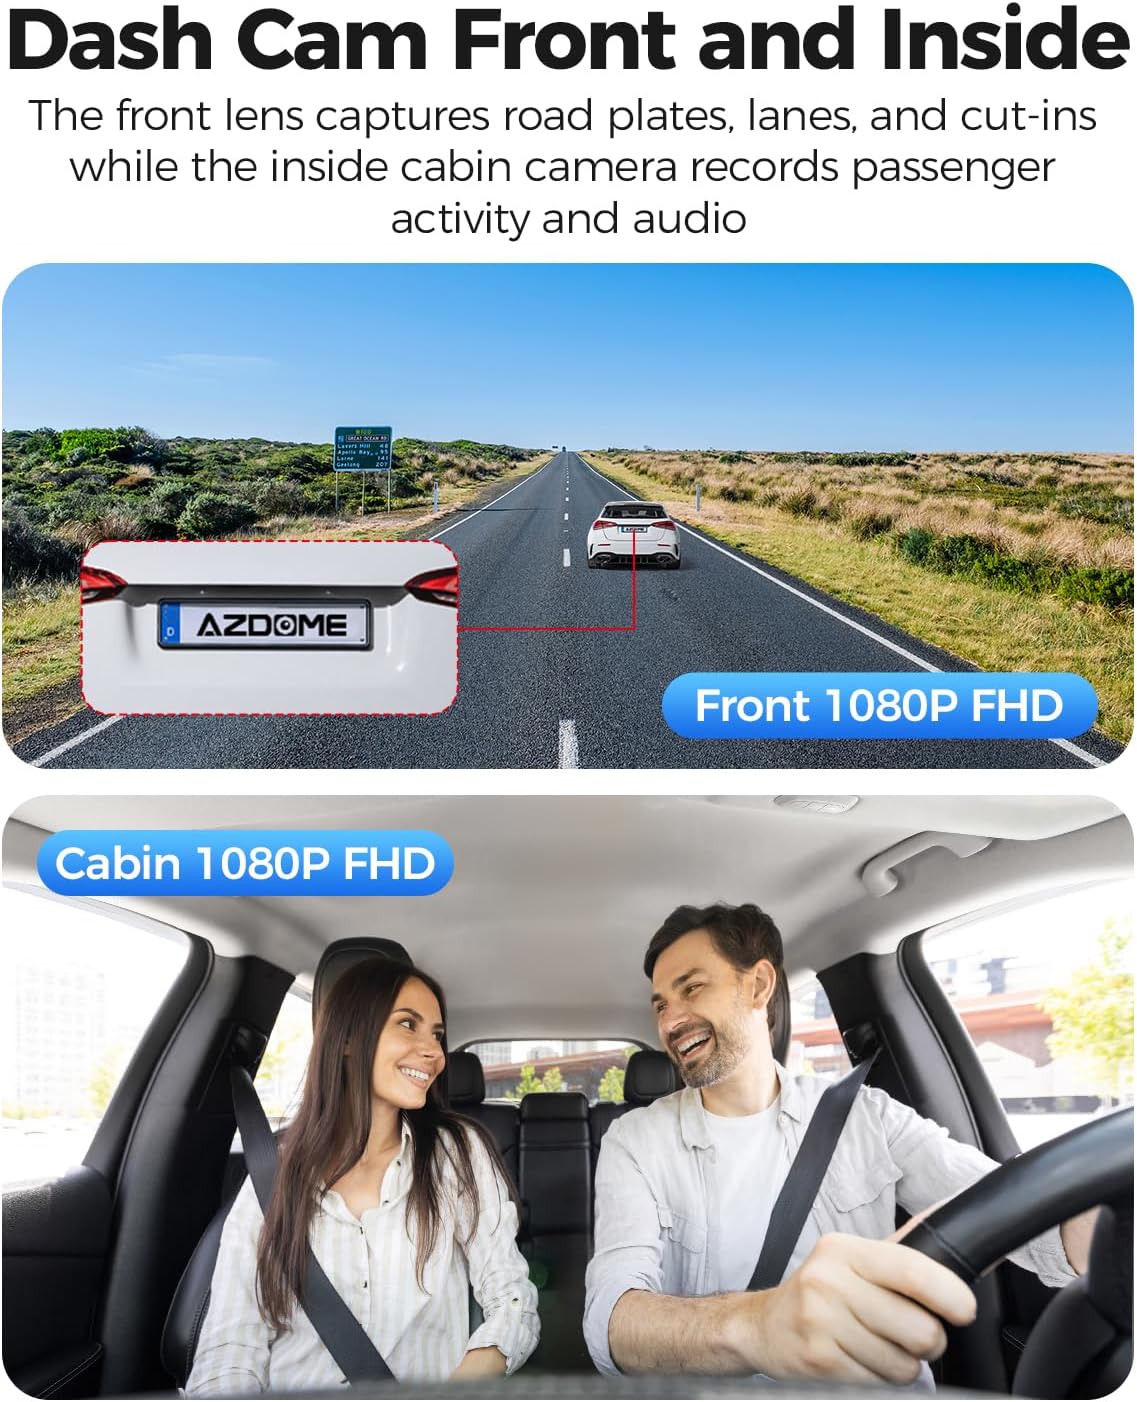
Image: A diagram illustrating the wide-angle coverage of the front (121°) and cabin (131°) cameras, showing how they capture a broad area around the vehicle.
Configurazione e installazione
Follow these steps for quick and secure installation of your dash cam.
- Parabrezza pulito: Ensure the chosen area on your windshield is clean and dry for optimal adhesion.
- Applica adesivo statico: Place the electrostatic film on the desired spot on the windshield. This helps in easy removal and repositioning without leaving residue.
- Montaggio Dash Cam: Attach the dash cam to the static sticker using the provided 3M adhesive. Ensure the lenses have a clear view della strada e della cabina.
- Connetti alimentazione: Plug the Type-C car charger into the dash cam and then into your vehicle's cigarette lighter socket. Route the cable neatly using the provided cable clips and pry tool.
- Inserire la scheda MicroSD: Before powering on, insert a compatible MicroSD card (up to 128GB, not included) into the designated slot. Ensure the card is inserted correctly until it clicks into place.
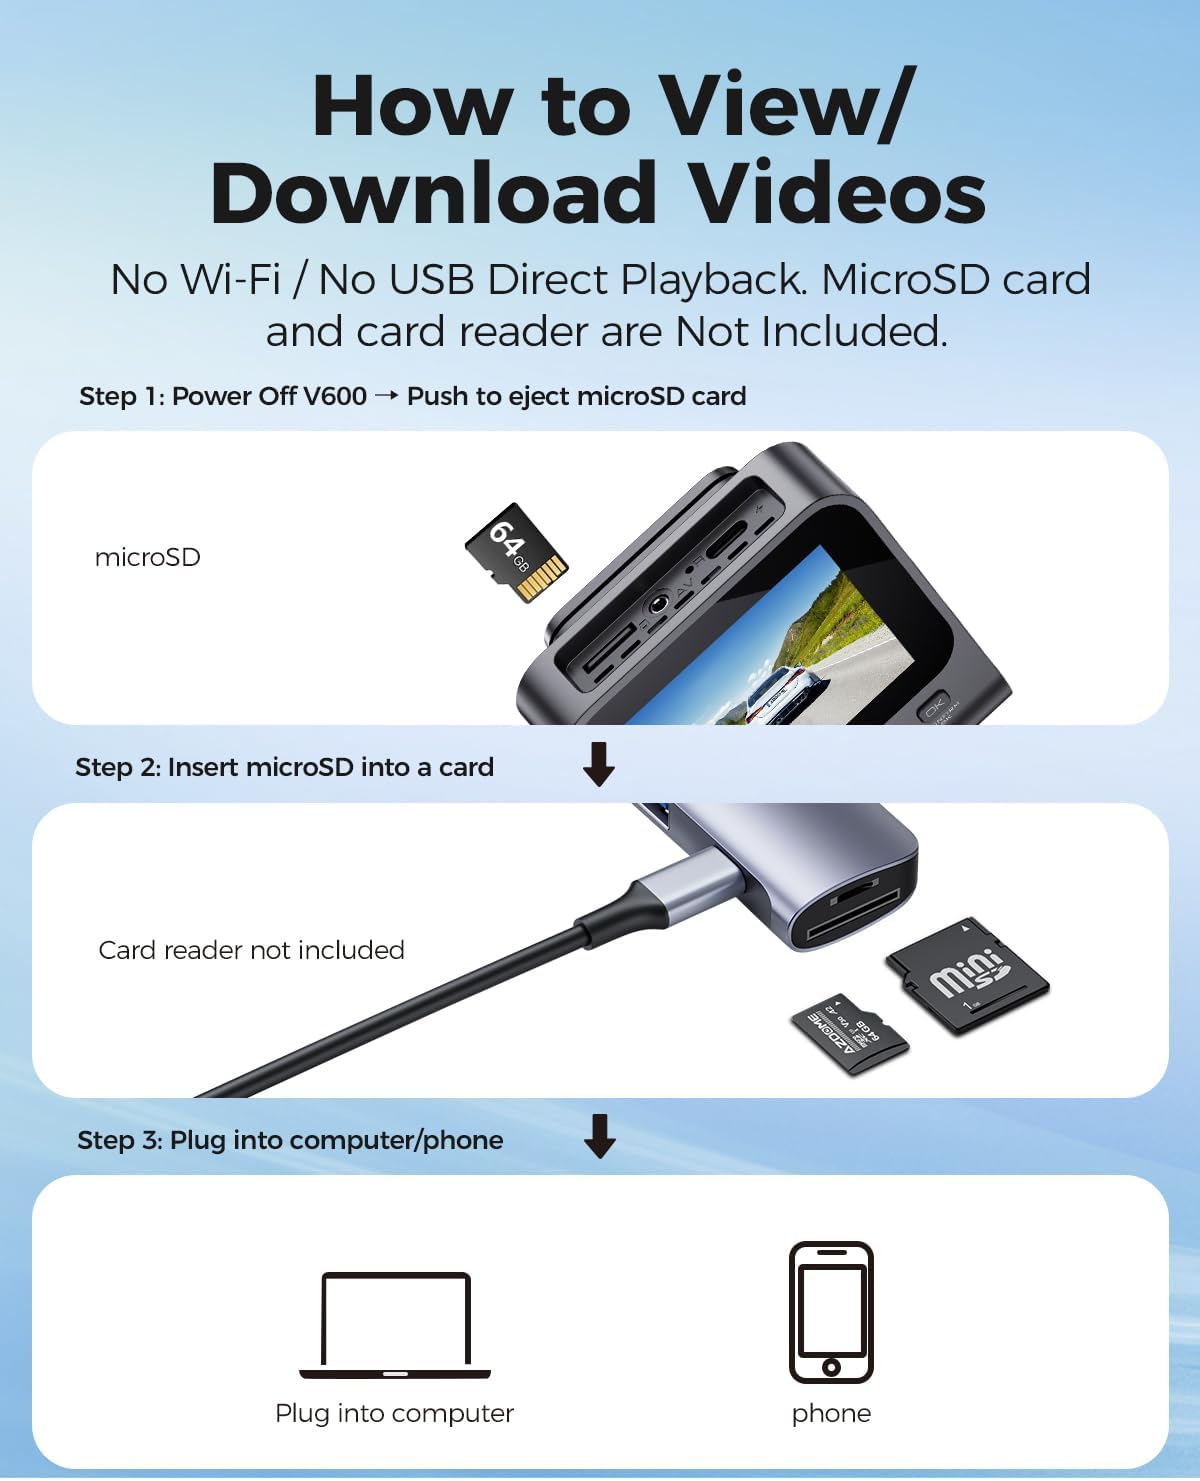
Image: A visual guide demonstrating the quick installation process of the dash cam, including cable routing and camera placement on the windshield.
Istruzioni per l'uso
Registrazione di base (registrazione in loop)
Once powered on, the dash cam will automatically begin recording. The loop recording function continuously records video in segments (e.g., 1, 3, or 5 minutes) and overwrites the oldest unlocked filequando la scheda di memoria è piena. Ciò garantisce una registrazione continua senza cancellazione manuale.

Image: A visual representation of the loop recording feature, showing how new footage overwrites older, unlocked fileAiuta a garantire la registrazione continua.
Sensore G (blocco di emergenza)
The built-in G-sensor detects sudden impacts or collisions. When an event is detected, the current video segment is automatically locked and saved to prevent it from being overwritten by loop recording. This footage serve come prova cruciale in caso di incidente.

Image: An illustration depicting the G-Sensor Auto Lock feature, showing how it detects impacts and automatically locks video clips to protect them from being overwritten.
Modalità di parcheggio 24 ore su 24
To enable continuous 24-hour parking monitoring, a 3-lead hardwire kit (not included, search ASIN: B096G6FKZP) is required. In parking mode, the dash cam can detect impacts (Collision Detection Parking Mode) or record continuously at a low frame rate (Time-Lapse Parking Mode). It also features low voltage protezione per evitare di scaricare la batteria dell'auto.

Image: A graphic detailing the 24-Hour Parking Mode, including collision detection, time-lapse recording, and low voltage protection, with a note about the required hardwire kit.
Visione notturna a infrarossi
The dash cam is equipped with IR lights to enhance interior cabin clarity in low-light conditions. For optimal night vision, the interior recording may switch to black-and-white mode to capture clearer details.

Image: An illustration highlighting the Clear Night Vision capabilities, showing how it brightens dark roads and reduces glare to capture more details, especially with infrared for the cabin.
Viewing and Downloading Videos
A view or download recorded videos, follow these steps:
- Spegni: Ensure the V600 dash cam is powered off.
- Eject MicroSD Card: Gently push the MicroSD card to eject it from the slot.
- Inserire nel lettore di schede: Insert the MicroSD card into a card reader (not included).
- Connetti al dispositivo: Plug the card reader into a computer or compatible phone to access the video files.

Image: A step-by-step guide demonstrating how to remove the MicroSD card from the V600, insert it into a card reader, and connect it to a computer or phone to view e scaricare video.
Manutenzione
Una corretta manutenzione garantisce la longevità e le prestazioni ottimali della tua dash cam.
- Pulizia: Use a soft, dry cloth to clean the camera lenses and screen. Avoid abrasive cleaners or solvents.
- Temperatura: Do not expose the dash cam to extreme temperatures for extended periods.
- Scheda MicroSD: Formatta regolarmente la tua scheda MicroSD (almeno una volta al mese) per prevenire il danneggiamento dei dati e garantire una registrazione fluida. Esegui il backup dei dati importanti files prima della formattazione.
- Aggiornamenti del firmware: Controlla il sito ufficiale AZDOME webperiodicamente il sito per verificare la disponibilità di eventuali aggiornamenti del firmware, al fine di migliorare le prestazioni e aggiungere nuove funzionalità.
Risoluzione dei problemi
Fare riferimento a questa sezione per trovare soluzioni ai problemi più comuni.
| Problema | Soluzione |
|---|---|
| La dash cam non si accende. | Ensure the car charger is securely connected to both the dash cam and the vehicle's cigarette lighter. Check if the vehicle's power outlet is functioning. |
| La registrazione si interrompe inaspettatamente. | The MicroSD card may be full or corrupted. Format the card regularly. Ensure you are using a high-speed (Class 10 or U1/U3) MicroSD card. |
| Video pippotage è sfocato o poco chiaro. | Pulisci le lenti della fotocamera con un panno morbido. Assicurati di aver rimosso la pellicola protettiva dalle lenti. Controlla che la fotocamera sia montata saldamente e non vibri. |
| La modalità parcheggio non funziona. | Parking mode requires a dedicated hardwire kit (ASIN: B096G6FKZP) for continuous power. Ensure the hardwire kit is correctly installed and connected. |
| Il sensore G è troppo sensibile o non abbastanza sensibile. | Regolare l'impostazione della sensibilità del sensore G nel menu della dash cam. |
Specifiche
| Caratteristica | Dettaglio |
|---|---|
| Nome del modello | V600 |
| Risoluzione di acquisizione video | 1080p (Front and Cabin) |
| Front Field Of View | 150 gradi |
| Caratteristiche speciali | G-Sensor, Loop Recording, IR Night Vision, 24-Hour Parking Mode |
| Display | Schermo da 3 pollici |
| Supporto di archiviazione | Scheda MicroSD fino a 128 GB |
| Tipo di montaggio | Supporto per cruscotto |
| Fonte di alimentazione | Charging Cable (Type-C Car Charger) |
| Dimensioni del prodotto | 16 x 14 x 6 pollici |
| Peso dell'articolo | 10.2 once |
Garanzia e supporto
Per informazioni sulla garanzia e supporto tecnico, fare riferimento al sito ufficiale AZDOME website or contact AZDOME customer service directly. Keep your purchase receipt as proof of purchase for warranty claims.
Produttore: AZDOME
Websito: Visita lo Store AZDOME su Amazon (per informazioni generali sul marchio)